Page is loading ...

RTU Installation & Operating
Packaged Air Conditioning Unit
..............................................................................................................................................
..............................................................................................................................................

2
Index
1. SECURITY
2. NOMENCLATURE AND CHARACTERISTICS PLATE
3. DOCUMENT FOR COMMISSIONING
4. COMMISSIONING AND TESTING
5. LIFTING AND HANDLING
6. DIMENSIONAL DRAWINGS
7. PLACEMENT AND NSTALLATION
8. VENTILATION
9. TECHNICAL SPECIFICATIONS
10. CLIMANAGER
ELECTRONIC CONTROL
11. ELECTRICAL DRAWINGS
12. CERTIFICATES

3
SAFETY RECOMMENDATIONS
Use PPE for intervention in the unit. Goggles, gloves, boots, clothing
and helmet if necessary.
It is mandatory to follow the recommendations and
guidelines contained within the maintenance manuals,
labels and specific instructions. It is necessary to obey rules
and regulations in force.
Before of manipulating the equipment, check that the unit general
supply is cut to prevent electric shock.
To prevent accidents during installation, implementation or maintenance, is required to take into
consideration the following specifications. The implementation of the equipment as well as repair and
maintenance must be carried out by qualified personnel.
Always use the provided cooling connections for measuring pressure, vacuum or make charging
refrigerant. Before working on the refrigerant lines to remove any component or desoldering, it
should be empty. Welds must be performed by a qualified welder. rod to use 30% silver content at
least in all brazings.
Wear goggles and safety gloves for work. Always avoid skin contact
with the refrigerant and beware of parts or cutting elements of the unit.
Always ensure proper ventilation in the work area
Refrigerant leaks can cause:
Asphyxiation due to displacement of oxygen in the air in confined work areas and narcotic
effect or cardiac arrhythmia by inhalation of refrigerant.
Eye irritation and burns from splashing or skin contact:
In case of accident by inhalation of refrigerant act according to the following instructions:
Remove victim to fresh air. Keep the victim lying down and if the victim is unconscious, place him on
the side with the head facing sideways.
When in doubt or symptoms persist, seek medical attention
In certain circumstances, the scroll compressors the top of the housing and
the compressor discharge line may reach temperatures above 160 ° C.
In case of contact with eyes:

4
If substance has got into eyes, immediately wash out with plenty of water for at least 15 minutes.
Never rub your eyes or skin if you have come in contact with refrigerant and do not allow the patient
to tightly shut the eyes. If contact lenses are used, they must be removed.
It is important to get the person to a doctor immediately.
In case of burn by refrigerant skin contact:
Immediately flush skin with plenty of water for at least 15 minutes, take off all contaminated
clothing immediately.
Do not cover the affected area with clothes, oil, bandages
Always use original spare parts to ensure proper operation of the unit.
You should only use the coolant shown on the nameplate of the unit. Always use refrigerants
premium. Never use other unapproved products. (Mixture of refrigerants, hydrocarbons, etc.). Use oils
recommended by the manufacturer, respecting the specifications of the oils.
If you install the indoor units it is necessary to pay attention to the
safety recommendations of working at heights, and as appropriate
restraint harnesses out.
Pay attention to the prevailing wind in the area. Removing the panels
with excessive wind may incur danger of injury from falling, keep in
mind that the panels can throw you off the working area due to wind
force effect

5
NOMENCLATURE
R T U 1 045 I N S 4 W SSF
RTU: Rooftop Unit
1: Construction size
042: Nominal Power (refrigeration if there would be several values) In ARI conditions..
I: Application type (I: Reversible; Q: Only Heating; R: Only Cooling; S: Cooling & Gas Fired)
N: Compressors type (N: Standard; D: Digital Scroll; V: Inverter; O: Others)
P: Version: (S: Standard; F: Free Cooling; R: Recovery)
3: Electrical Voltage: (1: 230V/I/50Hz, 2: 230V/III/50Hz, 3: 400/III/50Hz non neutral, 4:
400/III/50Hz + neutral, 5: 230V/I/60Hz, 6: 230V/III/60Hz, 7: 400/III/60Hz non neutral, 8:
400/III/60Hz + neutral, 9: 440/III/60Hz + neutral, E: Special
W: Refrigerant: (F: R404A; W: R410A; Z: R407C; U: R407F; Y: R134A; L: R407A; E: R1234ze; H:
Water; N: None, nitrogen loading)
In addition to this coding, the equipment is defined by an assembly code. These codes are
three digits behind the letter A (Assembly).

6
CHARACTERISTICS PLATE
All Roof Top Units have a characteristics plate with the following information:
The voltage on the plate should be respected, within the limits -10% / + 10%. It is your responsibility
to have proper mains voltage within limits. It is important to check that the voltage of the plate
matches the mains voltage.
The plate indicates the correct type of refrigerant. always use the refrigerant indicated on the plate at
its best. Avoid using refrigerant blends or other substances.
Note: For all communication with the
manufacturer is necessary to indicate the
machine's serial number. The first two
digits of the serial number indicate the
year of manufacture.

7
COMMISSIONING AND TEST REPORT
CUSTOMER AND PROJECT SITE DATA
Customer:
Contact person:
Telephone contact:
Site Address:
models:
Serial number:
Date:
Dates for implementation:
GENERAL CONDITIONS:
- The following preparatory work must be performed prior to commissioning:
• Connect the power supply.
• Check the phase sequence.
• Differential protection of line power supply.
• Power supply equipment for 12 hours prior to commissioning.
• Connecting the air ducts and checking filters (air-air equipment).
• Hydraulic piping connected to the computer, filter the water entering the equipment and filling and
purging the hydraulic circuit (air-water equipment).
- It shall check thermal load demand for the launch of the team.
- The equipment should be placed in its final position. If access to the equipment should be
performed by auxiliary means, these are borne by the customer.
- Teams have adjusted load refrigerant from factory. Therefore, if required additional refrigerant
charge must be provided by the customer.
- The supply voltage of the equipment shall be final. The teams are exempt from warranty if the
implementation is not done with final tension.
- By sending the document for start-up documentation shall communicate safety and PPE required
for access to the facility.
- The document application startup should be sent at least 5 working days before the date of
implementation required.
- From sending the document to launch the availability of dates in the next 24 hours will be
confirmed.
Delays or subsequent treatment due to non-compliance of the points made in the document to be
billed.

8
TECHNICIAN DATA
Made by:
Date of commissioning:
Unit ID
Model: RTU
Serial No.:
Refrigerant:
Electronic Control:
Version parameters:
ELECTRIC SECURITY TEST
1- General Check operation of switch:
- Cut off voltage properly
- Give all the thermal voltage / differential ON
2.- Check magnetic switches operation:
- Cut voltage properly in OFF
- Provides voltage properly when ON
3.- Check thermal relays to requested values
4.-Check earth continuity
5.- Check that access logs turbines and box stickers carry risk

9
HEATING MODE TESTING REPORT
1- Check rotation direction of fans / pumps / compressors
2- Check sensors are working correctly:
3-
B1: Return air
B2: Supply air
B3: Air Ambient
4- Check cooling values on the technical sheet.
GROUP 1
GROUP 2
Refrigerant charge
=
gr
Refrigerant charge
=
gr
Temperature Evaporation
=
ºC
Temperature Evaporation
=
ºC
Superheating
=
ºC
Superheating
=
ºC
Temperature
Condensation
=
ºC
Temperature
Condensation
=
ºC
Sub-cooling
=
ºC
Sub-cooling
=
ºC
GROUP 3
GROUP 4
Refrigerant charge
=
gr
Refrigerant charge
=
gr
Temperature Evaporación
=
ºC
Temperature Evaporación
=
ºC
Superheating
=
ºC
Superheating
=
ºC
Temperature
Condensation
=
ºC
Temperature
Condensation
=
ºC
Sub-cooling
=
ºC
Sub-cooling
=
ºC
5- Check air sensor measurements :
Supply air flow
=
m3/hr
Temperature Ambient
=
ºC
Air Exhaust Temperature
=
ºC
Temperature Difference
=
ºC
6- Check Electric Supply data:
Voltage =
V
Frequency =
Hz
Cos Phi (0.8) =
Electric Power. =
kW
Intensity =
A

10
7- Make Freecooling operation heating the return air sensor and check the right
operation order of the components
(Outdoor Temperature/Enthalpy > Temperature/Return Enthalpy – Differential
Freecooling)
Outdoor air register / air damper 0-100% / mixed air 100-0%
Exhaust fans ON mixing damper 50-100%
Compressor 1
Compressor 2
8- Verify a defrosting cycle, and verify the standard operation
9- Verify that when turning off the machine and defrosting cycle is active, it turns
on in standard mode

11
COOLING MODE OPERATION
10- Check thermal data of the cooling circuit in the testing sheet
GROUP 1
GROUP 2
Refrigerant charge
=
gr
Refrigerant charge
=
gr
Evaporation Temperature
=
ºC
Evaporation Temperature
=
ºC
Superheating
=
ºC
Superheating
=
ºC
Condensation
Temperature
=
ºC
Condensation
Temperature
=
ºC
Sub-cooling
=
ºC
Sub-cooling
=
ºC
GROUP 3
GROUP 4
Refrigerant charge
=
gr
Refrigerant charge
=
gr
Evaporation Temperature
=
ºC
Evaporation Temperature
=
ºC
Superheating
=
ºC
Superheating
=
ºC
Temperature
Condensation
=
ºC
Temperature
Condensation
=
ºC
Sub-cooling
=
ºC
Sub-cooling
=
ºC
11- Check sensors
Supply Air Flow
=
m3/hr
Temperature Ambient
=
ºC
Temperature Outdoor Air
=
ºC
Temperature difference
=
ºC
12- Check the electric supply values:
Voltage =
V
Frequency =
Hz
Cos Phi (0.8) =
Electric Power. =
kW
Intensity =
A
13.- Produce a Free Cooling heating return sensor and check the correct order of
input components:
(Outdoor temperature / Enthalpy > Temperature / Enthalpy Return - Differential
Freecooling) fresh air dampers 0-100% / 100-0% mixing
Outdoor Exhaust Fans ON with mixing damper at 50-100%
Compressor 1
Compressor 2
13- Produce a high pressure switch failure circuit 1 / 2 / 3 / 4
14- Produce a low pressure switch failure circuit 1 / 2 / 3 / 4

12
FINISHING AND PACKING INSPECTION
15.- Cleaning machine, check that there is no defect in appearance
16.- Check stickers and plate
17.- Check packing and handling parts

13
SAFETY, TRANSPORT AND OFF LOADING RECOMMENDATIONS
HANDLING AND TRANSPORT
The unit must be handled carefully to prevent damage during transport. Please note the following
instructions:
Always carry and operate the equipment in its vertical position.
Never stack the equipment during transport.
To move the unit uses a forklift or hand pallet.
Do not remove the pallet until the machine is in its final location.
Before moving the unit, make sure that if it takes skies for container. The skies or skates for
containers should be used to get the equipment for transport in containers, but must be
removed after this operation.
If you move the machine using a pallet jack or forklift. Be careful not to damage the lower
parts of the machine to move the machine with a forklift or pallet jack. Check that the forks
can not damage the machine bottoms.
To facilitate the equipment rising by crane, the unit has two holes in each of the four lower corners for
the anchoring with slings. It must be used fabric slings with rings, separated by a brace to prevent
deterioration of the unit body.
Units are shipped on a wooden pallet under request. All machines are shipped properly packed and
protected. Accessories and technical documentation are inside of the units.

14
The following checks should be taken into account upon receipt of the unit:
- The packaging is in perfect condition
- The outside of the machine is not damaged
- The equipment supplied is in accordance with the order placed.
- Hydraulic, refrigeration and sewage connections are not damaged (check condensate removable
tray).
- The accessories are inside the unit. Check that they have been delivered in accordance with relative
job.
Left: Hole in the corners to anchor slings. Right: Removable condensate tray.
If the product is damaged, it should be noted on the delivery note signed, a copy will be sent to the
factory in the shortest possible time. It is your responsibility to ensure that the goods have arrived in
perfect condition. Failure to indicate the damage and the absence of communication of the same
invalidate any claim. In the event that the product conforms to thereafter transport and maintenance
is your responsibility.
If units are going to remain stored until placement need to verify that they are located in a clean, dry
place. Avoid leaving the equipment packaged with protective film to the sun for long. The direct
sunlight over a period of prolonged exposure on the protective film may deteriorate paint equipment.
Check that all panels and the electrical panel are closed. Check inside remains protected circuits.
The units may be accompanied by matching structure or curb for placement. In the event that it is
included in the order, check the adjustment curb meets the specifications. If a rooftop curbe for
special adaptation to a pre-existing installation is going to be used, prior to manufacture the
customer approval is required to a drawing prepared by the technical office of Nortek Global HVAC, to
verify that the design meets the curbs need for installation. It is your responsibility to ensure that the
curb corresponds to the design shown in the drawings when material has arrived on site
INSTALLATION AND SET-UP
The final location of the unit will determine largely the proper functioning of equipment. For the best
performance use the following guidelines:
Upon receiving your unit, please inspect your machine and its components for damage during
shipping. Install the unit outdoors and away from heat sources. Before to install the equipment it is
important to check that the selected surface has sufficient strength to support the weight of the

15
machine, vibrations and effort that it can transmit. Ensuring the integrity and security of the
installation.
Do not obstruct air inlet or outlet spaces of the unit to facilitate the air intake and exhaust flow and
avoid as far as possible recirculation of air into the unit.
To ensure proper operation of the equipment and allow access for maintenance, respect the
minimum distances recommended.
Install in their location on type silentblock shock absorbers
Make sure the electric panel is in good condition before making the electrical connection, and please
follow the guidelines:
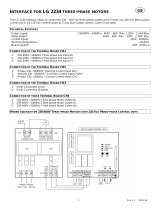
Follow the wiring diagram provided by the manufacturer.
Note that models to 400V/III/50Hz have a supply connection to 5 wires, being always the grounding
in colour green-yelow.
Install appropriate protective device on the undertaken line, thermomagnetic or thermomagnetic
differential. In cases where it is installed more than a machine it must be provided of its own system
of protection to each line.
To calculate the section of wires of the supply connection it should be considered electrical data
provided in the unit´s nameplate and other factors such as the length of the supply connection, the
type of wiring used, etc.; always respecting current regulations for electrical installations.
START-UP
Before starting/using the unit, please make sure all screws are tightened securely and the electrical
connections are properly installed. If you have worked inside the machine check that you have not left
extraneous objects or tools inside, make sure there are no gas leaks and that both assembly units and
hydraulic connections have been made properly.
Before initial startup of the gear unit or after a prolonged standstill period it is recommended to
activate the sump resistor twelve hours in advance. If the resistor cannot be enabled early enough, the
compressor must be heated otherwise to separate the oil from the refrigerant. This operation is
important, especially at low ambient temperatures start-ups.
Connect the power supply and turn on the system following the instructions given in annex of
regulation. Check subcooling and overheating to verify that the refrigerant charge is appropriate to
the operating conditions. After having been working several hours, key system parameter should be
verified to be sure that the system is working properly or it is needed to make some adjustment.
Compare temperatures of evaporation and condensation with the design conditions. Check security
features.

16
DIMENSION PLANS
SERIES 0000, STANDARD ASSEMBLY WITHOUT UPPER RETURN UNIT
SERIES 0000, STANDARD ASSEMBLY WITHOUT UPPER RETURN UNIT
Note. Plan includes transport pallet. Plan with short side supply.

17
SERIES 1000, STANDARD ASSEMBLY WITHOUT UPPER RETURN UNIT
Note. Plan includes transport pallet. Plan with short side supply.

18
SERIES 1000, STANDARD ASSEMBLY WITH UPPER RETURN UNIT
(SF)
Note. Plan includes transport pallet. Plan with short side supply.

19
SERIES 2000, STANDARD ASSEMBLY WITHOUT UPPER RETURN UNIT
Note. Plan not includes transport pallet. Plan with long side supply, lateral return.

20
SERIES 2000, STANDARD ASSEMBLY WITH UPPER RETURN UNIT
(SF)
Note. Plan not includes transport pallet. Plan with long side supply.
/