Page is loading ...

B07F2C9CLC
Water Purifying Hand Shower Set
Conjunto de Ducha de Mano con Purificador de Agua
Ensemble Douchette De Purification D’Eau

English ..................................... 3
Español .................................... 7
Français ................................. 11

3
Welcome Guide
•
English
Contents:
Before getting started, ensure the package contains the following components:
Hand Shower x1
Holder x1
Shower Hose x1
Water Filter Cartridge (in handle) x1
Recommended Tools:
• Safety Goggles
• Blanket or Tarp
• Adjustable wrench
• Pliers
• Rags
• Plumber’s tape
Before First Use
• Check for transport damage.
Risk of suffocation! Keep any packaging materials away from children – these
materials are a potential source of danger, e.g. suffocation.
DANGER

4
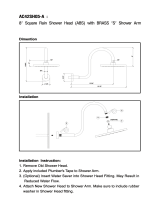
Installation
Step 1:
Shut off water supply
• Make sure the water (knobs or handle) are completely turned off. This will prevent any water
from leaking out as you work to replace the shower head.
• Lay a blanket or tarp down in the tub or on the shower floor to prevent any shower head bits
from possibly falling down the shower drain, and to protect the tub or shower floor surface from
falling tools or materials.
Step 2:
Remove old Shower Head with Hose
• Use a pair of pliers and grip onto the holder. Using an adjustable wrench to loosen and remove
the shower hose by turning counter clockwise.
• Wrap a cloth around the base of the shower arm, use a pair of pliers and grip onto the cloth.
Using an adjustable wrench, loosen and remove the holder by turning it counter clockwise.
Step 3:
Installation of Holder and Hose
• Use a clean rag to wipe off the screw threads of the shower arm. You could also use an old
toothbrush to get in between the threads and clean out any built-up grime and rust. Remove
any old plumber’s tape from the shower arm’s threads.
• Apply about 2-3 turns of plumber’s tape to the threads of the shower arm, wrapping the tape
tightly in a clockwise direction and making sure that it is embedding in the threads properly. Be
sure to press the tape into the grooves of the threads.
• Place the new shower head holder onto the shower arm and twist it clockwise by hand to secure
it into place. Wrap the base of the shower arm with a cloth and wrap the holder with a cloth.
• Use the pliers to grip onto the cloth and hold the shower arm in place. Use the adjustable
wrench to clamp onto the cloth and turn the holder clockwise until tight.
Make sure the water hose inlet is pointing down when tight.
• Verify that there is a black o-ring in the end of the sprayer hose that attaches to the holder. Screw
the shower hose (hex nut) onto the holder by turning it clockwise. Wrap a cloth around the shower
head holder, use the adjustable wrench to clamp onto the cloth, then wrap a cloth around the fitting
of the sprayer hose and use the adjustable wrench to tighten the sprayer hose.
NOTICE

5
Installation
Step 4:
Attaching Shower Head
• Verify that there is a black o-ring in the end of the sprayer hose (knurled nut) that attaches to the
shower head. Screw the shower hose onto the shower head by turning it clockwise.
• Wrap a cloth around the shower hose, use the adjustable wrench to clamp onto the cloth,
wrap a cloth around the fitting of the shower head and use the adjustable wrench to tighten the
sprayer hose.
Step 5:
Check for leaks
• Turn the water back on and turn on the shower and check for leaks.
•
If you find any leaks, try tightening the shower head a little more (Step 3) and check again for leaks.
• If you still see a leak, remove the shower head (Step 2) and remove and reapply any old
plumber’s tape and follow Step 3.
Step 6:
Replacing the water cartridge filter
• Make sure the water is turned off.
• Unscrew the handle from the shower head by turning the handle clockwise.
• Pull straight down on the cartridge (make sure the white rubber o-ring comes out with it).
• Slide the new cartridge into the handle with the o-ring end up and screw the handle back into
the shower head by turning the handle counter clockwise.
• Turn water on and check for leaks.
Cleaning and Maintenance
• Avoid using abrasive chemicals when cleaning, read the cleaner product label prior to use.

6
Warranty Information
To obtain a copy of the warranty for this product:
Visit amazon.com/AmazonBasics/Warranty
— or —
Contact Customer Service at 1-866-216-1072
Feedback
Love it? Hate it?
Let us know with a customer review.
AmazonBasics is committed to delivering customer-driven products that live up to your high
standards. We encourage you to write a review sharing your experiences with the product.
Please visit: amazon.com/review/review-your-purchases#
For further services:
Visit amazon.com/gp/help/customer/contact-us
— or —
Contact Customer Service at 1-866-216-1072

MADE IN CHINA
amazon.com/AmazonBasics
/