Page is loading ...

INSTALLATION INSTRUCTIONS
For Models # P806-077 (Revised Date: March 28,2011)
WARNING! SHUT POWER OFF AT FUSE OR CIRCUI T BRE AKER.
AVERTISSEMENT! COUPER LE COURANT AU NIVEAU DES FUSIBLES OU DU DISJONCTEUR.
WARNING
Risk of shock, do not plug in the unit before assembly.
Fig. 1
D
G
OUTLET BOX
A
C
F
Fig. 2
Fig. 3
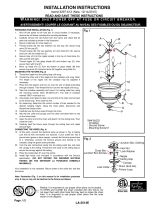
MOUNTING THE FIXTURE (Fig. 1)
1. Shut off power at the circuit breaker and remove the old
fixture including the mounting hardware.
2. Carefully remove the fixture from the carton and check
that all parts are included as shown in (Fig 1).
3. Remove mounting screws (E) from canopy (D). Secure
crossbar (A) using mounting screws (B) to the outlet
box. The side of the crossbar labeled “GND” must face
out.
ADJUST LENGTH OF ELECTRIC CABLE (Fig. 3)
4. Please refer to Fig. 3 if the hanging height needs to
be adjusted. The support cables do not need to be
cut. Pull the excess cable into the canopy until the
desired hanging height is reached. Secure the
support cable with the strain relief provided. Next,
pull the excess electrical cable into canopy. Knot
the electrical cable in the canopy so it does not pull
out. Carefully cut and remove approximately 4” of
the outer sheathing from the cord end and strip 1/2”
of the wire ends bare to expose the copper strands.
5. For minor adjustments after installation is complete,
depress the button at the canopy and allow the
desired length of support cable to slowly pull from
the canopy. Once the desired hanging height is
reached, release the button to secure the support
cable in place. Should you need to slightly shorten
the hanging height, simply push the support cable
through the relief button until the desired height is
reached. The button does not need to be depressed
to shorten the hanging height.
CONNECTING THE WIRES (Fig. 2)
6. Connect the electrical wires as shown in Fig. 2, making
sure that all wire connectors (C) are secured. If your
outlet has a ground wire (green or bare copper), connect
the fixture’s ground wire to it. Otherwise, connect the
fixture’s ground wire directly to the crossbar using the
green screw provided.
FINISHING THE INSTALLATION (Fig. 1)
7. Raise canopy (D) to crossbar (A) and secure tightly with
screws (E).
8. Install the 6-40W Xenon Bulbs (G) in accordance with
the fixture’s specifications. (DO NOT EXCEED THE
MAXIMUM WATTAGE RATING). (NE PAS DEPASSER
LA PUISSANCE NOMINALE MAXIMALE!)
9. Place the glass shade (H) on the lamp holder (F). Place
the silicone ring (I) between the lamp holder (F) and
glass shade (H). Use the aluminum cube (J) to fix the
glass shade to the lamp body by turning clockwise.
Repeat step 8 for each glass shade.
Your installation is now complete. Return power to the
junction box and test the fixture.
IMPORTANT: FIXTURE SHOULD BE INSTALLED
BY A QUALIFIED ELECTRICIAN TO ENSURE
PROPER WIRING AND INSTALLATION.
Step 1
suspending
cable
Wire
Step 2
Step 3
Step 4
Step 5
FIXTURE
WIRES
Clear or
Smooth
HOUSE
WIRES
Clear
(Hot)
FIXTURE
WIRES
Clear
with
White silk
HOUSE
WIRES
White
(Neutral)
FIXTURE
WIRES
Bare
Copper
(Ground)
HOUSE
WIRES
Green
(Ground)
1/1


