Page is loading ...

INSTRUCTION MANUAL

Table of Contents
1. Setting up the EQM-35 mount
.................................................. 1
1.1 Setting Up the tripod ................................................................................... 1
1.2 Attaching the mount ..................................................................................... 1
1.3 Attaching the accessory tray ....................................................................... 1
1.4 Installing the Counterweights ..................................................................... 2
1.5 Installing slow-motion control handles ..................................................... 2
1.6 Installing electrical components ................................................................. 3
1.7 Installing optional accessories to turn the EQM-35 PRO into the
EQM-35 PRO light photographic traveling version ............................................ 4
1.8 Installing optional accessories to turn the EQM-35 PRO into the
EQM-35 PRO super light photographic traveling version ................................ 5
2. Moving and balancing the EQM-35 mount ............................. 6
2.1 Balancing the mount: ................................................................................... 6
2.2 Orienting the mount before starting (polar aligning): ............................. 7
2.3 Pointing the telescope with the EQM-35 mount ...................................... 8
3. Use of the polar scope (precise polar aligning) .................. 12
3.1. Aligning procedure for the northern hemisphere: .................................. 13
3.2. Aligning procedure for the southern hemisphere: ................................. 13
4. SPECIFICATIONS ..................................................................... 14

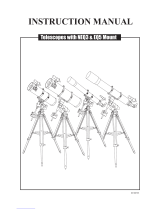
INSTRUCTION MANUAL for EQM-35 and EQM-35 PRO equatorial mount
The EQM-35 mount concept is an EQuatorial mount which is very Modular.
The basic manual version is the EQM-35 mount.
The automatic “goto” version with Synscan controller is the EQM-35 PRO mount.
Both versions can be equipped with optional accessories to obtain a light photographic
traveling version and a super light photographic traveling version.
The basic manual EQM-35 version can be upgraded with a motor kit to become an
automatic EQM-35 PRO mount.
EQM-35 basic manual version EQM-35 PRO automatic “goto” version with
Synscan controller

EQM-35 PRO light photographic traveling
version
EQM-35 PRO super light photographic
traveling version
Before you begin
This instruction manual is applicable to several versions of the EQM-35 mount. Take a
moment to find the version of your mount. Follow the instructions for your specific model in
the manual. Read the entire instructions carefully before beginning. Your telescope mount
should be assembled during daylight hours. Choose a large, open area to work to allow room
for all parts to be unpacked.
Caution!
SUN DANGER WARNING:
• NEVER USE YOUR TELESCOPE TO LOOK DIRECTLY AT THE SUN WITHOUT CERTIFIED
PROTECTIVE SUN FILTER. PERMANENT EYE DAMAGE WILL RESULT. USE A CERTIFIED SOLAR
FILTER FIRMLY MOUNTED ON THE FRONT OF THE TELESCOPE FOR VIEWING THE SUN.
• WHEN OBSERVING THE SUN, PLACE A DUST CAP OVER YOUR FINDERSCOPE OR
REMOVE THE FINDERSCOPE TO PROTECT YOU FROM ACCIDENTAL EXPOSURE.
• NEVER USE A NON-CERTIFIED EYEPIECE-TYPE SOLAR FILTER AND NEVER USE YOUR
TELESCOPE TO PROJECT SUNLIGHT INTO ANOTHER SURFACE, THE INTERNAL HEAT BUILD-
UP WILL DAMAGE THE TELESCOPE OPTICAL ELEMENTS.

Fig 1
Fig 2
1. Setting up the EQM-35 mount (all versions)
1.1Setting Up the tripod (fig 1)
1.1.1 Look for the north direction of your observation site,
and put the tripod with its leg marked “N” towards
the north. Important remark: if you observe in a
country in the southern hemisphere, the “N” should
point towards the south.
1.1.2 Locate the locking screw on the legs and turn
counter-clockwise to unlock them to extend the
tripod legs to the desired height.
1.1.3 Make sure the tripod top is level and then tighten the
locking screws.
1.2Attaching the mount (fig 2)
1.2.1 Loosen the two azimuth adjustment knobs on the
EQM-35 mount until there is sufficient space
between the two knob screws.
1.2.2 Align the metal dowel on the tripod top with the gap
between the two azimuth adjustment knobs; then
put the mount on the tripod top.
1.2.3 Once the mount is seated, slightly tighten the two
azimuth adjustment knobs.
1.2.4 While supporting the mount with one hand,
gently push the central locking shaft up against
the underside of the mount and turn the shaft
clockwise to secure the mount onto the tripod top.
Tighten with the knurled knob on the central
locking shaft.
1.3Attaching the accessory tray (Fig 3)
1.3.1 Slide the Accessory tray along the central
locking shaft until its three tips push against the
tripod legs, and then secure the tray with the
washer and the locking knob. (Fig3)
1.3.2 Level the mount (see bubble level on the mount) by
adjusting the length of the tripod legs.
Warning: The accessory tray will ensure the tripod legs
remain firmly expanded, which will prevent the tripod from
accidentally toppling over. When using the EQM-35 mount,
an accessory tray should always be used to ensure stability.
locking
screw
tripod leg
azimuth
adjustment
knob
dowel
central
locking
shaft
tip
locking knob
washer
Fig 3

Fig 7
Fig 4 Fig 5 Fig 6
1.4Installing the Counterweights
1.4.1 Locate the counterweight bar.
1.4.2 Screw the counterweight bar into the threaded hole on the end of the declination
shaft. Tighten the locknut on the counterweight bar until it is locked against the
mount (fig4).
1.4.3 Unscrew the threaded cap from the end of the counterweight bar (fig 4).
1.4.4 Locate the counterweight(s) and slide them halfway along the counterweight bar.
Tighten the counterweight locking screws to secure (fig 5).
1.4.5 Screw the cap back on the end of the counterweight bar (fig 6).
1.5Installing slow-motion control handles (EQM-35 manual version
only) (fig 7)
Attach the slow-motion control handles on to the end of Right Ascension (RA) and
DEClination(DEC) worm shaft and lock them in place with the locking screw. Make
surethat the locking screw presses on the little flat surface at the end the shaft.
threaded hole
threaded
cap
counterweight bar
counterweight
locknut
locking screw
security cap
locking screw
RA worm shaft
RA slow motion
control handle
DEC worm shaft
DEC slow motion
control handle

Fig 8
1.6Installing electrical components(EQM-35 PRO automatic “goto”
version only) (fig 8)
1.6.1 Attach the motor controller boxholder onto one tripod leg. Put the motor controller
box in its holder.
1.6.2 Plug in the DEC connecting cable, one side in the DEC motor, the other side in
the RA motor.
1.6.3 plug in the RA connecting cable, one side in the RA motor, the other side in the
motor controller box.
1.6.4 Plug in the handset connecting cable, one side in the Synscan handset, the other
side in the motor controller box. Plug in the power cable in the motor controller
box.
DEC connecting cable
RA connecting cable
Motor controller box
Synscan handset
handset connecting cable

Fig 11 Fig 12
Fig 10
Fig 9
1.7Installing optional accessories to turn the EQM-35 PRO into the
EQM-35 PRO light photographic traveling version (fig 9, 10, 11
and 12)
1.7.1 Loosen the 4 M6 screws with hex socket head, which hold the DEC body, and
take off the DEC body.
1.7.2 Install the saddle head, and tighten with 4 M5 hex socket head screws. Pay
attention to put the saddle in the direction as shown in the picture.
1.7.3 Install the L shaped bracket in the saddle head, tighten locking screw hand wheel
and screw.
1.7.4 Put the counterweight & counterweight shaft in the threaded hole at the rear end
of the L shaped bracket.
1.7.5 Slide the small counterweight in the right position (see also 2.1)and tighten the
counterweight locking screw.
M5 screws
M6 screws
DEC body saddle head
L shaped bracket
saddle head
saddle head
counterweight shaft
counterweight
locking screw
L shaped bracket
counterweight

Fig 13
1.8Installing optional accessories to turn the EQM-35 PRO into the
EQM-35 PRO super light photographic traveling version (fig 13)
1.8.1 Follow step 1 and 2 of the installation in paragraph 1.7
1.8.2 Clamp the accessory dovetail with a 3/8” screw in the saddle. This dovetail can
hold a ball head for example and a camera can be put on top of the ball head
(ball head and camera are not supplied).
3/8" screw
saddle
dovetail

Fig 14
2. Moving and balancing the EQM-35 mount (EQM-35 and
EQM-35 PRO version)
An equatorial mount has 2 axis, Right Ascension (RA) and DEClination (DEC). The
telescope can be moved around these 2 axis to allow reaching each part of the sky.
There is a rapid movement to point quickly and roughly, and a slow but precise
movement to get the targeted object exactly in the field of view of your telescope or
camera.
You can move the mount RA and DEC axis freely by hand when the clutches (see fig. 14)
are loose. Once the clutches are tight, you can move both axis slowly by turning the
slow-motion handles (EQM-35 manual version) or pushing the buttons on the Synscan
handset(EQM-35 PRO motorized version)
Important remark:
This type of mount should have the RA axis oriented in the direction of the earth rotation
axis, to be able to use its capacity to point and follow the celestial objects. See 2.2.
To ensure smooth moving of the mount, it is necessary to check the balance of the mount
when the load is attached on the mount (telescope and / or camera and accessories).
Some unbalance will not cause any problem, but a strong unbalance can surprise you
when loosening one of the clutches, since the telescope (or other load) will start rotating
at once, unexpectedly. When motorized, the motors may stop due to overload
2.1Balancing the mount:
2.1.1. Slowly unlock the R.A. and DEC. clutches while holding the telescope with
the other hand.
2.1.2. Bring the telescope in the position shown in fig. 15
2.1.3. Lock the DEC clutch
2.1.4. Sense the balance around the RA axis, and slide the counterweight(s) in
DEC slow motion
control handle
RA slow motion
control handle
RA clutch
DEC clutch

Fig 15
Fig 16
such way that a balanced situation is obtained. Lock the counterweight(s)
2.1.5. Lock the RA clutch and unlock the DEC clutch.
2.1.6. Sense the balance around the DEC axis, and slide the telescope forward or
backwards in such way that a balanced situation is obtained.
Important remark: moving the telescope should be done with caution by loosening the
telescope clamp screw slowly and holding the telescope securely. Some telescopes also have
rings to hold the telescope. These rings will also allow to slide the telescope forward or
backwards, by loosening their clamping screws. Don’t forget to tighten all clamping screws
after balancing!
2.2Orienting the mount before starting (polar aligning):
2.2.1. make sure the leg of the tripod which is marked with an “N” points to the
north (or to the south if you are observing in the southern hemisphere).
2.2.2. Use the latitude adjustment screws to set the mount to the latitude of your
observation site. One latitude screw
should be unscrewed and the other
should be screwed in to push the
mount to the right latitude angle.
Refer to the latitude scale to set the
right latitude.
2.2.3. This orienting can be finetuned with
the azimuth adjusters. The polar
scope (see 3) and the built-in
software in the EQM-35 PRO version
(see Synscan manual) allow
a very precise orientation which is
needed for long exposure
astrophotography.
latitude scale
Altitude
adjustment
Azimuth
adjustment

2.3Pointing the telescope with the EQM-35 mount
A problem for many beginners is recognizing that a polar-aligned, equatorial mount acts
like an alt-azimuth mount where the RA axis has been aligned to a celestial pole.
Once aligned,the RA axis allows rotation as shown in fig 17 where it scans the “new
horizon”.
That scanning movement is the Right Ascension (RA) movement.
Part of the new horizon is usually blocked by the Earth.
This “new horizon” is called Plane of Celestial Equator.
The other movement of the mount, square to this first movement, is the DEClination
movement.
Fig 17

Fig 18
2.3.1 Pointing to the North Celestial Pole (NCP) (fig. 18)
For the following examples, it is assumed that the observing site is in the
Northern Hemisphere. In the first case (Fig.18, mid position), the optical tube is
pointing to the NCP. This is its probable position following the polar-alignment
step. Since the telescope is pointing parallel to the polar axis, it still points to the
NCP as it is rotated around that axis counter-clockwise (Fig.18, left position), or
clockwise (Fig.18, right position).
2.3.2 Pointing toward the western or eastern horizon (fig. 19)
Now, consider pointing the telescope to the western or eastern horizon. If the
counterweight is pointing North, the telescope can be swivelled from one
horizon to the other around the Dec axis in an arc that passes through the NCP
(any Dec arc will pass through the NCP if the mount is polar-aligned). It can be
seen then that if the optical tube needs to be pointed at an object north or south
of this arc, it has to be also rotated around the R.A
Celestial Pole
1.
2.
3.

2.3.3 Pointing to directions other than due North (fig. 20)
Pointing in any direction other than due North requires a combination of R.A.
and Dec positions. This can be visualized as a series of Dec arcs, each
resulting from the position of rotation of the R.A. axis. In practice however, the
telescope is usually pointed, with the aid of a finderscope, by loosening both the
R.A. and Dec clutches and swiveling the mount around both axes until the
object is centered in the eyepiece field. When the object is centered, make sure
the R.A and Dec clutches are both retightened to hold the object in the field and
allow tracking by adjusting only in R.A. with the R.A. slow motion control handle
(or using direction knobs on the Synscan controller with the motorized EQM-35
PRO version).
Celestial Pole
Fig 19
Telescope pointing East
Counterweight pointing North
Rotation of the DEC axis
Rotation of the RA axis
Telescope pointing West
Counterweight pointing North
Fig 20
Examples of the
telescope moved
in RA and Dec
1. 2.

Important remark:
the motorized EQM-35 PRO version will do all movements automatically or by push
button on the Synscan controller keypad, using its motors. The only manual operations
will be done before the starting procedure, for balancing. After that, all moves will be
made by motor. Therefore, you must make sure the clutches are well tightened.
2.3.4 Pointing at an object (fig 21)
Pointing at an object, for example to the South, can often be achieved with the
optical tube positioned on either side of the mount. When there is a choice of sides,
particularly when there could be a long observing period, the East side should be
chosen in the Northern Hemisphere because tracking in R.A. will move it away from
the mount's legs.
Important remark:
the motorized EQM-35 PRO version will do all these movements automatically
1. 2.
Telescope pointing South
Fig 21

Fig
23
Fig
22
3. Use of the polar scope for precise orienting of the
mount before starting (precise polar aligning)
The polar scope is optional for the EQM-35 and included with the EQM-35 PRO (this may
vary, depending on the Skywatcher distribution policy in your area).
The rough polar aligning (see 2.2) will be OK for visual observation with the manual
version of the EQM-35 mount and quick setup, but when the automatic EQM-35 PRO
mount needs to find faint objects and when the mount is used for long exposure
photography, polar aligning of the mount will need to be done with higher accuracy. The
polar scope will help.
latitude adjustment screw
azimuth adjustment screw
polarscope
latitude adjustment screw

3.1. Aligning procedure for the northern hemisphere:
The SynScan hand control and several applications running on PCs and mobile devices
can give Polaris orientation in the field of view of a polar scope depending on the
observer’s position and local time. Generally, the orientations are given in time format.
The reticle has a clock like engraving which is compatible with these applications.
For polar alignment, rotate the R.A. axis of the mount to put the 0 o’clock of the reticle at
the highest position in the field of view of the polar scope, then place the Polaris at the
correct clock position given by the SynScan hand control or other applications. Placing
Polaris at the correct position in the polar scope must be done with the azimuth and
altitude adjustment controls
Polaris position also changes as time passes. The new reticle displays 3 circles to
represent Polaris’s orbit in year 2012, 2020 and 2028. It also gives sub-dials at 0, 3, 6,
and 9 o’clock position for year 2016, 2024 and 2032. An engraving labelled with the
above years is also displayed on the right of the field of view for memo purpose.
When doing polar alignment in Northern hemisphere, the user should put Polaris on the
correct circle corresponding to the present year for better alignment precision.
3.2. Aligning procedure for the southern hemisphere:
There is a 4-star pattern in the polar scope, which resembles the bucket of the Big Dipper.
In the Southern hemisphere,there is an Asterism in Octans, which has this shape. By
rotating the R.A. axis and by adjusting the altitude and azimuth of the mount, the four
stars in the Asterism can be placed in the circles in the Pole Finder. This procedure can
be somewhat difficult in the city because all four of these stars are fainter than the Big
Dipper in the northern hemisphere

4. SPECIFICATIONS
EQM-35 MOUNT EQM-35 MANUAL EQ MOUNT EQM-35PRO Automated EQ
MOUNT
TRIPOD 1.75” Stainless Steel 1.75” Stainless Steel
POWER DC12V 3A
TRIPOD WEIGHT 5.7kg 5.7kg
MOUNT WEIGHT 3.63 kg 4.38 kg(Astro-Mode 3.28 kg)
COUNTER WEIGHT 3.4kg (2 in total) 3.4kg (2 in total)
Hand controller SynScan
Payload 10kg 10kg
R.A.worm gear 92.5mm diameter,180teeth 92.5mm diameter,180teeth
Dec.worm gear 34.3mm diameter,65teeth 34.3mm diameter,65teeth
R.A.worm drive 25.5mm diameter, steel 25.5mm diameter, steel
Dec.worm drive 20mm diameter, steel 20mm diameter, steel
Stabilizer Bar 20mm diameter, steel 20mm diameter, steel
Latitude
Adjustment 15° - 65° 15° - 65°
Level Adjustment Approx. ±9 ° Approx. ±9 °
Polar Scope Optional Accessory RA Axis contains Polar Scope
Polar Adjustment
method
Software Polar Adjustment or using
built in Polar Scope
Motor DC12V High Precision Stepper
Motor
RESOLUTION 0.28125 arc-second
Tracking rate Sidereal rate, solar rate, lunar
rate, “sidereal”
Tracking Method Dual Axis or Single Axis tracking
Tracking Mode Alt-azimuth mode or Equatorial
mode
Database 42000 objects
/