Page is loading ...

www.buffalotech.com
User Manual - AirStation WHR-G125
Wireless AP Router with Bridging
v1.0

2
Table of Contents
Introduction . . . . . . . . . . . . . . . . . . . . . . . . . . . . . . . . . . . . . . . . . . 3
Initial Setup . . . . . . . . . . . . . . . . . . . . . . . . . . . . . . . . . . . . . . . . . . 4
Installation with CD . . . . . . . . . . . . . . . . . . . . . . . . . . . . . . 6
ManualConguration..........................7
UsingtheCongurationTool...........................11
AOSS . . . . . . . . . . . . . . . . . . . . . . . . . . . . . . . . . . . . . . . . . . . . . . 15
Router/AccessPointModeSwitch.............................17
Encryption and Security . . . . . . . . . . . . . . . . . . . . . . . . . . . . . . . . . . . . . . . . . . . . . . 18
ConnectingtoanExistingNetwork...............................22
Specications..............................................23
Troubleshooting...............................26
Glossary . . . . . . . . . . . . . . . . . . . . . . . . . . . . . . . . . . . . . . . . . . . . . . . . . 31
FCC Information . . . . . . . . . . . . . . . . . . . . . . . . . . . . . . . . . . . . . . . . . . . . . . 38
Warranty . . . . . . . . . . . . . . . . . . . . . . . . . . . . . . . . . . . . . . . . . . . . 40
Contact Information (USA). . . . . . . . . . . . . . . . . . . . . . . . . . . . . . . . . . . . . . . . . . . . 41
ContactInformation(Europe)...........................................42
GPL Information (USA). . . . . . . . . . . . . . . . . . . . . . . . . . . . . . . . . . . . . . . . . . . . 43
GPL Information (Europe). . . . . . . . . . . . . . . . . . . . . . . . . . . . . . . . . . . . . . . . . . . . 44

3
Introduction
Congratulations on your purchase! With both a wired LAN router and a 811g wireless access point,
the AirStation WHR-G125 Cable/DSL Router is perfect for linking your wireless devices with a
wired network and each other.
System Requirements
•Ahigh-speed(Broadband)Internetconnectionorexistinglocalareaconnection.
•Acomputerwithanetworkconnection(wiredorwireless)andagoodwebbrowser.The
screenshotsinthismanualweretakenwithFirefox,butNetscapeandInternetExplorer
arealsosupportedinversions4.5orlater,andSafari1.0andlateraresupportedwith
MacintoshOSX10.2andlater.
AirStation WHR-G125 Package Contents
•WHR-G125WirelessRouter
•ACadapterandpowercable
•CAT5LANcable
• Utility CD with Manual
•QuickSetupGuides
• Warranty Statement

4
Initial Setup
Begin by nding a good place to set up your router/access point. Some things to
consider:
•You’llneedtobeabletoplugyourinternetconnectionintoit,soitshouldgowithin
reachoftheLANcablefromyourDSLorCablemodem.You’llalsowantapoweroutlet
nearby.
•Keeptheaccesspointascentralinyourworkareaaspossible.Signalstrengthand
speed fall off with distance.
•Higherisoftenbetter.Forinstance,setituponthetopshelfofabookcaseratherthan
thebottomone,ifpossible.
•Theantennausuallyworksbestiforientedtopointstraightup.
Doyouneedapasswordorotherinformationtologintoyourinternetconnection?
ManyDSLconnectionsrequireinformationlikeglobalIPaddress,subnetmask,default
gatewayaddress,DNSserveraddress,orPPPoEparametersinordertoconnect.Cable
modemsusuallydon’trequireextrainformation.If
youhaveaDSLinternetconnection,makesure
that you have any necessary information
handybeforeyoucontinue.YourInternet
ServiceProvidercangiveyouthis
informationifyoudon’tknowit.

5
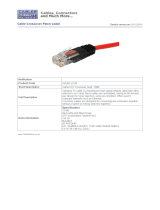
Connecting your AirStation
PC
CableorDSLModem
Power to outlet or
surgeprotector

6
Forasimpleinstallation,youmayusetheAirNavigatorCDinyourpackagetostep
youthroughconguration.InserttheCDinthedriveofyourcomputerandfollowthe
directions.
Theinstallationprogramwillstepyouthroughconnectingyourcomputertothe
AirStation and the Internet.
Setup with AirNavigator CD

7
Tocongureyourroutermanually,useawiredconnectiontoyourcomputer.Once
you’veconnectedtotheinternetthroughtherouter,youmayswitchtoawireless
connection if desired.
ThecomputerusedtoconguretheAirStationshouldbesettoobtainanIPaddress
automaticallyusingaDHCPserver(thisisWindows’default).TheWHR-G125hasa
defaultLANIPaddressof192.168.11.1andSubnetMaskof255.255.255.0.
1.PowerdowntheCableorDSLmodemandthecomputerwhichwillbeusedto
conguretheAirStationrouter.
2.PlugtheCableorDSLmodem’sEthernetcableintotheAirStation’sWANport.
Initially,youmayneedtounplugthiscablefromyourcomputer,huborotherrouter.
3.PlugtheprovidedEthernetcableintoaLANportontheAirStationandplugtheother
endintoyourcomputer’sEthernetadapter(NIC).
4. Important: turn everything on in the correct order!! PoweronyourcableorDSL
modemandwaitonefullminute,thenpowerontheAirStationrouterandwaitone
fullminute,andnallypoweronthecomputerwhichwillbeusedtocongurethe
AirStation.
Manual Configuration

8
Launchawebbrowseronthecomputerthatyou’re
usingtoconguretheAirStation.
Thersttimeyourrouterispoweredon,thewindow
belowshouldopenautomatically.Toopenitmanually,
you may enter your routers IP addrees (192.168.11.1
bydefault)intotheURLeld.
Awindowwillopen,promptingyoutoenteraUserID
and Password.
Enter root as the user name and leave the password
eldblank.
Log in to the Configuration Tool

9
YourAirStation’sSmartRoutertechnologywilldeterminethetypeofinternet
connectionyouhaveautomatically,andaskyouforanyneededinformation.If
yourISPassignsIPsautomatically(mostcableprovidersdo),theirDHCPserver
willgiveyourrouteranIPaddress.Ifadditionallogininformationisrequired
toconnecttotheinternet,thewizardwillaskforit.Enteranyrequiredlogin
Detecting Your Broadband Connection
informationifasked.Contactyour
DSLproviderforanymissinglogin
information.
If you need to relaunch the Internet
ConnectionWizard,justclickonRun
Internet Connection Wizard under
Basic Settings.
Congratulations!Youarenowconnectedtotheinternet.Openafamiliarweb
pagetomakesureeverythingisworkingcorrectly.

10
Toconnectwirelessdevicesto
theAirStation,youmayeither
entertheSSIDandencryptionkey
manually,oryoucanuseAOSS.
FormoreinformationonAOSS,see
pages14and15.
Consult your wireless clients’
manuals for instructions on
conguringthemmanually.You
cangetSSIDandencryption
Connecting Wireless Clients to the Access Point
informationfromtheAirStation’sinitialsetupscreen,asshownabove.The
defaultSSIDisthewirelessMACaddress,availablefromthelableontheside
oftheAirStation.Thedefaultencryptionisdisabled.Ifyouprefertouse
encryptionand/oradifferentSSID,youmaychangethesedefaultsettings
under Basic Settingsatthetopleftofthepage.

11
YoucangetbacktotheSetuppage
fromanywhereintheconguration
screensbyclickingontheSetup
tabinthetopleftcorner.From
here,youcanreruntheInternet
ConnectionWizard,changeyour
routermode,initiateAOSSorWPS,
and see your wireless SSID and
encryptionsettings.
Contextsensitivehelpisavailable
ontherightsideofeachpage.
Basic Setup Page

12
ThemenusintheCongurationToolletyouchangeyourAirStation’ssettings.To
navigatesettings,chooseacategoryatthetopofthepageandthenasubmenu
below.Settingswillappearontheleft,helplesontheright.Thisexample
showstheWAN/LANcategorywiththeInternetsubmenuitemselected.
Navigating the Menus
Categories
Individual
Settings
Submenus
Help and
Instructions
Thefollowingpagesshowexamplesofsomescreensfromthecongurationutility.

13
TheInitialize/Restartpagecanbe
reachedbychoosingtheAdmin
Cong catagorytabandthenclicking
on the Initialize/Restartsubmenu.
ClickRestart Nowfromthispage
torestartyourAirStation.Click
Initialize Now to restore your
AirStation to factory defaults and
restart it.
Youmayalsoinitializeyour
AirStationbyholdingdowntheReset
buttonfor3seconds.
Initialize/Reboot

14
Youcangettothispagebyselectingthe
Wireless Congcategoryandchoosingthe
AOSSsubmenu.
TheblueAOSSbuttonatthetopleftofthe
pagehasthesamefunctionasthephysical
AOSSbuttononthetopoftherouter:it
initiates the AOSS process.
IfallyourclientssupportAOSS,it’svery
simple to set them up. Press the AOSS
buttonontherouter,ortheoneonthispage,
andthenpushtheAOSSbuttonontheclient
device.
AOSS
Eachclientdevicewillhavetobesetupseperately.WaitforeachAOSSprocesstonish
beforestartingthenextone.
YoucanalsoactivateAOSSbypushingthebuttononthetopofyourAirStation(seepage
15).Consultyourclientdevice’sdocumentationforthelocationofitsAOSSbutton.
Ifyou’veusedAOSStoconguresomewirelessclients,andnowwanttoaddotherwireless
clientsthatdon’tsupportAOSStoyournetwork,thisscreenwillgiveyoutheinformation
you need to connect them manually.

15
AOSS
AOSS(AirStationOne-TouchSecureSystem)isasimplesystemfor
conguringyourwirelessnetworksecurely.Ifyourrouterandyour
client device are installed and bothsupport AOSS, thenmaking a
securewirelessconnectionbetweenthemisveryeasy.
standalone
client device
PC card ClientManager
Software
AOSS
PushtheAOSSbuttononthesideofyourrouterandholditinforafewseconds.The
AOSSlightwillbegintoashamber.YounowhavetwominutestopushtheAOSSbutton
onyourclientdeviceandnishtheconnection.
If you have a standalone client device,
itwillprobablyhavealittleredbutton
labled“AOSS”on it.Push thebutton!
About 15 seconds later, you’ll have a
securenetworkconnection.
If your client device is a PC card,
CardBus, or PCI adaptor, the AOSS
button will probably be in its
Client
Manager Software. Check your client
device’s user manual for instructions
on where to push or click the AOSS
button.
After you’ve pressed both buttons, it will take about 15 seconds for the connection to
complete.Whenit’snished,theAOSSlightwitllglowasolidamber.Younowhavea
securenetworkconnection!

16
Some things to keep in mind with AOSS:
•OnlyoneAOSSwirelessclientadaptercanbeconguredwiththeAOSSrouterata
time.Thebuttonswillneedtobere-pressedtoconnecteachadditionalAOSSwireless
client adapter.
•ItisnotnecessarytoAOSSclientdevicesthathavealreadybeenconguredviaAOSS,
unlesssignicantchangeshavebeenmadetothewirelessnetwork.
•DonotattempttoconguretwoseparateAOSSnetworksatthesametime,asitmay
causeundesiredcongurations.
•IfanundesiredclienthasconnectedviaAOSS,itcanbedisconnectedfromwithinthe
WHR-G125’scongurationGUI.
AOSS Notes

17
ThisAirStationsupportsquicklychangingthe
product from a wireless router to a conventional
access point.
Fornormaluse,leavethe“Router”switchintheON
position.
IftheRouterswitchismovedtoOFF,thedefaultIP
addressoftheAirStationchangesfrom192.168.11.1
to192.168.11.100,andDHCP,NAT,andtheWAN
portaredisabled.
Turningthisswitchoffmightbedesirableifyou’re
addingwirelesscapabilitytoanexistingnetwork
witharouter.Itisnotsuitableformosthomecongurations.Ifyouplantousethe
AirStationasannormalwirelessrouter,makesurethatthisswitchisinthenormal(ON)
position!
Router Mode

18
Bydefault,encryptionisnotenabledonthe
AirStation unless you used AOSS to perform your
setup.Anyonewithinrangecaneasilyconnectto
yourwirelessnetwork.Thismightnotbewhatyou
want.
Buffalorecommendsenablingencryptionand
settingapasswordforaccesstoyournetwork.This
iseasytocongurefromwithintheAirStation’s
congurationtool.Selectthe
Wireless Congtab
and the Securitysubmenu.Usethestrongestformof
encryption that all of your clients support.
Encryption and Security

19
Manykindsofencryptionareavailable.WEP
workswithalmosteverything.WPA2-PSKis
muchmoresecure.Choosethestrongestmethod
ofencryptionthatworkswithallofyourwireless
devices.
IfyoumustuseWEP,itisavailableunder“Wireless
Encryption”.
Enteranetworkkey(“password”)forthis
connection. Write down your password and put
itinasafeplace.Youwillnotbeabletoconnect
wirelessdevicestoyournetworkwithoutthis
password.
Encryption and Security

20
Each of your wireless clients will need your
passwordtoconnecttothenetwork.Clickonthe
wirelessiconinyourcomputer’ssystray,orthis
messageifitpopsup.
Anywirelessnetworksavailableintheareawillbe
listedasavailable.Clickonyourwirelessnetwork
SSIDsothatitturnsblueandthenclickonConnect
atthebottomright.
Encryption and Security
/