Page is loading ...

User Manual for User-friendly Firmware
NFINITI High Power Wireless Router & Access Point
WZR-300HP
www.bualotech.com

- 1 -
Contents
Chapter 1 - Product Overview .........................................5
Package Contents ................................................................... 5
Hardware Overview
................................................................. 6
Front Panel LEDs ........................................................................... 6
Back Panel
..................................................................................... 8
Bottom
............................................................................................ 9
Chapter 2 - Placing Your AirStation ................................10
Vertical Placement .................................................................. 10
Horizontal Placement
.............................................................. 10
Wall Mounting
......................................................................... 11
Chapter 3 - Installation .....................................................12
Initial Setup ............................................................................. 12
Chapter 4 - Conguration ................................................17
Accessing the Web-based Conguration Interface ................. 17
Conguration Interface Menus in Router Mode
...................... 19
Conguration Interface Menus in Bridge Mode
....................... 21
Setup
....................................................................................... 23
WAN/LAN
................................................................................ 25
Internet ........................................................................................... 25
PPPoE
........................................................................................... 26
DDNS
............................................................................................. 29
VPN Server
.................................................................................... 31
LAN
................................................................................................ 33
DHCP
............................................................................................. 35
NAT
................................................................................................ 36

- 2 -
Routing ........................................................................................... 37
Wireless .................................................................................. 38
WPS ............................................................................................... 38
Basic
.............................................................................................. 39
Advanced
....................................................................................... 42
WMM
.............................................................................................. 43
MAC Filter
...................................................................................... 45
WDS
............................................................................................... 46
AOSS
............................................................................................. 48
Multicast Control
............................................................................ 50
Firewall .................................................................................... 51
Firewall ........................................................................................... 51
IP Filter
........................................................................................... 53
VPN Passthrough
.......................................................................... 54
Games/Apps ........................................................................... 55
Port Forwarding ............................................................................. 55
DMZ
............................................................................................... 56
UPnP
.............................................................................................. 57
QoS
................................................................................................ 58
Movie Engine
................................................................................. 60
NAS ......................................................................................... 62
Disk Management .......................................................................... 62
Shared Folder
................................................................................ 64
Users
.............................................................................................. 66
Sharing
........................................................................................... 67
WebAccess
.................................................................................... 68
Media Server
.................................................................................. 70
BitTorrent
........................................................................................ 71
Admin ...................................................................................... 73
Name ............................................................................................. 73
Password
....................................................................................... 74
Time/Date
...................................................................................... 75
NTP
................................................................................................ 76
ECO
............................................................................................... 77

- 3 -
Network-USB ................................................................................. 79
Access
........................................................................................... 80
Log
................................................................................................. 81
Save/Restore
................................................................................. 82
Initialize/Restart
............................................................................. 83
Update
........................................................................................... 84
Diagnostic ............................................................................... 85
System Info .................................................................................... 85
Logs
............................................................................................... 87
Packet Info
..................................................................................... 88
Client Monitor
................................................................................. 89
Ping
................................................................................................ 90
Chapter 5 - Connect to a Wireless Network ...................91
Automatic Secure Setup (AOSS/WPS) ................................... 91
Windows 7/Vista (Client Manager V) ............................................. 92
Windows XP (Client Manager 3)
.................................................... 93
Mac OS X (AOSS Assistant)
.......................................................... 94
Other Devices (e.g. Game Console)
.............................................. 95
Manual Setup .......................................................................... 95
Windows 7 (WLAN AutoCong) ..................................................... 95
Windows Vista (WLAN AutoCong)
............................................... 96
Windows XP (Wireless Zero Conguration)
................................... 99
Mac OS X (Wi-Fi)
........................................................................... 100
Chapter 6 - Troubleshooting ............................................101
Cannot connect to the Internet over wired connection. ........... 101
Cannot access the web-based conguration Interface.
.......... 101
Cannot connect to the network wirelessly.
.............................. 102
You forgot AirStation's SSID, Encryption Key, or Password.
... 102
The link speed is slower than 300 Mbps (Maximum link speed
is only 130 Mbps).
................................................................... 102

- 4 -
Other Tips ................................................................................ 103
Chapter 7 - Default Conguration Settings ....................105
Chapter 8 - Network-USB Navigator
...............................112
Initial Setup for Windows Users .............................................. 112
Initial Setup for Mac Users
...................................................... 116
Opening the Network-USB User Manual
................................ 119
How to use Network-USB
....................................................... 120
Chapter 9 - Checking Wireless Signal Quality ...............121
Windows 7/Vista ...................................................................... 121
Macintosh
................................................................................ 122
Chapter 10 - TCP/IP Settings ...........................................124
Windows 7 ............................................................................... 124
Windows Vista
......................................................................... 125
Windows XP
............................................................................ 126
Mac OS X
................................................................................ 127
Chapter 11 -
Restoring the Default Conguration ...........128
Chapter 12 - Shared Folders and the USB Port .............129

- 5 -
Chapter 1 - Product Overview
Professional or User-friendly?
This AirStation wireless router comes with two dierent rmware packages. You may use either the
dd-wrt-based professional rmware or the simple user-friendly rmware. By default, the professional
rmware is preinstalled. Turn to page 15 for instructions on switching between the two rmware
packages.
Note : Most of this manual documents the user-friendly version of the rmware. For more
information on the dd-wrt-based professional rmware, consult the help les in its web-
based conguration interface or the User Manual for Professional Firmware, available for
download from Bualo Technology.
Package Contents
The following items are included in your AirStation package. If any of the items are missing, please
contact your vender.
• WZR-300HP ................................................................................................................................... 1
• AC adapter .....................................................................................................................................1
• Stand for vertical/wall-mounting ..........................................................................................1
• Screws for wall-mounting ........................................................................................................ 2
• LAN cable .......................................................................................................................................1
• AirStation Utility CD ...................................................................................................................1
• Quick Setup Guide ...................................................................................................................... 1
• Setup Card .....................................................................................................................................1

1
2
3
4
7
5
8
6
9
- 6 -
Chapter 1 Product Overview
Hardware Overview
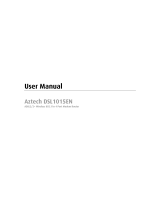
Front Panel LEDs
1
AOSS Button
To initiate AOSS, hold down this button until the Security
LED ashes (about 1 second). Then, push or click the AOSS
button on your wireless client device to complete the
connection. Both devices must be powered on for this to
work.
2
Power LED (Green)
On: The AC adapter is connected.
O: The AC adapter is not connected.
3
Security LED (Amber)
Indicates security status.
O: AOSS or Encryption is not set.
On: AOSS/WPS activated; accessed to exchange
security keys.
Wireless security has been set.
2 blinks: AirStation is waiting for an AOSS or WPS security
key.
Blinking: AOSS/WPS error; failed to exchange security
keys.
Note: The Security LED is lit if an security key has been set.
4
Wireless LED (Green)
Indicates wireless LAN status.
Blinking: Wireless LAN is transmitting.
On: Wireless LAN is enabled but not active.
O: Wireless LAN is disabled.
5
Router LED (Green)
On: Router functionality is enabled.
O: Router functionality is disabled.

Chapter 1 Product Overview
- 7 -
6
Diag LED (Red) This indicates the status of this unit depending on the number of blinks
per cycle.
Note: When the unit is rst turned on or restarted, the Diag LED will blink
for almost a minute during boot. This is normal.
Diag LED
status
Meaning Status
2 blinks *
1
Flash ROM error Cannot read or write to the ash memory.
3 blinks *
1
Ethernet (wired) LAN
error
Ethernet LAN controller is malfunctioning.
4 blinks *
1
Wireless LAN error Wireless LAN controller is malfunctioning.
5 blinks IP address setting error Because the network addresses of both the Internet port (WAN
port) and the LAN port are the same, it is not possible to establish
communication. Change the LAN side IP address of this unit.
Continuously
blinking
*2
Updating the rmware
Saving settings
Initializing settings
Updating the rmware.
Saving the settings.
Initializing the settings.
*1 Unplug the AC adapter from the wall socket, wait for a few seconds, and then plug it again. If the
light still ashes, please contact technical support.
*2 Never unplug the AC adapter while the Diag LED is blinking continuously.
7
Movie Engine On LED (Blue)
On: Movie Engine functionality is enabled.
8
Movie Engine O LED (Blue)
On: Movie Engine functionality is disabled.
9
Movie Engine Switch
On: Enables Movie Engine.
O: Disables Movie Engine.

LAN
USB
USB
EJECT
ON
OFF
AUTO
ROUTER
1
2
3
4
POWER
INTERNET
16
11
18
14
15
17
12
10
13
- 8 -
Chapter 1 Product Overview
Back Panel
10
Router Switch
Switches router mode between enabled, disabled, and auto.
On: Router functionality is enabled (router mode).
O: Router functionality is disabled (bridge/AP
mode).
Auto: This switches between modes automatically
based on whether or not another router is
detected on the Internet port. The default setting
for this switch is Auto.
11
USB Eject Button
To dismount a USB hard drive, hold down this button until
the USB LED ashes (about 3 seconds). The USB drive can
then be unplugged safely.
12
USB LED (Blue)
On: The USB drive is connected.
O: No USB drive is connected.
Note: When this LED is blinking, the connected USB drive
cannot be used. Remove the connected USB drive. If
the LED continues to blink even after the USB drive is
removed, restart the AirStation.
Do not remove the USB drive or turn o the
AirStation while the USB LED is on.
13
USB Port Connect the USB drive.
14
LAN Port Connect your computer, hub, or other Ethernet devices to these ports.
This switching hub supports 10 Mbps,100 Mbps, and 1000 Mbps
connections.
15
LAN LED (Green)
On: An Ethernet device is connected.
Flashing: An Ethernet device is communicating.

19
Chapter 1 Product Overview
- 9 -
16
Internet Port 10 Mbps, 100 Mbps, and 1000 Mbps connections are supported.
Note: In bridge/AP mode (router switch o), the Internet port becomes a
regular LAN port, for a total of 5 usable LAN ports.
17
Internet LED (Green)
On: The Internet port is connected.
Flashing: The Internet port is transmitting data.
18
DC Connector Connect the included AC adapter here.
Bottom
19
Reset Button To reset all settings, hold down this button until the Diag LED comes on
(about 3 seconds). Power must be on.

1
2
AO SS
ON
OFF
MOVIE
ENGINE
- 10 -
Chapter 2 - Placing Your AirStation
Vertical Placement
If the AirStation is to be placed vertically, attach the stand as shown.
Horizontal Placement
The stand is not used if the AirStation is placed horizontally.

FRONT
FRONT
Chapter 2 Placing Your AirStation
- 11 -
Wall Mounting
1
To wall-mount the AirStation, attach
the stand to the wall with the two
screws (included).
8.6 cm
(~3.4 inches)
2
Snap the center of the AirStation to the stand
as shown.

2) disconnect
modem computer
Conrm that the
switch is positioned to
[AUTO].
OFF
modem
LAN cable
1) connect
2) connect
AirStation
Internet
port
- 12 -
Chapter 3 - Installation
Initial Setup
To congure your AirStation, follow the procedure below.
1
Verify that you can connect to the internet without the AirStation, then turn o your modem
and computer.
2
Unplug the LAN cable which connects
your computer and modem.
3
Make sure the mode switch on the back of
the AirStation is in the “auto” position.
4
Plug one end of the LAN cable into your modem and the other end to the AirStation’s
Internet (WAN) port. Turn on the modem.

AirStation
1) connect
2) connect
LAN cable
computer
OFF
AirStation
1) Connect the power supply
power outlet
Chapter 3 Installation
- 13 -
7
Once your computer has booted, the AirStation’s LEDs should be lit as described below:
Power Green LED on.
Wireless Green LED on or blinking.
Router Green LED on or o depending on your network.
Diag O
LAN Green LED on or blinking.
Internet Green LED on or blinking.
For LED locations, refer to chapter 1.
5
Connect your computer to one of the AirStation’s LAN ports with the LAN cable.
6
Turn on the AirStation, wait one minute, then turn on your computer.

- 14 -
Chapter 3 Installation
8
Launch a web browser. If the home screen is displayed, setup is complete.
If username and password elds are displayed, enter “admin” for the username and
“password” for the password, then click [OK]. Step through the wizard to complete setup.
You’ve completed initial setup of your AirStation. Refer to Chapter 4 for advanced settings.

Chapter 3 Installation
- 15 -
Changing Firmware
To change between the professional rmware (dd-wrt) and the user-friendly rmware, follow the
steps below.
1
Open the conguration Interface of the AirStation.
2
To replace the professional rmware with the user-friendly rmware, click [Administration] >
[Firmware Upgrade].
To replace the user-friendly rmware with the professional rmware, go to [Easy Setup] and
click [Update AirStation Firmware].
3
Click [Browse...] to select the rmware le, and click [Upgrade] or [Apply].
Note: The rmware les are contained in the “Firmware” folder of the utility CD.
Professional rmware (dd-wrt) update screen:

- 16 -
Chapter 3 Installation
User-friendly rmware update screen:

- 17 -
Chapter 4 - Conguration
The web-based conguration tool lets you change advanced settings for the AirStation. Don’t
change these settings unless you know what you’re doing.
Accessing the Web-based Conguration Interface
To congure the AirStation’s advanced settings manually, log in to the web-based conguration
interface as shown below.
1
2
3
Launch a web browser.
Enter the AirStation’s LAN-side IP address in the
address eld and press the Enter key.
Note: · The AirStation’s default LAN-side IP address depends on the position of the mode switch.
In router mode: 192.168.11.1
In bridge mode: 192.168.11.100
Note: If the router switch is set to auto and the unit is in bridge mode, then the AirStation’s IP
address was assigned by an external DHCP server.
· If you changed the IP address of the AirStation, then use the new IP address.
Enter “admin” for the username and
“password” for the password and click [OK].
Note: If you forget your password, hold down the
Reset Button (page 9) to initialize all settings.
Note that all other settings will also revert to
their default values.

- 18 -
Chapter 4 Conguration
4
This is the conguration
interface, where most
AirStation settings can be
congured.
Help is always displayed on
the right side of each screen.
Refer to the Help screens for
more information on using the
conguration interface.

Chapter 4 Conguration
- 19 -
Conguration Interface Menus in Router Mode
The menu structure for the AirStation in router mode is as follows. Please refer to the pages listed at
right for explanations of each item.
Main screen Descriptions Page
WAN/LAN
Internet Congure Internet side port and settings. Page 25
PPPoE PPPoE settings (DSL login). Page 26
DDNS DNS settings. Page 29
VPN Server VPN server settings. Page 31
LAN LAN side port conguration. Page 33
DHCP DHCP lease settings. Page 35
NAT Network address translation settings, used to connect LAN side devices
to the Internet.
Page 36
Routing Congure the AirStation’s IP communication route. Page 37
Wireless
WPS WPS settings and status. Page 38
Basic Congure basic wireless settings. Page 39
Advanced Congure advanced wireless settings. Page 42
WMM Set priorities for Wireless Multimedia Extensions (Wi-Fi Multimedia). Page 43
MAC Filter Limit access to specic devices. Page 45
WDS Congure communication between AirStations. Page 46
AOSS AOSS (AirStation One-touch Secure System) settings and status. Page 48
Multicast Control Congure limits on sending unnecessary multicast packets to the
wireless LAN port.
Page 50
Firewall
Firewall Protect your computer from outside intruders. Page 51
IP Filter IP lters for packets passing through the LAN side and the Internet side. Page 53
VPN
Passthrough
Congure IPv6 passthrough, PPPoE passthrough, and PPTP passthrough. Page 54
Games/Apps
Port Forwarding Congure port translation and exceptions for games and other
programs.
Page 55
DMZ Congure a destination to transfer communication packets without a
LAN side destination.
Page 56
/