Page is loading ...

□
□
1
Installation
2
□
3
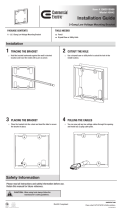
PREPARING THE WALL FOR INSTALLATION
CUT DRYWALL FOR TOP AND BOTTOM PLATES
Installation Guide
Flat Panel TV Cable Organizer Kit
Item #1001863164
Model #5623-WH
PACKAGE CONTENTS
A - Pre-Assembled Top Plate w/ 15 A/125 V duplex receptacle,
8 ft 14/2 with ground pre-stripped electrical building wire
and attached mounting wings
B - Bottom Plate with easy push-in connectors and attached
mounting wings
C - 6 ft. extension cord w/ 360˚ rotating at head
TOOLS NEEDED
Drywall saw
Tape measure
Phillips head screwdriver
Pencil
Level
Stud Finder
D - Electrical box
TEMPLATE
CAUTION
Intended for use on 15 amp branch circuits
Not intended for use in drywall with re
walls
On outside exterior walls with insulation
push away insulation to allow proper
mounting
Determine the top and bottom plate location*
Use the stud nder to center between the wall framing
studs.
□
Be sure to frame your plate both vertically and
horizontally
□
For video information visit homedepot.com and search SKU 1001863164 or model number 5623-WH
Tape
*This kit is designed for standard 2x4 framed walls. If your wall
does not have the standard 3.5” spacing between the drywall
you will need to use a kit that mounts on the front of the wall.
Both top and bottom plates are installed between the same two
studs.
Up to 7’
Up to 6’
Outlet
Height or
18”
TIP: Loop a piece of tape with the sticky side outward to form a circle and
apply it to the back of the template to secure it to the wall.
Using the template supplied, trace the opening for both the top and
bottom plate on the wall. Remember, the plates are designed to be
mounted centered between the studs.
With your template secured to the wall with the tape, using a drywall saw,
cut a hole in the drywall the size of each template
Page 1 of 4
Scan Me
RoHS Compliant
This product is patent protected by
U.S. Patent number: 7390964B2, 7399920B2,
D553475S, D554475S and D568719S
ETL LISTED
CONFORMS TO
UL STD. 498
CERTIFIED TO
C
AN/CSA STD. C22.2#42.1:200-1
3026001

□
4
Run your low voltage cables and the included 14/2 with ground UL
approved electrical building wire from the top opening in the wall
through the bottom opening in the wall. TIP: Straighten out the
cable from the top plate BEFORE running the cable through the wall.
You will need to sh the cables from the top opening to the bottom
opening. (For exterior walls as you may need to use the Commercial
Electricft Mini Cable Snake) BEFORE installing the top power plate
into the top template opening, make sure to pull your low voltage
cables through the low voltage cable opening at the back of the
plate.
RUN CABLES THROUGH WALL
□
□
5
Installation
6
Wall Opening
Now that you have pulled the top power outlet plate’s electrical building wire
through the bottom hole on the wall, bend the wire straight. Break the tab on
the back of the white old work box (D) and push the stripped end of the
wire through the opening. Insert the stripped end of the wires into the push-in
connectors. First, insert the stripped black wire into the open side of the push-in
connector with the black wire – be sure to push the stripped black wire
completely into the connector. Insert the stripped white wire into the open
side of the push-in connector with the white wire. Next, insert the bare copper
ground wire into the open side of the push-in connector with the green ground
wire. Push all of the wires and the push-in connectors into the white old work
box. Screw the white old work box to the back of the bottom plate (B).
Do not plug in the supplied 6ft. extension cord until the installation of the
wallplates are completed.
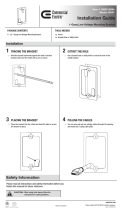
INSTALLING THE TOP PLATE
Installation of Electrical Connectors
Installation Guide
Flat Panel TV Cable Organizer Kit
Item #1001863164
Model #5623-WH
Electrical Wire
Connect Here
A
B
D
After inserting your low voltage cables and the electrical building wire
through the opening for the top plate (A), insert the top plate (A) into the
wall by inserting the electrical work box into the wall rst. Slowly slide
the top power plate (A) into the opening. Swing the top of the plate into
position until the entire plate is ush against the wall. Using a Phillips
head screwdriver, tighten the screws with wings. These wings fasten
tightly against the back of the drywall. Do not overtighten screws.
A
Page 2 of 4
RoHS Compliant
This product is patent protected by
U.S. Patent number: 7390964B2, 7399920B2,
D553475S, D554475S and D568719S
ETL LISTED
CONFORMS TO
UL STD. 498
CERTIFIED TO
C
AN/CSA STD. C22.2#42.1:200-1
3026001

□
□
7
Installation
8
Pull your low voltage cables through the cable opening in the
bottom plate (B). Before installing the bottom recessed plate
with inlet into the bottom wall opening, make sure to pull your
low voltage cables through the low voltage cable opening in
the back of the plate.
Insert the side of the plate with the electrical work box into the
wall. Swing the right side of the plate into position until the
entire plate is ush against the wall. Now tighten the screws
with wings. These wings fasten tightly against the back of the
drywall. Do not overtighten screws.
Hang your at panel TV on the mounting bracket (not included) and
plug your TV into the top power outlet plate. Then plug your power
cord set into the nearby wall receptacle.
INSTALLING THE BOTTOM PLATE HANG TV AND ENJOY
Installation Guide
Flat Panel TV Cable Organizer Kit
Item #1001863164
Model #5623-WH
Cables hidden inside wall
□
CAUTION:
When using tools always follow the
manufacturer’s safety guidelines.
Please read all instructions and safety information before use.
Retain this manual for future reference.
Safety Information
B
B
C
Page 3 of 4
RoHS Compliant
This product is patent protected by
U.S. Patent number: 7390964B2, 7399920B2,
D553475S, D554475S and D568719S
ETL LISTED
CONFORMS TO
UL STD. 498
CERTIFIED TO
C
AN/CSA STD. C22.2#42.1:200-1
3026001

TEMPLATE
ACTUAL SIZE
TEMPLATE
ACTUAL SIZE
Templates
Item #1001863164
Model #5623-WH
TOP PLATE
BOTTOM PLATE
4 3/4”
4- 9/16”
RoHS Compliant
This product is patent protected by
U.S. Patent number: 7390964B2, 7399920B2,
D553475S, D554475S and D568719S
ETL LISTED
CONFORMS TO
UL STD. 498
CERTIFIED TO
C
AN/CSA STD. C22.2#42.1:200-1
3026001
/