Page is loading ...

Installation Guide
Low Voltage Recessed Cable Plate w/ Duplex Receptacle
Item # 641134
Model #5310-WH
PACKAGE CONTENTS
A - Low Voltage Recessed Cable Plate
B - Old Work Electrical Box
TOOLS NEEDED
#2 Phillips Head Screwdriver
Stud Finder
Drywall Saw
Level
Pencil
C - 15 Amp/125 Volt Tamper Resistant
Receptacle
D- Four (4) Screws
□
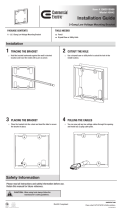
1
Installation
2
□
3
PREPARING THE WALL FOR INSTALLATION
CUT DRYWALL FOR LOW VOLTAGE CABLE PLATE
TEMPLATE
Use the stud nder to center between the wall framing
studs.
□
Be sure to frame your plate both vertically and
horizontally
□
For video information visit
homedepot.com and search SKU
641134 or model number 5310-WH
*This product is designed for standard 2x4 framed walls. If your
wall does not have the standard 3.5” spacing between the drywall
you will need to use a kit that mounts on the front of the wall.
Up to 7’
Up to 6’
Outlet
Height or
18”
TIP: Loop a piece of tape with the sticky side outward to form a circle and
apply it to the back of the template to secure it to the wall.
Using the template supplied, trace the opening for the low voltage recessed
cable plate on the wall. Remember, the plate is designed to be mounted centered
between the studs.
Using a drywall saw, cut a hole in the drywall the size of the template.
CAUTION
Before installing this product, be sure the electrical power is off at the circuit
breaker or remove fuse(s).
Tape
DETERMINE THE PLATE LOCATION
Scan Me
RoHS Compliant
This product is patent protected by
U.S. Patent number: 0553475 & 7390964
ETL LISTED
CONFORMS TO
UL STD. 514C
CERTIFIED TO
C
AN/CSA STD. C22.2#42.1:200-1
3026001
Rev. 01/29/2019

Installation Guide
Low Voltage Recessed Cable Plate w/ Duplex Receptacle
Item # 641134
Model #5310-WH
□ □
4 5
Pull the electrical building wire through the hole in the drywall.
Break one of the four tabs in the back of the old work box (B)
and push the electrical building wire through the tab.
PULL ELECTRICAL BUILDING WIRE WIRE THE RECEPTACLE
Wire the receptacle by connecting the White wire to the silver
screw, the Black wire to the brass screw, and the Green ground
wire to the green grounding screw. Then place the receptacle into
the electrical work box.
B
□
6 SECURE ELECTRICAL WORK BOX
Secure the electrical work box onto the back of the cable
plate using a Phillips head screwdriver.
□
7 PLACING THE PLATE
Swing the plate into the wall opening (receptacle rst) and
tighten down the screws until the plate fastens tightly against
the wall.
Installation
RoHS Compliant
This product is patent protected by
U.S. Patent number: 0553475 & 7390964
ETL LISTED
CONFORMS TO
UL STD. 514C
CERTIFIED TO
C
AN/CSA STD. C22.2#42.1:200-1
3026001
Rev. 01/29/2019

7-1/4”
ACTUAL SIZE
CUT ALONG DOTTED LINE
7-1/8”
Template
Item #640816
Model #5310-WH
CAUTION: When using tools always follow the
manufacturer’s safety guidelines.
Please read all instructions and safety information before use.
Retain this manual for future reference.
Safety Information
Template
RoHS Compliant
This product is patent protected by
U.S. Patent number: 0553475 & 7390964
ETL LISTED
CONFORMS TO
UL STD. 514C
CERTIFIED TO
C
AN/CSA STD. C22.2#42.1:200-1
3026001
Rev. 01/29/2019
/