Whirlpool ADP 790 WH User guide

Category
Dishwashers
Type
User guide

This manual is also suitable for

To review the section on troubleshooting Tips
will help you to solve some common problems
by yourself .
Dear Customer,
Please carefully read t his manual bef ore using the
dishwasher, it will help you to use and maintain the
dishwasher properly.
Pass it on to any subsequent owner of the applianc e.
This manual contains sections on safety Instructions,
Operating Instructions, Installation Instructions and
Troubles hooting Ti ps, etc.
The manufacturer, following a policy of constant
development a nd updating of the product, may
make modifications without giving prior notice.
Dishw asher Features........................... ......... .
A Wate r Softener ..................... ....................
Attention before or after loading the Dishwasher
Baskets........... . .............. ..............................
Filtering System..... ........................................
Caring for the Dishwasher..................... .. ........
How to use the 3 in 1 fun ction..........................
B Loading the Salt into the Softener...............
C Fill the Rinse Aid Dispenser............. ....... ...
D Function of Detergent ............... ................
Loading the upper ...............................Basket
Loading the Lower ...............................Basket
Cutlery Basket........................................... ..
Wash Cycle Table ...........................................
Turning on the Appliance................................
Change the Programme.............. ....................
At the End of the Wash Cycle...........................
Positioning the Appliance................... ............
Water Connection.................................. ........
About P ower Connection............. ........... ........
.. ......................................rehsawhsidfotratS
Before calling for service........................... ......
Error codes............... ..................... ...............
Technical information.............................. .......
Control Panel.................................................
Keep it to refer to it at a later date.
If you can not solve the problems by yourself ,
please ask for the help of professional technicians.
29
30
31
31
31
32
32
33
33
34
36
37
37
37
38
39
40
40
41
41
41
42
42
43
44
44
44
45
46
47
47
48
49
28
This appliance must be gro unded. In the event of a
malfunction or breakdown, grounding will reduce
the risk of anelect ric shock by providing a path of
least resistance of electric current. This appliance
is equipped with a cord having an equipment-
grounding co nductor and a grounding plug.
The plug must be plugged into an appropriate outlet
that is installed and grounded in accordance with
all local codes and ordinances.
Improper connection of the equipment-grounding
conductor can result in the risk of an electric shock.
Check with a qualified electrician or service
representative if you are in doubt whether the
appliance is properly grounded. Do not modify the
plug provided with the appl iance; If it does not fit
the outlet. Have a proper outlet installed by a
qualified electrician.
Keep children away from detergent and rinse aid, keep
child away from the open door of the dishwasher,
there could stil l be some detergent left inside.
ren
Do not abuse, sit on, or stand on the door or dish
rack of the dishwasher.
Do not wash plastic items unless they are marked
dishwasher safe or the equivalent. For plastic item s
n
ot so marked, check the manufacturer's
recommendations.
Us eon ly deterge nt and rinse ad di ti ves
design ed for an aut oma tic dishwash er.
Ne ver use s oap, laun dr yde te rg ent, orh and
wa shin gdeterg en t inyour dishwash er. K eep
these produ cts out of t he re ach of chi ldren.
During installation, the powersupply mustnot
beexcessively ordangerouslybent orflattened.
Do not tamper with controls.
Do not operate your dishwasher unless all
enclosure panels are properly in place. Open
the door very carefully if the dishwasher is
operating, there is a risk of water squirting out.
Do not place any heavy objects the
door when it is open. The appliance could tip
forward.
on or stand on
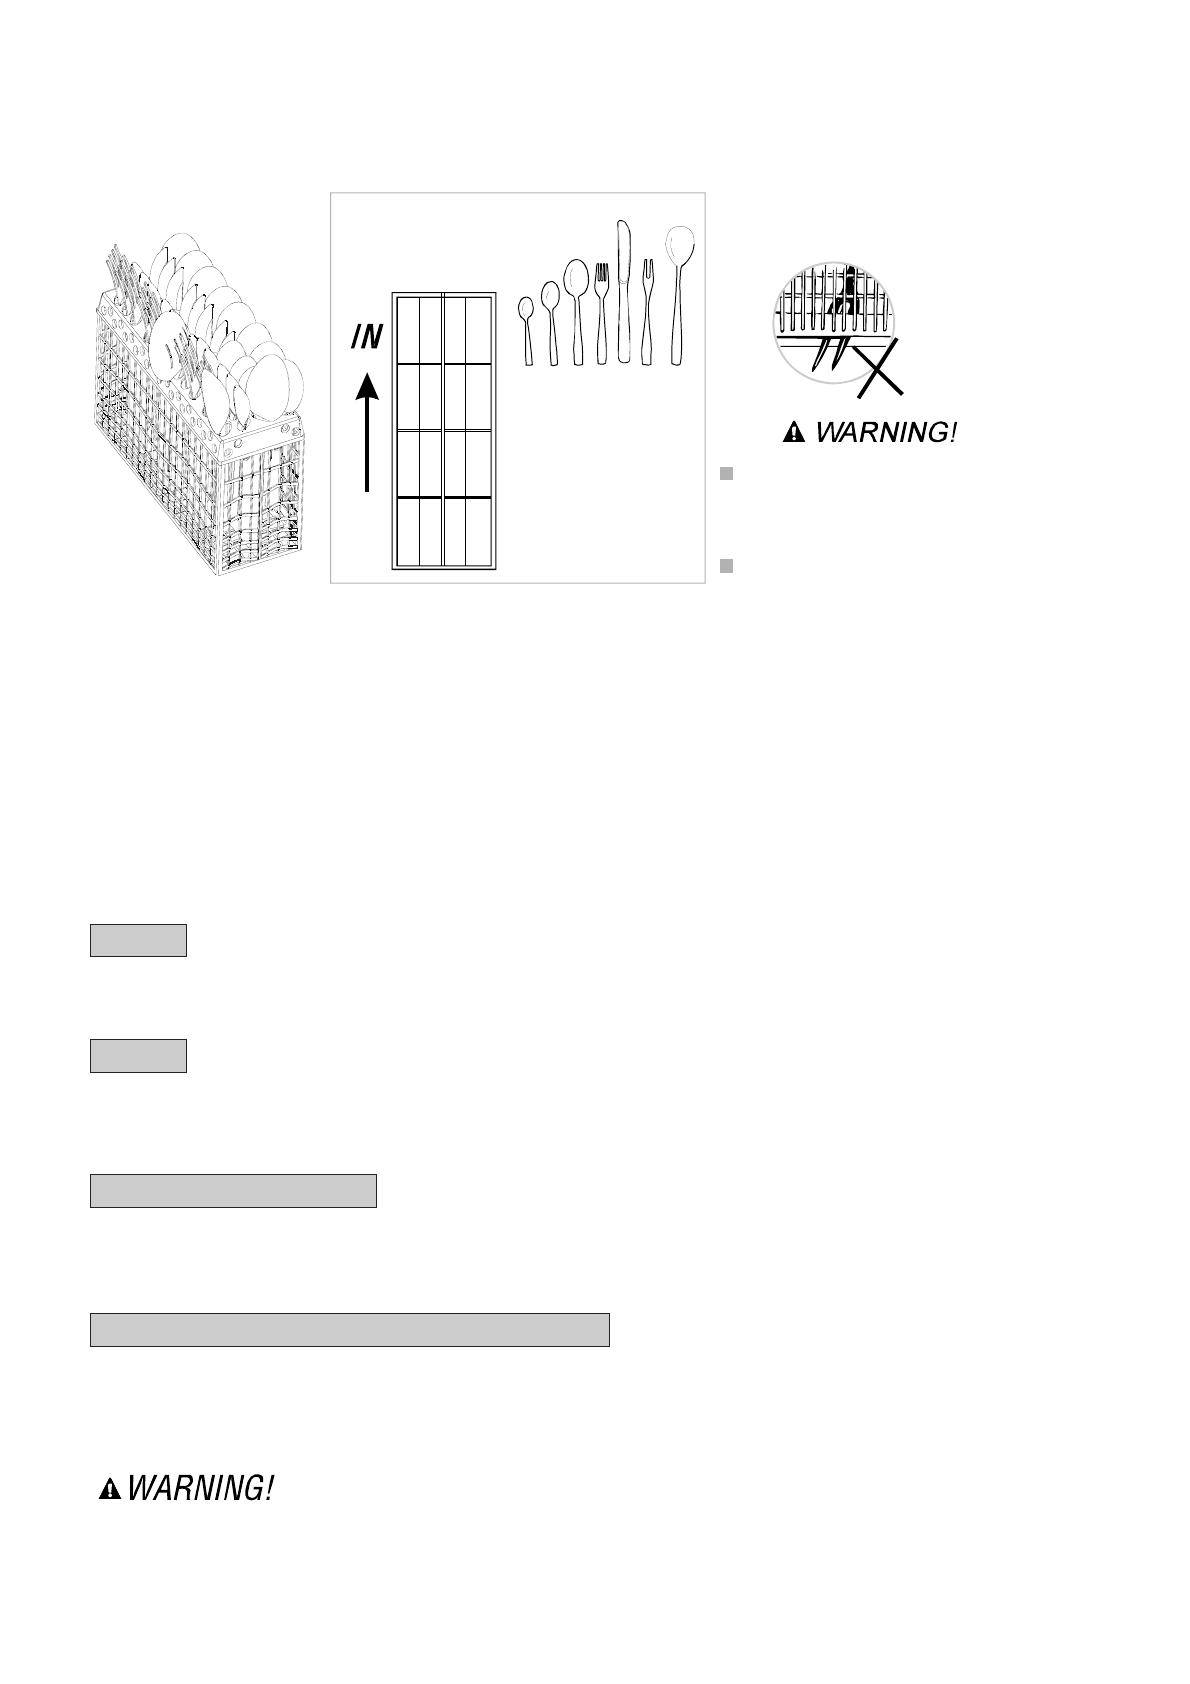
When lo ad in g ite m s to be wash ed:
1)Locatesharp items sothattheyarenot likely
todamagethedoorseal;
2 Warn ing : Kni ves and otheru te nsil swi th
sh a rp p oin t s m u st be loa ded i n th e bask et
w ith their points d own or p lace din a
horizontalposition.
)
When us ing you rdi shwasher, yo ush ould
preve ntpl astic items fro mcom in gi nto co nt act
wit hthe heating elem ent.(This i nstru ction is only
applica bl e to machi nes with a visual heat in g
ele ment.)
I fthe s upply cord i sd amaged, it must be repl aced
by th em an ufactur er or itsse rv ic eag ent or a
si mi larly quali fie d per son in o rde r to av oid a
hazar d.
Pl ea se d is pose of pack ing mater ial s properl y.
U se the dishwasher only for its intended function.
Remove the door to the washing compartment when
removing an old dishwasher from service or discarding it.
Dishwasher detergentsarestronglyalkaline, they
can be e xtr eme ly d anger ous i f s wa l low ed.Avoid
contact with skin and eye san dke ep child ren away
from t he dishwashe rwh en t he door is op en.
Check thatthe detergent comparment isempty
aft er com pletio nof thewash cycl e.
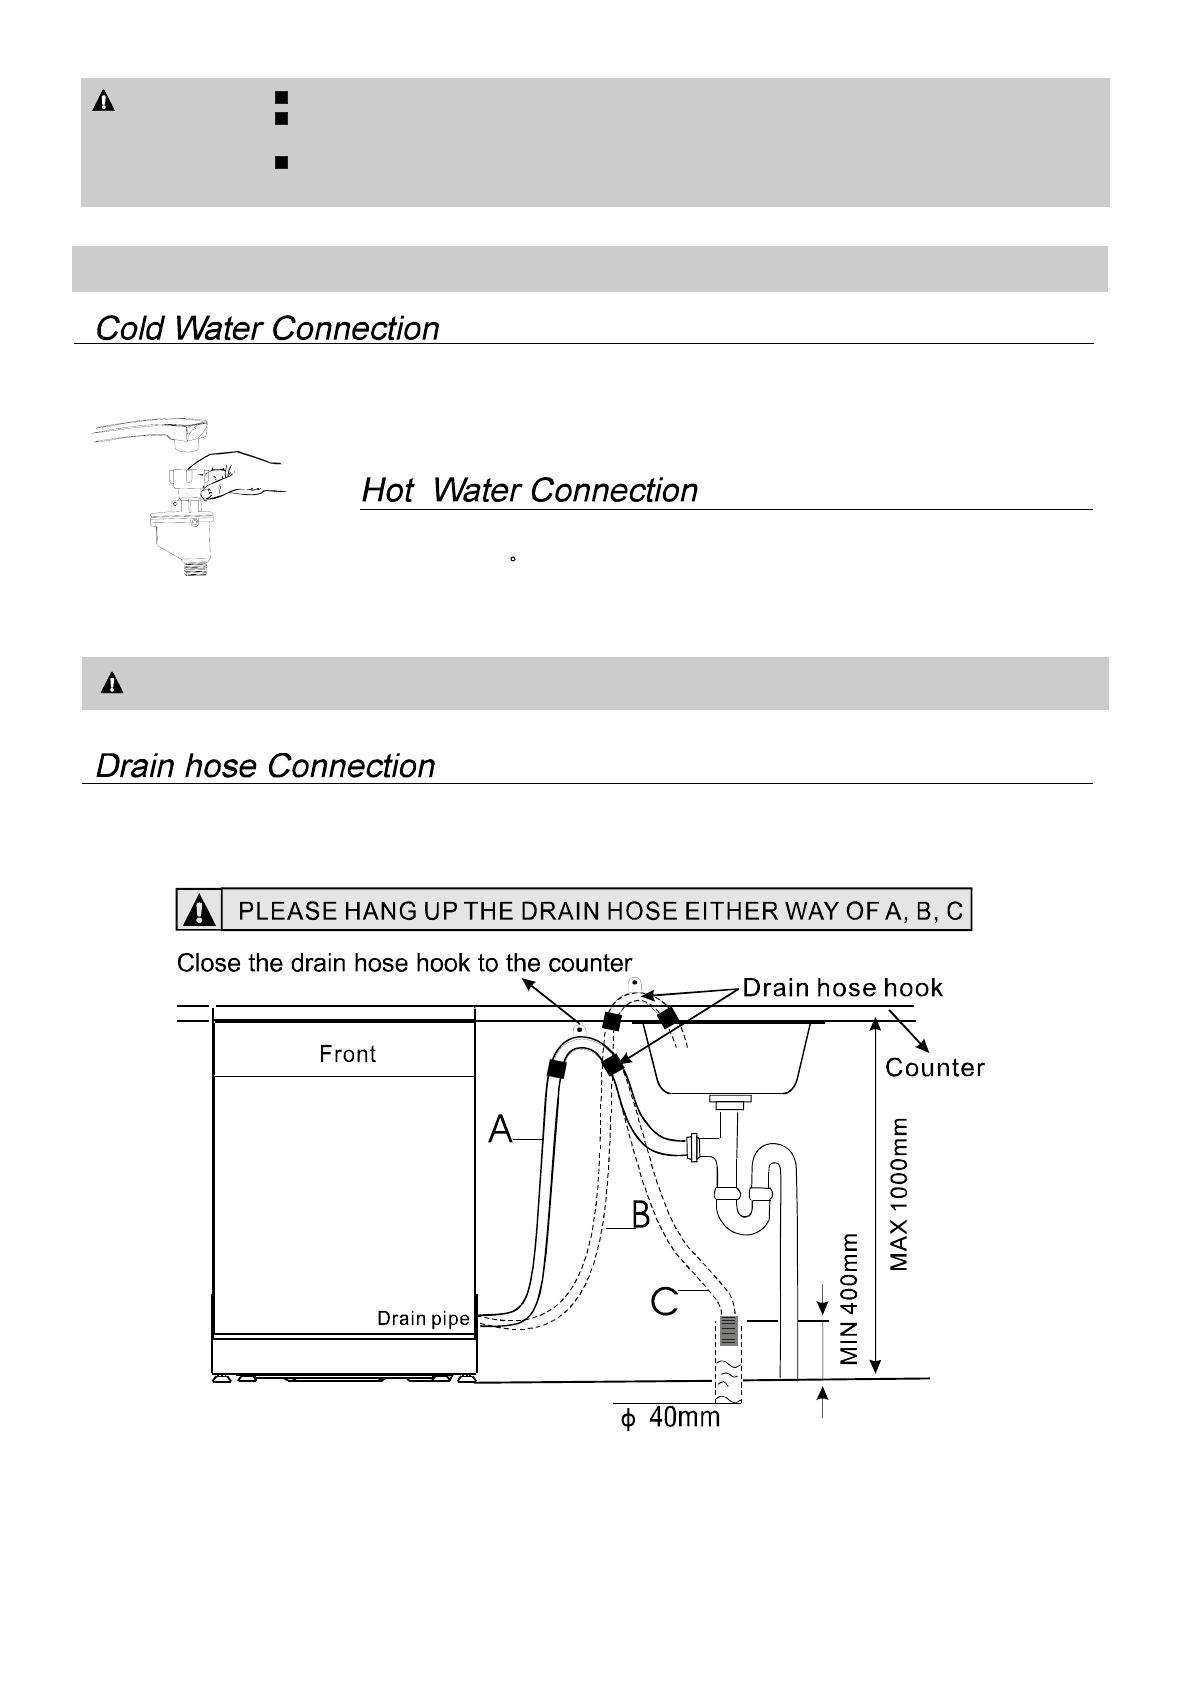
Th e app lian ceis to be co nn ected to t hew ater
mainsusing new hosesetsand that oldhose-sets
should n ot be reu sed .
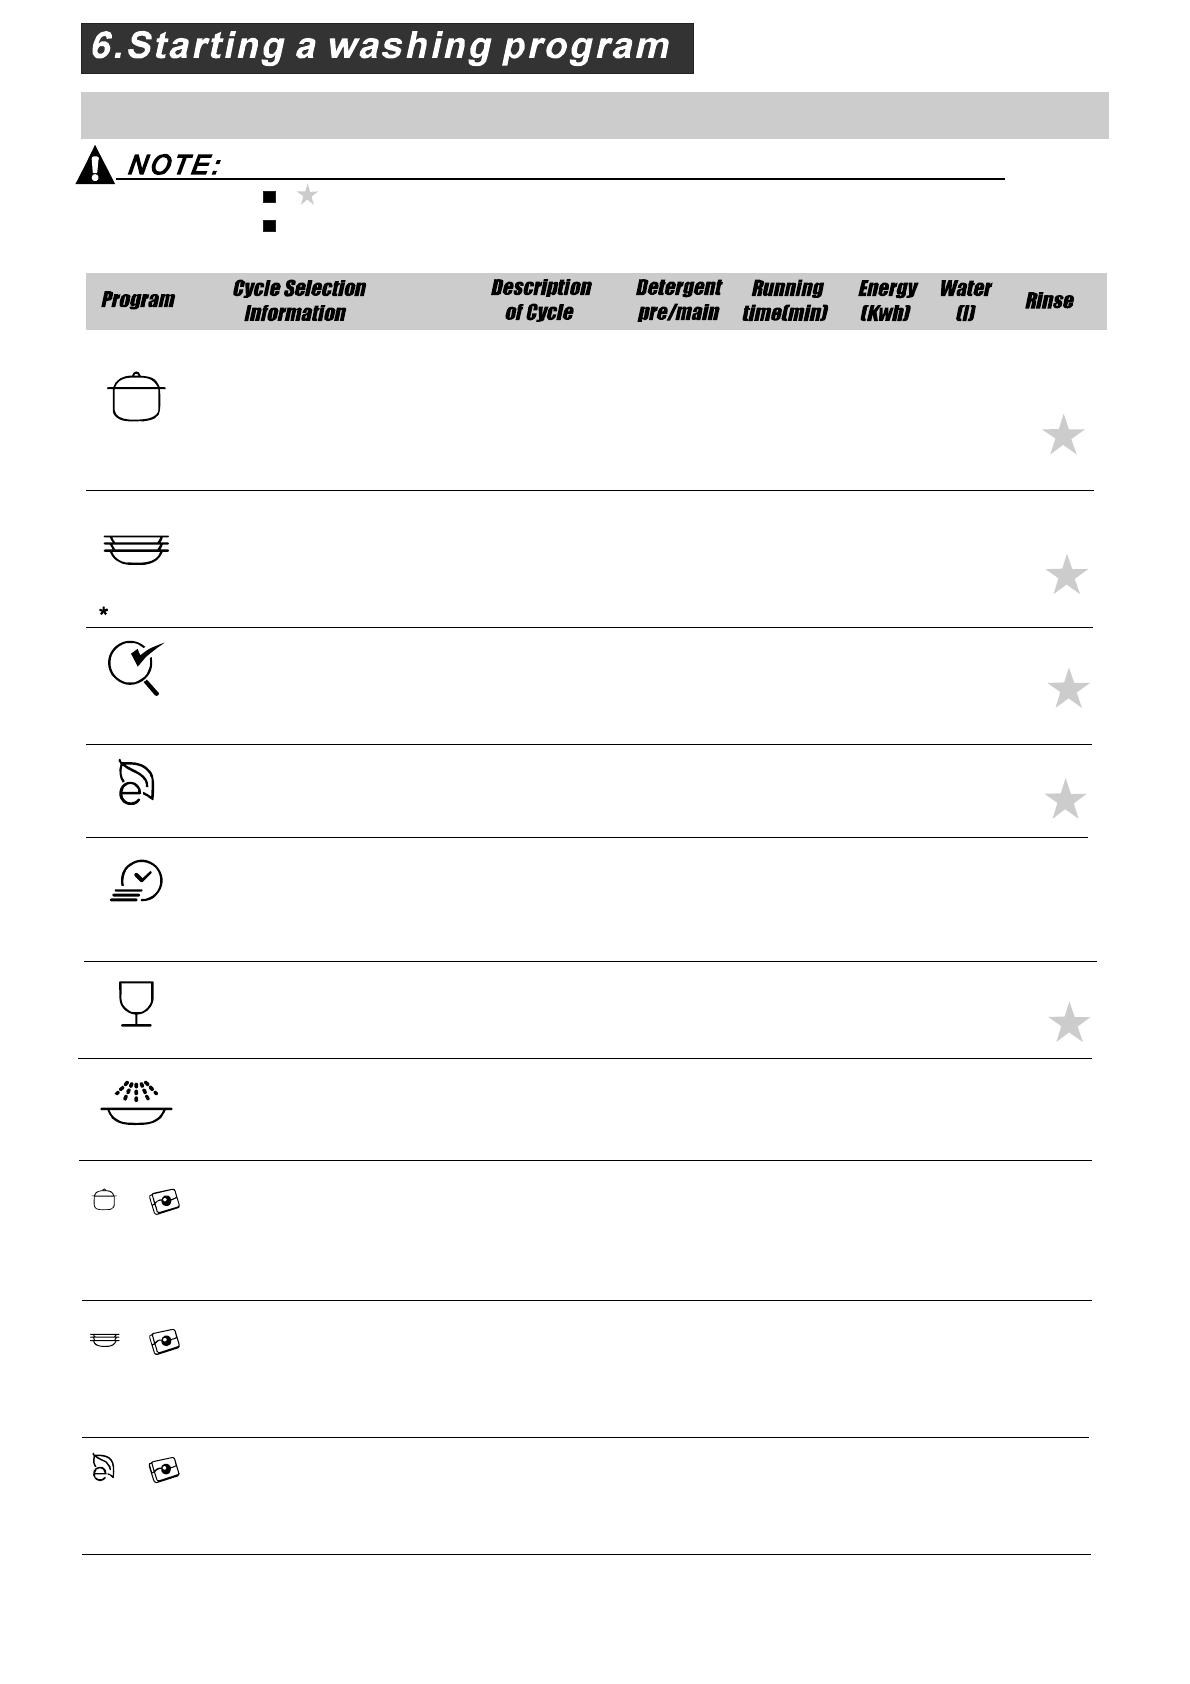
The maximumnumberof place settingstobe
was hed i s9 .
The maximumpermissibleinletwater pressureis
1Mp a.
The minimum permissibleinletwater pressureis
0.04Mpa.
Children should besupervised toensure that they do
not play with the appliance.
T his appliance is n ot intended for use by persons
(including children with reduced physical, sensory or
mental capabili ties , or lack of experience and
knowledge ,unless they have been given supervision
o r instruction concerning use of the appliance by a
person responsible for their safety.
)
When using your dishwas he r, fo ll ow the prec aut ions list ed below:
Th e doo rsh ould not be left o pen,
since th isco uld incr ease the risk of tr ipping.
29
D
ispo se o ft hed ish wa sher pac kag ingm ater ial c orrectly.
All pa ckagi ng mate ri alsca n be recy cled.
Pl ast ic pa rt sa rem ark edw ith th est and ard int ernat ional a bb reviation s:
PE fo r pol yet hylene, e .g. sheet wrapping m ateria l
PS for polystyrene,e.g.paddingmaterial
PO M polyox ymethylene, e.g .pla stic c lips
PP pol ypr opy lene , e.g. Sa lt filler
AB S Acr ylo nitri leBu tadiene St yrene, e.g .Contr ol Pa nel .
Packaging materialcouldbedangerousfor children!
Fo rdi sposing ofpa ckage a nd thea ppliance ple ase go to a re cyc ling cen tre. There for e cut
offthe powersupplycable and makethe doorclosingdevice unusable.
Cardboardpackaging is manufactured fromrecycledpaperand shouldbe disposedin the
w ast e paper c ollecti on for r ecycling .
By en surin gth ispr oduct is dispo se d of corr ect ly, you will hel p pre ven tpo tentialn egat ive
con se que nces for t hee nvi ronment a nd hum anhealt h,w hic h cou ld o ther wise be caus ed
byinappropriatewaste handlingof thisproduct.
Fo rm ored etail ed infor mat iona bout rec ycli ngo f this prod uc t, ple ase con tac t your loca l
ci tyoff ice and your hou seh oldw ast edis posal ser vic e.
DISPOSAL :Do not dispose th is pr oduct as unsorte dm unicipal wa ste . Collect ion of such
waste s epara te ly forspec ial t reatment i s n eces sary.
WARNING!
30
Ba ck Vie w
Front view
5
Pr og ra m indi cator l igh ts and button: To sele ct
one of t he seven an dsh ow the wash ing progra m.
2
3
4
3in 1 indi cato rl ig ht/ 3in1
functionbutton:Toselectand show3in1 .
St art and r ese tbut ton: To s tart the s elect ed was hi ng
pr og ra m o rres etth ew ashing p rogr am when t he
machine isworking.
Di spl ay wi ndo w: P rogram r emaini ng ti me, d elay t ime,
r unning i ndi cator, te mp er atu re of w ater, Err orcod es, et c.
6
Sa lt a nd ri nse aid w arn in g li ghts: To s ho w
w hen thes altcont aine ror disp ense r ne ed t o be
refille d
7
Powerindicatorlight and switch:Toturnon/off
and sh ow thep owe rsupply.
Dela yedStart Bu tton: To preset t he wash timer and de lay
the starting time up to 24h ours. Ever y press of this button
increase st hetime by 60 min utes.
MainFilter
Deterg entD ispenser
CupShelf
Cutlery Basket
CoarseFilter
Ri nse Ai d Di spenser
Inletpipe connector
Drainpipeconnector
Low er B ask e t
Sp ra yA rm s
Upp er B ask e t
1
Sa lt C ontainer
Dishwasher Features
Control Panel
beforeusingit forthe first time.
Togetthe best performance fromyourdi shwas her,read all operatinginstructions
5
6
7
8
9
10
12
11
3
2
4
11 12
1
2
3
4
5
6
7
8
9
10
on
Off
13
Tray ass
13
2
3
4
5
6
7
31
Be fore u sing you rdi shwa sher for the first ti me :
Th e wat er so ftener must be s et m anu al ly, usin gthe w ater hard ness dia l.
Th e wat er so ftener is des ign ed to rem ove minera lsan dsa lts fr omt hew ater, wh ich woul dha ve
a detrim enta lo r advers eeffe ct on the op eration of t he app liance .T heh igh er the
content oft hese minerals an dsa lts,t he harde ryourwat er is. The s of te nershou ld b e
adj usted acco rd ing t othe ha rdness o ft hewater in you rarea. Your local Wa terA uthority
canadvise you onthehardnessofthewaterinyourarea.
Adjusting Salt Consumption
Th e dishwas her isde signed to all ow for a dj ustment i n the am ount of sa lt co nsumed bas ed o nthe ha rdness of
thewaterused.This isintended tooptimiseand customisethelevelo f salt consumption.
1. Unscrewthe capfromthesaltcontainer.
2. T hereis ar ing o nthe con tai nerw ith a na rrow o ni t(see fig ure
ontheside), ifnecessary, rotate thering in the anticlockwise
directio nfro mthe "-" Setting towardthe"+"sign, basedon the
hardne sso fthe water being used.
It is recomm end edt hat a djust me nts shou ld b e made in
acco rd ance wit ht he foll owing sc hem e:
Contact your local w ater boar dfor i nformat io n on the hardne ssof your w atersuppl y.
dH
mm ol /l
0~1 40~8 0~1.4
/
0
/
14~398~22 1.4~3.9 - 20 50
39~8022~45 3.9~8 Mid 4 0 25
+
60 16
fH
0~10
10~28
28~56
Clar ke
°
Clark:British degree
°
fH: French degre e
°
DH : Ger man degr ee
dH =1.25 Clarke=1.78 fH=0.178mmol/l
Note:1
°°
WATERHARDNESS
SelectorPosi tion
Salt consumption
(gram/cycle)
Aut o nomy
(cycles/ 1kgs)
Pl eas e fol lo w the s t eps bel owf orad justment in salt cons um ption .
°
""/
"-"
"+ "
"Mid"
Note:2
Settingtowardthe"+"sign
Settingtowardthe"-"sign
Settingtowardbetween
the "-" si gn and "+" sign
No sa lt need added
45~60 80~1 07 56~75 8~11
A. Water Softener
A. Set the w ater sof tener
B. Pou r 1 2 li tre o fwa ter i nside th esa ltco ntainer a ndthen fill with d ishwash er sa lt
C. Fill the rins e aid d ispen s er
D. Fillindetergent
32
nor mal fo r a s mall a mo unt o f w ater t o c om e out o f t h e sa l t co nta iner.Itis
1.The salt contai ne r must onl y be refil le dw hen the salt wa rn ing ligh t in t he contr olpanel com es on.
Depend ing on how wel l the s alt diss olve s, th es alt warni ng light may still be on even t hough the
salt cont ai ner isfilled .
If the rei sn osa ltw arning li ght in the con tr olp anel (fo rso me Mode ls),you c an estim ate when t of ill
the s alt into the so ftener by the cycles that the di shwasher has run.
2. If there a re spills o fthe salt, a soak or a rap idpr ogramshoul dbe run t oremove the exce ssivesa lt.
Always use the sal ti ntende dfor use w ith di shwasher.
The sa lt c o ntain er i sl ocated ben eath the l ower bas ket and sh ould b ef ill ed a se xplained i n the
foll ow ing:
Attention!
Only us e salt spe cif icall y desi gne dfor t he use i nd ishw ashers! E very other ty peof
salt no t specif icallyde sig ned fo r t heu se in ad ishwas her, espe cial lytab le salt, will
damage the w ater sof tene r. I n case of da mages caused b yt he use o f unsuit able
salt t he ma nuf act urer doe s not gi ve any wa rranty nor is liable for a ny damage scau sed.
Only fil l wi thsal tjustb efo re start ingone o ftheco mp lete washi ngp ro gr ams.
This will p revent any g rains ofs alt or salty wate r, w hi ch ma y have b een spi lled,
remain ing on th e bottom o fth e m achi nef or any p eriod of t ime, which may c ause
c o rr osion.
B. Loading the Salt Into the Softener
C. Fill the RinseAid Dispenser
Th er inse aid i srel eas edduri ngt he fi nal rin seto pr event wate rfro m for min g droplet s o ny o ur dis hes, w hic h can l eave
spots ands treaks. It also improvesdryi ngby allow ing water to roll off the d ishes .Your di shwasheri s des igned t o
usel iqu id r in sea ids.The r in se a id di spen ser i slocated i nside the do or nex t tothe det ergentd ispenser. To fill th e
dispenser,open thecapand pourthe rinse aidintothedispenseruntil thelevelindicatorturnscompletelyblack.
Thevol umeo fthe rins eaid contai neris abou t 110ml.
RinseAid Dispenser
Function of RinseAid
Rinse ai d is aut om aticall ya dded d uring t hel ast r inse, ensuring thor ough rinsi ng , and spo tan dst reakf ree drying.
Attention!
Only usebranded rinseaidfor dishwasher.Neverfill therinseaiddispenserwithanyothersubstances
(e.g. Di shwasher cleani ng ag en t, liq uid d eterge nt ).Th is would dam age t he app liance .
A Remove the lower basket and then unscrew andremovethe cap fromthesaltcontainer.
B Before thefirst wash,fill 1lt. ofwater inthe salt container of your machine.
C Pl ace th ee nd of the f unnel (supp lied) i nto the ho le and introd uce abou t 1kg ofs alt .
D Af te rf il ling the co ntain er, scr ew the c ap t ightly back clo ckwise.
E Usu ally, the salt warni ng light wi llst op bei ng i llumi nat ed with in 2-6 days afte rth es altco ntain er ha sbe en fi lled wi t h
sal t.
F Imm ed iat el ya fter f illing t he s alt into th esa lt co ntainer, a w ashing program should be started ( Wesu gges t to use t he
soak orrapid program).Otherwisethe filter system,pumpor otherimportantpartsofthe machinemay bedamaged
bysalty water.This isoutofwarranty.
33
To op en the di spen ser,t urn t he ca p tothe " open" ( left) arr ow an d l if t i t o ut .
Po ur th e rin se ai d int o the disp ens er, b eing car eful n ot t oo ver fill .
Replace the ca pb y in se rt ing i taligned with "open" arrow and turning i tt ot he closed (right) arrow.
Adjusting RinseAid Di spenser
The r inse aid dispe nser ha ssi x or four s ett ings.Al ways sta rt wi th the d ispens er
set o n" 4". If spots and poor drying are a proble m, incre ase t he amoun to fr inse
aid d ispensed b y remov in g the di spenser l id an drot ating t he d ial to "5". If the
dishes s till are no td rying prope rlyo r ar eshow sp ots,a djust th e di alto the n ext
highe r lever un til your dishes a re sp ot-f ree. The recomm en ded setting is "4".
(Factoryvalue is "4".)
Increase thedose if thereare drops of waterorlimespotsonthe dishes after washing.
Reduceitifthere aresticky whitishstains on your dish es orabluish filmonglasswareor
knife blades.
1
2
3
As th eri nse aid d imin ishe s, t he si zeo f the black dot
ontherinse aidlevel indicator changes, as illustratedbelow.
Full
3/4full
1/2full
1/4 full- Should refilltoeliminate spotting
Em pty
Adjust lever
(Rinse)
When to Refill the Rinse Aid Dispenser
Ifth erei s no rinse- ai d warnin g ligh tin thec ontr olp anel, you can est imate the amount f rom the col our
oft heopt ica l l evel indi ca tor C loc ated ne xtto the c ap. When th erin se-a idc onta iner i sful l,th e whole
indicato rwil l be dark . As the r inse -aid diminishes, th esize o fthe dar k dot de creases. You should n ever let
t he r i nse aid lev el fa ll 1 / 4 f ull.
durin gth e nex twa sh. Don 'tf orget t ore pla cet he cap be fore you cl ose dis hwa sher do or.
Clean u p an y r ins e aid spi lled while du rin g fi ll i ngw i th a n abso rbe nt clot h t o a v oid ex ce ssiv e f oam in g
NOTE:
Deterge nt s w ith it s chem ic al ingred ients ar ene cessary t or emove dirt ,c rus hdirt an dtrans po rt it ou tof t he di sh washer.
Mostofthe co mmercial qualitydetergents are suitableforthispurpose.
D. Function of Detergent
Detergents
The re ar e 3 s orts of dete rge nts
1.Withphosphate andwithch lorine
2.With phos phate andwit hout c hlorine
3.Wi thou t phosph at e and with out chlorine
""
C ( Ri nse - Ai d in d ic ato r)
6
34
Amount ofDetergent toUse
Prop er U seo fDe terg ent
Use o nly deterge nts pecif ical lym ade f or the u sei n dish wa shers. Ke ep your det ergentfr esh and dry.
Don'tputpowdereddetergentinto the dispenseruntilyou'reready towash dishes.
Dishwash erdetergen tis co rr osi ve!Ta kec are to kee pi tout of reach of c hildren.
WARNING!
Based ontheir chemical composition, detergentscan besplitin twobasictypes:
Theuse of normal washingprograms incombinationwith concentrated detergents
redu ces poll utio na nd is g ood for your dish es ; these wash p rog ram sare spec if ically matche d
to t he di rt- diss olvin g pro pe rt i es of th ee nz yme sof the conce nt rated deterg ent. For this reas on
normal washprogramsin whichconcentrated detergentsareused canachie vethe same
resultsthatcanotherwiseonlybe achievedusing intensive programs.
“”
“”
“”
Detergenttabletsof different brandsdissolveat different speeds. Forthisreasonsome
det ergen tta blet sca nnot diss olve and dev elop the ir fu llcle anin gpo wer dur ing s ho rt
prog ra ms. There fore pl ease u se l ong prog ram s wh en u sin gde terg entt able ts,t o
ensure the complet e re mova l of de t er g e n t re sidu al s.
Th e dispens er m ust b ere fill edbef ore the start of each wash cy cle f ollowing the instructi ons
provided i nt he w ash cycleta ble . You r dis hwa sher use sle ssde tergent and ri nseaid tha n
Conventionaldis hwasher.Generally, only one tablespoon of detergent is neededfor
anormal washload. Moreheavily soileditemsneedmoredetergent.Alwaysaddthe
dete rgen tjus t be fore star ting th e dishwas her, othe rwis e it coul dg e tda mp and w ill n ot
di s solve prope rl y.
Concentrated Detergent
DetergentTablets
Detergent Dispenser
Always a dd the dete rg entj us tb efore start ing ea chwash cycle.
Only use brandeddetergentaidfordishwasher.
If th elid is cl osed: press rele asebutton.T he li d will sp ri ng open.
conventional,alkalinedetergentswithcausticcomponents
l ow a lkalineconc entr at ed d eterge nts w ith natural enzy mes
Normally ne wpu lverised dete rge nt is with out phospha te.T hus the wate rso ft ener fu nct ion o f
phosph ate i s not given. I n th i s c a se we recommend t o fil l sa lt in t h e sa lt co nta in er e ven whe n
the hard ne sso fwate r is o nl y 6 d H. I f dete rg entsw itho ut ph osphate are used in the case of h ard water
often wh ites pots app ear on d ish esa nd gl asses.I n this case pl ease add m ore d eter gent to r each
better r esul ts. D ete rgen ts wit h o ut chl orin e d o on ly bleac h a l itt le. Str o ng and c ol o u red sp o t s will not
ber emoved complete ly. I nth isc ase pleas ech oo sea p rog ram wi th a hi gher te mpera tur e.
°
35
I fyou use 3in 1ta ble ts in o ther pro gram s,t he a ppli ancewill not ac hieve ago odp erfo rma nce.
Only the 3in1 fun ction (for the prog ram :i nt ensi ve/No rmal/ E co. ) Can be used wit h 3 in 1ta blet s.
Fillt he de ter gent disp enserw ith d eter gent.
Th e m ark ing i n d ic ates th e do s ing l evel s , as
i ll us tra ted o n t he r ight:
Th eplace o fm ain wash cyc ledete rg ent placed ,
M IN means approxi mat ely 20 go f deter ge nt.
“”
Th epla ceof pr e-wash c ycle det erge ntp laced,
ap prox ima tely 5 go fdet ergen t
Pleaseo bser veth em anufactur er sdo sing and storage
Recommendationsas statedonthedetergent packaging.
Close the lid and press untilit locks in place.
I f t h e d i shes ar e heavily so i l ed , pl ac e an addit io nal
detergen tdo sei n the pre- was h det erg ent chamber. Th is d eter gen twill take effe ctd uri ng the pre- wa shp has e.
A
B
Fill in Detergent
You f indi nformatio nab ou t the amo unt o f det erg en t for th esi ngle pr ogramme ont he last p age .
Pl ea sea ware, tha t accordi ng t ot he lev elso iling and the spec ific har dnessof wat er d iffer ence sare po ssib le.
Pleaseobservethemanufacturer's recommendationsonthe detergentpackaging.
When us ing 3in1 combi nation / co mpa ct Det ergents ,p leas epa y atten tiont o make s ure th at
the size of th e combinat ion det erg ents fits to the dispe nser so th atc om bination
deterge ntsc anb e ea sil yp utinto t hed ispenser, and the d is penser would not b eb roken.
Your dish was her h as a 3i n1fu nct ionw hich needs n osa lta ndr inse aidb ut a 3 In 1 tablet.
This dish was her c om esw it ha 3in 1 ta bl et co nt aine ras ana cce ssory.
1.The figure below showshowtohangthe3in1 tablet containeron theupper basket.
2. Rotate t heup per spra yeran dch ange the locat ion o f the conta ine r to en sure the uppe rsp rayer i sno t
obstructedby the 3in1 tabletcontainer.Refertothe figurebelow for reference.
3.Put the 3in1tablet intothecontai ner ,thenstartthe 3in1 pro gram.
How To Use The 3IN1 Function
6
36
Fo
rb est pe rforma nce oft h ed ish washe r,f o llow t he se lo ading guide li nes. F eatures an d
appea rance of bask ets an d cutl er ybasket smay vary from your m odel.
Attention before or after Loading the Dishwasher Baskets
Scr ape off any lar gea mount so f le ftov erfoo d.Soft enr emnan ts of b urnt food in p ans .
It isn ot ne cessar yto rin se the dishes un de r runni ng wat er.
Plac eo bjects int he di shw asher in f ollowing way:
1.I te mss uch asc ups, glass es ,pot s/pans, etc. a re face d downw ards.
2.C urved i tems,o r on esw ith rece sses , sho uldb el oaded asla ntso that water can run off.
3.All utensils are stackedsecurely andcan not tip over.
4.All uten sils ar e place di n the way t ha t t he spr aya rms can r ota te fr eely d ur ingw ash ing.
Ve ry sma ll item s should no tbe washe d in t hed ishw ash era st hey c ould easi lyfall ou t of th eb askets.
Bowl M Bow l L() ()
Glasses
Desser t plate
Saucers
Cups
Front
(Eg g )
Gravy ladle
Loading the Upper Rack
The up pe r rack is desi g n ed t o hold m ore delicate and l ighter dishw are such as glas ses, cof fee
and t ea c up a nd sauc ers, as w ell as p lates, sm al lb owls and sh allow pa ns(a slo ng a sthe yar e
not too d irty).
Po sition the dish esa ndc ookware so t hat t hey do not get m ove dby t he spray of wate r.
Upper wheels
Lower wheels
Adjusting the UpperBasket
Th e hei ght o fthe upper b ask etca nb ea dj uste d in order to create mo re sp ace for lar ge u te nsils
both for theupper/lowerbasket.Theheight of the upper basketcanbeadjusted byplacingthe
wheels on di ff erent h ei ght of the r ails. Lo ng items , ser vi ng cu tl ery, sala dse rve r san dkn ives
should be pl aced on the sh elf so t hat the yd o not o bstr uct t herota tion o f the s pray a rm s.
Th e she lfca nb e fold ed b ac k or b eremove dw hen not re quired for us e.
37
Loadingthe Lower Basket
Werecommendthatyouplace largeitems whicharemostdifficultto cleanintothelower basket:
pots, pans,lids,servingdishes and bowls, asshownin the figureto theright.
I t isp refer abl e to place serving dish es a nd li ds ont hes ide of the ra cks in ordert o avoid b locking
therotationofthetopsprayarm.
Pots, servingbowls,etc.must always beplaced topdown.
D eep pot ssh ould bes lan tedto allow w ater tof lowo ut.
Th eb otto mbaske t fe ature f old down ti ner ows so th at la rge r or m ore pot s an dpans c anb elo aded .
1. Cutlery basket
2. Des sert plates
3. Soup plates
4. Dinner plates
5. Oval platter
6. Saucer
38
Cutlery Basket
Fo r washi ng in th edi shwashe rt he fol lowing cut ler y/ dishes
Cutle rywith wood en, hor n china or
mothe r-of-pe arlh andl es
Plas tic item s that ar en otheat re sistant
Older c utlery w ith gl ued p arts t hat are not
temperatureresistant
Bondedcutleryitemsordishes
Pewte r or c ooper i tems
Crystal glass
Steel ite mssu bject to rust ing
Woodenplatters
Ite ms madefrom synthetic fibres
Do n otp ut in i tems th atar edirt yo f c igarett ea sh,c andle wax,l acquer or pai nt.
If you b uy new d ishes pl ease mak es uret hat t hey are s uitable for d ishwashe rs.
Somety pes of g las ses c an b ecome
dullafte ra largenumberofwashes
Si lver and alu minu m pa rts hav e a
tendenc yto discolour du ring was hin g
Glazed pa tt er n s m a y f ade i f mac hi n e
was he d fr equently
Pl eas e do not overl o ad you r dis hwa she r. Th er e is on l y space f or 9 standar d d i s hes. Do no t
us ed ish that is no tsu itable f or dis hwa shers .Th isi simporta nt f org ood r esu lts a ndfo r
reasonableenergyconsume.
B efore lo ading the dishes , you sho uld:
Removelarge left-over
S ofte n re mnants of bu rntf ood in pa ns
Dishesandcutlerymustnotimpedetherotationof thesprayarms
Lo ad holl owi tems suc has cup s,gl ass es, p ans etc . with the ope ning do wnwa rds s ot hat
w ater can not coll ecti n the con tain ero r adeep base
NOT E:
NOT E:
Arenotsuitable
Are oflimitedsuitability
Loading cutleryanddishes
Whe nloading the dishes and cutlery, pleasenote:
Cutlery sh ould be place di n the cutler yb asket wi th the h andles a tthe bottom. If the r ackhas si debaske ts, the
spoons sh ould be lo aded s ep arat el y in to the appr opriate slots ,es pecial lyl on g utensil s sho ul d be pl aced in t he
horizont al posi tion at th efr on tof the u ppe rbasket as s how nin the pictur e.
Alwa yslo ads h arp u ten sils w ith the s harp
poin t down!
1 2 3456 7
3553
1551
3553
3553
1561
3213
3244
1244
2244
2214
1214
7274
1. Tea spoons
2. Dessert spoons
3. Soup spoons
4. Forks
5. Knives
6. Serving forks
7. Serving spoons
Do no t l eave any it em e x tend thro ugh bot t om .
Knivesandotherutensilswithsharp points
mustbe loaded in th eba sket with the irpo ints
dow no r pla ced i n an hor izon t al p osit ion.
Itis dangeroustoopenthedoorwhen washing,b ecausethe hot watermaybe scaldedtoyou.The doorshouldnot be
leftintheopenpositionsincethiscouldpresentatrippinghazard.
39
Wash Cycle Table
Meaning: ne ed tofill rinseinto t he Rinse-Aid Dispenser.
()
*En50242: This program isthe test cycle, therinse-aid dispenser
set ti ng i s r e comm e nde d to b e set to pos it io n 6 .
Daily
In ten s i ve
EN 50242
5/22g
Fo rnor mally soil ed loads ,
such as , plates ,glasses
and lightly s oile d pans .
St andard daily cycle.
pots
Fortheheaviest soiledloads,
such as pots, p ans, casserol e
dishes and di shes that h ave
beensitting withdriedfood
on themfora w hil e.
Asho rter wash f or ligh tly
soiled loa ds that do no t
need drying.
Pre -wash
For light ly so iled loa ds,
such as gl asses , cr ysta land
finechina.
Del icate
Pre-w a sh 50
-wash
Was h (60 )
Rinse
Rinse(70 )
Dryi ng
()
Pre
Rinse
Pr e- w ash
Was h (4 0 )
Rinse (70 )
Drying
Pre-wash
Wash (50 )
Rinse (60 )
Drying
Was h (4 0 )
Rinse (45 )
171
0. 81
173
1.4
28
0.35
118
0.8
18.4
13. 0
Ec o.
22g
Fo rlightlysoiled loads,such
as plates,glasses,bowls and
ligh tly so ile d pan s.
Pre-wash
Wash (45 )
Rinse (60 )
Drying
111
0.7
11.0
For d ishes th atn eed to b e
rinsed anddrie donly.
Sanirinse
Wash(45 )
Rinse (70 )
Drying
98
0.8
8.0
7.0
11.0
5/22g
Torinsedishes thatyou
pl an to w a sh la te r th at day.
Pre-wash
11
0.01
6.0
Express
15g
15g15g
Daily
Ec o.
In ten sive
3i n1
3i n1
Fornormally soiled l oads,
such as ,plates, glasses
andlightly soiledpans.
standarddailycycle.
pots
For lightly soiled loads,such
as pl at es ,glass es,b ow ls and
lightlysoiledpans.
F o r t h e he aviest s o iled loads ,
suchaspots,pans,casserole
dishesanddishesthathave
been sitting withdriedfood
onthem for a while.
Pre- wa sh 60
Wash (7 0 )
Rinse
Rinse
Rinse (70 )
Drying
(℃
Pre- wa sh
Wash (5 0 )
Rinse (70 )
Drying
Pre-w ash
Wash (45 )
Rinse (70 )
Drying
14 8
1.0
12 8 0. 8
161
1.5
15. 1
12. 7
12. 7
3i n1
3in1
3in1
3in 1
+
+
+
+
+
+
40
WARNING!
It i s d an gero u s to open th e do or w hen w ashi ng , be c aus e the hot wate r may s cald y ou.
W h en the workin g c y cle h as fini s hed, the bu z zer of the d is hw a she r w ill s o u ndfor 8 secon d s , t h en s top . Tur n off
t he a ppli anceusi ng the O N/O FF butto n, shut offth ewa te rs upp ly and open the d oor ofth edi shwashe r.
Wait for a few m inutes b efore unlo ading th edis hw ashe rto av oidha ndlin gth edishes and ute nsil swh ile th ey
are s ti ll h ot a ndm ore susc ept ible to br eak age. The ywil lals od rybe tter.
SwitchOfftheDishwasher
The p ro gram has ended, only if th erea ppears a 0 in t he digi ta l displa y( remaining pr ogram t im e).
1.S witch off t he dishwa sher by p ressing t he ON/OF F button.
2.Turnoffthewatertap!
Openthedoorcarefully.
Hot di shes are sensitive to kn ocks.The dishes should therefor eb ea ll owedt o cool d ow n arou nd15 minutes
beforeremovingfrom theappliance.
Open t hed ishwas her's door, l eave i taj arand wai t a few m inutes before r emoving t he dishes. In this way they
will be cool eran dt hedrying will b ei mproved .
Unloadingthe dishwasher
Itis normal that the dishw as her is we tinside.
Empty the low erbasket f irsta nd the nthe upper o ne.T his wil lavoi d water dripp ing from the upper Bas ket onto
the dishes in the l ower one.
Turning On theAppliance
Change the Program...
Forgot toAdd a Dish?
will working after10 seconds.continue
I fyou ope nt he doo r , the mach inewill pause. When you cl osethe door , the machineduring a wash cycl e
AttheEndoftheWashCycle
St arting a cycle wash
1 D raw out the lower and up perb ask et , load the d ish esa nd pu sht hem bac k.
It iscommendedtoloadthelowerbasketfirst,thentheupperone(seethe sectionentitled
Loadin g the Di shwasher ).
2 Pou r in the dete rgen t ( see t he sec tion entitl e d Salt, D et e r gent and Rin seA id ).
3 I nsert the plu gin tot he soc ket. The pow ers uppl yis 2 20- 240 VAC /50 HZ, th es pecifica tio n of th e
s ocketi s 10A 25 0VAC . Make sur e tha tthe water su pp ly is tu rn ed on tof ull pr essure.
4 C l os e t h e door, p res s the ON /OFF but ton, and the ON/ OFF l igh t will turn o n . Pre ss t h e progr a m
b ut to nto sele ct a desi re dw ash cycle,A fter 3 secon ds, t he m ach inew ill work.
“”
“”
Premi se:
1 Acycl e that is und erway ca non ly be modified if i tha son ly been r unning fo ra short
time . Othe rw ise, t hed etergent ma yha ve a lrea dyb een relea sed, a nd th ea pplia nce m ay
have al read y drai ned t hewash w ate r. If thi sis th eca se , the detergen t dispense r must
be r efill ed(s ee th e se ction enti tled " Loa ding theD eter gent " ).
2 Wh eny ou press t hes tart/reset button mo re th an3 sec onds , you can cance l the runn ing
programme andselec totherprogrammes(seethe sectionentitled "Startingawash cycle...").
3 Wh eny ou select Intensi ve /Norm al/Eco.P rogram me s,y ou can sel ectthe 3i n1fu nction.
Aforgott en dish can be added at an y time before the detergent cup opens.
Loa d the forgotten dishes.
Close the door, the dishwasher will start running again
after 10 seconds.
After the spray arms stop working,you can ope n the door
completely .
2
Open the door a little to stop the washing.
1
3
4
41
The fil ter prev ent sl arger remn ant sof food or ot her objects from ge tting insi deth epu m.
Theresidues may blockthefilter, inthis casethey mustbe removed.
The fi lter system c on sists of a coar sefilter,a flat (Main f il te r)
A n da mi cro fi lt e r( F i ne f i lter) .
Fo od and soil particles trapped inthis filter arepulverizedbya
specia ljet ont hel ower spr ay a rman dw ash edd own t od rain .
Larg er it ems, suc h as pie c es of bo nes or gl as s, t ha t could blo ck
the drainaretrappedinthe coarse filter.To remove theitems
caugh t by t he filter, gen tly s que eze the tap o nth eto p of this
filterandliftout.
Thisfilter holds soiland foodresiduesin the sumpareaand
preve ntsitfrombeingredepositon the dishes duringwashcycle.
Main filter
1
Coarse filter
2
Fine filter
3
2
3
1
Filtering System
Filterassembly
Thefilter efficiently
For best perfo rm ance and res ults ,the f ilt er mus tbe cleane dre gular ly. thi sr eason,i t i sa goo didea t o
r emo ve th ela rger fo od pa rticl est rapp edin the f ilt er aft ere ach was hcyc leb yrin sing the s em ici rcular filte ran d
c up u nderru nnin gw ater. To re moveth efil ter d evice ,p ull th ecu pha ndle in t heu pwardd irect ion.
re mo vesf ood parti cle sfrom th ewa sh w ater,allowin g it t obe recycle ddu ring t he cycl e.
For
WARNING!
T he di sh washer mus t ne ver beused wit hout the fil t er s.
Imp ro per repl ac ement of the f ilter may reduce the performanc elev el o fthe applian ce
anddamage dishesandutensils.
St ep 1 Turn the filter i nant i-clo ckw isedirect io n,
t hen li f t it up.
St ep 2 l ift the Ma in fil te rup
Step 3 lifttheFinefilter up
When following this procedure from step1 to step 3, the filter system will b e removed;
when following i t from Step 3 to Step 1, the f ilter sy stem will be installed.
42
Th e cont ro lpane lcan be cleaned by u si ng a lig htly dampen edc loth.
Af ter cle an in g, m ake sure to dry it tho roug hly.
For the exte rior, us e a good app li anc e po lis h wax .
Neveru ses harp obj ects, sco uri ngpads o rhar sh c lean ers ona ny part o fthe dis hw asher.
ProtectAgain st Freezing
1.Cutoffthe electricalpowertothe dishwasher.
2.Turn off the wat ersu ppl y an dd isc onnect the wat eri nlet pipe from the w ate rval ve.
3.Drainthewater from the inletpipe andwater valve. (Use apan tocatch thewater)
4.Reconnect the wate ri nl et pipe to the wate rval ve.
5.Remove the filter at t he bottom o f the t uband use a spong eto soak up wate rin the sump.
pl ease take frost protection meas ureso nt hedishw asher in winter.Ev ery fter washing c ycles,
pl ease oper ateas foll ows
time a
Caring for the Dishwasher
- Inspec t the filt ers for blo cki nga ftere ver ytime t he dis hwa she r has been u sed.
- By uns crewing the c oar sefi lter, you can r em ove t he filter sys tem . Re mov ean yfoo dre mna nts and
cleanthefilters underrunningwater.
Remarks:
Cleaning the Filter
CleaningThe Door
To c lean the c o a rs e filt er and the fi ne fi lt e r, us e acleani n g brus h. Re as se mble t he f ilt er par t s as sho wn i n th e f igures
on th e la st pa ge a nd r eins ert t he e nti re assem bly in the dis hwa sher, pos itio ning it i n i ts s eat and pres sing dow nwar ds.
Theentirefilter assembly shouldbe cleanedonce a week.
Whencle aning the filters, don't knock on them.Otherwise, the filterscould be
contorted andtheperformance ofthe dishwashercouldbedecreased.
WARNING!
To cle an thee dge around the door,you sho uldu seo nly a soft wa rm, d am pcl oth.
To avoi d penetrat iono fwa ter in tothe d oor lock and el ect rical componen ts,d o not
usea spray cleaner of any kind.
WARNING!
Never u se a spr ay c lean ert oclean t he door panel as i t m ay dam age the door loc k
andelectricalcomponents.
Ab rasive ag entso r som epaper towels shou ldnot b eu sed b ecau se o fth eris kof
sc r a t c hi ng o r l eav i ng spot s on the st ainless ste el s ur f a ce.
Cleaning the SprayArms
It is necessar y to cl ean the sp ra ya rms regul arly in or der to
remove the a ccum ulation of s cale fr omthe hard water
and t hus preve nt blocki ng of spray arm j ets and b earings.
We Sug ges tto poke the b locked spr ay arm j ets wit ha nee dle
to e nsure good w ashi ng effect.
I f y ou r dis hwashe r cann ot w ork beca u s e o f the i c e, ple a se c onta ct p ro fess ional ser v i ce perso ns.
Unscrew
43
Itis recommend thatyourunawashcyclewith the
di shwasher e mptyan dt he nremove t heplu gfro mthe
socket, t urn o ff th ewa te r supp ly and l eave the door of
t he app li a n c e s l i ght ly open. T h is will h elp th e door
sealstolastlongerandprevent odoursfromforming
withinth eappliance.
If th e appliance must be move d, tr yto keep i tin the
verticalposition.Ifabsolutely necessary, itcanbe
positi oned on its back .
Oneofthefactorsthatcauseodourstoforminthe
dishwasher is foo dth atr emains tr app edi n the seals .
Periodic cle aning with adamp sponge will p reve nt t his
f r o m occurr ing.
Ensu rethevoltag ea ndfr equencyof the p ow erbe ing correspond sto
t hose on the rati ngplate. Only in ser t the p lug i nto an elect rica lsocke twh ichis ea rthed
pr op erly. If th eel ectrical socket t owh ich thea pplianc emu st be c onn ected is not
appropriate fortheplug,replace the socket, ratherthan usingaadaptors orthelike as
they couldcause overheating andburns.
Plea sel ook at th era ting lab el to knowt he rat ing v olt age and c on nect t he dishw asher to t he app ropr iate pow er s uppl y.
Use the r equ ired fu se10 amp ,tim ed ela yf use or c ircuit bre ak errec omm end ed and prov ideseparate circuit servi ng
only th is appl ianc e.
This appliance m ust be earthed. In the event of a malfunction or breakdown, earthing will reduce the risk of
electric shock by providing a path of least resistance for the electric current. This applia nce is equipped with a
cord having an equipment -earthing conductor and an earthing plug. The plug mustbe plugged into an
ap propriate outlet that is installed and earthed in accordance with all local standards and requirements.
Posi tion the appli ance in the d esired lo cation.T he back should r est ag ainst t hew all b ehin d it, and the side s,
along the adj acen tcabine ts o rwal ls. T he d is hwasheri s equippe dwi th water supply and d rain hos es th at can
be pos itioned either to the righ tor the left s idesto facilit at ep roper in st allatio n.
O nce the appl ianceis positione df or levell in g, the height of the di shwashe r
m ay be a lteredv ia ad just mentof thescre wi ng level o fthe fee t. In any case,
th eapplia nceshould not b ei nclin ed more than 2 .
Positioning theAppliance
About Power Connection
WARNING!
for p ersonal safety:
DO NOT USEAN EXTENSION CORD OR AN ADAPTER PLUG WITH THIS APPLIANCE.
DO NOT, UNDERANY CIRCUMSTANCES, CUT OR REMOVE THE EARTHING
CONNECTION FROM THE POWER CORD.
Af ter ever ywa sh, t urn offt he wa ter sup ply to the
applia nce and l ea veth e doo rs li ght lyop en soth at
m oist urean dodou rs ar eno ttra ppedin side.
Befo re cleani ng or p erforming mainten ance, always
remove th ep lug from t hesocket.
Tocleanthe exteriorandrubberparts ofthedishwasher,
donot use solventsor abrasivecleaningproducts.
O nly u se a c lo th with w arm soapy wate r.
To re m ov e sp ots or st a in s f rom the sur f ac e of t he
interi or, usea clothda mpened withwater a na little
v ineg ar, o ra clean ingpro duct mad esp eci fically f or
dishwashers.
After EveryWash
Remove the Plug
No Solvents orAbrasive Cleaning
Mov ing theAp plia nce
Seals
Whennot inUse for aLongTime
44
for personal safety:
DO NOT USE AN EXTENSION CORD OR AN ADAPTER PLUG WITH THIS APPLIANCE.
DO NOT, UNDER ANY CIRCUMSTANCES, CUT OR REMOVE THE
FROM THE POWER CORD.
EAR THING
CONNECTION
C onn ect th eco ldwater supply hose t oa thre ad ed 3/4(i nc h) conne ctor an dm ak e su re
t hatit is f astened t ightly in place.
I fthe wat erpi pes are n ewor ha ven ot been use df or an e xtended pe rio d of ti me , let the
w ate r run to make sure that the w at er is clear. This p recaution i s need ed to avoi d the
r isk o f the wate rin lett o be bl oc ked an dd amage thea ppliance.
Th ewa ters upply to the ap plianc eca na lso b eco nn ec ted to th eho use hold hot water
line ( such a s, c entral system, he atin gsystem ),aslon gas it does no t exce eda
temper ature of 60 C. In this case ,the w ash c ycl e time wil l be s hor tene dby ab out 15
minutesandthe wash efficiency slightlyreduced.
Th eco nnec tion mu st be m adeto the hot wate rlin ef ollowi ng the s ame pr ocedures as
describedinthe sec tion for theconnectiontothe coldwaterline.
Insert the dr ainh ose i nto a dra inpi pe wi tha mini mu mdi ametero f 4c m,o r let it run into the sink , making sure to
avoidbendingorcrimping.Use thespecial plasticsupportthat comeswiththeappliance. The free end ofthehose
must be a t aheig htbet wee n40 and 100 cm and must not be i mmersed i nwate r.
WARNING!
Improper connection of the equipment earthing conductor can result in the risk of an electric shock.
Check with a qualified electrician or service representative if you are in doubt whether the
appliance is properly earthed.
Do not modify the plug provided with the appliance. If the plug does not fit properly to the outlet,
please have a qualified electrician to install a proper outlet.
In or der to avoid th atthereism ore water staying inthe inlet hose, please c lose
theh ydrantafter u sing.(Notapplic able to appliances without a qua-stop.)
WARNING!
Wa t e r O u t l e t
Connect t he wate rd rain hose. The dr ain h ose mu stbe cor rect lyf ittedt o avoid w ate r lea ks.
En sure tha tth ew aterinl et hos eis n otkinked or s quashed.
Water Connection
45
Thefollowing things should be checked beforestarting thedishwasher.
Syphon Conn ection
Th ew as te conne ction mustb e at a he ight of be twe en5 0 cm (m inimum) and 100 cm ( max imu m)
from the botto mo fth e dish.T hewater drain ho ses houldb e f ix edb ya h ose c lip .
StartofDishwasher
The content of this manual is very helpful to theusers.
Afterinstallation, please make sure to keep this manual.
ExtensionHose
Ifyou ne eda dra in h ose ext ensi on, m akesure to use a si milar dra inhose.
Itmust b eno lon ger than 4metr es;ot herwise the cleani ng effe ct of the dish was her coul dbe reduced .
1
Thedishwasheris level andfixed properly
2
T he i nlet va lve is ope n
3
There is a leakage at theconnectionsof theconducts
4
The wires aretightly connected
5
The poweris switched on
6
The inle t an d dr ain hos es are knotte d
7
Allpackingmaterialsand printings shouldbe taken out fromthe dishwasher
46
Fuse blown, or the
circuit breaker acted
Replace fuse or reset circuit breaker. Remove any other
appliances sharing the sam e circuit with the dishwasher
Spil led rinse- aid
Always wipe up rinse-aid spills immediately.
Hard water minerals
The affec ted items are
notcorrosion resistant.
The lid of the softer
is l oose
Aspayarmis
knocking against
an item in a basket
r
Items of croc kery
are loose in the
wash cabinet
This may be caused
by on-site installation
or the cross-secti on of
the piping.
A programme was not
run after dishwasher
salt was added.
Traces of salt have
gotten into the wash cycle.
To clean the interi or, use a damp spon ge with
dishwasher detergent an d wear rubber gloves.
Never use any other cleaner than dishwasher
detergent for the risk of foaming or suds.
Always run the quick wash program me .
with out any crockery in the dishwasher and
without select ing the T ur bo function (if pres ent),
after adding dishwasher salt.
Chec k the lip .Ensure the fix is fine.
Interrupt the programme, and rearrange the items
which are obstruct ing the sp ay arm.r
Interrupt the programme,
and rearrange the items of crockery .
This has no influence on the dishwasher function.
if in doubt, contact a suitably qualified plumber.
Detergent with
colouran t was used
Make sure that the detergent is the one without
colourant .
Improper de tergent
Make sure the dishwasher is turned on and the door is
closed securely.
Check that the water supply is connected properly and
the water is turned on.
Make sure to close the door properly and latch it.
Make sure the power cord is properly plugged int o the
wall socket.
Power supp ly is not
turned on
Error code:E1;
Water pr essure is low
Door of dish washer
not properly closed.
Kink in drain hose
Filt er clogged
Kitchen sink clogged
Check drain hose.
Check coarse the fi lter
(see section titled )" Cleaning The Filter "
Check the kitchen sink to make sure it is draining well.
If the problem is the kitchen sink not draining ,you may
nee d a plumber rather than a serviceman for dishwashers.
Use only the special dishwasher detergent to avoid
suds. If this occurs, open the dishwasher and let suds
evaporate.Add 1 gallon of cold water to the tub. Close
and latch the dishwasher, th en St art the "soak" wash
cycle to drain out the water . Repeat if necessary.
Before Calling for Service
Technical
problem s
Gen eral
problem s
Noise
47
  • Page 1 1
  • Page 2 2
  • Page 3 3
  • Page 4 4
  • Page 5 5
  • Page 6 6
  • Page 7 7
  • Page 8 8
  • Page 9 9
  • Page 10 10
  • Page 11 11
  • Page 12 12
  • Page 13 13
  • Page 14 14
  • Page 15 15
  • Page 16 16
  • Page 17 17
  • Page 18 18
  • Page 19 19
  • Page 20 20
  • Page 21 21
  • Page 22 22

Whirlpool ADP 790 WH User guide

Category
Dishwashers
Type
User guide
This manual is also suitable for

Ask a question and I''ll find the answer in the document

Finding information in a document is now easier with AI