Page is loading ...

1
DDC Controller for Tempered Air Products
Reference Guide for the DDC Controller
Please read and save these instructions. Read carefully before attempting to operate or maintain the product
described. Protect yourself and others by observing all safety practices. Failure to comply with instructions
could result in personal injury and/or property damage! Retain instructions for future reference.
Program Features
The DDC controller offers improved control through
easy monitoring and adjustment of unit parameters
by way of a lighted graphical display and a push-
button keypad. The controller also has the ability
to communicate with a BMS (Building Management
System) through protocols such as LonWorks®,
BACnet® MSTP, BACnet® IP or Modbus. See Points
List on page 26 for a complete list of BMS points.
Pre-Programmed Operating Sequences
The controller has been pre-programmed to offer
multiple control sequences to provide tempered air.
Factory default settings allow for easy setup and
commissioning. The sequence parameters are fully
adjustable. The controller is ready from the factory
with pre-set operating sequences:
•Outdoor Air Temperature Reset
The default operating sequence is supply
air temperature control based on outdoor
air temperature. The controller will monitor
the outdoor air temperature and adjust the
supply air temperature to provide comfortable
conditions. This sequence provides simple and
reliable control, reacting to changing outdoor
air conditions. For more information, see the
Sequence of Operation section of this manual.
•Room Temperature Reset
If an optional room temperature sensor is
installed, the controller will automatically change
its operating sequence. Similar to the default
sequence, the controller will adjust the supply air
temperature to satisfy the room temperature set
point. For more information, see the Sequence of
Operation section of this manual.
An optional room dehumidistat can also be used for
room humidity control for both operating sequences.
BMS Communication
With the addition of an optional BMS Communication
card, the user can remotely adjust set points, view
unit status points and alarms. The DDC controller is
capable of communicating over several protocols:
•BACnet® MSTP
•BACnet® IP/Ethernet
•LonWorks®
•Modbus
Internal Time Clock
The controller has an internal programmable time
clock, allowing the user to add up to seven different
occupancy schedules. The user may also add
Holidays for additional energy savings.
Alarm Management
The DDC controller will monitor the unit conditions
for alarm conditions. Upon detecting an alarm, the
controller will record the alarm description, time,
date, available temperatures, and unit status for user
review. A digital output is reserved for remote alarm
indication. Alarms are also communicated via BMS
(if equipped).
Occupancy Modes
The DDC controller offers three modes of determining
occupancy: a dry contact, the internal time clock
or the BMS. If in the Unoccupied mode the unit will
either be shut down, or will cycle on to maintain an
adjustable unoccupied room temperature set point.
Remote Display Panel (Optional)
A touchpad display panel allows for remote
monitoring and adjustment of parameters, allowing
ease of control access without going outdoors.
Introduction
TAP v1.04
Version Date: June 13, 2011
®
®
Part #474706
DDC Controller for
Tempered Air Products

2
DDC Controller for Tempered Air Products
Sequence of Operation . . . . . . . . . . . . . . . 2
General Operation . . . . . . . . . . . . . . . . 2
Set Point Control . . . . . . . . . . . . . . . . . 3
Heating . . . . . . . . . . . . . . . . . . . . . . 3
Cooling . . . . . . . . . . . . . . . . . . . . . . 3
Dehumidification . . . . . . . . . . . . . . . . . 3
Reheat . . . . . . . . . . . . . . . . . . . . . . . 3
Alarms . . . . . . . . . . . . . . . . . . . . . . . 4
Energy Recovery Wheel Sequences . . . . . . . 6
Controller Overview . . . . . . . . . . . . . . . . . 5
Display Use . . . . . . . . . . . . . . . . . . . . . 6
Example of Parameter Adjustment. . . . . . . . . 6
Example of Alarms . . . . . . . . . . . . . . . . . 7
Main Menu Overview . . . . . . . . . . . . . . . 8-9
Menu Overview . . . . . . . . . . . . . . . . . 10-11
Menus
A.
On/Off Unit . . . . . . . . . . . . . . . . . 12
B.
Setpoint . . . . . . . . . . . . . . . . 12-13
C.
Clock/Scheduler . . . . . . . . . . . . . . 15
D.
Input/Output . . . . . . . . . . . . . . . . 15
E.
Data Logger . . . . . . . . . . . . . . . . 15
F.
Board Switch . . . . . . . . . . . . . . . 16
G.
Service
a. Information . . . . . . . . . . . . . . . . 16
b. Overrides . . . . . . . . . . . . . . . 16-18
c. BMS Config . . . . . . . . . . . . . . 18-20
d. Service Settings . . . . . . . . . . . . .20
a. Working hour set. . . . . . . . . . . .20
b. Probe adjustment . . . . . . . . . . .20
c. Password/Defaults . . . . . . . . . . 20
H.
Manufacturer
a. Configuration . . . . . . . . . . . . . . .21
b. I/O Configuration . . . . . . . . . . . . . 21
c. Factory Settings . . . . . . . . . . . 21-25
d. Initialization . . . . . . . . . . . . . . . .25
Points List . . . . . . . . . . . . . . . . . . . . . .26
Auxiliary I/O (pCOe) . . . . . . . . . . . . . . . . .27
Setup. . . . . . . . . . . . . . . . . . . . . . . . . 27
Troubleshooting . . . . . . . . . . . . . . . . . . .28
NTC Temperature Sensor Chart . . . . . . . . . .28
BACnet MSTP Quick Start . . . . . . . . . . . . . 29
BACnet IP/Eth Quick Start . . . . . . . . . . . . .30
Maintenance Log . . . . . . . . . . . . . . . . . . 31
Warranty . . . . . . . . . . . . . . . . . . Backcover
Table of Contents Sequence of Operation
The DDC controller can be configured for air handler,
energy recovery and make-up air applications. Each
application utilizes similar technologies for heating
and cooling: chilled water, hot water, indirect gas,
electric heat, packaged DX cooling, and packaged
DX cooling with digital scrolls. All set points, lockouts
and delays are user adjustable.
General Operation
UNIT START COMMAND: The DDC controller
requires a digital input to enable operation. The unit
can then be commanded on or off by this digital
input, the BMS or internal time clock.
•Initialdelay
•Factorymountedandwireddampersarepowered,
if equipped. (Outdoor air, exhaust air, and
recirculation air dampers).
•Exhaustfanstartsaftera10seconddelay,if
equipped.
•Supplyfanstarts5secondsaftertheexhaustfan.
•Heating,coolingandwheeloperation(page3).
UNIT STOP COMMAND (OR DE-ENERGIZED):
•Supplyfan,exhaustfan,tempering,andwheelare
de-energized.
•OutdoorairandExhaustairdamperdampersare
closed after a 10 second delay.
OCCUPIED/UNOCCUPIED MODES: The DDC
controller offers three modes of determining
occupancy: a dry contact, the internal time clock or
the BMS. When in the unoccupied mode, the unit will
either be shut down, or will cycle on to maintain the
unoccupied room temperature set point.
•Occupied Mode:
- Exhaust fan on, if equipped.
- Supply fan on.
- Heating (refer to Heating section).
- Cooling (refer to Cooling section).
- Wheel control (page 4), if equipped.
•Unoccupied Mode (Unit Off): Default setting
when there is no recirculation damper or room
temperature sensor.
•Unoccupied Mode (Cycle on Room): Optional
unoccupied mode when there is a recirculation
damper and a room temperature sensor wired to
unit.
- Exhaust fan off, if equipped.
- Supply fan off.
- Recirculation air damper open.
- OA damper closed.
- Unoccupied heating is enabled when the
room temperature is less than the unoccupied
heating set point minus differential (65°F±5°F).
The supply air temperature set point will be
set to the supply maximum reset limit (90°F).
The unit cycles off when the room temperature
reaches the unoccupied heating set point plus
differential.
®

3
DDC Controller for Tempered Air Products
3
Sequence of Operation
- Unoccupied cooling is enabled when the room
temperature is greater than the unoccupied
cooling set point plus differential (85°F±5°F).
The supply air temperature set point will be
set to the supply minimum reset limit (55°F).
The unit cycles off when the room temperature
reaches the unoccupied cooling set point minus
differential.
Set Point Control
Supply air temperature set point can either be reset
by outside air temperature, or room temperature. If
equipped with BMS communications, the user can
also directly set the supply temperature set point, or
room temperature set point (if equipped with a room
temp sensor).
•Outdoor Air Temperature Reset Function:
Without a room temperature sensor, the controller
will default to supply temperature reset based
on outdoor air temperature. The controller will
monitor the OA temperature and reset the supply
temperature set point based upon the outdoor air
reset function.
•RoomTemperatureReset(optional): With a
room temperature sensor, the controller will
adjust the supply air temperature set point up/
down accordingly to satisfy the desired room
temperature. Cooling and heating are determined
by a difference in temperature of the room
temperature sensor compared to the desired room
temperature set point.
Heating
The heating is controlled to maintain the supply
temperature set point. The heating will be locked out
when the outside air temperature is above the heating
lockout (70°F).
•Indirect Gas Furnace: DDC controller will
modulate the indirect gas furnace to maintain the
supply temperature set point.
• Hot Water Coil: DDC controller will modulate a
hot water valve (provided by others) to maintain
the supply temperature set point. Coil Freeze
protection must be provided by others in the field!
•Electric Heater: DDC controller will modulate an
electric heater to maintain the supply temperature
set point.
•Heat Pump: DDC controller will stage
compressor(s) to maintain the supply air set point.
This signal will come wired to the factory provided
heat pump module. All external water valves and
valve controls are provided, wired and mounted
by others in the field, including freeze protection.
Cooling
The cooling is controlled to maintain the supply
temperature set point. The mechanical cooling will be
locked out when the outside air temperature is below
the cooling lockout (55°F).
•Chilled Water: DDC controller will modulate a
chilled water valve (provided by others) to maintain
supply air set point. Coil Freeze protection must
be provided by others in the field!
•Packaged DX Cooling (Standard Scroll): DDC
controller will control stages of cooling to maintain
the supply air set point.
•Packaged DX Cooling (Digital Scroll): DDC
controller will modulate the digital scroll to maintain
the supply air temperature set point.
•Heat Pump: DDC controller will power the
reversing valve within the heat pump module
to direct the refrigerant flow for airside cooling.
The cooling is controlled to maintain the supply
temperature set point. All external water valves
and valve controls are provided, wired and
mounted by others in the field, including freeze
protection.
Dehumidification
The cooling is controlled to maintain the cold coil set
point. The Dehumidification sequence will be locked
out when the OA is less than the dehumidification
lockout (10°F) above the cold coil set point.
•Optional Room Dehumidistat: The room
dehumidistat is a field mounted sensor that
monitors the relative humidity (RH) of the room.
If the RH exceeds set point, the dehumidistat will
decrease the cold coil set point to the dehumidify
set point (50°F) to further dry the supply air.
Once the room dehumidistat is satisfied, the DDC
controller will resume normal operation.
Reheat
While the unit is in dehumidification mode, the supply
air can be reheated via Primary Heating Source, On/
Off Hot Gas Reheat or Modulating Hot Gas Reheat.
•Primary Heating Source: The main heating source
is enabled to reheat the air to meet the supply
temperature set point. (Except heat pump).
•Modulating Hot Gas Reheat (bypass damper): The
DDC controller will open the On/Off hot gas reheat
valve, and modulate the Hot Gas Reheat bypass
damper to maintain the supply temperature set
point.
•Modulating Hot Gas Reheat (valve): The DDC
controller will modulate the hot gas reheat valve to
maintain the supply temperature set point.
•On/Off Hot Gas Reheat: The DDC controller will
open the On/Off hot gas reheat valve to maintain
the supply temperature set point.
®

4
DDC Controller for Tempered Air Products
Alarms
The DDC controller includes a digital output for
remote indication of an alarm condition. Possible
alarms include:
• Dirty Filter Alarm: If the outside air or return
air filter differential pressure rises above the
differential pressure switch set point, the DDC
controller will activate an alarm.
•Supply and Exhaust Air Proving Alarm: DDC
controller monitors proving switch on each blower
and displays an alarm in case of blower failure.
•Temperature Sensor Alarm: DDC controller
will send an alarm in the case of a failed air
temperature sensor.
•Supply Air Low Limit: If the supply air temperature
drops below the supply air low limit (35°F), the DDC
controller will de-energize the unit and activate the
alarm output after a preset time delay (300s).
•Other Alarms: Wheel Rotation, High Wheel
Pressure, High/Low Refrigerant Pressure.
Energy Recovery Wheel Sequences
Economizer (optional): If the unit is equipped with an
energy recovery wheel, the economizer will modulate/
stop the energy wheel to achieve free cooling. The
economizer will be locked out when:
- The outside air is less than the economizer
lockout (40°F).
- The unit is operating in dehumidification mode.
- The unit is operating in heating mode.
• Stop Wheel: When economizer mode is enabled
and there is a signal for cooling, the wheel will stop
rotating to allow free cooling.
•Modulate Wheel: When economizer mode is
enabled and there is a signal for cooling, the wheel
VFD modulates wheel speed to maintain the supply
temperature set point.
Frost Control (optional): The DDC controller will
activate the frost control method when the outdoor
air temperature is less than the defrost set point (5°F)
and the wheel pressure switch is closed, due to a
high wheel pressure drop.
•Electric Preheater: When frosting is occurring, the
preheater is energized to defrost the wheel. Once
the pressure drop decreases below the pressure
switch set point, the preheater is de-energized.
•Modulate Wheel: When frosting is occurring, the
VFD slows the wheel to allow defrosting to occur.
Once the pressure drop decreases below the
pressure switch set point, the wheel returns to full
speed.
Energy Recovery Wheel Sequences, continued
•Timed Exhaust: When frosting is occurring, the
supply fan is cycled off along with the tempering
for 5 minutes. The exhaust fan will continue to
run, allowing the warm exhaust air to defrost the
wheel. After the 5 minute cycle, the supply fan and
tempering are re-energized to continue normal
operation. The unit will continue normal operation
for 30 minutes before allowing another defrost
cycle to occur.
Sequence of Operation
®

5
DDC Controller for Tempered Air Products
Controller Overview
J1J1 J24J24
J14J14
J11J11
J15J15
J2J2 J5J5J4J4J3J3
service card
Rx-/Tx-
Rx+/Tx+
GND
C1
NO1
NO2
NO3
C1
C4
NO4
NO5
NO6
C4
C7
NO7
C7
NO8
C8
NC8
G
G0
24 VAC to Controller
B1
B2
B3
GND
+VDC
+Vterm
GND
+5 VREF
B4
BC4
B5
BC5
VG
VG0
Y1
Y2
Y3
Y4
ID1
ID2
ID3
ID4
ID5
ID6
ID7
ID8
IDC1
J10J9
eld card serial card
input: 24 V ~ / ; 50 to 60 Hz
max. power: 40 VA/15W
J12J12 J13J13
Outdoor Air Intake Temperature Sensor
Supply Discharge Temperature Sensor
After Cold Coil Temperature Sensor
Sensor B1, B2, B3 Commons
Room Temperature Sensor
Call for Dehumidication
24 VAC for Analog Outputs
24 VAC When Unit On
Frost Control Enable
Output to Supply Fan
Output to Exhaust Fan
24 VAC from Supply Fan Proving
Heating Enable/Reversing Valve
Compressor Output 1
Compressor Output 2
24 VAC
Output to Dampers
Alarm Dry Contact
Energy Wheel Analog Output
Heating Analog Output
Cooling Analog Output
Hot Gas Reheat Analog Output
Supply Fan Proving
Wheel Pressure
Wheel Rotation Alarm
Unit On/O
Exhaust Fan Proving
Occupied/Unoccupied Input
Dirty Filter
Compressor Limit
BACnet, LonWorks and Modbus cards
are located in Serial Card port
DDC Remote Display
(straight six wire phone cable)
®

6
DDC Controller for Tempered Air Products
The DDC controller is located in the unit control panel.
The face of the controller has six keys, allowing the
user to view unit conditions and alter parameters. The
DDC controller is pre-programmed with easy to use
menus.
To change the display contrast, hold the Enter and
Escape button while pressing the up and down arrows.
A remote mounted display is also available, which
connects via the J10 port. A six wire patch cable is
needed.
Keypad Description
Prg Esc
Alarm
Button will blink red, indicating an alarm condition. Press to review current alarms. To
review previous alarms, access the DATA LOGGER through the main menu.
Prg Esc
Down Arrow
The arrow keys allow the user to scroll through different screens and adjust parameters.
Prg Esc
Up Arrow
Prg Esc
Enter
A. In screens with adjustable parameters, pressing the Enter key moves the cursor from
the upper left corner of the screen to the parameter. The arrow keys can then be used
to adjust the parameter.
B. To move to the next parameter on the same screen, press the Enter button.
C. To save the change, press the Enter button until the cursor moves back to the upper
left corner of the screen.
Prg
Esc
Escape Allows the user to exit the current menu, jumping to the Main Menu.
Prg
Esc
Program
Pressing the Prg (Program) button allows the user to enter the Main Program Menu.
Refer to pages 8 and 9 for Main Program Menu description.
Display Use
Example of Parameter Adjustment
The cursor always begins in the upper left corner of the display and will be
blinking. Press the
Prg Esc
key to move the cursor down for parameter adjustment.
Once the cursor has reached the desired parameter, press the
Prg Esc
Prg Esc
keys to
adjust the value.
When satisfied with the adjustment, press the
Prg Esc
key to save the parameter.
When finished, make certain the cursor is in the upper left corner. If the cursor
is not in the upper left corner, the changes will not be saved. The cursor must
be in the upper left corner to enable screen advancement.
Supply air low limit
Alarm when supply is
below: 35.0º F
Alarm delay: 300s
Supply air low limit
Alarm when supply is
below: 32.0º F
Alarm delay: 300s
Supply air low limit
Alarm when supply is
below: 32.0º F
Alarm delay: 300s
®

7
DDC Controller for Tempered Air Products
Examples of Alarms
If an alarm occurs, the
Prg Esc
button will glow red on the controller and the remote display (if installed).
To view alarm, press the
Prg Esc
button once. This will display the most recent
alarm. Press the
Prg Esc
button again to reset the alarm. If the alarm cannot be
cleared, the cause of the alarm has not been fixed. Press the
Prg Esc
Prg Esc
buttons to
view any additional occurring alarms.
This is an example of an outdoor air sensor failure.
This screen appears if there are no active alarms.
To view all saved alarms, press the
Prg Esc
button to enter the DATA LOGGER. For
more information, see the Data Logger menu.
Examples of Alarms
Outdoor Air Temperature
Sensor Failure
Failure of outside air temperature sensor. Alarm only
Supply Air Temperature
Sensor Failure
Failure of supply air temperature sensor. Alarm & Shutdown
Cold Coil Temperature
Sensor Failure
Failure of after cooling coil air temperature sensor. Alarm only
Room Temperature
Sensor Failure
Failure of room temperature sensor.
(If UnOccupied - Cycle On Room is enabled)
Alarm only
System has exceeded the
set number of run hours
The unit has been operating for a period longer than
the maintenance set point.
Alarm only
Supply airflow Indicates a loss of airflow in the supply fan. Alarm & Shutdown
Wheel Pressure - Dirty
Wheel/High CFM
Indicates a buildup of pressure across the energy
wheel.
Alarm only
Energy recovery wheel
rotation. Check wheel.
Indicates a wheel rotation failure. Alarm only
Exhaust Airflow Indicates a loss of airflow in the exhaust fan. Alarm & Shutdown
Filter Alarm Indicates a buildup of pressure across the filters. Alarm only
A compressor limit
switch has tripped
Indicates a high or low refrigerant pressure switch
has tripped.
Alarm only
Supply temperature low
limit alarm
Indicates a supply air temperature lower than the
supply low limit set point.
Alarm & Shutdown
pCOe Offline
Indicates communication with pCOe auxiliary I/O has
failed.
Alarm only
pCOe - Analog input
probe on channel #
disconnected or broken
Indicates an analog probe failure on the pCOe.
Check integrity of auxiliary I/O analog probes.
Alarm only
Alarms
Press DOWN to review
current alarm(s).
Press ESC to exit.
Press ALARM to reset.
Alarms
No active alarm
Press ENTER
to DATA LOGGER
Outside Air Temperature
Sensor B01 Failure
®

8
DDC Controller for Tempered Air Products
The DDC controller will revert to a default main menu loop. This loop includes several screens to view the
operating conditions of the unit. Scroll through the menu screens by using the
Prg Esc
Prg Esc
keys. Screens with a
dashed line border are dependent upon an optional accessory and may not always appear.
The iniTial menu screen displays The program version, uniT code and sTaTus
line. The sTaTus line displ ays which mode The uniT is in.
Possible modes include:
•InitialDelay • SysOn-Dehumidifying
•OpeningDampers • SysOn-Dehumid&Reheat
•ExhaustFanStarting • Unoccupied-UnitOff
•SupplyFanStarting • Unoccupied-Heating
•SystemOn • Unoccupied-Cooling
•DefrostModeActive • ManualOverride
•SysOn-Economizer • RemoteOff
•SysOn-Heating • PressAlarmButton!!!
•SysOn-Cooling
The TemperaTures on This screen display real Time condiTions from The
sensors locaTed in The uniT and The room (if insTalled).
energy recovery wheel sTaTus. (if equipped)
If equipped with an energy wheel, this screen will display the wheel speed. If
the unit contains a wheel VFD, this screen will display the wheel speed being
sent via the controller’s wheel analog output.
If the unit does not contain an energy wheel VFD, 0% = OFF; 100% = ON.
If equipped with a frost control method, this screen will also display wheel
pressure differential status. A pressure status of high is an indication of frost
accumulation.
cooling sTaTus is displayed, along wiTh compressor operaTion. (if equipped)
This screen appears if a cooling option is provided.
Chilled Water: The Cooling Control % is directly proportional to the 0-10 VDC
output signal.
0% Cooling = 0 VDC
100% Cooling = 10 VDC
The cooling control output can be configured to DIRECT / REVERSE acting,
along with the minimum and maximum output voltages by entering the
MANUFACTURER menu.
Packaged DX Cooling: The Cooling Control displays internal cooling ramp as
a percent. Compressor operation is displayed when engaged.
•D=DigitalScrollCompressorOperation
•1=FirstStagedCompressorOperation
•2=SecondStagedCompressorOperation
Heat Pump Cooling: The Cooling Control displays internal cooling ramp as a
percent. Compressor operation is displayed when engaged.
•1=FirstStagedCompressorOperation
•2=SecondStagedCompressorOperation
Main Menu Overview
TIME DATE UNIT##
TAP v1.04 GMYXX000X00
STATUS LINE
TIME DATE UNIT##
Supply Air: 000.0°F
Outside Air: 000.0°F
Cold Coil: 000.0°F
Room: 000.0°F
STATUS LINE
Energy Recovery
Wheel: 000% Speed
Wheel Differential
Pressure Is: Normal
STATUS LINE
Cooling Status
Cooling Control: 000%
Compressor D 1 2
STATUS LINE
®
®

9
DDC Controller for Tempered Air Products
Heating Status
Heater Control: 000%
Hot Gas Reheat: 000%
Staged reheat is: ON
Compressor: 1 2
STATUS LINE
Preheat Status
Preheat: OFF
STATUS LINE
heaT and reheaT operaTion is displ ayed. (if equipped)
Heater Control displays the proportional percentage of the heater analog
output.
Electric Heater: The Heater Control % is proportional to the 0-10 VDC signal
being sent to the SCR controller, located in the electric heater control center.
0% Heating = 0 VDC - 0 kW output
100% Heating = 10 VDC - Max kW output
Hot Water: The Heater Control % is proportional to the 0-10 VDC signal being
sent to the heating control valve (BY OTHERS). The heating control output
can be configured to DIRECT / REVERSE acting, along with the minimum and
maximum output voltages by entering the MANUFACTURER menu.
0% Heating = 0 VDC
100% Heating = 10 VDC
Indirect Gas: The Heater Control % is proportional to the 0-10 VDC signal
being sent to the indirect gas furnace controller, located in the indirect gas
control center. The first stage is on at 1% Heater Control. The furnace will then
modulate proportionally from minimum to maximum capacity.
0% = 0 VDC – OFF
1% = 0 VDC – MINIMUM TURNDOWN ENABLED
1 - 100% = 0 - 10 VDC = FURNACE MODULATION
Heat Pump Heating: The Heater Control % displays internal heating ramp as a
percent. Compressor operation is displayed when engaged.
•1=FirstStagedCompressorOperation
•2=SecondStagedCompressorOperation
Hot Gas Reheat:
If hot gas reheat is staged control:
“Staged reheat is: ON/OFF” will indicate operation.
If hot gas reheat is modulating bypass damper control:
0% = OFF
1% - 100% = 4 - 10 VDC = AIRFLOW DAMPER MODULATION
If hot gas reheat is modulating valve control:
0% = OFF
1% - 100% = 0 - 10 VDC = HOT GAS REHEAT VALVE MODULATION
This screen indicaTes elecTric preheaT operaTion. (if equipped)
This screen appears if Electric Preheat frost control was provided.
®

10
DDC Controller for Tempered Air Products
Menu Overview
a. Information
b. Overrides
On/Off Unit
Setpoint
Heater Lockout
Lockout heater when
outside above: 70.0°F
Hysteresis: 2.0°F
Set Point Source
Use local set point,
or BMS interface set
point? Local
Clock/Scheduler
Input/Output
Hr:Min:Sec MM/DD/YY
Alarm Description
Room T: ##.#
Discharge T: ##.#
Outside Air T: ##.#
Cold Coil T: ##.#
Unit Status
Data Logger
Board Switch
Unit Address: 1
Switch to unit: 1
1 . . . . . . . . . . 16
17 . . . . . . . . . 32
Board Switch
Service
Unit ON/OFF Control
Enable unit OnOff
By digit input: Yes
By BMS: No
By scheduler: Yes
Room Set Point
Local set pt: 72.0°F
BMS set pt: ###.#°F
Active set pt: ###.#°F
Dehumidification lock
Lockout dehumidific–
action until outside
air is 10.0°F above
cold coil set point.
Scheduler
Number of schedules: 0
Holidays
Holiday = unoccupied mode
for 24 hours.
Number of Holidays: ##
Information
pCO Type: pCO3 Small
Total Flash: ####KB
Ram: ####KB
Built-in type:
T Memory writes: ##
Main Cycle:
7.4 Cycle/s ###ms
Control Loop Overrides
Unit must be ON.
To resume normal
operation, cycle unit
power.
HotGas Reheat Override
Hot Gas Reheat
Loop Control: Auto
Reheat: 100%
On/Off Unit
Actual state:
Off by DIG INPUT (ID4)
Change to: SWITCH ON
*Power ID4 to start…
Supply Set Point
is currently = 60°F
This set pt is reset up/down
by the DDC.
Cooling Lockout
Lockout cooling when
outside below: 55.0°F
Hysteresis: 2.0°F
Clock
Day: Monday
Date: MM/DD/YY
Hour: ##:##
Analog Input
Outside Temperature
Input B01: ###.#°F
Digital Input
Supply Fan
DI 1 Status:
(Closed)
(Open)
Relay Output
Defrost
Relay 1 Status:
(Off)
(On)
Analog Output Y1
Wheel
Output:
##.#vdc
Information
Greenheck Fan Corp.
Code: XXXXXXXXX00
Ver.: 1.04 ##/##/##
Manual/IOM: 474706
Bios: 5.12 ##/##/##
Boot: 4.03 ##/##/##
Heating Override
Heating Control: Auto
Heating: 100%
Service Password
Insert service
password (PW1): 0000
Supply Reset Limits
Supply Min: 55.0°F
Supply Max: 90.0°F
Economizer Lockout
Lockout econo when
outside below: 40.0°F
Hysteresis 2.0°F
Scheduler
Schedule #: #
Time On: ##:##
Time Off: ##:##
Days Enabled: MTWTFSS
Analog Input
Outside Temperature
Manual Control B01: OFF
Manual Position #
Value ###.#°F
Supply Air Reset
Outside: Supply
60.0°F - - > 72.0°F
70.0°F - - > 55.0°F
Supply air low limit
Alarm when supply is
below: 35.0°F
Alarm delay: 300s
Holiday #1
Month: MM
Day: DD
Unoccupied for 24 hrs
Energy Wheel Override
Wheel Control: Auto
Wheel: Off
Digital Input
Supply Fan sw
Manual DI 1: OFF
Manual Position: CLOSED
DI 1 Status: Open
Supply Set From BMS
BMS interface: aaa.a°F
Set pt min: 55.5°F
Set pt max: 90.0°F
Defrost
Allow wheel defrost
mode when outside
is below: 5.0°F
Wheel Preheat Override
Energy Recovery Wheel
Preheat Control: Auto
Preheater: Off
Relay Output
Defrost
Manual Relay 1: OFF
Manual Position: OFF
Relay 1 Status: OFF
Cold Coil Set Point
Normal Mode: 55.0°F
Dehumidify: 50.0°F
Active set pt: 55.0°F
UnOcc Fan Cycle Setup
Unit will energize to maintain
unocc room set points.
Heating: 65.0°F
Cooling: 80.0°F
Differential: 5.0°F
Cooling Override
Cooling Control: Auto
Cooling: 100%
Analog Output Y1
Wheel
Mode: Auto
Manual Value: 0.0vdc
Output: 0.0vdc
All I/O points are included. An example of each is shown.
Press
Prg
Esc
to enter menus.
I/O Manual Management
END OF OVERRIDE MENU
Press ENTER to go to
I/O Manual Management
menu.
®

11
DDC Controller for Tempered Air Products
Menu Overview
Press
Prg
Esc
to enter menus.
c. BMS Config
d. Service Settings
Service
Manufacturer
Service Password
Insert service
password (PW1): 0000
Service Password
Insert service
password (PW1): 0000
Manufacturer Password
Insert service
password (PW1): 0000
BACnet Read/Write
Function: Read
Update? Yes
*Cycle unit power to
confirm write command.
a. Working hour set
a. Configuration
c. Factory settings
c. Password/Defaults
b. Probe adjustment
Probe Adjust
pCOe number: 1
Offset Ch 1: 0.0
Offset Ch 2: 0.0
Offset Ch 3: 0.0
Offset Ch 4: 0.0
Digital Compressor
Minimum OFF: 1.0vdc
Minimum ON: 1.9vdc
Maximum: 5.0vdc
Delay OFF: 60s
Max Power Start: 120s
Hot Gas Controller
Integration: 300s
Band: 20°F
Unoccupied Mode Setup
Type: CycleSupplyFan
Source: Input ID6
TCP/IP SETUP
Instance: 77000
IP set by: DHCP
IP: 172.016.000.001
Subnet: 255.255.255.000
Gatewy: 192.168.001.001
Analog Input
Cold Coil Temperature
Input B03:
###.#°F
Offset: 0.0°F
Value: ###.#°F
Analog Output Config
Wheel
Channel: Y1
Action: DIRECT
Minimum: #.#vdc
Maximum: ##.#vdc
Cooling Controller
Integration: 300s
Band: 20°F
Reheat Setup
Will heater be used
for reheat during
dehumidification?
Reheat: Disable
Supply Reset Control
Integration: 1200s
Band: 10°F
Wheel Rotation Sensor
Alarm delay: 30s
(input ID3)
TCP/IP SETUP
DNS 1: ###.###.###
DNS 2: ###.###.###
Type: IP
Analog Input
Room Temperature
Input B04:
###.#°F
Offset: 0.0°F
Value: ###.#°F
Compressor Setup
# of stages: #
Rotation: LIFO
Reheat Setup 2
Will heater be used
for reheat along
with hot gas?
Heater: Disable
Heat/Cool Delay
Time delay between
heating, cooling &/or
economizer modes.
Delay: 180s
Temperature Scale
Select: Fahrenheit
Display Buzzer
Select: Disable
User Default
Insert new service
password (PW1): 0000
Unit BMS Control
Unit Start/Stop: Yes
Temp Setpoint: Local
Occupancy: Input ID6
BMS Configuration
Protocol: None
BACnet Plugin? Yes
MAINTENANCE HOURS
SYSTEM
Run hours: 0000h
Set Point: 0000h
Reset to Zero? No
Unit Code
Select DDC configur-
ation code here.
Code: GWXXXXXXX00
Analog Input
Outside Temperature
Channel:B1
Type: NTC
Offset: #.#°F
Value: ##.#°F
Factory Setup
Consult Factory
Before Altering
Compressor Timers
Minimum ON: ###s
Minimum OFF: ###s
Between Stages: ###s
Hot Gas Setup
Hot gas reheat coil
minimum on/off
time: 10minutes
Damper Setup
Allow the dampers to
open for: 10 seconds
before starting the
fans.
Factory Settings
Save? No
Restore? No
User Default settings
Save? No
Restore? No
BMS Write Points
TempSetpoint: aaa.a°F
Start/Stop: Stop
Reset Alarms: No
Occupancy: Occ
MODBUS SETUP
Address: 1
Baudrate 9600
Analog Input
Outside Temperature
Input B01:
###.#°F
Offset: 0.0°F
Value: ###.#°F
Unit Expansion Comm
Field Card Settings
Baudrate: 19200
Stop bit: 2
Parity mode: NONE
Timeout: 300ms
Digital Input
Supply Fan
Channel: ID1
Action: OPEN
Delay: 0s
Open
Economizer Controller
Integration 300s
Band: 20°F
Econo ON/OFF times:
Minimum ON: 300s
Minimum OFF: 300s
Compressor Staging
Stage1: ON @ 50% OFF 0%
Stage2: ON @ 100% OFF 50%
Fan/Airflow Proving
Alarm delay: 30s
(inputs ID1 & ID5)
Hot Gas Flush Setup
Cycle: 30minutes
Duration: 1minutes
New Password
Insert new manufacturer
password (PW2): ####
MSTP SETUP
Instance: 77000
Baudrate 38400
MAC Addr: 0
MaxMasters: 127
MaxInfoFrames: 10
Analog Input
Discharge Temperature
Input B02:
###.#°F
Offset: 0.0°F
Value: ###.#°F
Unit Expansion I/O
Enable Expansion: No
Relay Output
Defrost
Channel: 1
Status: OFF
Supply Fan Cycling
Defrost setup
Fan off time: 5min
Fan on time: 30min
Heater Controller
Integration: 300s
Band: 20°F
Mod Hot Gas Setup
Minimum On: 4.0vdc
Maximum On: 10.0vdc
Fan Delay
Time delay between
starting of supply
& exhaust fans.
Fan delay: 15s
Initialization
DEFAULT INSTALLATION
Erase user settings
and install global
default values: No
b. I/O Configuration
All I/O points are included An example of each is shown.
d. Initialization
®

12
DDC Controller for Tempered Air Products
A. On/Off Unit
B. Setpoint
The controller is equipped with several menus to help guide users with altering program parameters. The
following menus can be accessed by pressing the
Prg
Esc
key. To enter the desired menu, press the
Prg Esc
key.
The On/Off Unit menu allows the user to view the detailed On/Off status of the
controller.
The unit ships from the factory in a disabled state. To allow the unit to operate,
the controller must receive a run command from digital input ID4. Jumper unit
terminals R - G to allow the unit to operate.
Actual State: The controller may be in following On/Off states:
a. Unit On - Unit is ON, functioning normally.
b. Off by ALARM - Unit is OFF due to an alarm. View alarms by pressing
ALARM button.
c. Off by PLAN - Unit is OFF by pLAN network.
d. Off by BMS - Unit is OFF by BMS command
e. Off by SCHEDULER - Unit is OFF by internal Clock/Scheduler.
f. Off by DIGITAL INPUT(ID4) - Unit is OFF by digital input 4 (ID4).
g. Off by KEYPAD - Unit is commanded OFF by this screen.
Change to (Switch Off/Switch On): Enables user manually turn unit On/Off via
display. Unit terminal G must have 24 VAC power to enable the unit.
This screen allows The user To adjusT which sysTem conTrols The uniT
on/off sTaTe.
Digital Input: Default to YES. Unit terminal G must have 24 VAC power to
enable the unit.
The user can also use the BMS or internal time clock to command the unit
On/Off state. If scheduling is desired, go to the Clock/Scheduler menu to set
a schedule.
BMS: YES allows BMS to control unit On/Off state.
Scheduler: YES allows internal scheduler (time clock) for unit On/Off control.
The Setpoint menu allows the user to view and adjust temperature related
parameters.
This screen displays The currenT supply air seT poinT.
This screen does not appear if a BMS is directly setting the supply air set point.
This screen displays the current supply air set point, determined by the
controller. The supply set point is reset either by outdoor air temperature, or
room temperature if installed. The user may also directly control the supply air
set point. To activate the BMS set point capability, go to the Set Point Source
screen in this menu.
If a room temperature sensor is connected to the controller, the supply air
temperature is reset to achieve the room temperature set point. The “local”
room temperature set point can be set via the controller (see Room Set Point
screen). Otherwise, the BMS can directly input the desired room set point. To
activate the BMS set point capability, go to the Set Point Source screen in this
menu.
This screen displays The room seT poinT.
This screen only appears if a room sensor is wired into controller terminals B4 and
BC4.
The unit will reset the supply air temperature to maintain the local set point. If
a BMS is interfaced with the controller, the user has the capability to directly
input the desired Room Set Point though the BMS. The screen will show
a BMS set point and an Active set point. The active set point is the room
temperature the controller is currently trying to maintain.
Menus
On/Off Unit
Actual state:
Off by DIG INPUT (ID4)
Change to: SWITCH ON
*Power ID4 to start…
Unit ON/OFF Control
Enable unit OnOff
By digit input: Yes
By BMS: No
By Scheduler: Yes
Supply Set Point
is currently = 60°F
This set pt is reset up/down
by the DDC
Room Set Point
Local set pt: 72.0°F
BMS set pt: 70.0°F
Active set pt: 70.0°F
®

13
DDC Controller for Tempered Air Products
This screen displays The minimum and maximum supply air TemperaTure
limiTs.
This screen only appears if the unit is connected to a room temperature sensor.
The supply air temperature will be controlled within the Supply Min and Supply
Max limits to maintain room temperature set point.
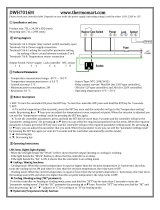
These parameTers dicTaTe The operaTion of The ouTdoor air reseT funcTion.
This screen does not appear when a room temp sensor is wired to the controller.
The controller monitors the outdoor air temperature and adjusts the desired
supply temperature accordingly. For example, when the outdoor air is below
60°F, the controller will change the Supply set point to 72°F. If the outdoor
air is above 70°F, the controller will change the Supply set point to 55°F. If
the outdoor air temperature is between 60°F and 70°F, the Supply set point
changes according to the outdoor air reset function. A visual representation of
the outdoor air reset function is shown below.
This screen displays The supply air seT poinT as seT by a bms.
This screen appears if the unit has BMS communications and set point source is
set to BMS.
See Set Point Source screen in this menu to allow BMS to determine set point.
The conTroller will lockouT cooling when The ouTdoor air TemperaTure is
below The cooling lockouT seT poinT. (facTory defaulT = 55°f)
This screen only appears if the unit the unit is equipped with cooling.
There is a built in hysteresis of 2°F which prevents the cooling from short
cycling. The hysteresis is similar to a dead-band above and below the lockout
set point. (Example: If Lockout = 55°F, cooling is locked out below 53°F and
enabled above 57°F outside air temperature.)
The conTroller will lockouT heaTing when The ouTdoor air TemperaTure is
above The heaTing lockouT seT poinT. (facTory defaulT = 70°f)
This screen only appears if the unit the unit is equipped with heating.
There is a built in hysteresis of 2°F which prevents the heating from short
cycling. The hysteresis is similar to a dead-band above and below the lockout
set point. (Example: If Lockout = 70°F, heating is locked out above 72°F and
enabled below 68°F outside air temperature.)
This screen displays The TemperaTure seT poinTs for The cooling coil.
This screen only appears if the unit is equipped with cooling.
The Normal mode set point is the after coil temperature the unit will maintain
under standard operation, when in cooling. If a humidistat was provided
with the unit, the Dehumidify set point is the temperature the cooling coil will
discharge on a call for dehumidification. The Active set point is the cooling coil
discharge temperature the unit is currently trying to maintain.
Supply Reset Limits
Supply Min: 55.0°F
Supply Max: 90.0°F
Supply Air Reset
Outside: Supply
60.0°F - - > 72.0°F
70.0°F - - > 55.0°F
Supply Set From BMS
BMS interface: ##.#°F
Set pt min: 55.5°F
Set pt max: 90.0°F
Cold Coil Set Point
Normal Mode: 55.0°F
Dehumidify: 50.0°F
Active set pt: 55.0°F
Heater Lockout
Lockout heater when outside
above: 70.0°F
Hysteresis: 2.0°F
Cooling Lockout
Lockout cooling when outside
below: 55.0°F
Hysteresis: 2.0°F
Outdoor Air Reset Function
49°
55°
61°
67°
73°
55°60° 65°70° 75°
Outside Air Temperature (°F)
Supply Air Set Point (°F)
®

14
DDC Controller for Tempered Air Products
users can choose eiTher The conTroller or The bms To deTermine su pply
air seT poinT during operaTion.
This screen only appears if the controller was supplied with BMS capability.
Local means the controller set point will be used during operation. (Outdoor Air
Reset or Room Reset)
BMS means that the BMS set point will be used during operation.
This screen displays The room seT poinTs for heaTing and cooling operaTion
during unoccupied mode.
This screen only appears if the unoccupied mode is set to “Cycle on Room”
instead of “Unit Off”. A room temp sensor must be wired into the controller. For
energy recovery units, a Night Set-Back Damper must be installed.
In unoccupied mode when the temperature falls below the room Heating set
point, the supply fan and heating will turn on. If the unit is an Energy Recovery
unit, the Night Set-Back Damper will also open. The unit will discharge the
Supply Max temperature per the Supply Reset Limits screen, until the room
set point is satisfied. Unit will then shut down. When the temperature rises
above the Cooling set point, the unit will discharge the Supply Min temperature
per the Supply Reset Limits screen until the room temperature set point is
satisfied. Unit will then shut down.
The differential acts as a hysteresis to keep the heating and cooling from
cycling too often. For example, on a call for heating, the unit turns on at 60°F
and turns off at 65°F. For cooling, the unit turns on at 85°F and turns off at 80°F.
This screen displays The TemperaTure aT which The uniT will enable frosT
conTrol mode if necessary. (facTory defaulT = 5°f)
This screen only appears if the unit has an energy recovery wheel and a frost
control method was provided with the unit.
Upon sensing a high differential pressure across the energy wheel, the unit will
go into defrost if the outside air temperature is below this temperature setting.
This screen displays The low supply air TemperaTure limiT.
If the unit supply air temperature falls below Supply Air Low Limit for a period
of Alarm Delay, the unit will shut down and an alarm will be signaled. The
purpose of the supply low limit is to protect the building and contents from
cold supply air. It is NOT designed to protect the air-handling unit.
If the unit does not have chilled water (CW) or hot water (HW) coils, it should
not need additional protection from freezing. If the unit does have CW or HW
coils, field provided coil freeze protection may be necessary.
economizer lockouT prevenTs The uniT from going inTo economizer mode
when The ouTdoor air condiTions are Too cold.
This screen only appears if economizer was provided with the unit.
The lockout prevents outdoor air from: (1) entering the space at too cold of a
temperature or (2) entering heating or cooling coils at conditions that could
freeze the coils. Built-in hysteresis of 2°F. The hysteresis is similar to a dead-
band above and below the lockout set point. Example: If Lockout = 40°F,
economizer is locked out below 38°F and enabled above 42°F outside air
temperature.)
This screen displays The TemperaTure difference aT which The
dehumidificaTion mode is locked ouT. (facTory defaulT = 10°f)
This screen only appears if the unit is equipped with cooling.
This setting prevents the unit from operating in dehumidification mode when the
outdoor air conditions are relatively cool. Example: If the cold coil set point is
55°F, dehumidification mode cannot operate until the outdoor air is at least 65°F.
Dehumidification lock
Lockout dehumidification until
outside air is 10.0°F above
cold coil set point.
Economizer Lockout
Lockout econo when outside
below: 40.0°F
Hysteresis 2.0°F
Supply air low limit
Alarm when supply is
below: 35.0°F
Alarm delay: 300s
Set Point Source
Use local set point, or BMS
interface set point? Local
Defrost
Allow wheel defrost
mode when outside
is below: 05.0°F
UnOcc Fan Cycle Setup
Unit will energize to maintain
unocc room set points.
Heating: 65.0°F
Cooling: 80.0°F
Differential: 5.0°F
®

15
DDC Controller for Tempered Air Products
E. Data Logger
The clock screen allows The user To adjusT The Time and daTe.
This screen allows The user To seT holiday daTes (if enabled).
This screen only appears if Holidays are enabled.
The internal time clock will go into unoccupied mode as long as the date is
equal to the holiday date (always a 24 hour period).
This screen allows The user To adjusT schedules.
This screen only appears if a Schedule was added in the screen above.
The program supports up to seven separate schedules. Each schedule will
require the user to enter a Time On, Time Off and which days the schedule is
applicable for.
This screen allows The user To add The number of unoccupied schedules
and holidays.
The Number of Schedules corresponds to the number of unoccupied periods
the user wishes to add. By setting the number of schedules to a value greater
than zero, the unoccupied mode will automatically be set to time clock.
A holiday is a single occurrence in which you would like the unit to be
unoccupied for 24 hours. A maximum of 15 holidays can be set. Holidays must
be reconfigured each year.
To manually control I/O values, go to the Service menu > Overrides.
Similar screens appear for all controller inputs and outputs.
This screen is an example of a recorded alarm.
The unit conditions are displayed for past alarm events. The date, time,
temperatures and unit status are recorded.
To clear recorded alarms, press
Prg
Esc
and
Prg
Esc
simultaneously.
Scheduler
Schedule #: #
Time On: 07:00
Time Off: 05:00
Days Enabled: MTWTFSS
Holiday #1
Month: MM
Day: DD
Unoccupied for 24 hrs
Analog Input
Outside Temperature
Input B01: 75.0°F
13:21:04 10/05/10
OA Sensor
Room T: 70.0
Discharge T: 65.0
Outside Air T: -623.3
Cold Coil T: 55.0
System Off
C. Clock/Scheduler
D. Input/Output
The Clock/Scheduler menu allows the user to view and alter the time and date.
The user can also add up to seven schedules for occupancy requirements.
Clock
Day: Monday
Date: 01/31/10
Hour: 15:30
Scheduler
Number of schedules: 0
Holidays
Holiday = unoccupied mode
for 24 hours.
Number of Holidays: 0
The Input/Output menu allows the user to quickly view the status of the controller
inputs and outputs.
The Data Logger menu allows the user to view past alarms.
®

16
DDC Controller for Tempered Air Products
The Overrides menu is for start-up, commissioning and troubleshooting.
This menu allows the user to override the control loops. If further control is
required, the user can also manually control the controller inputs and outputs.
To access the Overrides sub-menu, enter the service password (Default=1000).
To manually override a control loop, the unit must be ON. In each respective
screen, change the control from AUTO to MANUAL.
To resume normal operation after overriding the controller, simply cycle power
to the unit.
This screen allows The user To override The energy wheel operaTion.
This screen only appears if the unit is equipped with a non-VFD operated energy
wheel.
When the Wheel Control is in the MANUAL mode, use the arrow buttons to turn
the wheel ON or OFF.
This screen allows The user To override The energy wheel operaTion.
This screen only appears if the unit is equipped with a VFD operated energy wheel.
When the Wheel Control is in the MANUAL mode, use the arrow buttons to
alter the wheel %. This is directly proportional to a 0 - 10 VDC signal being sent
to the energy wheel VFD.
F. Board Switch
The Board Switch menu allows the user to jump between different controllers
with a remote display. This requires a remote display, along with additional
controllers, set-up in a pLAN network. A pLAN can consist of up to 32 devices, in
different combinations, but a maximum of 31 controllers.
when viewing This screen from a remoTe display, The user is able To change
which conTroller’s menu should be displayed.
Unit Address: The pLAN address of the controller the display is currently
accessing.
Switch to unit: The pLAN address of the controller the display would like to
access.
Board Switch
Unit Address: 1
Switch to unit: 1
1 . . . . . . . . . . 16
17 . . . . . . . . . 32
G. Service
enTering The informaTion sub-menu will display informaTion abouT The
conTroller and The program loaded on The conTroller.
Code: Controller setup code determines functionality of program. When
contacting the factory, please reference this code.
The Service menu allows the user to access several sub-menus regarding
controller information, controller overrides, operating hours, BMS configuration,
I/O manual management and Probe Adjustment. The user can also change the
default Service Password (1000) by accessing the Service Settings sub-menu.
By accessing the BMS Config sub-menu, the user can adjust BMS protocol
settings (BACnet, LonWorks, Modbus).
Information
Greenheck Fan Corp.
Code: GMY10000X00
Ver.: 1.04 06/13/11
Manual: 474706
Bios: 5.12 11/17/10
Boot: 4.03 07/03/06
Control Loop Overrides
Unit must be ON.
To resume normal operation,
cycle unit power.
Energy Wheel Override
Wheel Control: Auto
Wheel: OFF
Energy Wheel Override
Wheel Control: Auto
Wheel: 100%
G. Service
a. Information
G. Service
b. Overrides
®

17
DDC Controller for Tempered Air Products
This screen allows The user To override The heaTing operaTion.
This screen only appears if a heating operation was provided with the unit.
When the Heating Control is in the MANUAL mode, use the arrow buttons to
vary the heating output.
Electric Heater: The Heater Control % is proportional to the 0-10 VDC signal
being sent to the SCR controller, located in the electric heater control center.
0% Heating = 0 VDC - 0 kW output
100% Heating = 10 VDC - Max kW output
Hot Water: The Heater Control % is proportional to the 0-10 VDC signal being
sent to the heating control valve (BY OTHERS).
0% Heating = 0 VDC
100% Heating = 10 VDC
Indirect Gas: The Heater Control % is proportional to the 0-10 VDC signal
being sent to the indirect gas furnace controller, located in the indirect gas
control center. The first stage is on at 1% Heater Control. The furnace will then
modulate proportionally from minimum to maximum capacity. The furnace is
subject to minimum On/Off times and Heating Lockouts.
0% = 0 VDC – OFF
1% = 0 VDC – MINIMUM TURNDOWN ENABLED
1 - 100% = 0 - 10 VDC = FURNACE MODULATION
Heat Pump: The Heating % displays compressor engagement as a percent.
The compressors are subject to the minimum On/Off times and Heating
Lockouts. Compressors engage in sequence as described in the Compressor
Staging screen in the Manufacturer > Factory Settings menu.
This screen allows The user To override The hoT gas reheaT operaTion.
This screen only appears if modulating hot gas reheat option was provided with
the unit.
When the Hot Gas Reheat Loop Control is in the MANUAL mode, use the arrow
buttons to vary the reheat output.
This screen allows The user To override The hoT gas reheaT operaTion.
This screen only appears if On/Off hot gas reheat option was provided with the
unit.
When the Hot Gas Reheat Loop Control is in the MANUAL mode, us the arrow
buttons to turn the hot gas reheat ON or OFF.
This screen allows The user To override The cooling operaTion.
This screen only appears if a cooling operation was provided with the unit.
When the Cooling Control is in the MANUAL mode, use the arrow buttons to
vary the cooling output.
Chilled Water: The Cooling % is directly proportional to the 0 - 10 VDC output
signal.
0% Cooling = 0 VDC; 100% Cooling = 10 VDC
Packaged Cooling and Heat Pump: The Cooling % displays compressor
engagement as a percent. The compressors are subject to the minimum
On/Off times and Heating/Cooling Lockouts. Compressors engage in
sequence as described in the Compressor Staging screen in the
Manufacturer > Factory Settings menu.
This screen allows The user To override The energy recovery wheel
preheaTer.
This screen only appears if an electric preheat frost control was provided with the
unit.
Wheel Preheat Override
Energy Recovery Wheel
Preheat Control: Auto
Preheater: OFF
Cooling Override
Cooling Control: Auto
Cooling: 100%
Heating Override
Heating Control: Auto
Heating: 100%
HotGas Reheat Override
Hot Gas Reheat
Loop Control: Auto
Reheat: OFF
HotGas Reheat Override
Hot Gas Reheat
Loop Control: Auto
Reheat: 100%
®

18
DDC Controller for Tempered Air Products
This screen allows The user To enTer The i/o manual managemenT menu.
The Manual Management menu allows the user to manually control the I/O
of the controller. The user can manually input values for the analog inputs
and digital inputs. The user can also manually control the analog outputs
and digital outputs. EXTREME CAUTION should be used when manually
controlling the I/O. It is highly recommended that manual control of the I/O
is done only with factory assistance. The controller’s safeties and lockouts
are bypassed by this manual management and should only be used as
a troubleshooting feature. If the controller is powered down, I/O Manual
Management is reset to off. Therefore, if using this troubleshooting feature, the
best way to clear manually input values is to power down the controller.
This screen is an example of a ma nually managed TemperaTure analog inpuT.
To manually control an analog input, change Manual Control to ON. Move
cursor to Manual position and alter value. The altered value will be displayed
below.
Similar screens exist for the remaining I/O. Contact the factory for more
details.
The BMS Config menu allows the user to view and alter BMS protocol settings.
If the BMS protocol is BACnet or Modbus, additional screens allow further
configuration. See below for details. To access the BMS Config sub-menu,
enter the service password (Default=1000).
This screen allows The user To selecT The bms proTocol. all bms
proTocols require a communicaTions card insTalled in The serial card
porT, locaTed on The face of The conTroller.
If the protocol is BACnet MSTP or BACnet IP/Eth, the user can change
common BACnet parameters via the controller. The BACnet Plugin must be set
to YES.
This screen allows The user To adjusT modbus parameTers.
This screen only appears if the selected BMS protocol is set to Modbus.
The address is the Modbus address of the card installed in the SERIAL CARD
port located on the face of the controller. (Factory Default Address = 1).
The Baud Rate should be set to the BMS baud rate (Factory Default Baud Rate
is 9600).
I/O Manual Management
END OF OVERRIDE MENU
Press ENTER to go to
I/O Manual Management
menu.
Analog Input
Outside Temperature Manual
Control B01: ON
Manual Position 290
Value 84.2°F
BMS Configuration
Protocol: BACnet MSTP
BACnet Plugin? YES
MODBUS SETUP
Address: 1
Baudrate 9600
G. Service
c. BMS Config
®

19
DDC Controller for Tempered Air Products
This screen allows The user To adjusT bacneT msTp parameTers.
This screen only appears if the selected BMS protocol is set to BACnet MSTP and
BACnet Plugin = YES.
If a BACnet MSTP card has been installed, the default parameters can be
changed via the controller display. Factory settings are shown in the screen to
the left.
To view current parameters:
1. Power on controller and allow several minutes to initialize.
2. Go to BMS Config menu and view BACnet Read/Write screen.
3. Change Function to Read and Update? to YES.
Current BACnet MSTP parameters should now be displayed in the BACnet
MSTP SETUP screen. If all values appear to be zeros, consult the factory.
(Make sure you have allowed several minutes for the controller to initialize).
*Values may appear to be zero prior to setting the Function to READ.
To change BACnet MSTP parameters:
1. Power on controller and allow several minutes to initialize.
2. Go to BMS Config menu and view MSTP SETUP screen.
3. Move cursor to desired parameter by pressing the
Prg Esc
Prg Esc
buttons. Press
Prg Esc
to select the parameter to change. Press the
Prg Esc
Prg Esc
buttons to adjust
the parameter. Press
Prg Esc
to save adjusted value.
4. Once desired parameters have been entered, go to BACnet Read/Write
screen. Change Function to Write and Update? to YES.
5. Reboot the controller by cycling power to the unit. Allow several minutes
for the controller to initialize.
6. View MSTP parameters. If changed values did not save, contact the
factory.
This screen allows The user To adjusT bacneT ip parameTers.
This screen only appears if the selected BMS protocol is set to BACnet IP/Eth and
BACnet Plugin = YES.
If a BACnet IP card has been installed, the default parameters can be changed
via the controller display. The card is in DHCP mode from the factory. Once
communication is established, the user can enter static IP parameters.
To view current parameters:
1. Power on controller and allow several minutes to initialize.
2. Go to BMS Config menu and view BACnet Read/Write screen.
3. Change Function to Read and Update? to YES.
Current BACnet IP parameters should now be displayed in the BACnet TCP/IP
SETUP screen. If all values appear to be zeros, consult the factory. (Make sure
you have allowed several minutes for the controller to initialize).
*Values may appear to be zero prior to setting the Function to READ.
To change BACnet TCP/IP parameters:
1. Power on the controller and allow several minutes to initialize.
2. Go to BMS Config menu and view TCP/IP SETUP screen.
3. Move cursor to desired parameter by pressing the
Prg Esc
Prg Esc
buttons. Press
Prg Esc
to select the parameter to change. Press the
Prg Esc
Prg Esc
buttons to adjust
the parameter. Press
Prg Esc
to save adjusted value.
4. Once desired parameters have been entered, go to BACnet Read/Write
screen. Change Function to Write and Update? to YES.
5. Reboot the controller by cycling power to the unit. Allow several minutes
for the controller to initialize.
6. View TCP/IP parameters. If changed values did not save, contact the
factory.
MSTP SETUP
Instance: 77000
Baudrate 38400
MAC Addr: 0
MaxMasters: 127
MaxInfoFrames: 20
TCP/IP SETUP
Instance: 77000
IP set by: DHCP
IP: 128.2.104.134
Subnet: 255.255.000.000
Gatewy: 128.2.0.12
BACnet Read/Write
Function: Read
Update? Yes
*Cycle unit power to confirm
write command.
TCP/IP SETUP
DNS 1: 193.168.001.001
DNS 2: 193.168.001.001
Type: IP
BACnet Read/Write
Function: Read
Update? Yes
*Cycle unit power to confirm
write command.
®

20
DDC Controller for Tempered Air Products
This screen allows The user To quickly enable The bms To conTrol uniT
operaTion.
This screen appears if the unit is equipped with a BMS communication card.
The factory default configuration is for a non-BMS controlled unit. To allow
the BMS to start/stop the unit, change set point and occupancy, alter the
parameters on this screen.
This screen allows The user To view The sTaTus of The wriTable bms poinTs.
View the status of each point to confirm BMS communication.
The Service Settings menu allows the user to change the default Service
Password (1000), save and restore default parameters, and adjust probe
values.
This screen allows The user To view uniT run hours, and alTer seT poinTs
for mainTenance.
Run hours: The amount of time in hours that the unit has been powered.
Set Point: The amount of running time in hours before a maintenance alarm
should occur.
Reset to Zero: Reset the measured amount of run time.
The probe adjusTmenT menu allows The user To calibraTe sensor probes
wiTh an offseT value.
Similar screens are available for remaining sensor probes.
This screen allows The user To change The service level password (pw1)
This screen allows The user To save and resTore The defaulT
parameTers sTored in memory.
If the user would like to save their settings, move the cursor to the SAVE
position and change to YES. This will save all of the current parameters into
memory as Service Settings. If the user would like to restore to these values
at some point in the future, moving the cursor to the RESTORE position, and
selecting YES will restore the controller to the user saved defaults.
Unit BMS Control
Unit Start/Stop: No
Temp Setpoint: Local
Occupancy: Input ID6
BMS Writable Points
TempSetpoint: 78.0°F
Start/Stop: Stop
Reset Alarms: No
Occupancy: Occ
MAINTENANCE HOURS
SYSTEM
Run hours: 0000h
Set Point: 0000h
Reset to Zero? No
Analog Input
Outside Temperature
Input B01
Offset: 0.0°F
Value: 70.5°F
User Default
Insert new service password
(PW1): 1000
User Default Settings
Save? No
Restore? No
G. Service
d. Service Settings
a. Working hour set
b. Probe adjustment
b. Password/Defaults
®
/