Dell M5200 Medium Workgroup Mono Laser Printer User guide
- Category
- Laser/LED printers
- Type
- User guide

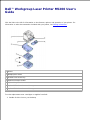
Dell™ Workgroup Laser Printer M5200 User's
Guide
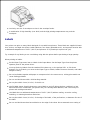
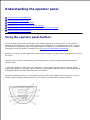
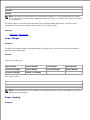
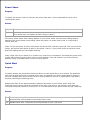
Click the links to the left for information on the features, options, and operation of your printer. For
information on other documentation included with your printer, see Finding information.
1
Printer
2
Multipurpose feeder
3
Standard 500-sheet tray
4
Optional envelope feeder
5
Optional duplex unit
6
Optional 250-sheet drawer with tray
7
Optional 500-sheet drawer with tray
To order replacement toner cartridges or supplies from Dell:
Double-click the icon on your desktop.1.

1.
Visit Dell's website, or order Dell printer supplies by phone.2.
www.dell.com/supplies
For best service, have your Dell printer Service Tag available.
For help locating your Service Tag number, see Express Service Code and Service Tag number.
Notes, Notices, and Cautions
NOTE: A NOTE indicates important information that helps you make better use of your printer.
NOTICE: A NOTICE indicates either potential damage to hardware or loss of data and tells you how
to avoid the problem.
CAUTION: A CAUTION indicates a potential for property damage, personal injury, or death.
____________________
Information in this document is subject to change without notice.
© 2003 Dell Computer Corporation. All rights reserved.
Reproduction in any manner whatsoever without the written permission of Dell Computer Corporation is
strictly forbidden.
Trademarks used in this text: Dell and the DELL logo are trademarks of Dell Computer Corporation;
Microsoft, Windows, and Windows NT are registered trademarks of Microsoft Corporation; ENERGY STAR is a
registered trademark of the U.S. Environmental Protection Agency. As an ENERGY STAR Partner, Dell
Computer Corporation has determined that this product meets the ENERGY STAR guidelines for energy
efficiency.
Other trademarks and trade names may be used in this document to refer to either the entities claiming the
marks and names or their products. Dell Computer Corporation disclaims any proprietary interest in
trademarks and trade names other than its own.
UNITED STATES GOVERNMENT RESTRICTED RIGHTS
This software and documentation are provided with RESTRICTED RIGHTS. Use, duplication or disclosure by
the Government is subject to restrictions as set forth in subparagraph (c)(1)(ii) of the Rights in Technical
Data and Computer Software clause at DFARS 252.227-7013 and in applicable FAR provisions: Dell
Computer Corporation, One Dell Way, Round Rock, Texas, 78682, USA.
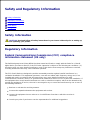
FCC emissions information
This equipment has been tested and found to comply with the limits for a Class B digital device, pursuant to
Part 15 of the FCC rules.

Refer to the Drivers and Utilities CD for details.
March 2003 Rev. A01

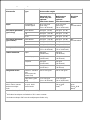
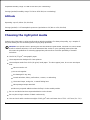
Finding information
Software overview
Fonts
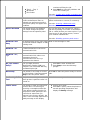
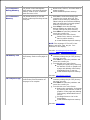
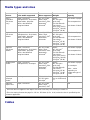
What are you looking for?
Find it here
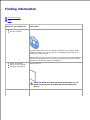
Drivers for my printer
My User's Guide
Drivers and Utilities CD
Documentation and drivers are already installed on your printer when
shipped from Dell. You can use the CD to uninstall/reinstall drivers or
access your documentation.
Readme files may be included on your CD to provide last-minute updates
about technical changes to your printer or advanced technical reference
material for experienced users or technicians.
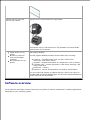
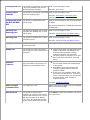
Safety information
How to use my printer
Warranty information
Owner's Manual
CAUTION: Read and follow all safety instructions in your
Owner's Manual prior to setting up and operating your
printer.
How to set up my printer
Setup diagram

Express Service Code and
Service Tag number
Express Service Code and Service Tag number.
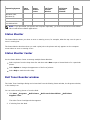
The Express Service Code and Service Tag numbers are located inside
the front door of your printer.
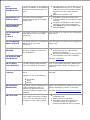
Latest drivers for my
printer
Answers to technical
service and support
questions
Documentation for my
printer
Dell Support Website
The Dell Support Website provides several online tools, including:
Solutions - Troubleshooting hints and tips, articles from
technicians, and online courses
Upgrades - Upgrade information for components, such as memory
Customer Care - Contact information, order status, warranty, and
repair information
Downloads - Drivers
Reference - Printer documentation and product specifications
You can access Dell Support at support.dell.com. Select your region on
the WELCOME TO DELL SUPPORT page, and fill in the requested details to
access help tools and information.
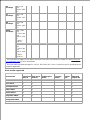
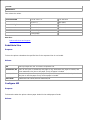
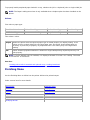
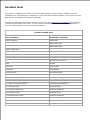
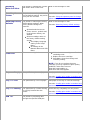
Software overview
Use the Drivers and Utilities CD that came with your printer to install a combination of software applications,
depending on your operating system.

Operating System
Status
Monitor
Status
Monitor
Center
Dell Toner
Reorder
Window
Dell Printer
Software
Uninstall
Driver
Profiler
Windows 2000,
Windows XP
Y
Y
Y
Y
Y
Windows NT
Y
Y
N
Y
Y
Windows 95, Windows
98, Windows Me
Y
N
N
Y
Y
NOTE: If you purchased your printer and computer separately, you must use the Drivers and Utilities
CD to install these software applications.
Status Monitor
The Status Monitor alerts you when an error or warning occurs; for example, when the top cover is open or
toner is running low.
The Status Monitor launches when you send a print job to the printer and only appears on the computer
screen when an error or warning occurs.
Status Monitor Center
Use the Status Monitor Center to manage multiple Status Monitors.
Select a printer from the drop-down list and then select Run to open a Status Monitor for a particular
printer.
Select Update to change the appearance of the list of printers.
Select Help to read the online help.
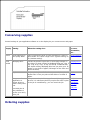
Dell Toner Reorder window
The Order Toner Cartridges dialog can be launched from the Printing Status window, the Programs window,
or the desktop icon.
You can order toner by phone or from the Web.
Click Start Programs Dell Printers Dell Laser Printer M5200 Dell Printer
Supplies–Laser.
1.
The Order Toner Cartridges window appears.
If ordering from the Web:
a.
2.

Choose your printer model from the drop-down list on the screen.a.
Enter your Dell printer Service Tag number in the field provided.b.
2.
Your Service Tag number is located inside the front door of your printer.
Click Visit Dell's cartridge ordering website.c.
If ordering by phone, call the number that appears under the By Telephone heading.3.
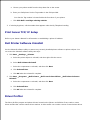
Print Server TCP/IP Setup
Refer to your Owner's Manual for information on establishing a printer IP address.
Dell Printer Software Uninstall
Use the Uninstall software utility to remove any currently installed printer software or printer objects. You
can access the Uninstall software utility two ways:
Click Start Settings Printers.
Select the printer object to uninstall, and then right-click the mouse.a.
Select Dell Software Uninstall.b.
Select the components to uninstall, and then click Next.c.
Click Uninstall Now.d.
Click OK when the uninstall is complete.e.
1.
Click Start Programs Dell Printers Dell Laser Printer M5200 Dell Printer Software
Uninstall.
Select the components to uninstall, and then click Next.a.
Click Uninstall Now.b.
Click OK when the uninstall is complete.c.
2.
Driver Profiler
The Driver Profiler program and printer drivers located on the Drivers and Utilities CD are used to create
driver profiles that contain custom driver settings. A driver profile can contain a group of saved printer driver

settings and other data for things such as:
Print orientation and N-Up (document settings)
Installation status of an output tray (printer options)
User-defined paper sizes (custom papers)
Simple text and watermarks
Overlay references
Font references
Form associations
Profiles are stored in Driver Configuration Files (DCF). The individual profiles inside the DCF are identified by
a short description. During installation, the user can point to the DCF that contains the profiles to use when
creating a customized printer object.
A DCF can contain profiles for any number of printer models and any number of different drivers (PostScript
or PCL, Windows 95, Windows 98, Windows Me, Windows 2000, Windows NT® 4.0, or Windows XP). Profiles
can be added to an existing DCF by specifying an existing configuration file in the Driver Profiler when
creating a profile. New profiles are always appended to an existing configuration file. No two profiles in the
same DCF can have the same short description.
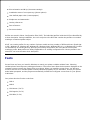
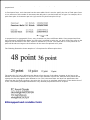
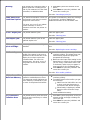
Fonts
Screen Fonts are fonts you install in Windows to match your printer scalable resident fonts. Selecting
resident printer fonts improves printing performance. The screen fonts allow the documents displayed on the
computer screen to match the output from your printer. When you install the screen fonts, you will have
access to the full set of resident printer fonts by Windows programs for PCL emulation. Choose your printer
model when prompted, and the program automatically installs the TrueType® screen fonts for your printer
in Windows.
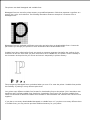
Your printer also has five bar code fonts:
OCR-A
OCR-B
C39 Narrow (3 of 9)
C39 Regular (3 of 9)
C39 Wide (3 of 9)

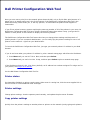
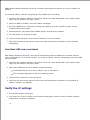
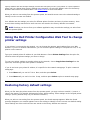
Dell Printer Configuration Web Tool
Have you ever sent a print job to the network printer down the hall, only to find it didn't print because of a
paper jam or an empty paper tray? One of the features of the Dell Printer Configuration Web Tool is the
Email Alert Setup, which sends you, or the key operator, an email when the printer needs supplies or
intervention.
If you fill out printer inventory reports requiring the asset tag number of all of the printers in your area, the
Dell Printer Configuration Web Tool has a Printer Information feature that makes it easy. Just type the IP
address of each printer on the network to display the asset tag number.
The Dell Printer Configuration Web Tool feature also lets you change printer settings and keep track of
printing trends. If you are a network administrator, you can easily copy the printer's settings to one or all
printers on the network – right from your Web browser.
To launch the Dell Printer Configuration Web Tool, just type your network printer's IP address in your Web
browser.
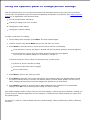
If you do not know what your printer's IP address is, print a network setup page, which lists the IP address:
Press Menu until you see Utilities Menu, and then press Select.1.
Press Menu until you see Print Net Setup, and then press Select to print a network setup page.2.
If the IP address shows 0.0.0.0. (the factory default), an IP address has not been assigned. To assign one for
your printer, see Assign an IP address.
Use the Dell Printer Configuration Web Tool for:
Printer status
Get immediate feedback on printer supply status. When toner is running low, click the toner supplies link on
the first screen to order additional toner cartridges.
Printer settings
Change printer settings, view the operator panel remotely, and update the print server firmware.
Copy printer settings
Quickly clone the printer's settings to another printer or printers on the network just by typing each printer's

IP address.
NOTE: You must be a network administrator to use this feature.
Printing statistics
Keep track of printing trends, such as paper usage and types of jobs being printed.
Printer information
Get the information you need for service calls, inventory reports, or the status of current memory and engine
code levels.
Email alert setup
Receive an email when the printer needs supplies or intervention. Type your name or the key operator's
name in the email list box to be notified.
Set password
Lock the operator panel with a password so that other users don't inadvertently change the printer settings
you selected.
NOTE: You must be a network administrator to use this feature.
Online Help
Click Help to visit the Dell website for printer troubleshooting.

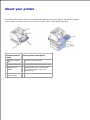
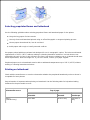
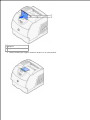
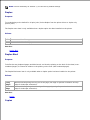
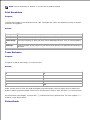
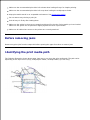
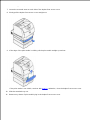
About your printer
The following illustrations show the standard Dell Workgroup Laser Printer M5200, and with an envelope
feeder, duplex unit option, and a tray 2 and tray 3 option (250- or 500-sheets) attached.
Standard network
printer
Network printer with options
1
Standard output
bin
5
Optional envelope feeder
2
Operator panel
6
Optional duplex unit
3
Multipurpose
feeder
7
Optional trays (250 or 500 sheets).
The printer supports up to four
optional trays.
4
Standard tray
(500 sheets)

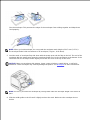
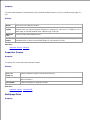
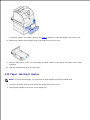
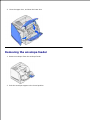
Unpacking the printer
Select a location for your printer.1.
CAUTION: The printer requires at least two people to lift it safely.
Leave enough room to open the printer trays, covers, doors, and options. It is also important to allow
space around the printer for proper ventilation.
Provide the proper environment:
A firm, level surface
Away from the direct airflow of air conditioners, heaters, or ventilators
Free of sunlight, humidity extremes, or temperature fluctuations
Clean, dry, and free of dust
NOTE: Leave the printer in the box until you are ready to install it.
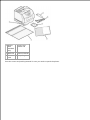
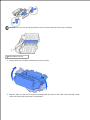
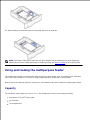
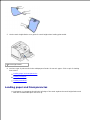
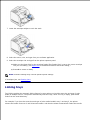
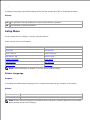
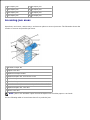
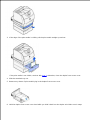
Remove all items from the box except the printer. Make sure you have the following items:2.

2.
1
Printer
with
standard
tray
4
Drivers and
Utilities CD
2
Wire bail
5
Owner's Manual
3
Power
cord
6
Setup diagram
Save the carton and packing material in case you need to repack the printer.

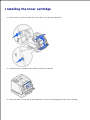
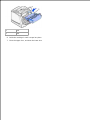
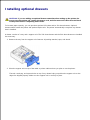
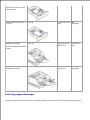
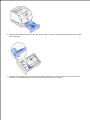
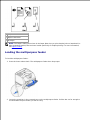
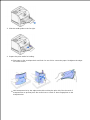
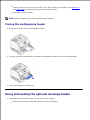
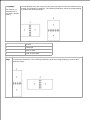
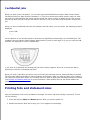
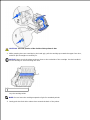
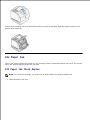
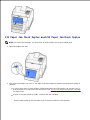
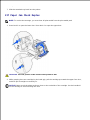
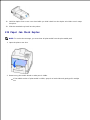
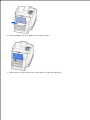
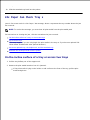
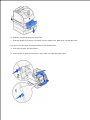
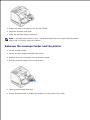
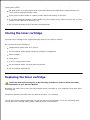
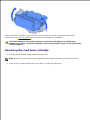
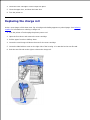
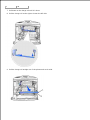
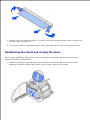
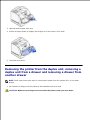
Installing the toner cartridge
Press latch 1 to open the lower door. Press latch 2 to open the upper door.1.
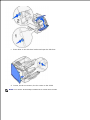
Grasp the toner cartridge by the handle and pull it up and out.2.
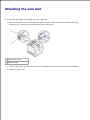
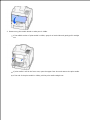
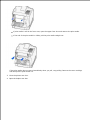
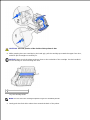
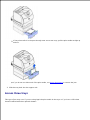
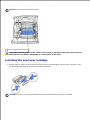
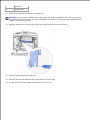
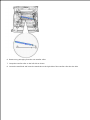
Pull on the tabs on each side of the red plastic to remove the packaging from the toner cartridge.3.

3.
NOTICE: Do not touch the photoconductor drum on the underside of the toner cartridge.
1
Photoconductor drum
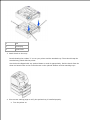
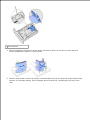
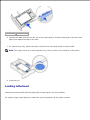
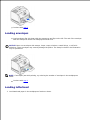
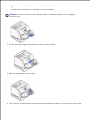
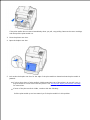
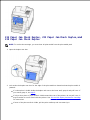
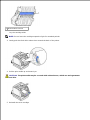
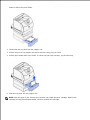
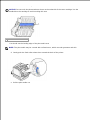
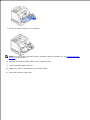
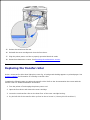
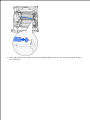
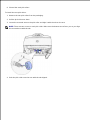
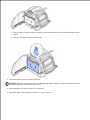
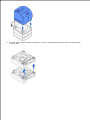
Gently shake the cartridge to distribute the toner evenly.4.
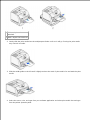
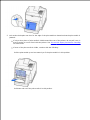
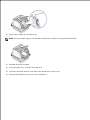
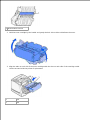
Align the tabs on each side of the toner cartridge with the slots on each side of the cartridge cradle.
Use the arrows inside the printer for placement.
5.

1
Tab
2
Slot
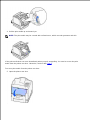
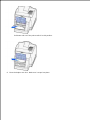
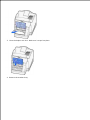
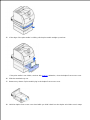
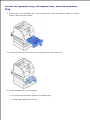
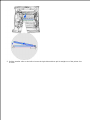
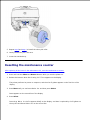
Guide the cartridge in until it snaps into place.6.
Close the upper door, and then the lower door.7.

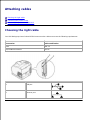
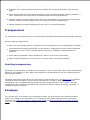
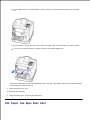
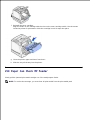
Attaching cables
Choosing the right cable
Connecting the printer locally
Connecting the printer to the network
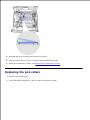
Choosing the right cable
Your Dell Workgroup Laser Printer M5200 interconnection cable must meet the following requirements:
Connection
Cable certification
USB
USB 2.0
10/100BaseT Ethernet
CAT-5E
1
USB port
2
Ethernet port

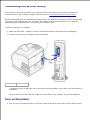
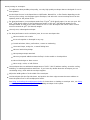
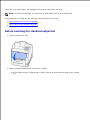
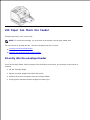
Connecting the printer locally
A local printer is a printer attached to your computer using a USB cable. If your printer is attached to a
network instead of your computer, skip this step and go on to Connecting the printer to the network.
Microsoft® Windows® 98 SE, Windows Me, Windows 2000, and Windows XP operating systems support USB
connections. Some UNIX® and Linux computers also support USB connections. Refer to your computer
operating system documentation to see if your system supports USB.
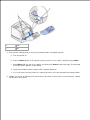
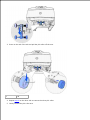
To attach the printer to a computer:
Make sure the printer, computer, and any other attached devices are turned off and unplugged.1.
Connect the printer to the computer using a USB cable.2.
1
USB port
A USB port requires a USB cable. Be sure to match the USB symbol on the cable to the USB symbol on
the printer.
Plug the other end of the cable into a USB port on the back of the computer, not the USB keyboard.
Turn on the printer
Plug one end of the printer power cord into the socket at the back of the printer and the other end into1.

a properly grounded outlet.
1.
Turn on the computer and the printer.2.
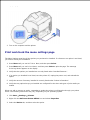
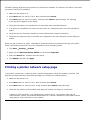
Print and check the menu settings page
The Menu Settings page lists all the options you purchased or installed. If a feature or an option is not listed,
you need to check your installation.
Press Menu until you see Utilities Menu, and then press Select.1.
Press Menu until you see Print Menus, and then press Select to print the page. The message
Printing Menus appears on the display.
2.
Verify that the options you installed are correctly listed under "Installed Features."3.
If an option you installed is not listed, turn the printer off, unplug the power cord, and reinstall the
option.
4.
Verify the amount of memory installed is correctly listed under "Printer Information."5.
Verify that any optional trays you installed are configured for the sizes and types of print media you
loaded.
6.
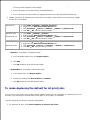
When you add or remove an option, remember to update the printer's configuration through your printer
driver. The following instructions may vary, depending on your operating system.
Click Start Settings Printers.1.
Right-click the Dell Laser Printer M5200 icon and select Properties.2.
Select the Device tab, and then select the option.3.
4.

2.
3.
Click Update, and then click Apply.4.
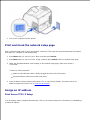
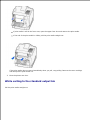
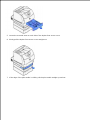
Connecting the printer to the network
To attach the printer to a computer:
Make sure the printer, computer, and any other attached devices are turned off and unplugged.1.
Remove the red plug from the Ethernet port on the back of the printer.2.
Plug one end of a standard category 5 cable into a LAN drop or hub, and the other end into the
Ethernet port on the back of the printer. The printer automatically adjusts for the network speed.
3.
2
Ethernet port
Turn on the printer
Plug one end of the printer power cord into the socket at the back of the printer and the other end into
a properly grounded outlet.
1.
Page is loading ...
Page is loading ...
Page is loading ...
Page is loading ...
Page is loading ...
Page is loading ...
Page is loading ...
Page is loading ...
Page is loading ...
Page is loading ...
Page is loading ...
Page is loading ...
Page is loading ...
Page is loading ...
Page is loading ...
Page is loading ...
Page is loading ...
Page is loading ...
Page is loading ...
Page is loading ...
Page is loading ...
Page is loading ...
Page is loading ...
Page is loading ...
Page is loading ...
Page is loading ...
Page is loading ...
Page is loading ...
Page is loading ...
Page is loading ...
Page is loading ...
Page is loading ...
Page is loading ...
Page is loading ...
Page is loading ...
Page is loading ...
Page is loading ...
Page is loading ...
Page is loading ...
Page is loading ...
Page is loading ...
Page is loading ...
Page is loading ...
Page is loading ...
Page is loading ...
Page is loading ...
Page is loading ...
Page is loading ...
Page is loading ...
Page is loading ...
Page is loading ...
Page is loading ...
Page is loading ...
Page is loading ...
Page is loading ...
Page is loading ...
Page is loading ...
Page is loading ...
Page is loading ...
Page is loading ...
Page is loading ...
Page is loading ...
Page is loading ...
Page is loading ...
Page is loading ...
Page is loading ...
Page is loading ...
Page is loading ...
Page is loading ...
Page is loading ...
Page is loading ...
Page is loading ...
Page is loading ...
Page is loading ...
Page is loading ...
Page is loading ...
Page is loading ...
Page is loading ...
Page is loading ...
Page is loading ...
Page is loading ...
Page is loading ...
Page is loading ...
Page is loading ...
Page is loading ...
Page is loading ...
Page is loading ...
Page is loading ...
Page is loading ...
Page is loading ...
Page is loading ...
Page is loading ...
Page is loading ...
Page is loading ...
Page is loading ...
Page is loading ...
Page is loading ...
Page is loading ...
Page is loading ...
Page is loading ...
Page is loading ...
Page is loading ...
Page is loading ...
Page is loading ...
Page is loading ...
Page is loading ...
Page is loading ...
Page is loading ...
Page is loading ...
Page is loading ...
Page is loading ...
Page is loading ...
Page is loading ...
Page is loading ...
Page is loading ...
Page is loading ...
Page is loading ...
Page is loading ...
Page is loading ...
Page is loading ...
Page is loading ...
Page is loading ...
Page is loading ...
Page is loading ...
Page is loading ...
Page is loading ...
Page is loading ...
Page is loading ...
Page is loading ...
Page is loading ...
Page is loading ...
Page is loading ...
Page is loading ...
Page is loading ...
Page is loading ...
Page is loading ...
Page is loading ...
Page is loading ...
Page is loading ...
Page is loading ...
Page is loading ...
Page is loading ...
Page is loading ...
Page is loading ...
Page is loading ...
Page is loading ...
Page is loading ...
Page is loading ...
Page is loading ...
Page is loading ...
Page is loading ...
Page is loading ...
Page is loading ...
Page is loading ...
Page is loading ...
Page is loading ...
Page is loading ...
Page is loading ...
Page is loading ...
Page is loading ...
Page is loading ...
Page is loading ...
Page is loading ...
Page is loading ...
Page is loading ...
Page is loading ...
Page is loading ...
Page is loading ...
Page is loading ...
Page is loading ...
Page is loading ...
Page is loading ...
Page is loading ...
Page is loading ...
Page is loading ...
Page is loading ...
Page is loading ...
Page is loading ...
Page is loading ...
Page is loading ...
Page is loading ...
Page is loading ...
Page is loading ...
Page is loading ...
Page is loading ...
Page is loading ...
Page is loading ...
Page is loading ...
Page is loading ...
Page is loading ...
Page is loading ...
Page is loading ...
Page is loading ...
Page is loading ...
Page is loading ...
Page is loading ...
Page is loading ...
Page is loading ...
Page is loading ...
Page is loading ...
Page is loading ...
Page is loading ...
Page is loading ...
Page is loading ...
Page is loading ...
Page is loading ...
Page is loading ...
Page is loading ...
-
 1
1
-
 2
2
-
 3
3
-
 4
4
-
 5
5
-
 6
6
-
 7
7
-
 8
8
-
 9
9
-
 10
10
-
 11
11
-
 12
12
-
 13
13
-
 14
14
-
 15
15
-
 16
16
-
 17
17
-
 18
18
-
 19
19
-
 20
20
-
 21
21
-
 22
22
-
 23
23
-
 24
24
-
 25
25
-
 26
26
-
 27
27
-
 28
28
-
 29
29
-
 30
30
-
 31
31
-
 32
32
-
 33
33
-
 34
34
-
 35
35
-
 36
36
-
 37
37
-
 38
38
-
 39
39
-
 40
40
-
 41
41
-
 42
42
-
 43
43
-
 44
44
-
 45
45
-
 46
46
-
 47
47
-
 48
48
-
 49
49
-
 50
50
-
 51
51
-
 52
52
-
 53
53
-
 54
54
-
 55
55
-
 56
56
-
 57
57
-
 58
58
-
 59
59
-
 60
60
-
 61
61
-
 62
62
-
 63
63
-
 64
64
-
 65
65
-
 66
66
-
 67
67
-
 68
68
-
 69
69
-
 70
70
-
 71
71
-
 72
72
-
 73
73
-
 74
74
-
 75
75
-
 76
76
-
 77
77
-
 78
78
-
 79
79
-
 80
80
-
 81
81
-
 82
82
-
 83
83
-
 84
84
-
 85
85
-
 86
86
-
 87
87
-
 88
88
-
 89
89
-
 90
90
-
 91
91
-
 92
92
-
 93
93
-
 94
94
-
 95
95
-
 96
96
-
 97
97
-
 98
98
-
 99
99
-
 100
100
-
 101
101
-
 102
102
-
 103
103
-
 104
104
-
 105
105
-
 106
106
-
 107
107
-
 108
108
-
 109
109
-
 110
110
-
 111
111
-
 112
112
-
 113
113
-
 114
114
-
 115
115
-
 116
116
-
 117
117
-
 118
118
-
 119
119
-
 120
120
-
 121
121
-
 122
122
-
 123
123
-
 124
124
-
 125
125
-
 126
126
-
 127
127
-
 128
128
-
 129
129
-
 130
130
-
 131
131
-
 132
132
-
 133
133
-
 134
134
-
 135
135
-
 136
136
-
 137
137
-
 138
138
-
 139
139
-
 140
140
-
 141
141
-
 142
142
-
 143
143
-
 144
144
-
 145
145
-
 146
146
-
 147
147
-
 148
148
-
 149
149
-
 150
150
-
 151
151
-
 152
152
-
 153
153
-
 154
154
-
 155
155
-
 156
156
-
 157
157
-
 158
158
-
 159
159
-
 160
160
-
 161
161
-
 162
162
-
 163
163
-
 164
164
-
 165
165
-
 166
166
-
 167
167
-
 168
168
-
 169
169
-
 170
170
-
 171
171
-
 172
172
-
 173
173
-
 174
174
-
 175
175
-
 176
176
-
 177
177
-
 178
178
-
 179
179
-
 180
180
-
 181
181
-
 182
182
-
 183
183
-
 184
184
-
 185
185
-
 186
186
-
 187
187
-
 188
188
-
 189
189
-
 190
190
-
 191
191
-
 192
192
-
 193
193
-
 194
194
-
 195
195
-
 196
196
-
 197
197
-
 198
198
-
 199
199
-
 200
200
-
 201
201
-
 202
202
-
 203
203
-
 204
204
-
 205
205
-
 206
206
-
 207
207
-
 208
208
-
 209
209
-
 210
210
-
 211
211
-
 212
212
-
 213
213
-
 214
214
-
 215
215
-
 216
216
-
 217
217
-
 218
218
-
 219
219
-
 220
220
-
 221
221
-
 222
222
-
 223
223
-
 224
224
-
 225
225
-
 226
226
-
 227
227
-
 228
228


Dell M5200 Medium Workgroup Mono Laser Printer User guide
- Category
- Laser/LED printers
- Type
- User guide
Ask a question and I''ll find the answer in the document
Finding information in a document is now easier with AI
Related papers
-
Dell 2230d User manual
-
Dell 2230d/dn Mono Laser Printer User manual
-
-
Dell P1500 Personal Mono Laser Printer Owner's manual
-
-
Dell Precision U4803 User manual
-
-
-
-
Other documents
-
Canon CLBR 460ps User manual
-
IBM 1422 User manual
-
Lexmark T620 User manual
-
Lexmark 09H0052 - T522 25PPM LASERPR User manual
-
Lexmark 352dn - E B/W Laser Printer Reference guide
-
Lexmark MX711de User manual
-
Lexmark 34A0252 Reference guide
-
Lexmark 644dtn - T B/W Laser Printer Connection Manual
-
-