4
LLAWROOD SRETFARMIRT
19/32 x 3 x 21-3/4" (1,5 x 7,6 x 55,2 cm) x4 KX
19/32 x 4 x 36" (1,5 x 10,2 x 91,4 cm)x2
ZJL
x14
PRE-ASSEMBLED
3/8 x 6 x 24" (1 x 15,2 x 61 cm)x12
2 x 4 x 60" (3,8 x 8,9 x 152,4 cm)x2
SX
7/16 x 3-1/2 x 24" (1,1 x 8,9 x 61 cm) COLLAR TIE GUSSET
x2
19/32 x 4 x 36" (1,5 x 10,2 x 91,4 cm)x2
ZJR
19/32 x 4 x 60-7/8" (1,5 x 10,2 x 154,6 cm)x2
ZOL
19/32 x 4 x 60-7/8" (1,5 x 10,2 x 154,6 cm)x2
ZOR
19/32 x 2-1/2 x 26-5/8" (1,5 x 6,4 x 67,6 cm)x2
AH
19/32 x 3 x 62" (1,5 x 7,6 x 157,5 cm)x1
AHL
19/32 x 3 x 62" (1,5 x 7,6 x 157,5 cm)x1
AHR
19/32 x 3 x 72” (1,5 x 7,6 x 182,9 cm)x1
ZJ
1-1/2 x 1-1/2 x 69" (3,8 x 3,8 x 175,3 cm) x2 oo
2 x 4 x 48" (5,1 x 10,2 x 121,9 cm)x5
SP
2 x 4 x 67" (5,1 x 10,2 x 170,2 cm)x1
AM
2 x 4 x 68" (5,1 x 10,2 x 172,7 cm)x2
UM
2 x 4 x 78-1/2" (5,1 x 10,2 x 199,4 cm)x23
AI
2 x 4 x 92-1/2" (5,1 x 10,2 x 235 cm)x6
TJ
2 x 4 x 96" (5,1 x 10,2 x 243,8 cm)x5
TP
2 x 4 x 9" (5,1 x 10,2 x 22,9 cm)x5
UU
2 x 4 x 39" (5,1 x 10,2 x 99,1 cm)x4
QL
2 x 4 x 40" (5,1 x 10,2 x 101,6 cm)x2
SKA
2 x 4 x 44-1/2" (5,1 x 10,2 x 113 cm)x6
STL
1 x 3 x 5" (2,5 x 7,6 x 12,7 cm) ONE USED AS A GAUGE BLOCK FOR 3/4" MEASUREMENT x1
GAA
3/8 x 1-3/4 x 82-1/4” (1 x 4,4 x 208,9 cm)
x4
3/8 x 1-3/4 x 83-1/2” (1 x 4,4 x 212,1 cm)
x4
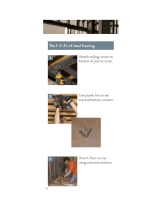
0!243)$%.4)&)#!4)/.!.$3):%3
Double letter part identification
is stamped on some parts.
• Check these locations for part stamp.
WOOD SIZE CONVERSION CHART
Nominal Board Size Actual Size
1" x 4".................3/4" x 3-1/2" (1,9 x 8,9 cm)
2" x 4"..............1-1/2" x 3-1/2" (3,8 x 8,9 cm)
2" x 3"..............1-1/2" x 2-1/2" (3,8 x 6,3 cm)
1" x 3".................3/4" x 2-1/2" (3,8 x 6,3 cm)
RS
RS
RS
#,!33)#%34!4%f8f0!243,)34
INVENTORY YOUR PARTS before you begin.
We suggest sorting parts by the category they are listed in.
12x12'
3/4"
(1,9 cm)