Page is loading ...

11 13/16”
11 5/8”
11 5/8”
Futuro Futuro
Futuro Futuro
RANGE HOOD
INSTALLATION MANUAL
MODEL: TACTIO ISLAND
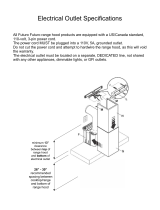
NOTE: PRIOR TO INSTALLATION
Please inspect range hood visually,
as well as connect it to power supply
and test its operation.
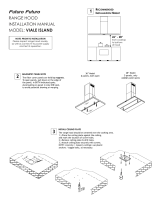
RECOMMENDED
INSTALLATION HEIGHT
1
26” - 28”
from cooktop
to bottom
of hood
Height “X”
Ceiling height
- 36” countertop
- 26”-28” spacing
- 14 1/8” hood
14 1/8”
Recommended
Installation Height
1
Recommended
Positioning
2
INSTALL CEILING PLATE
1.) Locate the centerline of the cooktop/range, and project it upward onto the ceiling.
2.) Place the ceiling plate against the ceiling, centered over the cooktop/range, and mark location of holes.
NOTE: 24” model has square plate with 4 holes, 36” model has rectangular plate with 6 holes.
3.) Drill holes as necessary.
4.) Secure ceiling plate to ceiling with screws (concrete/masonry ceilings: with anchors + screws).
3
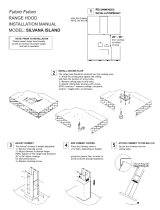
ATTACH SUPPORT WIRES
1.) Loop the supporting wire through the lock-nut, as shown.
2.) Secure screw through the lock-nut (with the wire in it) into the ceiling, inside the inner cut-out of the ceiling plate.
3.) Repeat Steps 1 & 2 for the other 3 wires.
4.) Thread support wires through the 4 horizontal holes of the ceiling plate, as shown.
NOTE: There are also vertical holes on the ceiling plate anges - those are for mounting the trim cover, not for support wires.
4
Range hood should be
centered over the
cooktop / range
Center of
cooking area

SITUATE THE TRIM PLATE
1.) Thread the support wires through the trim plate.
2.) Raise trim plate to the ceiling & temporarily secure it with 1-2 screws.
3.) Bring hood body to the support wires.
5
6
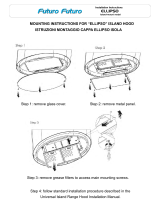
ATTACH HOOD BODY TO SUPPORT WIRES
1.) Loosen the lock-nuts located on top of the hood body.
2.) Bring the hood body to the recommended height
(26” to 28” from bottom of hood to cooktop).
3.) Thread the support wire through the lock-nut & tighten the nut.
4.) Repeat for the other 3 support wires.
5.) Check that the hood body is level, adjust wires as necessary.
7
CONNECT POWER CORD
1.) Remove the screws holding the trim panel.
2.) Lower the trim panel and thread power cord
through the pre-drilled hole.
3.) Connect power cord to power line, in accordance
with local regulations.
4.) Check range hood operation.
8
SECURE TRIM PLATE
1.) Raise trim plate
to ceiling plate.
2.) Secure with 4 screws.
/