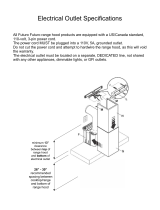
Page is loading ...

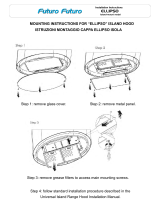
ADJUST CHIMNEY
The vertical chimney is height-adjustable.
1.) Remove retaining screws.
2.) Adjust chimney to desired height.
NOTE: bottom of the range hood should be
26” to 28” above cooktop,
for best performance.
3.) Replace retaining screws.
3
ADD CHIMNEY COVERS
Place the chimney cover/s
(1 or both, depending on height)
onto the chimney structure.
NOTE: DO NOT REMOVE the
protective plastic film, in order to
avoid scratches during installation.
4
ATTACH CHIMNEY TO CEILING (1/2)
Secure the chimney into the
ceiling plate.
5
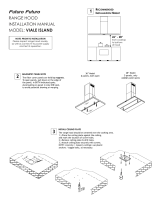
Futuro Futuro
Futuro Futuro
RANGE HOOD
INSTALLATION MANUAL
MODEL: SILVANA ISLAND
NOTE: PRIOR TO INSTALLATION
Please inspect range hood visually,
as well as connect it to power supply
and test its operation.
RECOMMENDED
INSTALLATION HEIGHT
1
26” - 28”
from cooktop
to bottom
of hood
INSTALL CEILING PLATE
The range hood should be centered over the cooking area.
1.) Place the ceiling plate against the ceiling,
and mark the location of screw holes.
2.) Remove ceiling plate & drill holes.
3.) Attach ceiling plate securely with screws.
NOTE: concrete / masonry ceilings: use plastic
anchors / toggle bolts, as necessary.
2
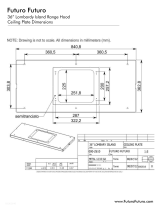
7 1/4”
10 1/2”

SECURE CHIMNEY TO PLATE
Screw the chimney into the
ceiling plate, with provided screws.
7
INSTALL DUCT & ELECTRIC
Connect the duct & power cable.
NOTE: Duct should be 6” round,
RIGID type (NOT flexible).
8
ATTACH CHIMNEY TO CEILING (2/2)
Secure the other side of the chimney
into the ceiling plate.
6
SECURE CHIMNEY COVERS
1.) Secure chimney covers with screws.
2.) Remove protective film.
9
/