Escea EW5000 Installation guide
- Category
- Fireplaces
- Type
- Installation guide
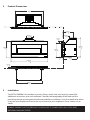
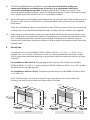
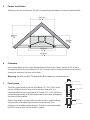
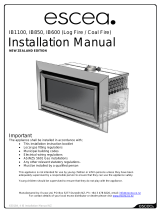
Escea EW5000 is an outdoor wood fireplace designed for cooking and heating purposes. It can burn wood and charcoal, and requires a flue system for proper ventilation. Installation must comply with local and national building codes, and the unit should be placed in a non-combustible cavity with a minimum size of 39 3/8" x 19 9/32" x 29 15/16". The fascia, which is attached using hooks, can be removed for cleaning and maintenance. The ash pan should be cleaned regularly to prevent overfilling. For optimal performance, the flue should be swept and cleaned at least once a year.
Escea EW5000 is an outdoor wood fireplace designed for cooking and heating purposes. It can burn wood and charcoal, and requires a flue system for proper ventilation. Installation must comply with local and national building codes, and the unit should be placed in a non-combustible cavity with a minimum size of 39 3/8" x 19 9/32" x 29 15/16". The fascia, which is attached using hooks, can be removed for cleaning and maintenance. The ash pan should be cleaned regularly to prevent overfilling. For optimal performance, the flue should be swept and cleaned at least once a year.


-
 1
1
-
 2
2
-
 3
3
-
 4
4
-
 5
5
-
 6
6
-
 7
7
-
 8
8


Escea EW5000 Installation guide
- Category
- Fireplaces
- Type
- Installation guide
Escea EW5000 is an outdoor wood fireplace designed for cooking and heating purposes. It can burn wood and charcoal, and requires a flue system for proper ventilation. Installation must comply with local and national building codes, and the unit should be placed in a non-combustible cavity with a minimum size of 39 3/8" x 19 9/32" x 29 15/16". The fascia, which is attached using hooks, can be removed for cleaning and maintenance. The ash pan should be cleaned regularly to prevent overfilling. For optimal performance, the flue should be swept and cleaned at least once a year.
Ask a question and I''ll find the answer in the document
Finding information in a document is now easier with AI
Related papers
-
Escea EF5000 User manual
-
Escea EW5000 Installation guide
-
Escea DX1000 Installation guide
-
 Escea IB1100 Installation guide
-
Escea DS1900 Installation guide
-
Escea DS1150 Installation guide
-
Escea DL850 Installation guide
-
Escea DFS730 Installation guide
-
-

Other documents
-
 Mode KS1150 User guide
-
Stovax Riva 50 User Instructions
-
Yunca Xander Masonry Installation & Operating Manual
-
 Yunca Gas ALLURE 630, 730, 930 INBUILT Installation, Operation, Maintenance & Warranty Information
-
-
 Regency Fireplace Products HI400 Owner's manual
-
Real Flame HOT BOX Installation & Operating Manual
-
 Regency Fireplace Products HI500 Owner's manual
-
 Regency Fireplace Products Pro-Series CI2700 Owner's manual
-
Wincor Nixdorf Kiosk Solution W1000 Assembly Instructions


