Page is loading ...

Belshaw Bros., Inc.
814 44th Street NW, Suite 103
Auburn, WA 98001 USA
Tel: (206) 322-5474
Fax: (206) 322-5425
Toll Free (US): 1-800-578-2547
E-mail: service@belshaw.com
www.belshaw.com
Operator’s Manual
and
Technical Supplement
Donut Depositor
Type B

Donut Cutter
Type B
Operator’s Manual
Belshaw Bros., Inc.
814 44
th
Street NW, Suite 103
Auburn, WA 98001 USA
Phone: (206) 322-5474 • Fax: (206) 322-5425
Email: [email protected] • http://www.belshaw.com


If you accept the machine from the shipping
company, you are, in effect, saying that the
machine is in good condition, and you must
pay for the machine. The freight company has
accepted responsibility for the safe delivery of
our machines. For your protection, inspect the
machine to see that no parts are bent, scratched,
or otherwise damaged. If any damage has
occurred in shipping, file a freight claim with the
shipping company immediately.
IMPORTANT
Keep this manual for reference purposes.
EQUIPMENT RECORD
Please provide the information below when you correspond with us about your machine.
Purchased by ______________________________________________________________________
Installed by _______________________________________________________________________
Date of installation __________________________ Model number _________________________
Serial number ______________________________________________________________________
011608
MN-1527EN
Belshaw Bros., Inc.
814 44
th
Street NW, Suite 103
Auburn, WA 98001 USA
Phone: (206) 322-5474 • Fax: (206) 322-5425
Email: [email protected] • http://www.belshaw.com


Belshaw Bros., Inc. • www.belshaw.com • Phone 206-322-5474 • Fax 206-322-5425
Type B Donut Cutter OM MN-1527EN iii
Contents
1 Operating 1
2 Cleaning 2
3 Maintenance 3
Lubrication 3
Care, Maintenance & Cleaning Instructions for Plungers, Cylinders & Hoppers 4
4 Donut-Making Helps 5
Tips on Making Quality Cake Donuts 5
Calculating Correct Water Temperature 6
Ratios of Plunger Sizes to Donut Weights 6
Temperature Conversion 6

Belshaw Bros., Inc. • www.belshaw.com • Phone 206-322-5474 • Fax 206-322-5425
iv MN-1527EN Type B Donut Cutter OM
Preface
The Type B Donut Cutter is designed to cut cake
donut products and deposit them in a variety of
fryers. It is designed to be mounted on a wall or
on a column attached to the fryer.
During production, the operator must move the
Cutter, holding the guide handle, to deposit
donuts in the desired locations in the fryer. The
operator must work safely at all times and read
this manual and follow its instructions and
warnings.
A thorough understanding of how to install,
maintain, and safely operate the Type B Donut
Cutter will prevent production delays and
injuries. Heed the following warnings and all
other warnings that appear in this manual:
• Make sure the machine is mounted
securely. Doing so will prevent the
machine from tipping over or falling,
which could cause serious injury.
• When the machine is column-mounted
on a fryer, make sure the fryer is
securely fastened to the floor. If the
fryer is not fastened to the floor, the
weight of the cutter could cause the fryer
to tip over, resulting in serious burns,
other injury, or death.
• To avoid damaging the machine, never
use force to assemble, disassemble,
operate, clean, or maintain it.
• Be careful never to get shortening,
water, or other materials on the floor. If
anything does get spilled on the floor,
clean the area immediately. Materials on
the floor can cause people to slip or fall,
resulting in serious injury or loss of life.
WARNING
Never put your hand in the hopper or
between trip arms while machine is being
operated.
DANGER!
When the cutter is column mounted, the
fryer must be securely fastened to the floor
to prevent tipping or overturning the fryer.
If the fryer is tipped, SERIOUS BURNS or
other injury can occur.

Belshaw Bros., Inc. • www.belshaw.com • Phone 206-322-5474 • Fax 206-322-5425
Type B Donut Cutter OM MN-1527EN 1
1 Operation
For best results, and to keep your machine in
perfect running condition, observe the following:
• Be sure that wing nuts and thumb nuts are
kept tight when the cutter is running.
• Rotate the crank before filling the hopper
with dough to be sure that it turns freely.
• The numbered scale on the side of the
cutter head regulates the weight of the
donuts. To change, loosen the wing nut
and set pointer at desired number (larger
numbers product larger donuts).
Retighten the wing nut.
• The outer lip of the cutting cylinder
should clear the shortening in the fryer by
the following distances:
Cake plungers, sizes 7/8” to 1” require 1”
clearance.
Cake plungers, 1 1/8” through 2 ¼” require 1
¼” to 1 3/8” clearance.
French Cruller plunger, all sizes, require 1
½” clearance.
This height is adjusted with the set collar on
the column or wall mount bushing.
• After putting dough into an empty
hopper, any air trapped in the cylinder
should be expelled. To do this, hold the
dough bowl under the cutter, and turn the
donut cutter crank until it has dropped
two or three donuts into the bowl (this
dough can then be replaced in the
hopper). After this initial priming, dough
can be added without repriming as long
as the hopper hasn’t been emptied.
• When ready to start frying, swing the
cutter over the frying kettle and turn the
crank to start depositing donuts. Move
the cutter approximately 4” after each
donut is dropped. Swing the cutter back
from over the fryer when done cutting
donuts.
• To use the last of the dough in the
hopper, push the remaining dough to the
bottom of the hopper. Use a rubber
scraper (spatula) to avoid scratching
hopper.
• Once a week, remove the main frame
from the pivot arm and hold in horizontal
position (with trip arms facing down),
and allow any accumulated oil to run
from the cam case. Wipe any excess oil
from trip arms and cam case.
WARNING
Never put your hand in the hopper or
between trip arms while cutter is being
cranked.

Belshaw Bros., Inc. • www.belshaw.com • Phone 206-322-5474 • Fax 206-322-5425
2 MN-1527EN Type B Donut Cutter OM
2 Cleaning
The hopper and plunger are easily removed for
cleaning purposes. Remove the hopper and
plunger as follows:
1. Be sure the plunger is in the “stop”
position so the lower piston is up in the
hopper cylinder.
WARNING
Keep your hand under the cylinder flange
at the bottom of the hopper to keep the
plunger from falling through.
2. Loosen wing nut at crown bearing and
remove crown bearing.
3. Loosen wing nut at lower clamp hinge.
4. Open hinge and pull hopper and plunger
forward. The cylinder can be removed
from the hopper. If they do not separate
readily, run hot water on the hopper and
cold water on the cylinder and try again.
CAUTION
Never put your hand in the hopper or
between trip arms while cutter is being
cranked.

Belshaw Bros., Inc. • www.belshaw.com • Phone 206-322-5474 • Fax 206-322-5425
Type B Donut Cutter OM MN-1527EN 3
3 Maintenance
Lubrication
CUTTER SHAFT: One drop of light food grade
oil to the main shaft bearing, located on the hub
between the dial and cam case, once a day.
CAMS AND TRIP ARM BEARINGS: Before
staring and after every two hours of operation,
apply several drops of light food grade oil to
each of the two holes in the top of the cam case.
CAM TRACK: Once a week, grease cam tracks
with food grade grease. Turn cutter manually to
spread trip arms. Using a ½” wide paint brush,
apply grease to cam track through opening
between trip arms.
CROWN BEARING: Before starting and after
every two hours of operation, apply several drops
of edible grade mineral oil onto the center rod
directly above the crown bearing.
PLUNGERS & CYLINDERS: The plungers and
cylinders of your donut cutter are precision
equipment built from stainless steel. They will
provide years of productive service if they are
handled carefully. Plungers and cylinders should
be covered with a thin film of cooking oil. This
provides protection and lubrication for the
plungers and cylinders.

Belshaw Bros., Inc. • www.belshaw.com • Phone 206-322-5474 • Fax 206-322-5425
4 MN-1527EN Type B Donut Cutter OM
CARE, MAINTENANCE, and CLEANING INSTRUCTIONS
for PLUNGERS, CYLINDERS, and HOPPERS
The plungers and hoppers of your donut machine are precision instruments built from alloy
steels and aluminum. They should be handled with care to insure continued satisfactory
performance.
When cleaning aluminum, selection of the right type cleaner is your most important
consideration. Any household dish washing detergent that is safe for aluminum does a good job
of cleaning and does not attack aluminum. Strong Alkali cleaners, such as lye, soda ash, and tri-
sodium phosphate, will discolor or even corrode aluminum even in weak solutions.
WARNING To prevent injury, disconnect machine from power source before
removing or installing plungers, cylinders, or hopper.
DO NOT Handle roughly or drop on hard surfaces.
DO NOT Mix with other utensils in the sink when washing.
DO NOT Allow to rust. Always wash parts thoroughly. Dry completely and then lubricate with
mineral oil or liquid shortening before storing or reinstalling in unit.
DO NOT Force the machine if it becomes jammed. Disassemble and remove any obstruction to
prevent damage to the plunger.
Washing Plungers, Cylinders, and Hoppers
By Hand:
1. Remove “O” Rings, if so equipped.
2. Use plenty of warm water.
3. Add cleaner approved for aluminum in
concentrations recommended by
manufacturer.
4. Presoak to loosen stubborn or dried-on
deposits.
5. Use a non-scratching plastic scour cloth
to remove soil and restore luster.
6. Rinse in clear hot water (170-190 °F)
7. Wipe completely dry.
8. Dip plungers in mineral oil or liquid
shortening to prevent rust and sticking.
By Machine:
1. Remove “O” rings, if so equipped.
Clean, hot water must be used with a
minimum temperature of 160°F (71°C)
for single tank conveyor machines. For
all other machines, a temperature of
140°-160°F (60°-71°C) must be used.
2. Use clean, hot water (170°-190°F; 77°-
88°C) during rinsing cycle. Avoid
contamination of the rinsing water with
the detergent.
3. Dry completely. Dip plungers and
cylinders in mineral oil or liquid
shortening to prevent rust and sticking.
CAUTION Never immerse main cutter frame assemblies, cams, bearings, rollers or
electrical components in water.
SPECIAL INSTRUCTIONS FOR THE CARE OF FRENCH PLUNGERS:
The French plunger must be handled with great care. Before each use, put one drop of mineral
oil on each of the gibs that slide in the grooves near the top of the plunger. After each use,
unscrew the lower piston and remove the product former. Thoroughly wash and dry and then oil
the parts with mineral oil or liquid shortening to prevent sticking. Reassemble the plunger. Be
certain that the bottom piston is threaded into place completely.

Belshaw Bros., Inc. • www.belshaw.com • Phone 206-322-5474 • Fax 206-322-5425
Type B Donut Cutter OM MN-1527EN 5
4 Donut-Making Helps
Tips on Making Quality
Cake Donuts
• Use the correct batter temperature.
In general, the correct batter temperature is
75°-80°F/24°-27°C. Check the mix
manufacturer’s instructions, as the
recommended temperature range may vary.
If the batter is too warm, the donuts will lack
volume and may “ring out” or be misshapen.
If the batter is too cold, the donuts will stay
under the shortening too long, fry too
slowly, and crack open or ball up. They
may also absorb excess shortening and lose
volume.
• Use the correct floor time.
A floor time of 10 minutes between mixing
and cutting allows the baking powder to
react with the water. This helps the donuts
attain the proper volume the proper level of
shortening penetration.
If the floor time exceeds 30 minutes, the mix
will gas off, the donuts will lose volume and
shape and will absorb too much shortening.
• Use the correct frying temperature.
The correct shortening temperature for
frying is 370°-380°F/188°-193°C.
If the shortening is too hot, the donuts will
fry too quickly on the outside and will lose
volume. The donuts may also become dense
inside.
If the shortening is too cold, the donuts will
spread too rapidly, will form large rings, will
tend to crack open, will be too light in
appearance, and will absorb too much
shortening.
• Maintain the proper shortening level. We
recommend a distance of 1 1/4” between the
cutter and the shortening.
If the shortening is too deep, the donuts may
not turn over when they reach the turner,
causing them to cook unevenly.
If the shortening is too shallow (too far
below the cutter), the donuts may not drop
flat, may turn over while submerging and
surfacing, and may become irregular,
cracked, or rough-crusted.
• Ensure that the donuts absorb the right
amount of shortening.
Donuts should absorb 1-1/2 to 3 oz/42 to 85
g of shortening per dozen, depending on
their weight. You can achieve proper
absorption by following tips 1-3.
• If the donuts do not absorb enough
shortening, they will not keep well.
If they absorb too much shortening, they
will lose volume and may become
misshapen. If this happens, follow tips 1-3,
mix the batter a little longer than usual, turn
the donuts as soon as they become golden
brown, and turn the donuts only once.

Belshaw Bros., Inc. • www.belshaw.com • Phone 206-322-5474 • Fax 206-322-5425
6 MN-1527EN Type B Donut Cutter OM
Calculating Correct Water Temperature
The following is an example of how to calculate the correct water temperature to use. You must use your
own room temperature, dry mix temperature, desired batter temperature, and, if you are making yeast-
raised donuts, estimated temperature increase during mixing.
Cake Donuts Yeast-Raised Donuts
°F
°C
°F
°C
Room temperature 72 22.2 72 22.2
Dry mix temperature +70 +21.1 +70 +21.1
Total A
142 43.3 142 43.3
Desired batter temperature 75 23.9 80 26.7
x3 x3 x3 x3
Total B
225 71.7 240 80.1
Total B
225 71.7 240 80.1
-Total A
-142 -43.3 -142 -43.3
Desired water temp. for cake donuts
83°F
28.4°C
98 36.8
↓
↓
Figure from above 98 36.8
Temperature increase during mixing (average: 30°F/17°C)
-30 -17
Desired water temperature for yeast-raised donuts
68°F
19.8°C
Ratios of Plunger Sizes to
Donut Weights
The weights given are for donuts without icings
or other toppings. They are provided for
reference only, as weights vary according to the
density of the batter.
Plunger Size Donut Weight per
Dozen
1” 5-8 oz/142-227 g
1 5/8” 14-17 oz/397-482 g
1 3/4” 16-20 oz/454-567 g
1 7/8” 19-24 oz/539-680 g
2" 22-27 oz/624-765 g
Temperature Conversion
To convert temperatures from Fahrenheit to
Celsius, subtract 32 from °F and divide the result
by 1.8. For example, 212°F-32/1.8 = 100°C.
To convert temperatures from Celsius to
Fahrenheit, multiply °C by 1.8 and add 32 to the
result. For example, (100°C x 1.8) + 32 = 212°F.
°F °C °F °C
55 12.8 340 171.1
60 15.6 345 173.9
65 18.3 350 176.7
70 21.2 355 179.4
75 23.9 360 182.2
80 26.7 365 185.0
325 162.8 370 187.8
330 165.6 375 190.6
335 168.3 380 193.3

Donut Cutter
Type B
Technical Supplement
Belshaw Bros., Inc.
814 44
th
Street NW, Suite 103
Auburn, WA 98001 USA
Phone: (206) 322-5474 • Fax: (206) 322-5425
Email: [email protected] • http://www.belshaw.com


If you accept the machine from the shipping
company, you are, in effect, saying that the
machine is in good condition, and you must
pay for the machine. The freight company has
accepted responsibility for the safe delivery of
our machines. For your protection, inspect the
machine to see that no parts are bent, scratched,
or otherwise damaged. If any damage has
occurred in shipping, file a freight claim with the
shipping company immediately.
IMPORTANT
Keep this manual for reference purposes.
EQUIPMENT RECORD
Please provide the information below when you correspond with us about your machine.
Purchased by ______________________________________________________________________
Installed by _______________________________________________________________________
Date of installation __________________________ Model number _________________________
Serial number ______________________________________________________________________
041808
MN-1528EN
Belshaw Bros., Inc.
814 44
th
Street NW, Suite 103
Auburn, WA 98001 USA
Phone: (206) 322-5474 • Fax: (206) 322-5425
Email: [email protected] • http://www.belshaw.com


Belshaw Bros., Inc. • www.belshaw.com • Phone 206-322-5474 • Fax 206-322-5425
Type B Donut Cutter TS MN-1528EN iii
Contents
1 Installation 1
Wall Mount 1
Column Mount 2
2 Maintenance 4
Lubrication 4
3 Troubleshooting 5
4 Plungers, Mounting Info 11
French Plunger Drawing (7B-1001) 12
Service Bulletin #254B (Extension Arm Limiting Bracket Installation Instructions) 13
Service Bulletin #18 (Trip Arm Adjustment) 14
Service Bulletin #88 (#400 Height Adjustment Kit Instructions) 15
5 Parts Info 16
6 Appendix 19
Parts List Drawing Insert Page Insert

Belshaw Bros., Inc. • www.belshaw.com • Phone 206-322-5474 • Fax 206-322-5425
iv MN-1528EN Type B Donut Cutter TS
Preface
The Type B Donut Cutter is designed to cut cake
donut products and deposit them in a variety of
fryers. It is designed to be mounted on a wall or
on a column attached to the fryer.
During production, the operator must move the
Cutter, holding the guide handle, to deposit
donuts in the desired locations in the fryer. The
operator must work safely at all times and read
this manual and follow its instructions and
warnings.
A thorough understanding of how to install,
maintain, and safely operate the Type B Donut
Cutter will prevent production delays and
injuries. Heed the following warnings and all
other warnings that appear in this manual:
• Make sure the machine is mounted
securely. Doing so will prevent the
machine from tipping over or falling,
which could cause serious injury.
• When the machine is column-mounted
on a fryer, make sure the fryer is
securely fastened to the floor. If the
fryer is not fastened to the floor, the
weight of the cutter could cause the fryer
to tip over, resulting in serious burns,
other injury, or death.
• To avoid damaging the machine, never
use force to assemble, disassemble,
operate, clean, or maintain it.
• Be careful never to get shortening,
water, or other materials on the floor. If
anything does get spilled on the floor,
clean the area immediately. Materials on
the floor can cause people to slip or fall,
resulting in serious injury or loss of life.
WARNING
Never put your hand in the hopper or
between trip arms while machine is being
operated.
DANGER!
When the cutter is column mounted, the
fryer must be securely fastened to the floor
to prevent tipping or overturning the fryer.
If the fryer is tipped, SERIOUS BURNS or
other injury can occur.

Belshaw Bros., Inc. • www.belshaw.com • Phone 206-322-5474 • Fax 206-322-5425
Type B Donut Cutter TS MN-1528EN 1
1 Installation
Wall Mount
When the donut cutter is to be mounted on a wall
bracket, it is mandatory to provide a good, solid
support on the wall. For this purpose, we
suggest using a 2” x 4” or 2” x 6” timber of good
quality. The timber should extend from the
ceiling to the floor. The timber must be secured
with #4 wood screws, 4” long mini8mum,
screwed directly into a wall stud. The screws
should be located approximately every 12” over
the entire length of the timber.
After attaching the 2” x 4” or 2” x 6” timber as
described above, do the following:
1. Position the fryer 6” to 8” from the wall
and slightly to the right or left of the
timber support. Level the fryer.
2. Lay a straight edge (a board will do)
across the kettle top to the wall support
and mark the height of the kettle top on
the wall support.
3. Find the point in the center of the wall
support and 15” above the kettle height.
Drill a ¼” diameter hole at this point and
attach the wall plate to the wall support
with a 5/16” x 1 ½” lag screw through the
top hole in the wall plate.
4. Check to see that the wall plate is vertical
(use a level if available). Then, secure
the wall plate with the five remaining lag
screws.
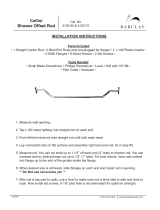
5. To connect the straight arm section to the
wall plate: First slide the bushing
through one leg of the straight arm, slide
set collar onto the bushing (pin side
down); then slide the bushing through the
hole in the other leg of the straight arm.
Position the bushing between the hinge
brackets on the wall plate and pass the
wall pin through hinge brackets and
bushing (See Figure 1).
6. The pivot arm is connected to the straight
arm by passing the arm pin through both
arm sections, with the legs of the pivot
arm between the legs of the straight arm
(See Figure 1).
7. The cutter frame can now be mounted on
the pin at the end of the pivot arm.
Figure 1
/