Page is loading ...

www.buyersproducts.com
Phone (440) 974-8888
Fax 800-841-8003
1
Installation Instructions
1501675 Aluminum Truck Rack
1501680 Black Aluminum Truck
Rack
WARNING
Read carefully and understand all ASSEMBLY AND OPERATION
INSTRUCTIONS before operating. Failure to follow the safety
rules and other basic safety precautions may result in serious
personal injury.
WARNING
WORK AREA SAFETY
• Inspect the work area before installation. Keep work area clean, dry,
free of clutter, and well lit. Cluttered, wet, or dark work areas can result
in injury. Installing the truck rack in confined work areas may put you
dangerously close to other cutting tools and rotating parts.
• Do not allow the rack to come into contact with an electrical source.
The rack is not insulated and contact will cause electrical shock.
• Keep children and bystanders away from the work area while installing
the truck rack.
• Be aware of all power lines, electrical circuits, water pipes, and other
mechanical hazards in your work area. Some of these hazards may be
below the work surface hidden from your view and may cause personal
harm or property damage if unintentionally contacted.
PERSONAL SAFETY
• Stay alert, watch what you are doing, and use common sense when in-
stalling the truck rack, loading and unloading. Do not load the rack while
you are tired or under the influence of drugs, alcohol, or medication. A
moment of inattention may result in serious personal injury.
• Use safety apparel and equipment when necessary. Use ANSI-
approved safety goggles or safety glasses with side shields, or when
needed, a face shield. Use a dust mask in dusty work conditions. Also
use non-skid safety shoes, hardhat, gloves, dust collection systems, and
hearing protection when appropriate. This applies to all persons in the
work area.
• Do not overreach when loading and unloading. Keep proper footing and
balance at all times.
OPERATION SAFETY
• Carrying any load can be hazardous. All loads must be tied down se-
curely to the rack to prevent them from vibrating or sliding forward,
backward, laterally or being blown off or broken by unexpected wind or
road hazards such as potholes.
• Check each time you install the rack, load the rack, as well as daily to
ensure that all connections are tight. Periodically check welds for crack-
ing caused by metal fatigue.
• Avoid roll over by ensuring that loads are not top-heavy. High loads
must be transported with GREAT CAUTION to prevent loads from striking
low overhead objects or tipping during turns, abrupt stops, or high winds
—continued inside
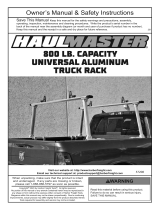
Please read and understand all instructions before use.
Retain this manual for future reference.
Use and Care
• Do not over fill the rack. Racks do a better and
safer job when used in the manner for which they are
designed. Plan your work, and do not overload.
• Check for damaged parts before each use. Carefully
check that the rack will operate properly and perform
its intended function. Replace damaged or worn parts
immediately. Never load the rack with a damaged part.
• Do not let children play with or around the rack. It is
not a toy. Store it in a dry, secure place out of the reach
of children. Inspect the rack for good working condition
prior to storage and before re-use.
• Use only accessories that are recommended by the
manufacturer for use with your rack. Accessories that
may be suitable for one rack may create a risk of injury
when used with another rack. Be aware of the different
loading capacities of each accessory.
Max Capacity: 800 lbs.

www.buyersproducts.com
Phone (440) 974-8888
Fax 800-841-8003
2
Assembly Instructions
IMPORTANT: DO NOT fully tighten any bolts during steps 1 or 2.
1. Preassemble Crossbars – Fig. 1
a. If necessary, insert M10x25 bolt into each Mounting Sleeve.
b. Install two Mounting Sleeves onto each Crossbar.
c. Install a Divider into each Mounting Sleeve using M8x40 bolts and M8 Lock Nuts.
NOTE: Make sure that each Divider’s vertical leg is facing the center as shown in
Fig 1.
d. Position each Dividers with an Adjustment Knob by loosening the Knob, sliding
the Divider to a desired location and retightening the Adjustment Knob.
2. Install Legs – Fig 2
a. Attach Post A to the preassembled Crossbar using M10x25 Bolts, M10 Flat
Washer, M10 Spring Washer and M10 Locking Nut. DO NOT FULLY TIGHTEN AT
THIS TIME.
b. Attach Post B to the opposite side of the Crossbar using the same M10
hardware. DO NOT FULLY TIGHTEN AT THIS TIME. Note: Install so that the
mounting feet on the Posts face the same direction.
c. Repeat this process for the second Crossbar
3. Install the Assembled Rack
a. Position one Assembled Crossbar near the cab of the truck ensuring that the
flanges on the Posts’ mounting feet are flush against the inside rail of the truck bed.
b. Attach to the truck bed by installing J-Hooks up through the tubes on the
mounting feet and tightening with M12 Flat Washers, Spring Washers and Nuts.
NOTES: Acorn Nuts are provided to cap the ends of the J-Bolts if desired. The
extra length of J-bolts may be cut off prior to installing the Acorn Nuts if desired.
Be sure to leave enough thread for this installation.
c. Confirm the Posts are properly positioned and tightened then center the
Crossbar and fully tighten the M10 hardware used to mount the Crossbar onto the
Posts.
d. Repeat this process for the Rear Crossbar Assembly.

www.buyersproducts.com
Phone (440) 974-8888
Fax 800-841-8003
3
Fig. 1
Fig. 2

www.buyersproducts.com
Phone (440) 974-8888
Fax 800-841-8003
4
3039587_A
ITEM QTY. DESCRIPTION
ALUMINUM
(1501675)
BLACK POWDER
COAT (1501680)
1 2 Post A 3039590 3037680
2 2 Post B 3039591 3037681
3 4 Divider 3037677
4 4 Mounting Sleeve 3039593 3037687
5 8 HHCS, M8X40 3039594
6 8 Nut,Locking,M8 3039595
7 12 HHCS, M10x25 3039596
8 12 Washer,Spring,M10 3039597
9 4 Adjustment Knob 3039598
Bills of Material
Truck Rack Assembly
ITEM QTY. DESCRIPTION
ALUMINUM
(1501675)
BLACK POWDER
COAT (1501680)
10 8 J Hook 3037671
11 8 Washer,Flat,M12 3039599
12 8 Washer,Spring,M12 3039600
13 8 Nut,M12 3039601
14 2 Crossbar 3039592 3037683
15 4 End Plug 3037673
16 8 Nut,Locking,M10 3039602
17 16 Washer,M10 3039603
18 8 Nut,Acorn,M12 3039604
/