Axis Communications Security Camera axis User manual

Category
Security cameras
Type
User manual

This manual is also suitable for

ENGLISH
FRANCAIS
DEUTSCH
ESPAÑOL
ITALIANO
AXIS 215 PTZ
Installation Guide
AXIS 215 PTZ Installation Guide Page 3
ENGLISH
ENGLISH
AXIS 215 PTZ
Installation Guide
This installation guide provides instructions for installing the AXIS 215 PTZ Network
Camera on your network. For all other aspects of using the product, please see the User’s
Manual, available on the CD included in this package, or from www.axis.com/techsup
Installation steps
1. Check the package contents against the list below.
2. Hardware overview. See page 4.
3. Mount the hardware. See page 5.
4. Assign an IP address. See page 10.
5. Set the password. See page 13.
Package contents
Item Models/variants/notes
Network camera AXIS 215 PTZ 50Hz (PAL)
AXIS 215 PTZ 60Hz (NTSC)
Power adapter 12V DC
Power adapter mains
cable
(country-specific)
Europe
•UK
Australia
USA/Japan
•Argentina
•Korea
4-pin block connector For connecting external devices to the I/O terminal connector
Drop ceiling mounting kit 1 inner bracket, 1 outer bracket
Plastic domes x 2 1 x for surface mounting
1 x for drop ceiling mounting
Screwdriver Resitorx T20
Screw kit 1 x safety wire 1m (3.3 ft)
2 x plug 30x3.4-4mm
2 x screw ST4.2x38
4 x screw M4x10
1 x screw M4x4
2 x screw M4x10 resitorx
Template Use to mark positions for surface/drop ceiling mounting
CD AXIS Network Video Product CD, including product documentation,
installation tools and other software
Printed Materials AXIS 215 PTZ Installation Guide (this document)
Axis Warranty Document
Important!
This product must be used in
compliance with local laws
and regulations.
Page 4 AXIS 215 PTZ Installation Guide
Hardware overview
Surface mounted unit
Drop ceiling mounted unit
AXIS 215 PTZ Installation Guide Page 5
ENGLISH
ENGLISH
Weights
Camera: 0.60kg (1.32lb)
Drop ceiling mount 0.54kg (1.19lb)
Drop ceiling cover 0.12kg (0.26lb)
Surface mount cover 0.13kg (0.29lb)
Power adapter, including mains cable: 0.43kg (0.95lb)
Connectors & buttons
Mounting
The front position
The AXIS 215 PTZ can pan (swivel) ±180° from position 0°, i.e. the metal tab to the left of
the connectors, as illustrated above. This position can be thought of as the “front” of the
camera, and is the point to which the camera will return whenever it is (re)started.
!
IMPORTANT! - The AXIS 215 PTZ is designed for indoor and outdoor use. To
use the camera outdoors, it must be installed in an approved outdoor housing.
Please see www.axis.com for more information on outdoor housings.
Do not use the camera’s dome bubble if it is to be installed in an outdoor
housing as the use of two dome bubbles will reduce the image quality and
cause image blurring.
Power connector
(see page 15)
Network
connector
(see page 15)
I/O terminal
connector
(see page 15)
Status, Network & Power
Indicator LEDs (see
page 16)
Audio out
Control button
Audio in
Position 0
°
Page 6 AXIS 215 PTZ Installation Guide
The AXIS 215 PTZ can be mounted in 2 different ways:
Surface mounted on a hard ceiling, in which case the unit is fastened directly to the
ceiling material
Recessed in a drop ceiling, which involves cutting a hole in the ceiling and using
the supplied drop ceiling mount
Surface mounting
If the required cabling is also surface mounted, the cables should enter via the removable
cable inlet on the large plastic dome cover.
1. Use the supplied template to mark
out the positions for the screws that
will fasten the camera to the ceiling.
If required, drill holes for the
supplied mounting plugs.
2. Use the 2 supplied 4.2x38 screws to
fasten the camera to the ceiling.
3. Connect the camera to the network
using a shielded network cable.
4. Optionally connect external input/
output devices, e.g. alarm devices.
See page 15 for information on the
terminal connector pins.
5. Optionally connect an active speaker
and/or external microphone.
6. Connect the supplied indoor power
adapter to the power connector.
7. Using the supplied screwdriver,
attach the large dome cover, using
the 2 M4x10 resitorx screws.
Notes:
When power is applied, check that the
indicator LEDs indicate the correct
conditions. See the table on page 16 for
further details.
The dome cover can be fitted with the
clear or the smoked plastic glass. See
Replacing the dome glass, on page 9.
Cable inlet
4.2x38mm
screw
M4x10 resitorx
screw
AXIS 215 PTZ Installation Guide Page 7
ENGLISH
ENGLISH
Drop ceiling mounting
1. If possible, remove the ceiling tile in which the drop ceiling mount is to be fitted.
2. Use the supplied template to mark the position for the hole in the ceiling tile. Remove the
protective paper, fix to ceiling tile and cut around the template.
Note: The combined weight of the camera, ceiling mount and cover is 1.26 kg (2.78 lb).
Check that the ceiling material is strong enough to support this weight. The
thickness of the ceiling should be 20-60mm (0.79”-2.36”).
3. Tilt and insert the outer ceiling bracket through the hole, and then pull it into place. The
bracket should be positioned so that the 3 vertical tabs point downwards in the hole.
4. Pull all of the required cables
(network, power, etc) down through
the hole, ready for connection.
5. Align the camera’s screw holes with
the holes in the inner ceiling
bracket, and using the 4 supplied
M4x10 screws, mount the camera
on the inner ceiling bracket, as
illustrated here.
Ceiling tile
Outer ceiling bracket
Hole diameter 168-175mm
(6.6-6.9”)
inner ceiling bracket
tabs
tabs
Page 8 AXIS 215 PTZ Installation Guide
Note: It is important that the camera is centered within the inner ceiling bracket. The
distance between the camera and the rim of the inner ceiling bracket must be
equal on all sides. Measure an equal distance between the camera and the tabs on
either side of the inner ceiling bracket. Visually ensure the centering.
6. Adjust the length of the
supplied safety wire and attach
it to both the inner bracket and
the hard ceiling above the drop
ceiling.
7. Connect the camera to the
network using a shielded
network cable.
8. Optionally connect external
input/output devices, e.g.
alarm devices. See page 15 for
information on the terminal
connector pins.
9. Optionally connect an active
speaker and/or external
microphone.
10. Connect the supplied indoor
power supply to the power
connector on the camera.
11. Lift and turn the inner bracket
(with camera) so that the
screws on the outer bracket
enter the screw slots on the
inner bracket. Make sure that
the screws go all the way to
the back of the slots.
Distance between camera
and tab must be equal
distance between
camera and bracket
distance between
camera and bracket
Camera must be centered within the inner ceiling bracket
tab
tab
Safety wire
Align slots
with screws
M4x4 screw
AXIS 215 PTZ Installation Guide Page 9
ENGLISH
ENGLISH
12. Gently tighten the screws so that the ceiling tile is held between the inner and outer
brackets. Check that none of the cabling is trapped by the brackets.
Note: When power is applied, check that the indicator LEDs indicate the correct condi-
tions. See the table on page 16 for further details.
13. Using the supplied screwdriver, attach the smaller dome cover, using the 2 M4x10
resitorx screws.
Replacing the dome glass
The dome cover can be fitted with the clear or the
smoked plastic glass. To switch covers, use a torque T6
screwdriver to remove the 4 fastening screws on the
inside of the dome, as shown here.
You are advised to take care when handling the plastic
glass, to avoid scratching it. The wearing of cotton
gloves is recommended.
M4x10 resitorx
screw
Page 10 AXIS 215 PTZ Installation Guide
Assign an IP address
Most networks today have a DHCP server that automatically assigns IP addresses to
connected devices. If your network does not have a DHCP server the AXIS 215 PTZ will use
192.168.0.90 as the default IP address.
If you would like to assign a static IP address the recommended method in Windows is either
AXIS IP Utility or AXIS Camera Management. Depending on the number of cameras you
wish to install, use the method that best suits your purpose.
Both of these free applications are available on the Axis Network Video Product CD supplied
with this product, or they can be downloaded from www.axis.com/techsup
Notes:
If assigning the IP address fails, check that there is no firewall blocking the operation.
For other methods of assigning or discovering the IP address of the AXIS 215 PTZ, e.g. in other
operating systems, see page 14.
Method Recommended for Operating system
AXIS IP Utility
See page 11
Single camera
Small installations
Windows
AXIS Camera Management
See page 12
Multiple cameras
Large installations
Installation on a different subnet
Windows 2000
Windows XP Pro
Windows 2003 Server
AXIS 215 PTZ Installation Guide Page 11
ENGLISH
ENGLISH
AXIS IP Utility - single camera/small installation
AXIS IP Utility automatically discovers and displays Axis devices on your network. The
application can also be used to manually assign a static IP address.
Note that the computer running AXIS IP Utility must be on the same network segment
(physical subnet) as the AXIS 215 PTZ.
Automatic discovery
1. Check that the AXIS 215 PTZ is connected to the network and that power has been
applied.
2. Start AXIS IP Utility.
3. When the camera appears in the window, double-click it to open its home page.
4. See page 13 for instructions on how to set the password.
Assign the IP address manually (optional)
1. Acquire an unused IP address on the same network segment as your computer.
2. Select the AXIS 215 PTZ in the list.
3. Click the button Assign new IP address to the selected device and enter the IP
address.
4. Click the Assign button and follow the instructions.
5. Click the Home Page button to access the camera’s web pages.
6. See page 13 for instructions on how to set the password.
Page 12 AXIS 215 PTZ Installation Guide
AXIS Camera Management - multiple cameras/large installations
AXIS Camera Management can automatically discover multiple Axis devices, show
connection status, manage firmware upgrades and set IP addresses.
Assign an IP address in a single device
1. Select AXIS 215 PTZ in AXIS Camera Management and
click the Assign IP button.
2. Select Assign the following IP address and enter the IP
address, the subnet mask and default router the device
will use.
3. Click the OK button.
Assign IP addresses in multiple devices
AXIS Camera Management speeds up the process of
assigning IP addresses to multiple devices, by suggesting IP
addresses from a specified range.
1. Select the devices you wish to configure (different
models can be selected) and click the Assign IP
button.
2. Select Assign the following IP address range and enter
the range of IP addresses, the subnet mask and default
router the devices will use.
3. Click the OK button.
AXIS 215 PTZ Installation Guide Page 13
ENGLISH
ENGLISH
Set the password
When accessing the AXIS 215 PTZ for the first
time, the ‘Configure Root Password’ dialog
will be displayed.
1. Enter a password and then re-enter it, to
confirm the spelling. Click OK.
2. Enter the user name root in the dialog as
requested.
Note: The default administrator user name
root cannot be deleted.
3. Enter the password as set above, and click OK. If the password is lost, the AXIS 215 PTZ
must be reset to the factory default settings. See page 16.
4. If required, click Yes to install AMC (AXIS Media Control), which allows viewing of the
video stream in Internet Explorer. You will need administrator rights on the computer to
do this.
The Live View page of the AXIS 215 PTZ is displayed, with links to the Setup tools, which
allow you to customize the camera.
Accessing the AXIS 215 PTZ from the Internet
Once installed, your AXIS 215 PTZ is accessible on your local network (LAN). To access the
camera from the Internet, network routers must be configured to allow incoming traffic,
which is usually done on a specific port. Please refer to the documentation for your router
for further instructions. For more information on this and other topics, visit the Axis Support
Web at www.axis.com/techsup
Page 14 AXIS 215 PTZ Installation Guide
Other methods of setting the IP address
The table below shows the other methods available for setting or discovering the IP address.
All methods are enabled by default, and all can be disabled.
Set the IP address with ARP/Ping
1. Acquire an IP address on the same network segment your computer is connected to.
2. Locate the serial number (S/N) on the AXIS 215 PTZ label.
3. Open a command prompt on your computer and enter the following commands:
4. Check that the network cable is connected to the camera and then start/restart the
camera, by disconnecting and reconnecting power.
5. Close the command prompt when you see ‘Reply from 192.168.0.125: ...’ or similar.
6. In your browser, type in http://<IP address> in the Location/Address field and press Enter
on your keyboard.
Notes:
To open a command prompt in Windows: from the Start menu, select Run... and type cmd. Click OK.
To use the ARP command on a Mac OS X, use the Terminal utility in Application > Utilities.
Use in operating
system
Notes
UPnP™
Windows
(ME or XP)
When enabled on your computer, the camera is automatically
detected and added to “My Network Places.”
Bonjour
MAC OSX
(10.4 or later)
Applicable to browsers with support for Bonjour. Navigate to the
Bonjour bookmark in your browser (e.g. Safari) and click on the
link to access the camera’s web pages.
AXIS Dynamic DNS
Service
All A free service from Axis that allows you to quickly and simply
install your camera. Requires an Internet connection with no
HTTP proxy. See www.axiscam.net for more information.
ARP/Ping
All See below. The command must be issued within 2 minutes of
connecting power to the camera.
View DHCP server
admin pages
All To view the admin pages for the network DHCP server, see the
server’s own documentation.
Windows syntax Windows example
arp -s <IP Address> <Serial Number>
ping -l 408 -t <IP Address>
arp -s 192.168.0.125 00-40-8c-18-10-00
ping -l 408 -t 192.168.0.125
UNIX/Linux/Mac syntax UNIX/Linux/Mac example
arp -s <IP Address> <Serial Number> temp
ping -s 408 <IP Address>
arp -s 192.168.0.125 00:40:8c:18:10:00
temp
ping -s 408 192.168.0.125
AXIS 215 PTZ Installation Guide Page 15
ENGLISH
ENGLISH
Unit connectors
Network connector - RJ-45 Ethernet connector. Using shielded cables is recommended.
Power connector - DC connector 12V DC
±5%, max 14.5W. See product label for ±
connection.
Audio in - 3.5mm input for a mono microphone, or a line-in mono signal (left channel is
used from a stereo signal).
Audio out - Audio output (line level) that can be connected to a public address (PA) system
or an active speaker with a built-in amplifier. A pair of headphones can also be attached. A
stereo connector must be used for the audio out.
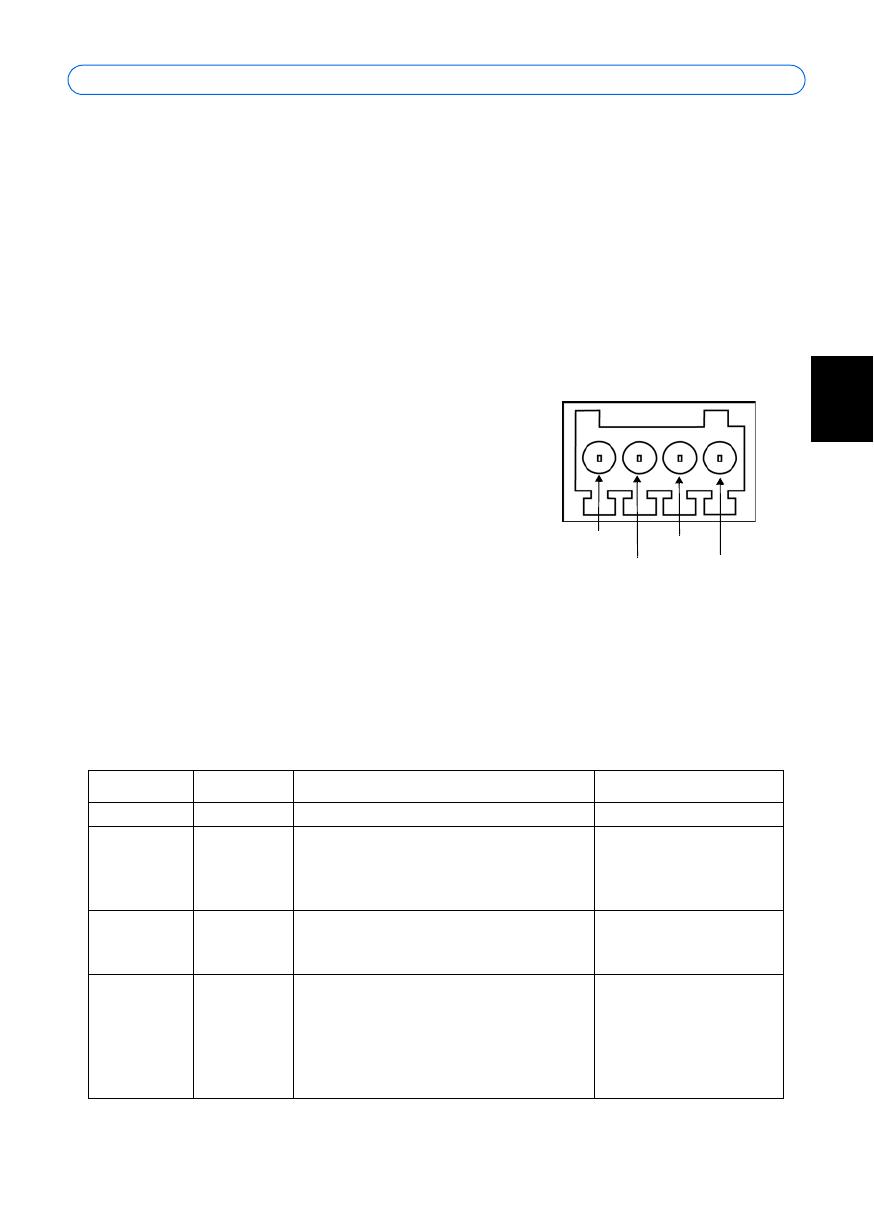
I/O terminal connector - Used in applications for e.g.
motion detection, event triggering, time lapse recording
and alarm notifications. It provides the interface to:
1 transistor output - For connecting external
devices such as relays and LEDs. Connected
devices can be activated by AXIS VAPIX API,
output buttons on the Live View page or by
an Event Type. The output will show as active
(shown under Event Configuration > Port
Status) if the alarm device is activated.
1 digital input - An alarm input for connecting devices that can toggle between
an open and closed circuit, for example: PIRs, door/window contacts, glass break
detectors, etc. When a signal is received the state changes and the input becomes
active (shown under Event Configuration > Port Status).
Auxiliary power and GND
Function Pin number Notes Specifications
GND 1 Ground
12V DC
Power
2 Can be used to power auxiliary equipment.
Note that the AXIS 215 PTZ itself cannot be
powered via the I/O terminal connector.
Max load = 100mA
Digital Input 3 Connect to GND to activate, or leave float-
ing (or unconnected) to deactivate.
Must not be exposed to
voltages greater than
12V DC
Transistor
Output
4 Uses an open-collector NPN transistor with
the emitter connected to the GND pin. If
used with an external relay, a diode must be
connected in parallel with the load, for pro-
tection against voltage transients.
Max load = 100mA
Max voltage = 24V DC
(to the transistor)
Pin 4
Pin 3
Pin 2
Pin 1
Page 16 AXIS 215 PTZ Installation Guide
Connection diagram
LED indicators
Resetting to the Factory Default Settings
This will reset all parameters, including the IP address, to the factory default settings:
1. Disconnect power from the camera.
2. Press and hold the Control button and reconnect power.
3. Keep the Control button pressed until the Status indicator displays amber (this may take
up to 15 seconds), then release the button.
4. When the Status indicator displays green (which can take up to 1 minute) the process is
complete and the camera has been reset.
5. Re-assign the IP address, using one of the methods described in this document.
It is also possible to reset parameters to the original factory default settings via the web
interface. For more information, please see the online help or the user’s manual.
LED Color Indication
Network Green Steady for connection to a 100 Mbit/s network. Flashes for network activity.
Amber Steady for connection to 10 Mbit/s network. Flashes for network activity.
Unlit No network connection.
Status Green Steady green for normal operation.
Amber Steady during startup, during reset to factory default or when restoring settings.
Red Slow flash for failed upgrade.
Power Green Normal operation.
Amber Flashes green/amber during firmware upgrade.
o
z
AXIS 215 PTZ
12V
max. 100mA
e.g. pushbutton
4
o
3
o
o
2
1
AXIS 215 PTZ Installation Guide Page 17
ENGLISH
ENGLISH
Further information
The user’s manual is available from the Axis Web site at www.axis.com or from the Axis
Network Video Product CD supplied with this product.
Tip!
Visit www.axis.com/techsup to check if there is updated firmware available for your
AXIS 215 PTZ. To see the currently installed firmware version, see the Basic
Configuration web page in the product’s Setup tools.
AXIS 215 PTZ Installation Guide R2.1 May 2010
Copyright © Axis Communications AB, 2007 - 2010 Part No. 39307
  • Page 1 1
  • Page 2 2
  • Page 3 3
  • Page 4 4
  • Page 5 5
  • Page 6 6
  • Page 7 7
  • Page 8 8
  • Page 9 9
  • Page 10 10
  • Page 11 11
  • Page 12 12
  • Page 13 13
  • Page 14 14
  • Page 15 15
  • Page 16 16
  • Page 17 17
  • Page 18 18
  • Page 19 19
  • Page 20 20
  • Page 21 21
  • Page 22 22
  • Page 23 23
  • Page 24 24
  • Page 25 25
  • Page 26 26
  • Page 27 27
  • Page 28 28
  • Page 29 29
  • Page 30 30
  • Page 31 31
  • Page 32 32
  • Page 33 33
  • Page 34 34
  • Page 35 35
  • Page 36 36
  • Page 37 37
  • Page 38 38
  • Page 39 39
  • Page 40 40
  • Page 41 41
  • Page 42 42
  • Page 43 43
  • Page 44 44
  • Page 45 45
  • Page 46 46
  • Page 47 47
  • Page 48 48
  • Page 49 49
  • Page 50 50
  • Page 51 51
  • Page 52 52
  • Page 53 53
  • Page 54 54
  • Page 55 55
  • Page 56 56
  • Page 57 57
  • Page 58 58
  • Page 59 59
  • Page 60 60
  • Page 61 61
  • Page 62 62
  • Page 63 63
  • Page 64 64
  • Page 65 65
  • Page 66 66
  • Page 67 67
  • Page 68 68
  • Page 69 69
  • Page 70 70
  • Page 71 71
  • Page 72 72
  • Page 73 73
  • Page 74 74
  • Page 75 75
  • Page 76 76
  • Page 77 77
  • Page 78 78
  • Page 79 79
  • Page 80 80
  • Page 81 81
  • Page 82 82
  • Page 83 83
  • Page 84 84
  • Page 85 85
  • Page 86 86
  • Page 87 87

Axis Communications Security Camera axis User manual

Category
Security cameras
Type
User manual
This manual is also suitable for

Ask a question and I''ll find the answer in the document

Finding information in a document is now easier with AI