nóicalatsnInóicalatsnI
Procedimiento de Instalación
En primer lugar realice todas las conexiones eléctricas y a continuación
compruebe que sean correctas.
Ajuste de opciones del menú (SEL)
SEL para seleccionar entre las funciones del menú:
- BASS/TREBLE(graves/agudos):-7, -6, ~, 1, 0, +1,~, +6, +7
- BALANCE:L7, L6,~, L1, 0, R1,~,R6, R7
- FADER:R7, R6, ~, R1, 0, F1, ~ ,F6, F7
- Ajustes de EQ (ecualizador): OFF, CLASS, ROCK, POP, FLAT
- Sonoridad: LOUD ON/OFF
- DX/LOCAL: Activa o desactiva el modo de radio local (LOCAL).
- Stereo/Mono: Cambia los modos de recepción de frecuencias de radio
entre MONO y STEREO.
- CLOCK 12/24: Esta unidad está equipada con dos formatos de
visualización de la hora,12 y 24 horas.
- ÁREA DE EEUU / UE: Esta radio está equipada con frecuencias Europa /
Estados Unidos.Gire la rueda de volumen para cambiar entre frecuencia
US(EEUU) y EU(Europa). El sistema cambiará la configuración de
frecuencia en 3 segundos aproximadamente.
- Botones de Cambio de 7 color en la iluminación:
El color de iluminación puede ser preestablecido como Auto(el color
cambia automáticamente uno por uno), azul, rojo, cian, verde, púrpura,
amarillo o blanco.
seleccionado.
Ajustar reloj (CLK)
Presionar y mantener botón CLK una vez para mostrar la hora.
Presione el botón CLK hasta que la hora parpadee. Puede ajustar la HORA
presionando los botones y . A continuación presione brevemente el
botón CLK, los minutos parpadearán y podrá ajustarlos usando los botones
y . Por último, pulse el botón CLK para confirmar.
Pantalla LCD
On/off Silencio
Presione brevemente el botón MUTE para activar/desactivar el silencio.
Puerto USB
Micrófono de manos libres
Conector de entrada auxiliar
Reiniciar
Presionar el botón RESET para reiniciar la unidad a las configuraciones de
fábrica si ocurre algún funcionamiento anormal. El botón de reinicio se
encuentra en el panel frontal.
Introduzca la carcasa de montaje en el salpicadero y doble las lengüetas de
montaje con un destornillador.
Asegúrese de que la palanca de bloqueo quede a nivel con la carcasa de
montaje (sin sobresalir).
Conectar todos los arneses de cableado y deslizar la unidad principal en la
manga de montaje hasta que haga click.
Turnar On/Off de unidad, Cambiar fuente
Presionar el botón /SRC para encender la unidad.
Presionar y mantener /SRC nuevamente para apagarla.
Pulse el botón /SRC para cambiar entre los modos tal como la RADIO,
USB (con el dispositivo USB insertado), BT(Bluetooth) y AUX-IN(entrada
auxiliar).
Ajuste de volumen (VOL)
Gire la rueda del VOL para subir o bajar el nivel de volumen.
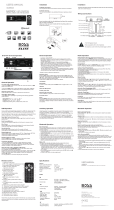
Apertura para Instalación
Esta unidad puede ser instalada en cualquier salpicadero con una apertura
como la que se muestra a continuación.
2.05 inch
7.20 inch
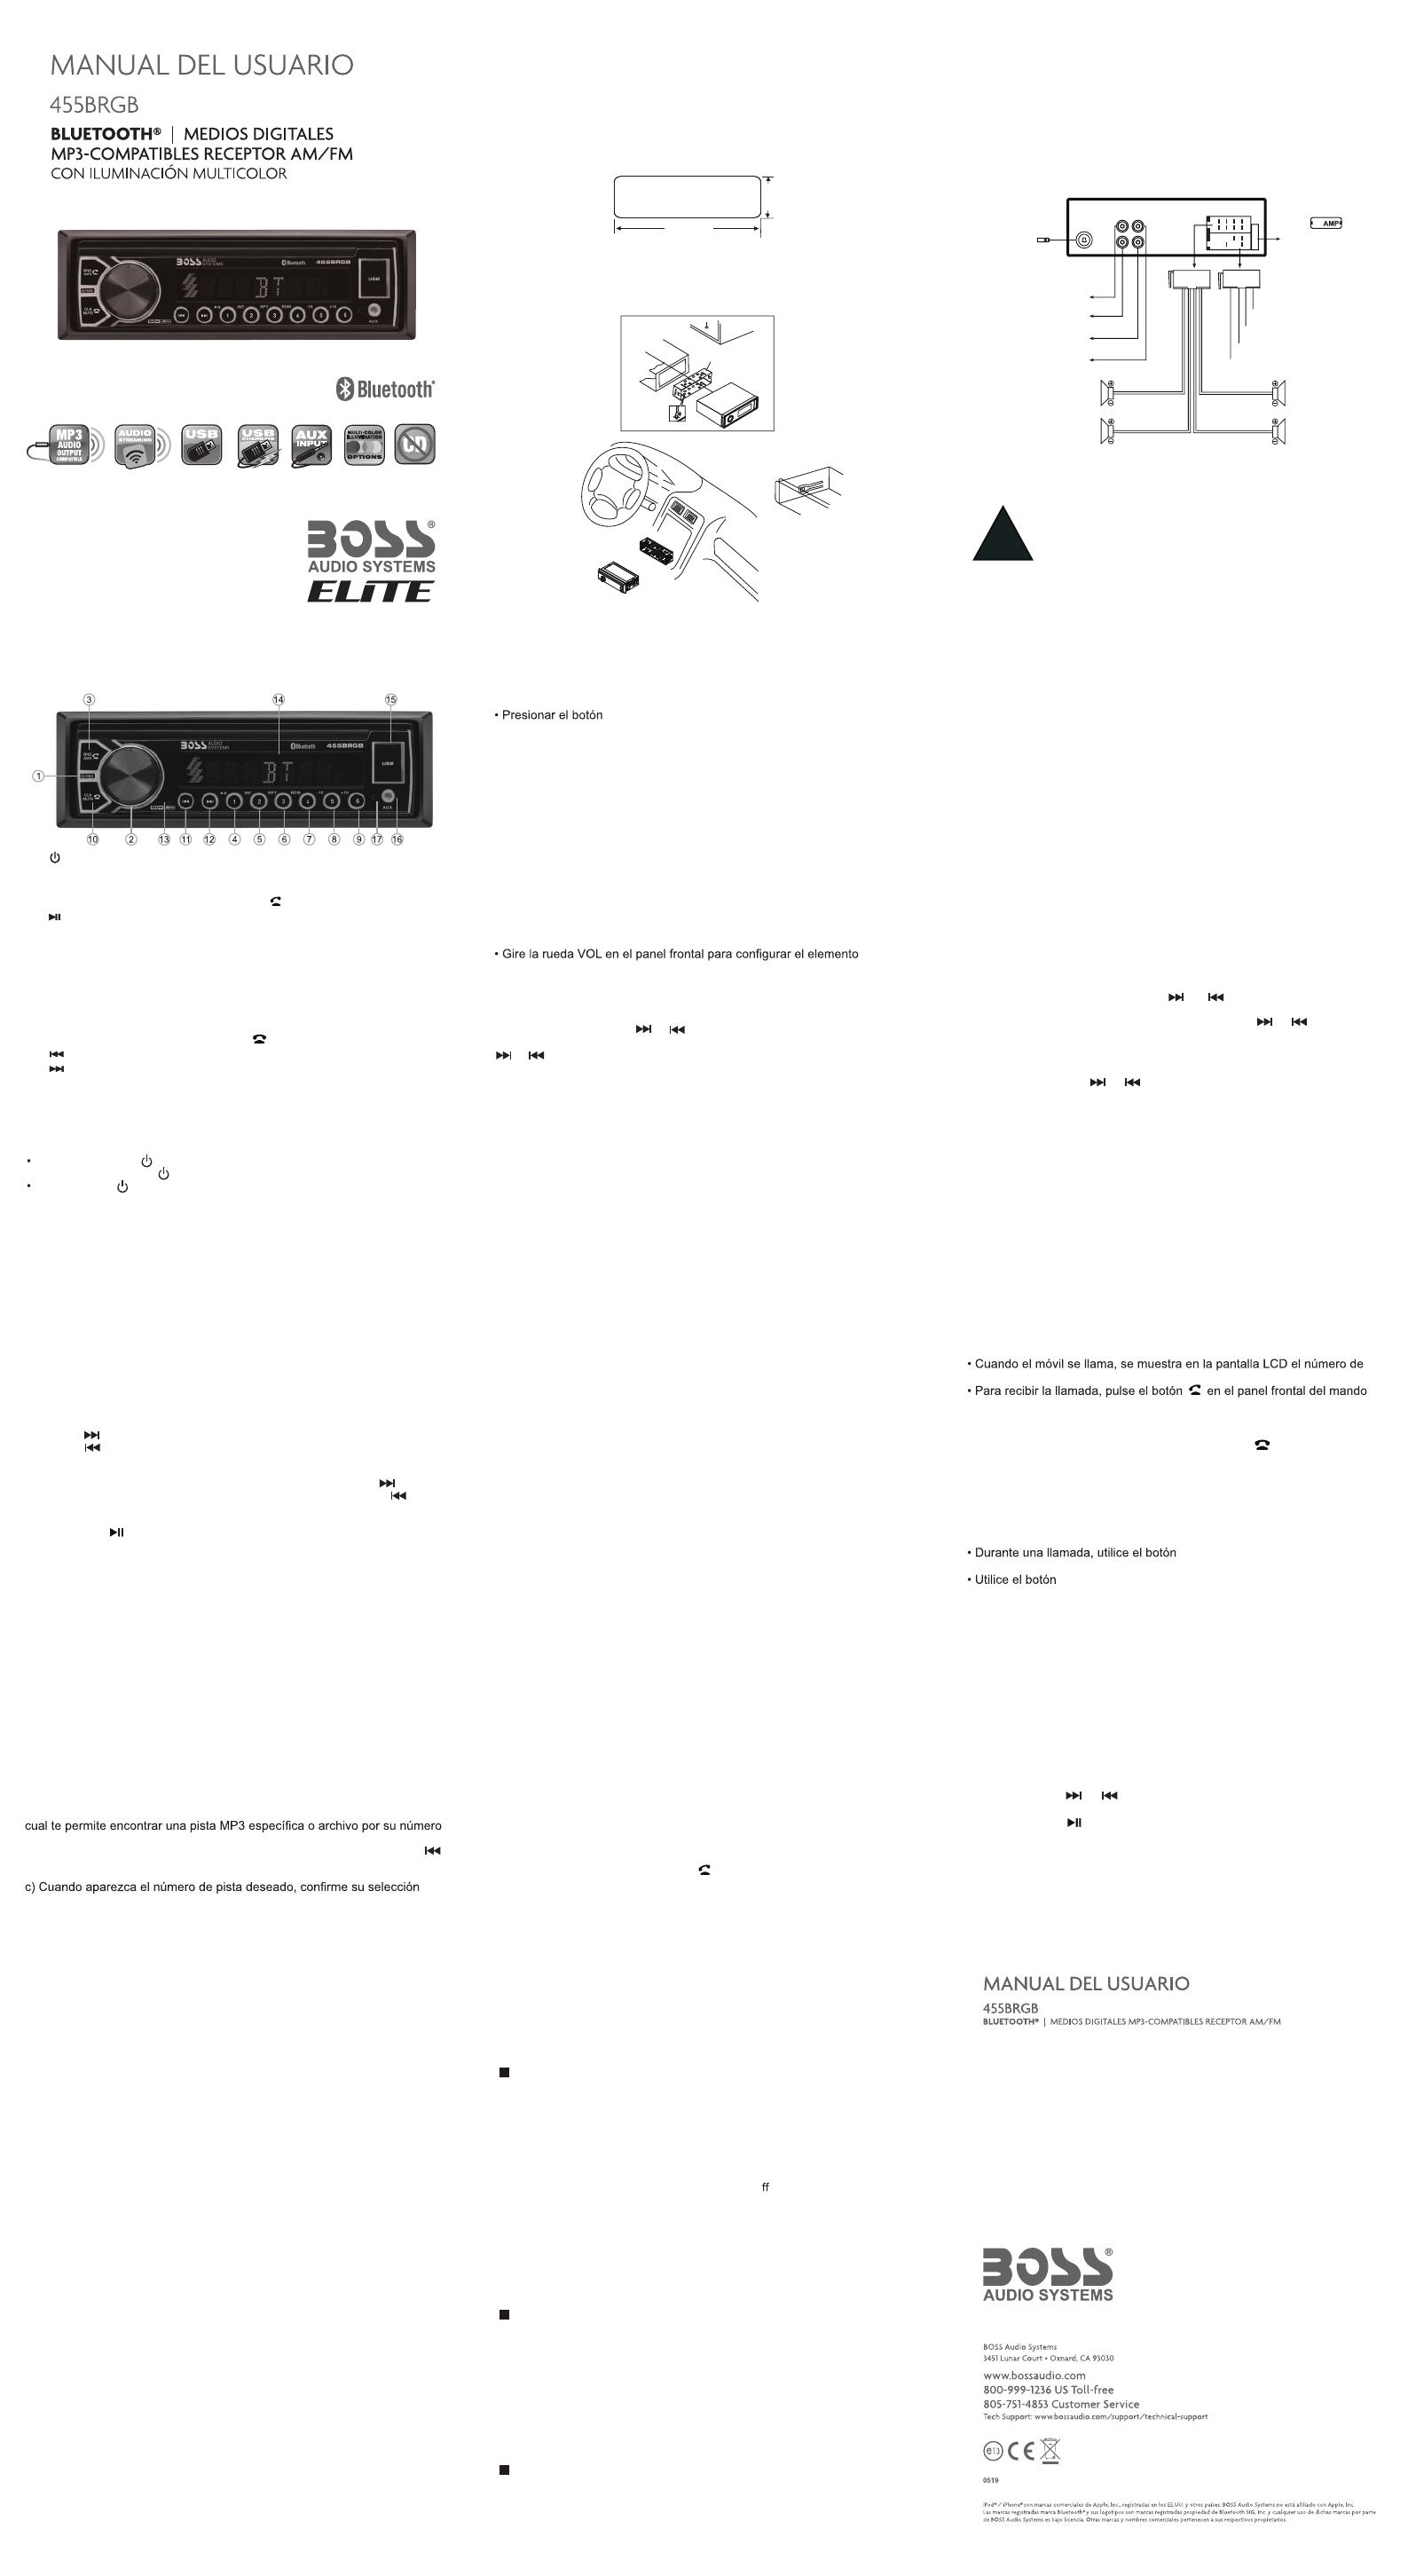
- Sólo puede utilizar el altavoces con 4 ohmios de impedancia.
- +12V DC NEGATIVO TIERRA.
- La corriente máxima del disparador a remoto del amplificador
es de 200 mA.
!
Conexiones de cableado
15
Blanco: Salida PRE-AMP
Frontal Izquierdo
Blanco: Salida PRE-AMP
Trasero Izquierdo
Rojo: Salida PREAMP
Frontal Derecho
Rojo: Salida PRE-AMP
Trasero Derecho
Antena de radio
ACC + (Rojo)
GND - (Negro)
ANT + (Azul)
Energía B + (Amarillo)
15A
Púrpura
Altavoz Trasero
Derecho
Altavoz Frontal
Derecho
Altavoz Trasero
Izquierdo
Altavoz Frontal
Izquierdo
Púrpura/Negro
Verde/Negro
Blanco
Blanco/Negro
Gris
Gris/Negro
Verde
Operación General
Descripción general de los componentes Operación General
Operación de la Radio
Turnar la frecuencia entre el área de EE.UU. y de Europa
En el modo de radio, pulse el botón SEL para entrar en el estado de turnar
la frecuencia de los EE.UU. y de la UE (europa), luego lo gire a cambiar la
frecuencia entre los Estados Unidos (EE.UU.) yde la UE (europa).
El sistema cambiará el ajuste de la frecuencia en aproximadamente 3
segundos.
Cambiar banda (BANDA)
Presione el botón BND para cambiar entre FM1, FM2, FM3, AM1 y AM2.
Cada banda puede almacenar hasta seis emisoras memorizadas.
A almacenar / recordar emisoras predeterminadas
La radio puede almacenar 6 emisoras predeterminadas para cada banda
(FM1, FM2, FM3, AM1 y AM2), totalmente de 30 emisoras preestablecidas.
- Para memorizar una emisora:
Pulse el botón de ajuste deseado (numerados 1-6) durante más 2
segundos para guardar la emisora a ese número preestablecido.
- Para recordar una emisora memorizada:
Pulse brevemente un botón de ajuste (numerados 1-6) para recordar la
emisora predeterminada.
Sintonización manual
Pulse y mantenga pulsado el botón ó para entrar en el modo de
sintonización manual.
En el modo de sintonización manual, pulse el botón ó para mover
a un paso el número de frecuencia de radio hacia arriba o hacia abajo .
Sintonización buscar
En el modo de espera o fuera del modo de sintonización manual, pulse
rápidamente el botón ó para pasar de manera automática a la
emisora disponible siguiente / anterior.
Reserva automática de emisora
Pulse y mantenga pulsado el botón BND/AMS durante más de 2
segundos para seleccionar seis emisoras a ser reservadas en la banda
actual.
Operación de USB
Para reproducir archivos MP3, insertar un dispositivo USB que contenga
archivos MP3.
Nota: El puerto USB de esta autoradio está diseñado para jugar multimedia
desde dispositivos de memoria flash, y carga desde el móvi de liPhone /
android. El consumo de corriente de carga es de 1 amperio.
Pista de Siguiente/ Anterior
Presionar para pasar al comienzo de la siguiente canción.
Presionar nuevamente para pasar al comienzo de la canción anterior.
Avance / retroceso rápido
Para avanzar rápidamente, pulse y mantenga pulsado el botón ;
Para retroceder rápidamente, pulse y mantenga pulsado el botón .
Jugar/ pausa
Pulse el botón (jugar / pausa) para pausar o recuperar la reproducción.
Explorar introducción
Presione el botón INT para reproducir los primeros 10 segundos de cada
pista, pulse de nuevo para detener explorar introducción.
Repetir misma pista
Presione el botón RPT para cambiar entre RPT ALL(Reproduce todas los
archivos en el USB), RPT FLR(Reproduce todas los archivos en la carpeta),
RPT ONE (Repite continuamente la pista seleccionada)
Jugar todas las pistas en aleatorio
Presione el botón RDM para reproducir todas las pistas en orden aleatorio,
pulse de nuevo para cancelar esta función.
Navegar pista / carpeta
- En modo USB, presione el botón 5/-10 para retroceder 10 pistas.
En modo USB, presione el botón 6/+10 para avanzar 10 pistas.
- Pulse y mantenga pulsado el botón 5 /-10 para volver a la carpeta anterior.
Mantenga pulsado el botón 6 /+ 10 para ir a la carpeta siguiente.
Seleccionar la pista o archivo para reproducir en formato MP3
a)En la reproducción de archivos con formato MP3, pulse y mantenga
pulsado el botón BND/AMS para entrar al modo de búsqueda de pista, el
de serie y el “TRK0000” aparecerá en la secuencia en la pantalla LCD.
b) Gire la perilla VOL para seleccionar la "primera serie". Pulse el botón
para mover la "Primeronumero" a la izquierda y entrar en el siguiente
número.
pulsando la tecla SEL.
Esta radio para coche cuenta con una toma de entrada auxiliar externa
(3.5mm) en el panel frontal. Es compble con la salida de audio de un
reproductor de música MP3.
1. Podrá escuchar sonido y música desde disposivos externos si conecta
un reproductor a la toma AUX IN usando un cable de audio.
2. Presione el botón SRC para seleccionar el modo de entrada AUX.
Operación de entrada auxiliar
Operación de Bluetooth
Resolución de problemas
El siguiente cuadro le ayudará a resolver la mayoría de problemas que
puedan aparecer.
Si sigue teniendo dudas después de mirar la lista, consulte con su
representante local del servicio al cliente. Antes de consultar la lista, lea los
procedimientos de cableado y operación.
Vincular y Conectar
Antes de utilizar en la primera vez el dispositivo Bluetooth como un sistema
de manos libres para un teléfono móvil compatible con Bluetooth, usted
debe vincular y conectar los dos dispositivos de la siguiente manera:
1. En cualquier modo, antes de vincular y conectar, el logo BT en la pantalla
LCD se indica que no hay ningún dispositivo está conectado. Para vincular,
active el modo de BT en su teléfono móvil.
2. Cuando el teléfono encuentra con el sistema de audio del coche, se
mostrará el nombre de "Boss 455BRGB".
3. Elegir el "Boss 455BRGB" en la lista de dispositivos para vincular y
conectar con el sistema de audio del coche. Una vez confirmada, dejará de
parpadear el logo BT.
4. Cuando se completa vinculación, el audio del teléfono móvil se transferirá
automáticamente al sistema de audio del coche por cada vez que se hace o
se recibe una llamada o cuando el teléfono móvil reproduce música.
Hacer una llamada
Para hacer una llamada, marque la llamada directamente desde el móvil
vinculado.
Remarcar el último número Marcado
Pulse y mantenga pulsado el botón en el panel de control para volver a
marcar el último número de teléfono marcado.
Operación de Bluetooth
Responder una llamada
teléfono entrante.
remoto.
Rechazar o finalizar una llamada
Para rechazar o finalizar la llamada, pulse el botón en el panel frontal
o el mando remoto.
Cambiar el audio entre el audio del coche y del móvil
Durante una llamada, pulse la tecla / botón VOL para cambiar la fuente de
audio del sistema de audio del coche volviendo a su móvil.
Ajustar volumen de llamada
VOL para ajustar el nivel de volumen
de la llamada.
MUTE(Silencio) para silenciar el sonido.
Transmisión de audio (A2DP)
La unidad es compatible con audio de la transmisión inalámbrica A2DP
(perfil de distribución de audio avanzada ) desde su móvil de Bluetooth
directamente a la unidad principal. También puede controlar su música
desde el panel frontal de la unidad principal utilizando AVRCP (Perfil de
mando remoto de audio y vídeo).
1. Después de la vinculación, conecta y permitiendo la transmisión de
audio desde un dispositivo móvil compatible, pulse el botón SRC para
entrar en el modo BT,mientras se demostrará pausa en la pantalla LCD.
2. Cuando está vinculado con un dispositivo móvil, la música que se
reproduce a través del este dispositivo será oido automáticamente
mediante del sistema de audio del coche y demostrará A2DP en la
pantalla LCD.
3. Pulse el botón o para reproducir la siguiente o anterior en el
teléfono móvil.
4. Pulse el botón para pausar o recuperar la reproducción de música.
FM
AM
BT
Especificaciones
General
Alimentación : DC 12V
Máxima potencia de salida : 50W X 4CH
Impedancia de altavoz : 4 - 8 Ohm
Dimensiones del Chasis : 7.0(Anchura) X 2.0(Altura)
X 3.8(Profundidad) pulgadas
Peso : 1.54 Lb (0.7 kg)
Fusible : 15 A
Rango de Frecuencia: 87.5 MHz - 107.9 MHz (EEUU)
87.5 MHz - 108.0MHz (EUROPA)
Incremento de Canal: 200 KHz(EEUU)
50 KHz(EUROPA)
Rango de Frecuencia: 530 KHz - 1710 KHz (EEUU)
522-1620 KHz(EUROPA)
Incremento de Canal: 10 KHz(EEUU)
9 KHz(EUROPA)
USB
RADIO
Formatos de Audio: MP3/WMA
Salida Pre-amp: Frontal y Trasera
Respuesta en Frecuencia : 20 Hz - 20KHz
Relación Señal/Ruido: 60dB
Tipo Puerto USB: 2.0
Carga de USB : 5V/1A
Perfiles BT: A2DP, AVRCP y HFP
Rango de Frecuencia: Espectro 2.4 GHz
SALPICADERO
CONSOLA
CARCASA DE MONTAJE
SUSTITUCIÓN FUSIBLE
SÓLO CON TIPO ATO
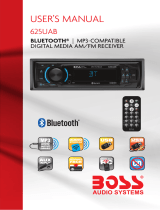
Botón (potencia)/ SRC (fuente)
Botón SEL (seleccionar / menú) y el mando VOL (volumen)
BND(BANDA) / AMS (reserva automática de emisoras, búsqueda automática
de música, búsqueda de música automá) y el botón (respuesta de llamada)
(pausa / jugar), botón de emisora 1 predeterminadas
RPT (repetir), botón de emisora 3 predeterminadas
-10 (10 pistas anteriores, carpeta anterior), botón de emisora 5
predeterminadas
1.
2.
3.
4.
INT (intro), botón de emisora 2 predeterminadas 5.
6.
RDM (aleatorio), botón de emisora 4 predeterminadas7.
8.
9. +10 (siguientes 10 pistas, siguiente carpeta), botón de emisora 6
predeterminadas
10. CLK (ajuste del reloj), botón de silencio, botón (colgar llamada)
11. botón(sintonizar / búsqueda hacia abajo, pista anterior, retroceso rápido)
12. botón(sintonizar / búsqueda hacia arriba, pista siguiente, avance rápido)
13. Micrófono manos libres 14. Pantalla LCD 15. Puerto USB
16. Puerto AUX IN (entrada auxiliar) 17. Botón de reajuste
General
1) El motor del carro no esta encendido.
- Gire la llave del carro en ACC o ON. (encendido)
2) El cable no esta conectado correctamente.
- Revise la conexión.
3) El fusible esta quemado.
- Reemplace el fusible.
4) No hay volúmen o suena muy bajo.
- Revise el volúmen o el silencio (MUTE) on/o
, ajuste el volúmen a un
nivel deseado.
5) Saltos en el sonido
- El ángulo de instalación es superior a 30°. Ajuste el ángulo de
instalación a menos de 30°.
6) Los botones de operación no funcionan.
- La computadora integrada no funciona adecuadamente
debido al ruido. Presione el botón RESET para reiniciar el equipo.
Radio
1) Demasiado ruido en las estaciones.
- La estación o la señal está muy débil. Seleccione otra estación u
otro nivel de señal.
2) El cable de la antena no esta bien conectado.
- Inserte el cable de la antena firmenmente en la conexión de la
antena del dispositivo de audio.
3) La estación preestablecida se borró
- El cable de la batería no esta conectado correctamente.
Conecte el cable de la batería en la terminal correctamente.
USB
1) Las memoria USB está conectada pero no suena.
- La memoria USB no estan bien conectadas. Sáquelas y reinsértelas.
- La memoria USB no está dañana o no contiene música.
Cámbiélo por otra o cárguele música.