Page is loading ...

{a:,,
nas{cr
bea/s2,yc{
Soewr,te
qruild
8
TOI I PLEASANT
VATLEY
ROAD
SWEET
HOME,
OPERATO
RS
INSTRUCTIONS
C**m*.-$**6*$f
t3
(rq"*H)*{Eg
Cm_*zffiE7
,Qnfr.
s'P*ao
oREGON 973s6
G.E.B.
All-Metal
Detectors
(Standard
Models)
Manutacturers
of
The
World's Largest Line
ol Mineral and Metal Detectors
MINERAL AND
METAL
OETEtrTORS
ELECTRtrNItr
MAEiNETOMETERsi
SUPER
GEIEiER AND
strI NTILLATItrN
COUNTERS
ULTRA V!trLET
LIGHTS

Proper
Care
of
Your
Detector
The
lollowing
are
precautions
you
should.take
to
protect
your
instrument lrom
harm,
insure
its
long life, and
attlid
nullifying
the
warrantY
Cleaning:
The
loop
and
rod or
probe
are waterproof.
They can
be cleaned with
fresh
water
and
a
mild cteanser-
Afrer
cleaningl
however,
dry
the
instrument
thoroughly.
Caution!
The
instrument
case
is
not waterprool,
and
water-il
allow-
ed
to
enter
lt-may
damage
electronic
components.
Weather
Conditlonr:
Prolect
your
detector
lrom excessively
cold
weather.
Freezing can
damage
the
electrcriic
components,
the case
and/or
the
batteries.
Excesslve
heat can
also damage
the
instrument.
Never
leave
it in the sun-
It's best
to
lay it in the
shade
when temporarily
not in use.
lf
it's
lelt
in a car
on
a
hot day,
cover
it with
a
blankel
or
something
similar
to
protect
it
lrom the direct
rays ol the
sun,
and then
leave
the
windows
slightly
open
to
permit
ven-
tilation.
Needless
to say,
protect
youl
detector
if
you
operate
it
in the
raln,
as
water
may
get
into
the
instrument
case'
Sali
Water:
Salt
water
is
very
corrosive!
lmmediately
alter
your
detector
has
been
exposed
to salt
water,
rinse
it
tnJi"rJnfy
*itn'fresh
water, being
careful
not to
allow
water
to
enter the
instrument
case.
Then
wipe
it with
a cloth
dampened
wiih
fresh
water and dry
it
lhoroughly.
Slorage:
6
you
plan
to
store
your
detector
for any
length
of
time,
unsnap
the
batteryand
remove
it
lrom
the
instrument'
WhenLver
your
detector
is
not in use,
turn the
VOLUME
knob
all
the
way to the"PWR
OFF"
position.
Service
And
lverranly
tnlormation:
lf
your
new
metal detecior
is
ever
in need
of service,
ship
it
to
us at
the
factory
address
below
or to
one of
the Service
Centers
listed
on
the back
ol
the
warranty
statement.
lnsure
it
fully,
prepay
the
charges,
and
enclose
a
letter describing
the
nature
of the
problem.
As long as
your
detector
is under
warranty
there
is
no charge
other
than
a small
handling
and
postage
fee.
Read
your
warranty
card
carefully.
lt describes
completely
what
is
covered
and
the
length ol
the
coverage.
lf
you
have
any
qiestions
don't
hesitate
to
write us.
We
will be
happy
to
answer any
questions
you
may
have.
HELPFUL
HINTS
AND
TIPS
1.
,,How
deep
will it
go?"
Detection
depth
is
determined
by
five
main
factors.
a.
The SIZE ol
the object
b.
The SIZE
of the
looP.
c.
The LENGTH
OF
TIME the
object
has
been
buried.
d.
The SKILL
of
the oPerator.
e.
The
ground
MINERAL
CONTENT.
The
longer an
object
has
been buried,
the
belter
you
will be
able to detect
it. A chemical
reaction called
a
"halo
elfect"
between
such objects
as silver
or copper
coins
and the surrounding
soil may
cause
your
detector
to
register
a
much
larger
inirease
in volume
than
might
otherwise
be expected
lor a smafi
coin' ll the
halo effect
is
strong
enough,
your
detector
may
contlnue
to
register
even
after
you
have dug
up
the
coin.
2.
,,Wnai
will
my detector
locate?" Sitver,
lead, copper,
bottle caps,
tin
loil,
pull
tabs, cartridge
cases,
rings'
brass
and tin
cans
are
just
a
lew of
the
conductive
obiects
that
can
be detected.
Your detector
will not
locate
sticks,
rags,
bones,
paper,
wood
or other
non-metallic
obiects.
3.
Learn
how to
interpret
the
ditlerent
types
of
responses
from
your
detector.
A hail
lying
flat in the
ground will
sometimes
produce
a
double
or single
reading
depending
upon
whether
your
loop
passed
across
it
lengthwise
or
across
its width. So
it's
a
good
idea
to
sweep
your
finds
from
several diflerent
directions
to
try to
learn
as
much
as
possible
about
the object
you
have located.
Coins
will
usually
only
produce
one
reading
regardless
of
sweep
direction.
4.
Rather
than
waste time,
check
around the
trees
for
junk
items
such
as
foil,
pull
tabs,
bottle
caps,
etc.
This
will
frequently
indicate
whether or
not someone
has already
been in the
area
with a detector.
5.
Always
"criss-cross" an
area
when hunting
it.
6.
After
you
have dug up a
coin, always
check
the
hole again
lor more. As many
as
10 coins
have
been
found
in one
hole!
T.
When
beachcombing
the best
place
to
look
lor coins
is
near
the concession stands.
g.
Gheck
the shallow
rvater in swlmming
areas.
Most
rings
and coins
are
lost when
people
enter
the
water'
9.
lf
you
make
plans
lor
coinshooting,
check
the
history
records
of the area.
10.
Always
carry
a
plastic
bag
for
your
detector
in case
you
get
caught
in
the
rain.
11. Nevei
ask
permission
to treasure
hunt over the
phone.
People tend
to
visualize
you
using
a
pick
and
shold.
mak-
ing large
holes.
12.
Join
a
local historical
society
or
get
acquainted
with
its
members.
13.
ln
lawn
areas, us6
a screwdrlver
of
no
more than
eight
inches
as
your
tool.
Limit
the
size
ol
the
hole to
a
MAXIMUM
of
h^ro
inches
ln
diameter.
Don',t
lOrget
to
fillin the
hole.
Public
and
privato
offbisls
and
property
ownsrs
will be
more
likely to allow contlnued
treasure
hunting if
you
do
no.
environmental
<tamqe-

G.E.B.
Detect0rs
(Ste#ard
Models)
F
F
r.'
COINMASTER
is.!
U.S.
Fglstered
tredemark
of Whitc,s
Electronics,
tnc.
u.5.
patent
pending
by
white's
Elecrmnkr,
tnc.,
on
Ground
Exclusion
Balance
circuitry.

A Message
from
Mr.
Kenileth
White,
Sr.
President,
White's
Electronics
Congratulationst
You are
now
the
proud owner
of
one"of
the
world's
finest
metal
detectors'
You'll
enjoy
the
many
relaxing
hours
you'll
spend
with
vour
new
detector.
'
Ahead
of
you
lie exciting
experiences
you'll
never
forget.
For
years
to
come
you'll
have
yarns
to
spin
a6out
the-places
you'll-visit,
the.people
you;ll meet,
the
history
you'll learn,.
and
the
treasures
and
relics
you'll uncover.
We
envy
you
your
journey
and
wish
you every
success'
.
'
Befbre
we tell
you how
to
assemble
and
operate
your
instrument,
however,
there
are
two
important
Points
to leave
You
with:
i.
you
new
detector
is
precision-made
and
has
been
carefully
tested
ai
our
factory.
Properly
cared
for,
it
will last
for
years
and
years. Treat
it like
a
good
friend and
it should
never
let
you
down.
2.
Any
piece of
fine
equipment
is
only
as
good
as
the
person operating
it.
Right
now
your
detector
is
"smarter"
than
you,
so
you've
got
some
catching
up to
do.
Become
very
familiar
with
your
instrument.
Practice
as
much as
you can'
Soon
it
will
become
a
Part
of
You.
You
and
your metal
detector
will
make
an
outstanding
team.
We've
known
many
"shooters"
who
couldfollow
in the
tracks
of
others
and
find
buried
coins
and
rings
the
others
had
missed'
You've
got
the
equipment
to
out-shoot
most
-
anyone. Now
all
you need
is the
practice.
Search
t""\
toop
uountin/
Thumbnut
short
Rod
section--
Lower
Rod
Section
Cood
Hunting,
fu*v,Q*
Kenneth
White,
Sr.
Spring-loaded
Studs
l
a
Connector
Sectioq

Check The Contents
of
Your
Metal Detector
Kit:
Your
detector
kit should
contain the
items
listed
below. lf any
parts
are
missing, contact
your
dealer
at
once.
lf
you
cannot
do that,
note the
problem
on
the
warranty card and
send
it
back
to the
factory.
ln
either case,
your problem will receive
prompt
at-
tention.
Cable
Connector
Plug
1.
2.
Two brass-colored
metal rod sections
a. short section
b. long
section
Plastic rodlloop connector
section
(Note:
Some
units are shipped
from the
factory with
this sec-
tion already attached
to the
search
loop.)
Mode Switch
3. Search loop
;with
cable
attached
4. lnstrument
5. Small
Jiffy
Bag
containing:
a. white battery
pack
(eight
batteries)
b. black battery
pack
(six
batteries)
c.
coin and
mineral
samples
6. Large envelope
containing:
a. Assembly and Operating
lnstructions
b.
Warranty statement
and card
(Not
available
on al!
models)
Power Knob
Discriminate
Knob
(Not
available
on
all
models)
a
Upper
Rod Section
./r""p
cable
Tuning Knob
T.A. Knob
(Not
available
on
all models)
Volume
Knob
fack
for
Headphones
Battery Compartment

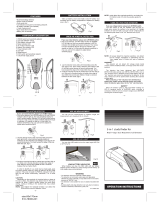
Assembly
lnstructions
1 Crasp the short rod
section in
your
left hand
and
the
long rod
section in
your
right hand.
Align
the two sections and insert
the short
one
into
the
fong
one until it stops,
about two inches.
(lllustration
AI
2 With
the thumb and forefinger of
your
left
hand,
depress the two spring-loaded
studs
on
the
short rod section and
push
it
gently
into
the long rod
section
until the
first
pair
of matching holes in
both
sections is
lined up. The spring will
then automatical-
ly force
the studs through the holes, locking
the two
sections together.
3
You
are now ready
to attach the rod,/loop
connector
to
your
search loop. lf
this
was
ac-
complished
prior
to shipping, however,
simply
proceed
to Step 9.
4 Place
your
loop on
a table. Using
your
left
thumb
and forefinger,
unscrew and
remove
the
black
thumbnut, setting
it
to one side. Note how the
brass
flange
bolt
passes
through the holes in
both
of
the mounting flanges,
and through two
plastic
washers.
(lllustration
B)
Cently
remove
the
flange
bolt
and the two
washers,
setting them to
one
side
also.
F
D
Next,
examine the
plastic
rodlloop
connector
end. Note that it has two
circular depressions, one
on either side. lnsert the two washers into these
depressions.
6 Now, steady the loop with
your
right hand
and,
grasping
the connector section in
your
left
hand,
slowly lower
the connector
end down
between
the two mounting flanges
until both
pairs
of holes
are
lined
up.,
(lllustration
C)
7
Crasp
the brass flange
bolt between the
thumb
and
forefinger
of
your
right hand
and
insert it
slowly
through the aligned holes. You may find it
a
bit difficult
to align the holes
so that the bolt slips
through
on
your
first
try. lf
so,
just
push
the rod a lit-
tle deeper
until
the holes
align.
I
Finally,
using the
thumb and
forefinger
of
your
left hand,
screw the black
thumbnut
onto
the
brass flange
bolt until it is finger
tight. tf it's
too tight,
the loop will not
adjust to
different angles. lf it's too
loose,
the loop may not
stay
in
position.
9
Next,
grasp
the
rod,/loop
connector section in
your
left hand
and
the
rod
in
your
right hand.
Align
the
two ends and insert
the rodlloop
connector sec-
tion into
the rod,
about
3/4
inch.
(lllustration
D)
10
with
your
left
thumb,
depress the
spring-
loaded
stud
on the
rodlloop
connector section and
push
this section
gently
into
the
rod
until the
holes
on
both sections match
up. The spring will then
automatically force
the stud
through the
hole, lock-
ing
the two sections
together.
4
11
Now
you're
ready
to connect the rod and
loop
to the instrument.
Move
the assembled rod and
loop
from
the
table and rest it
on the
floor
so that
the
loop is flat
on the
floor
and the rod is
sticking
straight
up.
Make
sure that
the
printing
on the loop
is
facing
you
and reads right side
up.
lllustration
A
lllustration
B
lllustration
C

12.
.
uring
both hands,
pick
up the
instrument
by
its
sides
and hold
it
so that
the
underside
of the in-
strument
case is
facing you.
Note
that there
is
a six-
inch,
brass-colored
metal
rod
coupling
attached
to
the.case.
Align
the rod
coupling
with
t[e
upper
end
of
the rod
and
gently
slide
one into
the
othei
until
it
stops,
about
1% inches.
(lllustration
E)
13 tfotaing
the instrument
firmly
with
the
one
hand,
use
the thumb
and
forefinger
of the
other
hand
to
depress
the
two
spring-loaded
studs in
the
rod.
Slowly lower
the instrument
until
the
matching
holes
in
both
the rod
and
rod
coupling
are
matcheJ
up.
The
spring
will then
automatically
fbrce
the studs
through
the holes,
locking
the
rod
to the instrument.
to
the instrument.
Crasp
the instrument
wiih
one
hand.
With
the
other
hand, grasp
the
loose
loop
cable
and wrap
it
around
the
rod
three
or
four
timei.
Now, with
the
screwlock
connector
between
the
thumb
and forefinger,
gently
ease
the
cable
up
the
length
of the
rod
until
the
connector
reachei
the
plug
on
the
end of
the instrument
case.
(lllustration
F)
15
lnsert
the
screwlock
connector
into
the
plug.
There
is
only one way
it
will
go
in,
so
there,s no
nee?
to_force
it.
Simply
turn
the
connector
one way
or the
other
until it
slips in.
Using
the
same
thumb
and
forefinger,
push
the locking
ring
over
the
connec-
tion
and
twist
to lock
the cable
in
place.
Check
this
by
trying
to remove
the
connector
from
the
plug.
lf
16
Now
you're
ready
to install your
two
battery
packs.
Rest
the loop
flat
on
the floor,
letting
the in-
strument
case
rest
against
your
knees.
On the
back
of
the
case
are
two black
latches, one
on either
side
of
the
case. Unsnap
these,
allowing
the
battery
access
door
on
the back
of the instrument
case
to
open.
21
Your
new
detector
is
fully
assembled
and
ready
to
use.
(Note:
The
length
of the
rod
may
be
shortened
for
more
comfortible
use,
or
for
use in
confined
areas.
To
shorten
the
rod,
depress
the
two
spring-loaded
studs
and
push
the
lower
rod
section
further
into
the
upper
section
until
the
second
and
thir.d pair
of matching
holes
are lined
up.
Again,
the
spring
will
automatically
lock
the
two
-sections
together.
You
will probably
need
to
take
up the
slack
in
the
loop
cable
after
you,ve
shortened
the rod.
To
dg..ro,.simply
rotate
the lower
rod
section
again
while
depressing
the
two
spring-loaded
studs.)-
17 lnside
the
opened
case,
you
will
notice
two
sets
of red
and
black
wires
twisted
together.
Cently
pull.on
both
oJ these,
so that
the
battery
lead
snapi
on
the
ends
of each
red
and
black
wire
set
are out-
side
the
case. Note
that
one
twisted
red
and black
wire
set has
a white
battery
lead
snap
end.
The
other
18
Now,
examine
the
two
battery
packs.
Note
that
each
pack
has
a
pair
of button
snaps.
Snap
the
white
battery
lead
snap
to
the white
battery paci<
and
the
black
battery
lead
snap
to
the black
ba-ttery pack.
Be
sure
each is
snapped
firmly
in
place.
1
compartment.
Keep
the red
and
black
wires
outside
the.compartment.
Make
sure
the
snap
ends
of
each
pack
face
you
and
that
the
snap
ends
are
down.
(lllustration
H)
20 Slowly
close
rhe
battery
access
door,
tucking
all
the wires
inside
the
case
as
you
do.
Lift
up
on eacF
case
latch
until the
top
of the
latch
is
engaged
and
then
firmly press
the latch
snugly
against
the side
of
the
case.
l&

operating
lnstructions
Familiafizlng
Yourself
With
Your
Detector
First,
examine
the instrument
case,
which
contains
the following
items,
and
compare
it
with
the
photograph
on
page
3 of
this
manual.
Power
Switch:
This
switch
has
four positions:
,.,Otf/1-cell,,,,,,On,,,,,Bat.
Ck.9,,
and,,Bat.
Ck.
.12,,.,,Ott/1-cell,,
is
the
position
to use
when you
want
to
turn
the
detector
ofI,
or wien.you
want
to
iir".t
t'ri".Jnittio";7;dii;;;'batteries.
"on" is the
normal
operating
position
of the
switch.
"Bat. ck. s"'is
the
fosiii."
i.
,i""*nln
you
want
to
check
the
condi_
tion
of
your
small,
black
battery
pack.
"Bat. Ck.12"
is the
position
to
uise
whe;'r;;;;ito
check
in"1."aiij"n
of
your
large,
white
battery
pack.
lntensity
Meter:
This
meter
has
two
uses'
The
signal
coming
from
the
loop
goes
to the
speaker
and
to
the
meter.
you
can
Iisten
for
the
telltale
sou.nd
of
a buried
object
riJvo,
.in'*ui.'h
ior.
it
on
ihe
meter.
when
the indicator
needle
moves,
the
loop
mav
be
over
a buried
obiect.
rne
other
ri;it
f;;i;;ti";
ro*
two
battery
packs
or individual
batteries.
For
this
use,
the
meter is
used
in
conjunection
with.the
power
sinii.
ir.l3tu,
s"r"
,,iirc
i"6?plr.,"
a BatteryCheck
Merer
in_
stead
of this meter.
Other
units
simply
utilize
a different
ityt" )nt"nrity
Meter.)
--'r-'
Tuning:
This
knob
is
used
to
help
tune
the
detector
in
the
air. Note
that
it
has
a
graduated
scale
around
the
outside
of the
knob
which
vou can
use
as reference
poinis
to
.ia
yo,
in
i;ri;;.
you
may
find
that
this
is
a
,,Ten-Turn
Control,,
knob
which
takes
ien turns
to
turn
it
all
the'way
frorniL"l;,,y;ri;;;:ition
to its,,highest,,.position.
lt
may
actually
have
no
definite
stopping
points.
when
vou've reiched
tne hijrreii
J-to*urt
point,
th-e
knof,.ay
simply
become
a bit
more
difficult
to
turn.
This
drag
is
the
same
as a
definlte
rto"ppinip"int
T'A'
(Terranean
Attenuator
or cround
Tuner):
These
two
stacked
knobs
are
used
to help
tune
the
detector
on the
ground.
There
is
a
graduated
scale
around
the
outside
of
the knobi
ioi
,i"it
reference.points
to
aid
in
tuning.
Notice
that
one full
turn
of
the
bottom
knob
produces
ten full
turns
on tn"1"p
lnou.
fitu
uotto,,'
f;b
ir;;Jfor
coarse
tuning.The
smaller
top
knob
is
used
tor
fini
tuning.
Notice,
also,
ihai
th;;;yie
a',,Ten-Turn
cortior;-[nob,
roo.
speaker:
The
round,
brass-colored.grill
near
the
back
of the
case
covers
the
speaker.
(Note:
Not
available
on
Model
"C.E.B. 1."
Unit
shipped
with
head[hones.)
volume:
This
knob
is
used
to
increase
the
volume
of sound
coming
from
the
speaker,
from
a
set
of headphones,
or from
an
earplug'
The
arrow
marked
"lncrease"
shows
the
.orr.u.i
Jiru?tion
to
trin-irr"
InJu
to
make
the
sound
louder.
fack:
This
is
the
hole
into
which you
can
insert
the
plug
on headphones
or
an
earplug.
Detector
Mode
Switch:.
This
switch
has
four positions.
Three
are for
setting-
the
sensitivity
in
the
discriminator
mode,
"High",
"Medium",
and
"Low".
The
other
ooiition
is
"c.E.B."
which
is-uieJ?;;;;;i;etecting
activity
or thecround
Exclusion
Balance
mode.
(Note:
Not
availabi"
",
uil rnoJ"lr.l
'
-
Discriminate:
This
knob
will
allow
you
to
select
different
amounts
of_discrimination
when
your
Detecto
r
Modeswitch
is
set
on
one
of the
three
discriminator
modes:
high,
medium,
t"*.
tu"L, Nri'.riii"'di"
Jn
all
models.)
How
To
Tune
Your
Detector
Your
new
detector
will
help you
locate
buried
metal
or mineral
objects,
and
the
discriminator
circuit
available
on
some
models
will
help you
decide'on
whether
or not
to aig
tte;
up.
-
Tuning
your
instrument
properly
is
extremely
important,
as
you
would
expect,
considering
how
versatile
it is.
Read
the
l:lf#:,
instructions
carefully
anl practice
tn6 ,.'iorii;i;si;;;.ari"r
.I"tii'yr'r';;n-';o
them without
tooking
at this
one
more
thing:
Always
tune your
instrument
out-of-doors.
That
way
you
won,t
get
unwanted
interference
from
metal
objects
used
in
the
conslruction'of
your
home.
6

G.E.B.
Tuning
..
This
tuning is
used
to
detect
buried
ferrous
or non-ferrous
objects.
Ferrous
objects
are
those
that
contain
mostlviron.
we
call
them
MINERALS.
Sometimes
these
obiects
are metalli.
tnuiti,'i'torruttouii'inJ;";;;il;:ir:;';J';Hi'ii"'.1
,.na
for
prospecting).
You
should
note,
however,
that y"ri
Jui".ioi:;'h;,
tr""i
iZl"rairg
t;ir"
instru6ions-will
not
detect
non-metallic
objects.
,".0)il-filffi;?:"tt:,iiil?lttthat
contain
little
or no iron.
we
callthem
METALS.
cotd,
sitver
and
copper
coins,
brass,
Follow
these
steps
for
C.E.B.
Tuning:
1'
whilestanding,.letthelooprestflatontheground.
lf
yourinstrumenthasabuilt-inDiscriminator,besureyouhaveset
the Detector
Mode
Switch
to
,,C.E.8.,,.
2'
Turn
the
r'A'
knob
so that
the
p.ointer
points
to
"5".
Turn
the
runing
knob
all
the way
to
the
left
(counter-clockwise)
until
it
sto.ps
or
begins
to.dlag.lf
your
instrument
has a
built-in
Discrinrinator,
be
sure
you
have
set
the Discriminate
knob
all the
way
to the
left
lcounter-clockwise)
to
;,0r,.-
-
-
"
3' Turn
the volume
knob
all the
way
to the
right
(clockwise),
in
the
direction
of
the
arrow.
lf
you
are
wearing
head-
phones,
however,
you
only
needio
turn
thls
control
"
ir"ii"rorntlo
ir'"iijiiiGiockwise).
-
4.
Turn
the Power
Switch
to
,,On,,.
5'
Raisetheloopuntil
therodorprobeis-parallel
tothe.ground,or.theloopis.twotothreefeetoff
theground.Atthis
point,
there
will
be no
sound
toming
from
the
speakEr
or
hladphon"i.-rrjlrlJr't-J"a
5.
Now,
turn
the
funing.
knob
to
the
right
(clockwise),
in the
direction
of
the
arrow,
until
a tone
appears.
Slowly
turn
the
knob
back
to the lefi(counter-clocktise)
until
tr,eionealmori.irpl"t"iy;;""t';;;;:'il
isfaintsound
is
the rhresho/d
Ione,
and
this
step
is
called
Air
Tuning.
7'
Next,
lower
the loop
again,
letting
it
rest
flat
on the
ground.
Do
not
force
it
against
the
ground.
8' The
Threshold
rone you've
been
hearing.
will now.
do one
of
three
things:
a) it
will increase
in
volume;
b) it
will
decrease
or
disappear
compretery;
or
c) lhere
wiil
be-viriuilly
rr;h;;;;j;iir;r"irn.,".
a) lf
the
sound
increases,
then
turn
the top
LA..knob
slowly.to
the
left
(counter_clockwise)
until
the
tone
a/most
completely
Soes
away. lf
this
does not
occur,
however,
within
"
,"ry
,hoiiiin..u
irUout
vr-turn),
simply
stop
and
proceed
to
Step
9. This
is
called
Ground
Tuning.
b) tf
the
sound
de.creases
or
disappears,
then
turn
the top
T.A.
knob
slowly
to
the
right
(clockwise)
until
the
sound
reappears.
lf
this
does
not
occui,
however,.within
a.veiy.short
time-abbut
z"r#:Jir"pr;';;
;;;"p"o=.""a
to
Step
9.
Now,
turn
the
top LA.
knob
slowly'back
to the l6ft
(c;unter-clockwir"i
;;ilithe
tone
is
a/mosr
completely
gone
again.
This
is
called
Cround
Tuninfr.
c)
lf
there
is
virtually
no
change,
then
your
detector is
properly
tuned
and
ready
for
G.E.B.
use.
9'
Now raise
the
looo
back
into
the
air
and reset
Air Tu1i.ng.
This
is.done
by
simply
turning
the
runing
knob
to
the right
(clockwise)
as needed
in
oraeilo
i"ii"*
tr,"
iii"iir,rZrr,ria'ion".
10.
Again,
lower
the
loop
back
to
the
ground
and reset
cround
Tuning
(step
g).
11'
Repeat
steps
9
and 10
until
there
is virtually
no
difference
in
the volume
of sound
coming
from
the
speaker
or
headphones
as
you
raise
and lower
the loop.
Three
or four
repetitions
of
these
steps
should
be
sufficient.
12.
Your
detector
is
now properly
tuned
and
ready
for
C.E.B.
use.
R
area,
vou
may
have
to reiune your
instrument.
ro
do so,
simpt;T":if?#lltl';Lm*ve
to
a.different
search
lllustration
I

Using
Your
Detector
in
the
Discriminate
Mode
Once
you
have
located
a buried
object
using C.E.B. operation,
you
can
use the Discriminate rnode
available on some
models
to
help
you
decide whether
you
should
dig
it
up.
The Discriminate
function
will help- identify
small
junk
items
(bottle
caps,
tin foil, gum
wrappers,
naib
and
dre like).
lt
will
also.identify
ferrous
obfects regardless
of size. Remember, a
ferrous
object is
one
made
mottlr
of
iron
(belt
hrcfhs,
cannon
balls,
chunks of scrap iron,
tin cans and the like).
lf
you
are searching.for
coins, rings
or
jewelry
on a beaclr or in
a
park,
then
you
will
probably
want
to use the
Discriminate
function
to help
you
eliminate
both the small
lunk
items
and
the ferrous
objeas.
On the other hand, if
you're
searching
on an old Civil
War
battlefield for relics
(swords,
cannonballs, rifles
and the
like),
or if
ygu
are
prospecting,
then
you
would not
want to use the
Discriminate
function
as that eliminates
these
ferrous
objects,
as well
as the
lunk
items.
Follow
these
steps for Discriminate
Operation:
.To
simplify matters_here, we will
consider both smalllunk items and ferrous
objects
as
MINERALS,
even though many
lunk
items
are
not made
mostly
of
iron.
1. Turn
the Detector
Mode
Switch to
the
"High"
Discriminate Sensitivity position,
be sure
the
Discriminate
knob
is set
all the way
to the left
(counter-clockwise)
10
"0".
2. While standing, let
the loop rest flat on the
ground,
just
along side
the
spot tvhere you
located
the
object.
3. Turn
the
funing
knob
all
the
way
to the right
(clockwise)
until
it
stops
or begins
to drag.
A toud tone
should
then come from
the
speaker
or
headphones.
4. lf
you
do
not hear
a loud tone, move
the
Detector
Mode
Switch
to
the
"Medium"
Discriminate
Sensitivity
position.
lf
there
is
still
no
sound coming from
the speaker or
headphones,
then
set
the Detector
Mode Switch
on ihe
"Low"
position.
(The
reason
there may be no
sound
wtrile
in the
"High,"
or
sometimes
"Medium"
position,
is
that
the
ground
ranges
from
heavy mineralization
to
extremely
heavy
mineralization.
lt will
be most
unusuil if
you
ever have
to-set the
swilch
in
the
"Low"
position.
But,
regardless,
you
want
to
hear a tone
from
the speaker
or
headphones
because it is
this tone
that will help
you
discriminate
in
your
"shooting".)
5. Now
that
you
have
a
loud
tone, turn
the
Tuning
knob slowly back
to the left
(counter-clockwise)
until the sound
almost
completely
goes
away. This
faint sound is
called
the
Threshold
Tone.
6. Next,
pass.
the loop
over the exact
spot where
you
first
received
a reading
that an object was buried.
tf the sound
fades
or disappears, the
obfect
is
MINERAL
and
probably
a bottle
cap
or
imall nail.
(Note:
The
obiea could
be MINERAL
even
if
the tone did
not fade
or disappear.You
can determine
this by
increasing
the
amount of discrimination
as described
below.)
Adjusting
Discrimination
With
the Discriminate-
knob
set on"0",
your
detector will discriminate
against
such items
as
bottle
caps and
small
naits
while
in Discriminate
modes.
You can, however,
increase
the amount of discri-mination
by advancing
this control
to the
right
(clockwise).
For
example,.by Setting
the Discriminate knob
at about
"4"
you
can
discriminate
against
pull
tabs and foil. You should
note,
however,
that
at this
.setting .you
will
also. discriminate
against
such
objects ai nickels
and rings. By turning the
Discriminate
knob
even further
to the right
(clockwise),
you
can
rule
out largei items
like
aluminum sdrew caps,
tiricans
and large
chunks of iron. But
at the
same time,
you
will eliminate most
sing-ie
coins.
Generally,
you
can
determine through
practice
just
how far the
Discriminate
knob
needs
to be turned in
order
to
eliminate
various
types of MINERAL
objects. You should, therefore, avoid
turning
it further
than absolutely necessary,
as
this will result in
discriminating
against other
objects
for which
you
may
be
searching.
After
you
have identifigd
t-hg type of
object
you
have located, decided
whether
or not
to
dig,
and are
finally ready
to resume
searching,
you
should retune
your
instrument in
the C.E.B. mode,
as described
earlieiin this manual.

Searching
with
Your
Detector
To locate
hidden
or
buried
objects
with
a
prop-qrlytuned
detector,
systematicaily
sweep
the
loop
from
side
to
side
acrojs
the
area
you
are
working'
(tllustrition
t,
prsi
zitni
r.ig"itr*
a-i.i"a".
of
your
loop,
the
more
area
you
can
cover in
a
single
sweep
and
the
faster you
can
searci
an
area.
r5r
"r.rpt",
with
an
eight-inch
loop you
should
take
four-inch
steps,
moving
the
loop
ahead
the
same
amount
after
"".r'
rii"ip.
ro,.
.uri"rrn,,-
f"irorh6n.e
when
,"ir.hing,
yo,
*::l,gr:I:l:,;:11;
ffl;[:I,"r:p
at a
constant
levelinJ
.i.i.'"i"
iie
ground
.,
po*irii",
}"tt"iiiitr,"
i",,,sirri.,.tion,
You
should
note
that you
can
also
search
an
area
with
yo.
ur
detector
in
the
Discriminate
mode.
The
Discriminate
function,
however,
tends
to
work
best in
iieas.of.light"r
;i;"i"lil.tion
"nJ
in
.**;'fi;;;
the
ground
is
relatively
smooth
and
even,
therebv
allowing
you
to
r""r.h
*iitr
itrli"opri;i-on.'iil
g..rra
lillri
'i;;;fy
above
it.
should you
decide
to
search
an area
with
your
detector
in
the
Discriminate
mode,
use
the same
searching
procedures
as
described
above.
But
first,
trn" yiii
irii-ir."rt
as follows:
1.
Tune your
instrument
in
the
G.E.B.
mode.
Follow
steps
1
through
5
for
tuning
in
the Discriminate
operation,
but
keep
the
loop
stightty
(about
1/z-inch)
ott
the ground
at
all
times.
3.
Finally,
lower
the
loop
until
it
is f/at
against
the
ground
and
in
tn.i'oisl,imin"tu
,'oa".
it
'i",rJ'"1"*
"ii.init?;;i;,;ii.Jiy'fiIi.rlit'Jfii3."3':,;ffilllg,lltl,l,"#:odetector
(Note:
You
should
remember
that
if
vou
are
searching.in
an
area
of rough
terrain
(a
plowed
field
for
example),
it
may
not
be
possible
to
search
with v'oui
i."i17ri
rr"tri"
!-r"rna.
ln
,rii'."s"i'vo,
!r,oriJ
r"ir.r,
*ii6-the
loop
iust
barelv
off
the
ground,
after
turiing yopi
instrumunt
r"t,shrr-rd;;
;i"*6;tvlt
wrrich you
intend
to search.
Remember,
also,
thit
if
the
loop
is
raistd
i6or"-i't'"
tr"iirii'?t
,ir'ilr'
ir,"'Ji,".iri.iras
trned,
a toud
tone
may
be
emitted
from
the
speaker.
Yet,
an
unneeded
toss
of aeteEiion
a"ptt
may
occur
if
the
instrument
is
tuned
with
the
loop
higher
than
necessary.)
All
in
all,
the
depth
to
which
vour
instrument
witl
detect
in
the
Discriminate
mode
may
depend
on a
number
of
factors:
1)
The
degree
of
mineralizalion
in the
ground.
rhe'[ii
,in"rrri;;il;;
ih;iiJJi
i,
wi1
d'etect.
2) The
height
of
the
loop
during
tuning
and
searching.
The
to*Er
i[u lo"p,
,r,"-a""per
it
wiri
aeie;.
A;i;
3) How
carefully your
detector
is
tuned.
The
more
aclurate
the
tuning,
the
deeper
ii;iii
i;*i.-
Finally'
it
is
a
good
policy,
no
matter
which.
mode
you
are
using,
to.periodicalty
stop
and readjust
the
tuning
of
your
instrument
slightlv'
As you
b6come
more
exferie;."d,
h;;;;;il"L
*iri
begin
to noticL-lust
by
differences
in
the
toneyou
hear-whether
or
not
the
tuning
n""al
to
U"-.Jir;il:'-''
'"'
listen
for
the
Tone
The
tone
coming
from
the
speaker
or
headphones
will
tetl
you
where.
objects
are
located.
when
the votume
of the
tone
increases,
the loop
is
over
ihe
obiect.
whJ,
trr"
,"i;r;
;a;;".ses,
the.loop
has passed
away
from
the
obiect.
The
volume
will
be
the
loudest
when
the.6ri"r
ri th"-lo;;ir-Jir"iiv
o*r.the
objeci.
nn
[iception
to
this
rule,
however,
is
a
coin
buried
on
edge.
tn
this
case,
the
rotrr"
*iri-u5
b;;ilh""
tri"
"ali"7iI,;;;;p
passes
over
the
coin.
Another
exception
is
a
nail
buried
flat.
To
become
more
familia.r
with
the
sound
of
nails, place
a large
nail
ftat
on
the
ground
and
pass
the
loop
lengthwise
high
over
it.
Norice
the
double.
sr!rnJi;;;';f;oJ
can
usualty
tell
a nail
or
otherlong
iron
obiect
is
bein!
deteited.
t,toti'ce,-atio,
init
v"i,
j;;"";r-1;';.;6i;r;;#'if
;Jr"io*",
the
toop
or
sweep
it
ar
adifferent
angle'
Thus,
19u
c1n
avoia
Jilg-inirp
rort'rnwanred
""ir;,"ii;;;r,
r"r'ill
')orbt"soundby
simpty
raisingyour
loop
slightly
higher
and passing
it"Jr"i
tte
ar"i-"1
JirJ"i"nt'"ngr"r.
b*,,Tf#;,ql:nxffii:lifr:illi":$",":"ill"p:;'"*i,,,",%;-J,i[J:T#[:'illli,lil?;illi,:illilJi*:,3""?Jij[:
the
loop
stishtty
after
first
toc.itil
;
ilri;
;bi;:"'
rrq.J
qJ
us'Lr
I
Finally,
large
or small
increases
in
the volume
of the
tone
are
usually
caused
by
9ne
of
three
things
when
detecting
an
obiect:
1)
the
size
of the
object;
2)
how
dApliih"_gLi".i
iiirri"d;'or
3j
"
.o'ruiniiion
of
the
tio.
Generaily,
the
larger
the
object,
the greater
ttr"
ii.i"ir"-i;.rdi;;e.
rh;;;6;;.it.
ir'u*r"t,
i;
,;ir;,
the
increase.
Thus,
a singre
:'#r;f::iJlro,;::;';":'v
cause
onlv
aiLilhi
in.,""'e
in ,olumJ,
*r'il"
.-r"'s;-;uil1*[iii;"il;i';;
J,;ipryj..y..r,"
k

lllustration
lllustration
Watch the
Meter
The
indicator
needle on the
rntensity
Meter
is
very sensitive
to
change.
lt.will
register
buried objects
that
you
might
-is,
Uy
just
listening
t"in"
ion"
fronr tl6
speaker.
The
meter
will alw.ays
piovide
a
visual. reading
to
match sound
readings,
;;;;lf
i;;;;;i
f,; i Jiii"r"n."
in the
ione.
so,
keep
an
eye
on thit
meter;
it could
be
very important.
(tllustration
K)
Practice
Makes
Perfect
Here are a
few
ideas
to
help
you
practice and
sharpen
your
l'shooting"
skills:
1.
place
a
small
object
(the
sample
that
comeswith
your detector
kit), a medium-sized.object
(a
tin can
lid
will do
nicely),
"
;;J;l;rs".bja-.id.i;yi;;i;;i;;th"
liiit'6niorton
the
lawn.
Leave a
few
reei between
them.
Following
the
'inrirr.tio"nr
girln
Li;liei.t,inL
you, instrument.
Pais
the
loop over each
object,
noting
how
much
the
volume
increases
or decreases-as
you move
from object
to
object.
(lllustration
L)
2.
Take two
quarters. Place one
on
top of
the
gras.s. A
few
feet away,
dig a small
hole, no
more than
two
inches
deep,
and
-
;;,
ir,"
,l11.'g.."in.
Tune
your instrum"r,tlnJp.rt
the
loop,over t6e
coin
on the
surface,
then
over
the
buried
coin.
Note
how the
volume
incieases
or decreases
as
you move
from one
to the
other.
3.
plant
a
test
garden. To
become
better
acquaintedwith
various kinds of
buried
obJe.c1s,^|rtf
:9-T"_T^utal.items
at
-'l;";;J"ptf,r.M;["';;y*;i";ag".d;;liioiatea.wnerg.y.ou.cansettoiteasily..lt'-s.besttomakeamapojthearea,
i6r*i"s
,,[t
it
i, ilriiJ'.-niiiti
a"pfi.
voril"ii
g"rden
will'help
yoi
practice
aid
will also
provide a
handv
method
of
peri6dically checking
the
performance
of
your instrument'
Proper
Care
Of
Your
Detector
The
following
are
precautions
you
should
take
to
protect
your instrument
from
harm,
insure
its long
life,
and
avoid
nullify-
ing the
warranty.
Cleaning:
The
loop and
rod or
probe
are
waterproof.
They_can-be
cleaned
with
fresh
water
and
a
mild cleanser'
After
cleaning",
however,
d;tih"
;rtrJment
thoroughly.
Cautioni
The instrument
case
is not
waterproof,
and
water-if
allowed
to enter
it-may
damage
electronic
components.
Weather
Conditions:
protect
your detector
from excessively
cold
weather.
Freezing
can
damage
the
electronic
com-
ponents,
the
case
and/or
the bitteries.
Excessive
heat can
alsodamage
the
instrument.
Never
leave
it in the
sun.
lt's
best to
tt
iii;iil;rr"a"
*n"n t"mfoiarity
not
in use.
lf it's
left
in
a car oni.hot
day,.cover
it with
a blanket
or something
similar
iJ
piot".tlt
t-, tn" Jii".t'riyi
of
the sun,
and
then
leave
the
windows
slightly
open
to
permit ventilation.
Needless
to
,uyi
prot".t
your
detector
if
you
operate
it in the
rain,
as
water
may
get into the
instrument
case'
Salt
Water:
Salt
water
is
very
corrosivel
Immediately
after
your
detector
has been
exposed
to
salt
water,
rinse
it
thorouehly
with
fresi'1a,i1;6"in|iri"tur'noi
toitt"'*
wateito
enter
the
instrument
case.
Then
wipe
it with
a cloth
dampeied
with
fresh
water and
dry it
thoroughly'
Storage:
if
you plan
to store
your
detector-for
any
length
of.time,
unsnap
the battery
pack,
remove
it from
the
instrument
and
take
the batteries
out
of the
holder.
Wtren6re,
iour
detecior
is not
in use, turn
the
Power
knob all
the
way to the
"Off"
position.
10

t
t
Batteries
Batteries
are
the
lifeblood of
your
instrument. Your
white battery
pack
holds
eight'1
%-volt
AA
penlight
batteries.
Your
black battery
pack
holds sixlVz-volt AA
penlight
batteries.
(lllustration
M)
These
are available
at drug and
grocery
stores
almost everywhere.
Any
brand
will work well, although
many
"shooters"
recommend the alkaline
type
for longer life.
To change batteries, first
remove
the battery
pack
from the
instrument.
Before
you
remove any batteries
examine
the
pack.
Note
the exact
position
of each
battery and the
position
of
the
battery lead snaps.
Your
detector
will not work unless the
batteries
are
properly
installed
and the
battery
lead is
properly
connected.
Each
battery
has
a
positive
(+)
end and a
negative
(-)
end.
The
plus
(+)
and
minus
(-)
symbols are clearly
marked on all
batteries.
Remove
one of
the
batteries
from the
battery
pack.
Notice that the slot
from which
it
was
removed also
has the
positive
(*)
and negative
(-)
symbols clearly
marked.
To
replace
the
batteries, simply
match the
plus
(+)
and
minus
(-)
symbols on the
new
battery with the
plus
(+)
and minus
(-)
synibols on the
battery snhf, and then
snap
the
new
battery
into
place.
The battery
lead snaps
must also be
matched
to
the
button
snaps on
the
pack-plus
(*)
to
plus,
minus
(-)
to
minus-befoie
you
reconnect
the
power
cable.
You detector
is designed so that
you
can test
(1)
the
full
white
battery
pack,
(2)
the
full black battery
pack,
or
(3)
each
battery, one
at a
time.
1. To test the
full
white battery
pack:
a. Set the
Power
switch to
the
"Bat.
Ck.
12"
position.
b.
Turn
the
Volume knob all the way to the
right,
in the direction of the arrow, so
that the volume of sound
coming
frofn the speaker is as loud as
it
can be.
Adjust the
funer knob if necessary.
c. Observe the lntensity
Meter.
Notice the area
on
the dial which has
the
words
"Bat.
Check"
printed
on
it. lf
the
in-
dicator needle moves into
that
area and stays
there
for three
or
four
seconds,
your pack
is in
good
condition.
lf it
does not move into
the
"Bat.
Check"
or
"Battery"
area,
or
it moves there for only a second
and then
drops
back
down,
your pack
is
weak.
(Note:
On models
with
Eattery
Check Meters
only, the
needle should
register
in
the
"Bat."
zone.)
d. lf
your
pack
is weak
you
will
have one or
more
weak
batteries. See the
instructions
below
for
testing
a single
battery.
L To test the full black battery
pack:
a.
Set the Power switch to the
"Bat.
Ck. 9"
position.
b.
Follow the steps listed
above
for testing
the white
pack.
3.
To
test
a single battery:
a.
Open the battery access door at the
rear of
your instrument
case by unsnapping
the side latches.
b.
Remove
the white battery
pack
(if
it
is
the
pack that
tested as being weak), or the black battery
pack
(if
it is
the
weak
pack).
c.
Now, remove a
single
battery from the
weak
pack.
d. Notice that the battery access
door has a
receptacle
designed
to hold one battery.
Match
the
positive
(+)
end of
the
battery
with
the
positive
(+)
end of the
receptacle and
press
the battery into
place.
(lllustration
N)
e. Observe
the
indicator needle
on
the lntensity or
Battery
Check
Meters.
lf it moves into
the
Bat. Check area and
stays there three or four seconds, the
battery
is
good.
lf
the needle fails
to
move into the area or drops out of
it
after a second, the battery
is weak and should
be discarded.
f. Repeat this entire
procedure
to test
each
individual battery in the weak
pack.
When
you
have located all the
weak
batteries and discarded them,
snap
new
ones
in
their
place
and
replace
the battery
pack in its
proper
position
in
the
battery
pack
compartment.
Proionged use of
your
detector
will cause a severe
drain on
your
batteries. lt's best to turn
the
power
off
from time to
time
during
the day of
"shooting".
This
gives you
a chance to take
a break and it
gives
your
batteries a
rest. ln a
few minutes both
you
and
your
batteries
will
be
ready to
go
again.
lf
you plan
to store
your
detector
for
several
weeks or
more,
it
would be wise to keep the
batteries
in
the
refrigerator.
Do-
ing
so
will
prolong
their lives.
Also, it's
a
good
idea to carry
an extra battery
pack
and some
spare batteries
with
you
on
out-
ings.
11
I
tllustration
M
lllustration
N

What
Will
Your Instrument
Detect?
.
Silver,
lea.l.,. copper,
bottle
caps, tin
foil,
cartridge cases, rings, brass
and tin cans
are
just
a few
of the
highly
conductive
objects
that will cause
a response in
your
speaker
or headphones.
Your
instrument,
however,
will not
deleci sticks, rags,
bones,
paper,
wood
or
other non-metallic
objects.
The longer
many metal
objects
have
been buried, the better
you
may
be able
to detect
them.
A chemical
reaction
between such objects as silver or copper
coins and the.surrounding soil
often
creates
a
"hato"
effect. This
"halo"
may
cause
your
detector to
register
a much larger increase in volume than might
otherwise
be
expected for
a
small coin.
Thei,halo,,
can actually
help
you
delect
betterl
ln fact, if
the
"halo"
is strong enough, your
instrument
may continue
to register
even
after
you
have
dug up the coin.
Some
Thoughts
on
Ethics
Treasure hunting
is the kind
of
new hobby
that
fires
the
imagination
and
generates
its
own
enthusiasm. lt's
the
most
natural
thing
in
the
world
to dig as fast
as
you
can the minute
you
hear
that
first
loud,
unmistakable signal. lt will
be
a real
thrill
to discover what treasure is right
beneath
your
feet.
But
stop a
minute!
Be
a little far-sighted
and consider
the
long-run,
too.
.
We
strongly urge
you
to
adopt a
code
of ethics
which will
preserve
the
environment
and also the rights of treasure
hunters
to operate detectors with as few restrictions as
possible.
Before
you
even begin
a
search, check
the
law,
ordinance
or regulations
about hunting
on
publicly
owned sites.
Abide
by
the
rules. lf
the area
is
private property,
get
written
permission
from
the
owner to search
it.
You may
find he
will
be
more
eager
to
give permission
if
you
suggest sharing
your
finds with
him,
or if
you
offer to search for
a
specific item he
has lost.
About digging:
in lawn
areas use a screwdriver
of
no more than six or
eight inches
as
your
tool.
Limit
the size of the hole
to
a
maximum of two
inches
in diameter,
cutting a
plug
of sod
which
can
be easily replaced
after
you
make
your
find
and
fill
the
hole. Leaving
holes
is
both unsightly and dangerous!
Detectors
or detector modes
designed
for
locating large and
deeply
buried
objects should be used with discretion-
never in lawn
areas, and with
careful
judgment
in
other
locations. Consider
the
scar
you
may leave by
your
digging before
you
start. This will vary
a lot from
one
part
of
the country to another, depending
on local soil and climatic conditions.
Public
officials and
private property
owners will
be
much more likely
to allow
continued treasure hunting if
you
do no
environmental
damage.
You
may
even be able to
increase
your
reputation
as an ethical
hunter by
volunteering
to carry
out
and dispose
of whatever trash items
you
find.
Adoption
of these attitudes
can only enhance the
public's
opinion of
treasure hunters
and assure that
many areas, both
public
and
private,
remain
open to
you
and
your
new detector.
Service And
Warranty
lnformation
lf
your
new metal
detector is
ever
in
need of service, ship
it to us
at the factory
address below or to one of the Service
Centers listed
on the back of
the
warranty
statement. lnsure
it fully,
prepay
the
charges and enclose a letter describing the
nature
of the
problem.
As long as
your
detector
is
under
warranty,
there is no
charge
other than a
small handling and
postage
fee.
Read your
warranty
card
carefully. It
describes completely what
is
covered
and the length
of the coverage.
lf
you
have
any
questions,
don't hesitate
to write
us.
We
will be happy to answer any
questions
you
may
have.
White's Electronics,
lnc.
1011
Pleasant
Valley
Road,
Sweet
Home,
Oregon 973ffi, U.S.A.
12
P/N
62t-o1itz
Printed inU.S.A.11/76

ALTERilATE
GTB
TUNI}IG
PROCEDURES
Note: Famlliarize
yourself
with
controls
(see
page
6
ln
instruction
manual).
INSTANT
CONTROL
CHECK: This is
to
check
that
your
GEB
controls and
search loop are
operating
correctly.
Follow this
procedure
io
complete
the
Cohrrul check.
1.
Set
the
Detector Mode
switch
to the GEB
position;
turn the'volume
control
knob fully
in
the direction
of
the arrow
(to
the right);
and turn
the instrument
to
the "ON"
position.
2. Hold
the
loop
6" to 8" in
the air; set
the
T.A.
Knob
(ground
tuner)
fully
clockwise
(right)
and adjust
the
tuning
knob
(air
tuner) for
a slight
tone from
the
speaker.
The
tuner must
be turned clockwise
to
increase
or
reach
the tone or counter-clockwise
to
reduce
the tone.
Lower
the loop
to the
ground.
THE
TONE
SHOULO
GET
LOUDER!
3.
Raise
the loop again
6"
to
8".
Turn
the
T.A.
knob
f
ully
counter-clockwlse
(left)
and readjust
the tuning
knob
(air
tuner) for a slight tone from the speaker.
Lower
the loop
to the
ground.
THE TONE
SHOULD
GET
QUIETER!
KEEP
CLEAR
OF ANY BURTED
OBJECTS
You
have
now
completed
the
control
checks and
imay

l0ll
Pleasant
Valley
Rd.
Sweet
Home,
Or.
97386
Printed in
U.S.A.
Code No.621-0112
/