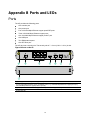
H3C UAP380: is a high-performance access point designed to provide wireless connectivity in various indoor environments, including offices, schools, and hospitals. With its advanced features and capabilities, the H3C UAP380 is an ideal solution for deploying and managing wireless networks of any scale. Some of the key features and use cases of the H3C UAP380 include:
-
High-speed wireless connectivity: The H3C UAP380 supports the latest Wi-Fi 6 standard, providing blazing-fast speeds and seamless connectivity for multiple devices simultaneously.
-
Wide coverage and signal strength: Equipped with high-gain antennas, the H3C UAP380 delivers a wide coverage area and strong signal strength, ensuring reliable wireless connectivity even in challenging environments.


-
 1
1
-
 2
2
-
 3
3
-
 4
4
-
 5
5
-
 6
6
-
 7
7
-
 8
8
-
 9
9
-
 10
10
-
 11
11
-
 12
12
-
 13
13
-
 14
14
-
 15
15
-
 16
16
-
 17
17
-
 18
18
-
 19
19
-
 20
20
-
 21
21


H3C UAP380: is a high-performance access point designed to provide wireless connectivity in various indoor environments, including offices, schools, and hospitals. With its advanced features and capabilities, the H3C UAP380 is an ideal solution for deploying and managing wireless networks of any scale. Some of the key features and use cases of the H3C UAP380 include:
-
High-speed wireless connectivity: The H3C UAP380 supports the latest Wi-Fi 6 standard, providing blazing-fast speeds and seamless connectivity for multiple devices simultaneously.
-
Wide coverage and signal strength: Equipped with high-gain antennas, the H3C UAP380 delivers a wide coverage area and strong signal strength, ensuring reliable wireless connectivity even in challenging environments.
Ask a question and I''ll find the answer in the document
Finding information in a document is now easier with AI
Related papers
-
H3C WA5620i-ACN Installation guide
-
-
-
-
-
H3C WA530X Installation guide
-
H3C SecPath AC2500 User manual
-
-
-