XciteRC 13009000 Operating instructions
- Category
- Remote controlled toys
- Type
- Operating instructions
This manual is also suitable for

Bedienungsanleitung
Manual
Mode d‘emploi
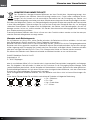
#13008000 XciteRC Flybar 190E Single Blade 2.4 GHz
black
#13009000 XciteRC Flybar 190E Single Blade 2.4 GHz
white
Page is loading ...
Page is loading ...
Page is loading ...
Page is loading ...
Page is loading ...
Page is loading ...
Page is loading ...
Page is loading ...
Page is loading ...
Page is loading ...
Page is loading ...
Page is loading ...

14
XciteRC Flybar 190E Easy
EN
Summary
Imprint
This manual is a publication of
XciteRC Modellbau GmbH & Co. KG
Autenbachstrasse 12
D-73035 Göppingen
Phone: +49 7161 40 799 0
Fax: +49 7161 40 799 99
E-mail: [email protected]
Web: www.XciteRC.de
All rights including translation. Reproductions of any kind, such as photocopying, microfilming or storage in electronic data
processing equipment, without the written permission of the publisher. Reproduction in whole or part, is prohibited.
This manual corresponds to the technical status of the product at time of printing, changes in technology and equipment
reserved. Text and illustrations of this manual, no claims can be derived.
NO LIABILITY FOR PRINTING ERROR! SUBJECT TO CHANGE!
The latest version of this manual can be found on the Internet at www.XciteRC.de
© Copyright 2013 by XciteRC-Modellbau GmbH & Co. KG
Summary
Intended Usage ...................................................................................................................... 15
Scope of delivery ......................................................................................................................................15
Required accessories ............................................................................................................................... 15
Explanation of Symbols ............................................................................................................................15
Warnings and safety notes........................................................................................................................15
Handling precautions for batteries or rechargeable batteries: .................................................................... 17
The remote control system .......................................................................................................................18
Transmitter ...............................................................................................................................................18
Transmitter display .................................................................................................................................... 18
Battery charging .......................................................................................................................................19
Getting started .........................................................................................................................................19
RC functions MODE 1 ..............................................................................................................................20
RC functions MODE 2 ..............................................................................................................................21
Landing: ...................................................................................................................................................22
Maintenance .............................................................................................................................................22
Troubleshooting ........................................................................................................................................23
Repairs, Spare Parts .................................................................................................................................23
Environmental Protection Notes ................................................................................................................24
Notes on battery law: ...............................................................................................................................24
Declaration of conformity ..........................................................................................................................39

15
XciteRC Flybar 190E Easy
EN
Introduction · Intended Usage
Thank you for purchasing the helicopter Flybar 190E from XciteRC. This manual contains important instruc-
tions for operating your new model. Therefore, please read all instructions in this manual thoroughly
before using the model, so that you can operate your model safely.
All company and product names mentioned are trademarks of their respective owners. All rights reserved.
Intended Usage
The Flybar 190E is an electrically driven ready to run helicopter including motor and speed controller. The
control is wireless with the included 2.4 GHz remote control. The model may only be operated on a suitable
and sufficiently large room without obstacles. An outdoor use is not recommended.
The product is not a toy and not suitable for children under 14 years of age, by children under 14 years the
maintenance and operation of the model must be supervised by an adult.
Read and observe all warnings and safety instructions in this manual and on the packaging before
operating!
This manual is part of this product. It contains important information for handling this product. Keep the
manual for future reference and also it must be strictly kept and passed on the subsequent sale
of the model to the buyer. Failure to follow the operating instructions and the safety instructions
may invalidate the warranty.
Scope of delivery
RTF helicopter assembled
Transmitter
LiPo battery included
USB charging adapter
Spare blades
Manual with spare parts list
Required accessories
4 AA batteries or rechargeable batteries for the transmitter
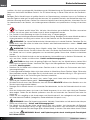
Explanation of Symbols
WARNING: These instructions must be strictly observed by the operator! Failure to follow
these instructions may interfere with the safe function. These notes are also for your own safety
and that of other people!
ATTENTION: this information must be observed by the operator! Failure to follow these inst-
ructions can damage whatsoever, warranties power loss, etc. have resulted.
Information or advice, by which a smooth operation is ensured.
Instructions for care and maintenance to ensure a long shelf life of the product.
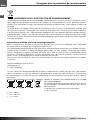
Warnings and safety notes
The following safety instructions must be strictly observed. For property damage, personal injury or conse-
quential damage caused by improper use or non-observance of the safety instructions the XciteRC Modell-
bau GmbH & Co. KG accepts no liability. In these cases, the warranty becomes void.
Move your model always with the maximum caution and responsibility, otherwise it may cause damage to
other property or even physical injury. We therefore recommend to secure the operation with a third party

16
XciteRC Flybar 190E Easy
EN
Safety notes
liability insurance. If you already have a liability insurance policy, check before start-up the model, whether
radio-controlled models are covered by a corresponding amount.
•
The product contains small parts that can cause injury if swallowed, and must therefore be kept
away from children under 3 years.
• The product is not a toy and not suitable for children under 14 years.
• The operation of radio-controlled models requires practice. In the beginning operate your new model
therefore with extra caution and familiarize yourself with the response to your commands.
•
WARNING: The safe operation requires concentration and quick reaction. Do not operate your
model if you are tired or under the influence of drugs or alcohol – risk of accident and injury!
•
WARNING: The control of this model is done via radio signals, which can be influenced by the envi-
ronment. This may cause a suddenly loss of control of your model. The model may only be operated on a
suitable and sufficiently large room without obstacles. An outdoor use is not recommended.
• Operate your model therefore only with sufficient light within line of sight, away from cars, traffic and peo-
ple – risk of accident and injury!
•
ATTENTION: due to the small size and weight, the model should not be exposed to drafts or a
strong winds. Avoid flights near open windows or air-outlets of an air-conditioning system - crash hazard!
• Do not operate your model during a thunder storm or near radio towers or power lines.
• Radio remote controlled models may not be operated at any public space by implication (streets, roads,
squares or lakes). Before operation please ask where the operation is allowed. This also applies to private
property, here the consent of the owner is required.
•
WARNING: Keep your fingers or loose clothing or hair away from the rotating parts or the propeller
/ rotor unit - risk of injury!
• Always switch on the transmitter first, then the model. NOTE: during the operation of the transmitter must
remain switched on!
• Never operate your model with low transmitter batteries, because this reduces the range of your model
dramatically.
• If the drive battery is empty, the model first slow down until it no longer reacts properly to your commands.
Stop the operation and change the drive battery or charge it again.
• Pay attention to the instructions and warnings for this and any other equipment used by you (chargers,
rechargeable battery packs, etc.).
•
WARNING: Keep packaging material, small parts, chemicals and electrical components away from
children – risk of accident and injury!
• The model and the transmitter may be neither get humid nor wet, especially the electronic components
(receiver, speed controller, servo) and, if used, lithium batteries, are not waterproof! The model may not
be used in the rain (or heavy fog), do not drive in wet grass or through puddles or snow.
WARNING:
Fire or explosion due to moisture in lithium batteries!
• Plastic parts (eg. fuselage or main blades) is less flexible and can break more easily at cold temperatures
(below 10 ° C).
• The modification of the model is not permitted for safety and CE approval regulations, which applies in
particular to the transmitter, receiver and speed controller. Maintenance or repairs using original replace-
ment parts are excluded.
• After use, first turn off the model and then the transmitter.
•
WARNING: remove the drive battery from the model and transmitter after use. Store the model
never with built-in battery. Fire hazard!
• Store batteries separately on a non-combustible surface.
• The drive components (motor and speed controller) or the car battery may become hot during operation.

17
XciteRC Flybar 190E Easy
EN
Safety notes
WARNING: Risk of burns! Let these components cool down completely after the operation (and
also before each battery change)!
Operation of the model is performed solely at the risk of the operator. Only a careful and deliberate operation
protects against physical injury and damage to property.
Handling precautions for batteries or rechargeable batteries:
• Keep batteries away from children! Never let batteries unattended, as they can be swallowed by children
or pets!
• Use only the recommended or equivalent type of batteries / rechargeable batteries.
•
WARNING: Do not expose batteries / rechargeable batteries to heat or throw into fire – fire or
explosion hazard!
•
WARNING: Insert batteries / rechargeable batteries with the correct polarity, no short-circuiting –
fire or explosion hazard!
• If possible, always replace all batteries at the same time, never use new and used batteries and batteries
with different charge levels simultaneously.
•
WARNING: Do not use defective or damaged batteries or rechargeable batteries – fire hazard!
Risk of chemical burns on contact with skin, use protective gloves!
• WARNING: Do not attempt to recharge non-rechargeable batteries in a charger – fire or explosion
hazard!
• Remove the rechargeable batteries from the device before charging.
•
WARNING: Charging may take place only with a suitable charger for the type of battery on a fire-
proof surface and under constant adult supervision – fire hazard!
• Immediately remove used batteries from the devices.
•
NOTE: NiMH batteries must be checked at least every 3 months and, if necessary, recharged, other-
wise because of the typic self-discharge they may get deep discharged and damaged! Therefore, better
use so-called RTU batteries with a very low self-discharge.
•
NOTE: note the specified storage voltage for lithium batteries. Is a completely full or empty lithium
battery time stored for a longer time, it can be damaged.
The XciteRC Modellbau GmbH & Co. KG cannot monitor the proper use of the battery or batteries you use,
therefore, the warranty is excluded due to incorrect charging or discharging.

18
XciteRC Flybar 190E Easy
EN
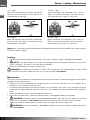
The remote control system
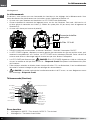
The remote control system
Here you get an overview of the remote control system of your XciteRC Flybar 190E and its various features
and settings. Before the first flight, you should absolutely have read and understood all these functions and
settings.
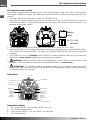
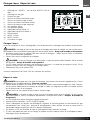
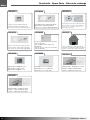
• Do make sure that the transmitter is turned off - POWER-LED off.
• Now open the battery compartment cover on the backside of the transmitter. Remove the srew and
slide the cover down (1). Insert four AA batteries into the battery compartment of the transmitter (2). Pay
attention to the correct polarity!
Battery
cover
4x 1.5 V AA
batteries
• Close the battery compartment cover, then turn on transmitter – push ON / OFF switch.
• When the POWER LED is flashing, move the left throttle lever to the top position, then back to the bottom.
The POWER LED will light constantly. This safety circuit prevents the rotor may start after turning on the
helicopter.
• The POWER LED must lit. Attention: if the POWER LED flashes or does not light at all, the model may
not started – crash hazard! Change transmitter batteries immediately.
•
WARNING: check the POWER LED also during operation. If the POWER LED starts to blink, stop
operation, switch the model off and replace the transmitter batteries – crash hazard!
•
ATTENTION: The maximum range of the remote control system is about 25 meters, do not fly
farther away under any circumstances! If the XciteRC Flybar 190E gets out of range, the fail-safe function
is activated and turns off the motor.
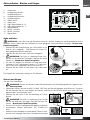
Transmitter
3
4
5
6
7
8
9
11
MODE 1:
Trim left/right
MODE 2:
Trim yaw
Mode selector
Trimmung
MODE 1:
Trim yaw
MODE 2:
Trim left/right
Throttle trim
Antenna
Power ON/OFF
Direction lever
Direction trim
Power-LED
Speed switch
Throttle lever
LCD Display
Trim
forward-backward
Transmitter display
1. Trim display: MODE 1: trim left/right, MODE 2: trim yaw
2. Trim display forward/reverse
3. Trimm display: MODE 1: trim yaw, MODE 2: trim left/right
4. Trim display throttle

19
XciteRC Flybar 190E Easy
EN
Battery charging · Getting started
5. Throttle position
6. Forward lever level
7. Direction lever right
8. Backward lever level
9. Direction lever left
10. Yaw right
11. Yaw left
12. High-Speed mode on „H“
13. High-Speed mode off „L“
14. Tranmitter power level
15. MODE 1 activated
16. MODE 2 activated
17. Signal strength
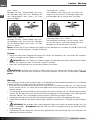
Battery charging
WARNING: Be sure to read all safety instructions regarding the use of rechargeable batteries. Charging
may take place only with the supplied charger on a fireproof surface and under constant adult supervision -
fire or explosion hazard!
• Insert the plug of the USB cable into the socket of the char-
ger.
• Connect the helicopter battery with the charger.
•
WARNING: The helicopter battery is polarized. Check
the side channels. Do not use force - fire or explosion ha-
zard!
• The red LED lights to indicate charging. Charging time is
about 50-60 minutes. If the battery is fully charged, the red
LED goes out.
• Unplug the battery and the USB cable.
The flight time of the helicopter is about 6-8 minutes.
Getting started
Before you begin please check:
•
WARNING: Only start with a sufficiently full transmitter batteries (rechargeable batteries) and fully
charged drive battery – crash hazard!
• Check all parts for damage and dirt. Replace any damaged parts and clean the model, because dirt
increases the weight and therefore can degrade the flying qualities.
• Insert the battery in the battery holder on the landing gear.
•
WARNING: The helicopter battery is polarized.
Check the side channels. Do not use force - fire or ex-
plosion hazard!
• The red LED on the receiver board starts to flash.
• Then switch on the transmitter. The POWER LED flashes.
• Place the helicopter in the start position and move the left
throttle lever all the way up and then back in the lowest
position. This safety circuit prevents the rotor may start
after turning ON the helicopter
• The transmitter LED and the red helicopter LED will now
light.
• Check the motor and servo functions.
9
Red LED off Red LED on
Charging completed Charge

20
XciteRC Flybar 190E Easy
EN
RC functions MODE 1
• If the flight battery runs low, the motor speed is reduced and the helicopter sinks automatically. Find a
suitable place to land safely. Charge the flight battery again.
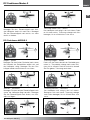
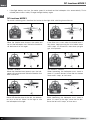
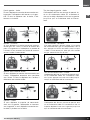
RC functions MODE 1
For mode switching press direction trim button to the right while switching transmitter on.
Up - down
Move the throttle lever forward, the motor revs
up and the helicopter rises. Move the throttle le-
ver backwards to sink again.
Trim up - down
If the rotor turns, even when the throttle lever is
fully down, keep pressing the trim button down
until it stops. If it will not turn, even when you give
gas, trim upwards.
Left - Right
Move the direction lever to the left, the helicop-
ter turns to the left. Move it to the right to turn
the helicopter to the right.
Forward - reverse
Move the direction lever towards you, the heli-
copter will move forward. Move the throttle stick
back to reverse.
Trim forward - reverse
When hoovering, the helicopter must stand in
place. If it moves forward, move the trim button
down until it stops, or vice versa.
Trim left - right
When hoovering, the helicopter must stand in
place. If it moves to the right, move the trim but-
ton to the left until it stops, or vice versa.

21
XciteRC Flybar 190E Easy
EN
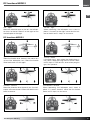
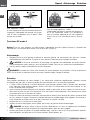
RC functions MODE 2
RC functions MODE 2
Left - Right
Move the direction lever to the left, the helicop-
ter turns to the left. Move it to the right to turn
the helicopter to the right.
Trim left - right
When hoovering, the helicopter must stand in
place. If it moves to the right, move the trim but-
ton to the left until it stops, or vice versa.
Up - down
Move the throttle lever forward, the motor revs
up and the helicopter rises. Move the throttle
lever backwards to sink again.
Trim up - down
If the rotor turns, even when the throttle lever is
fully down, keep pressing the trim button down
until it stops. If it will not turn, even when you give
gas, trim upwards.
Forward - reverse
Move the direction lever towards you, the heli-
copter will move forward. Move the throttle stick
back to reverse.
Trim forward - reverse
When hoovering, the helicopter must stand in
place. If it moves forward, move the trim button
down until it stops, or vice versa.

22
XciteRC Flybar 190E Easy
EN
Speed · Landing · Maintenance
Speed: press the button during the flight and the helicopter becomes faster (display H). Press again to return
to slower speed (display L).
Landing:
• Carefully push the left throttle lever rearward. Try to land „smooth“ without damaging the helicopter.
•
NOTE: if the flight battery runs empty, the helicopter does not respond accurately to your com-
mands, the flight is unstable. In this case land immediately.
• Switch of the helicopter and then the transmitter.
WARNING: the motor of the XciteRC FLYBAR 190E may get very hot during operation. Allow to cool
down minimum 20 minutes before the next start to avoid damage. Fire hazard!
Maintenance
To have fun with your model over a long period, occasional service work is required to get your model in good
condition and to minimize wear.
• Remove dirt or dust depending with compressed air or a soft brush after each use. For stubborn dirt, a
harder brush or a toothbrush can be used.
• To clean the body/fuselage no chemical cleaners such as thinners may used, as this damage the plastic
of the body/fuselage. Normally a piece of soft cloth is ok, stubborn dirt can be removed with washing-up
liquid.
• Check the tightness of all screws and tighten if necessary.
• Also check all connections, cables and power battery / rechargeable battery for damage.
•
WARNING: Damaged batteries or rechargeable batteries must not be used again and must be
disposed of immediately – fire hazard! Please note the disposal notes at the end of this manual.
• Check the model for worn, broken or jammed parts and gears and repair if necessary.
•
WARNING: remove the batteries / rechargeable batteries of the transmitter and model when not in
use – fire hazard!
Left - Right
Move the direction lever to the left, the helicop-
ter turns to the left. Move it to the right to turn
the helicopter to the right.
Trim left - right
When hoovering, the helicopter must stand in
place. If it moves to the right, move the trim but-
ton to the left until it stops, or vice versa.

23
XciteRC Flybar 190E Easy
EN
Troubleshooting · Repairs
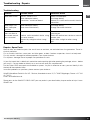
Troubleshooting
Problem Possible Cause Corrective Action
Rotor don‘t move ON/OFF switch is OFF
Weak helicopter battery
Transmitter - model not bound
Switch ON helicopter
Re-charge battery
Rebind: first switch on the model, then the
transmitter
Rotor stops sud-
denly, helicopter
chrashes
Weak helicopter battery
Weak transmitter battery
Re-charge battery
Change transmitter batteries
The helicopter
does not react to
the remote control.
Loss of control.
Gyro initialisation failure
Another radio controlled device using
the same channel
Affected by sunlight or other strong
light
Place the model on a flat surface when
switching on
Switch off another/own device or move to
another spot
Avoid direct sunlight or other strong
light
Repairs, Spare Parts
Normal wear and defective parts that result from an accident, are excluded from the guarantee. These in-
clude in particular:
For car models: bald tires, worn parts and drive gears, or bent / broken suspension, chassis or bodywork
For ship models: damaged or broken propellers, torn superstructure
For airplanes: damage due to improper transportation or crash
I If you find a part that is defective in material or workmanship right after opening the package, return - before
you used it – to your dealer or directly to us and we will send you a replacement.
For the Flybar 190E some parts are available as spares. If a part is defective or worn, you can identify it with
the help of the exploded view.
In case of problems or questions, please contact your dealer or:
XciteRC Modellbau GmbH & Co. KG - Service, Autenbachstrasse 12, D-73035 Göppingen, Phone +49 7161
40 799 50
Email: [email protected]
Spare parts for the XciteRC FLYBAR 190E you may order in your local hobby shop or online at http://www.
XciteRC.de/

24
XciteRC Flybar 190E Easy
EN
Environmental protection
Environmental Protection Notes
The symbol of the crossed out dust bin on the product or packaging indicates that this product
must be disposed of separately from normal household waste. In order to avoid harmful effects
on the environment and human health in the disposal of electrical and electronic equipment and
the re-use or recycling are possible. You have the opportunity to submit electrical and electronic
equipment free of charge at an appropriate collecting point in your area. Please check with your city or town
across the available depot. You also have the option to return old electrical and electronic equipment which
has been purchased from us. We will then perform a proper recycling or reuse.
Possibly contained batteries must be removed from the product and disposed of at the appropriate collecting
point.
Notes on battery law:
According to the German Battery Act (BattG) the one who sells batteries (and accumulators etc.) or devices
containing batteries, we are obliged to draw your attention to the following:
Batteries and rechargeable batteries should not be disposed of with household waste but you are legally
obliged to return used batteries. Batteries can contain contaminants that could harm the environment or your
health if improperly stored or disposed of. Batteries also contain important raw materials such as iron, zinc,
manganese or nickel and can be recycled.
You can send us back the batteries after use either sufficient postage:
XciteRC Modellbau GmbH & Co.KG
Autenbachstr. 12
D-73035 Göppingen
returned free of charge or in close proximity (eg in trade or municipal collection). The levy is limited to points
of sale to end-users for the disposal of such waste batteries and customary amounts, which the distributor
as new batteries in his range or has done.
Batteries containing pollutants are marked with a sign, a crossed-out rubbish bin, and the chemical symbol
of the pollutant-heavy metal.
This crossed-out bin means that you must not dispose of batteries with household waste.
Among these characters, see also the following symbols have the following meanings:
• Cd = cadmium
• Pb = plumbium
• Hg = mercury
• Li = lithium
Cd Hg Pb
Li-Po

25
XciteRC Flybar 190E Easy
EN
Page is loading ...
Page is loading ...
Page is loading ...
Page is loading ...
Page is loading ...
Page is loading ...
Page is loading ...
Page is loading ...
Page is loading ...
Page is loading ...
Page is loading ...
Page is loading ...

38
XciteRC Flybar 190E Easy
Ersatzteile - Spare Parts - Pièces de rechange
13008001
Landegestell Flybar 190E Single Blade
Landing Gear Flybar 190E Single Blade
Train d'atterissage Flybar 190E Single Blade
13008002
Rotorblätter Flybar 190E Single Blade
Blades Flybar 190E Single Blade
Pales de rotor Flybar 190E Single Blade
13008003
Reparaturset Rotorkopf Flybar 190E Single Blade
Rotor Head Repair Set Flybar 190E Single Blade
Set de pièces de réchange pour tête de rotor
Flybar 190E Single Blade
13008004
Wellen und Zahnräder Flybar 190E Single Blade
Shafts and Gears Flybar 190E Single Blade
Axe et pignons Flybar 190E Single Blade
13008005
Heckausleger und Motorhalterung Flybar
190E Single Blade
Tail + Tail Motor Mount Flybar 190E
Single Blade
Tube de queue et support moteur Flybar
190E Single Blade
13008007
Sender 2.4 GHz Flybar 190E Single Blade
Transmitter 2.4 GHz Flybar 190E Single Blade
Emetteur 2.4 GHz Flybar 190E Single Blade
3
4
5
6
7
8
9
11
13008008
LiPo-Akku 3.7 V / 150 mAh
LiIo battery 3.7 V / 150 mAh
Accu LiIo 3.7 V / 150 mAh
13008006
Flybar LiPo-Ladegerät 7.4 V
Flybar LiPo charger 7.4 V
Flybar LiPo chargeur 7.4 V
13008009
Kabinenhaube + Stabilisator schwarz
Canopy + Vertical stabiliser black
Cellule + stabilisateur arrière noir
13008010
Kabinenhaube + Stabilisator weiß
Canopy + Vertical stabiliser white
Cellule + stabilisateur arrière blanc

39
XciteRC Flybar 190E Easy
Konformität · Conformity · Conformité
Konformitätserklärung – Declaration of conformity
H
ersteller/Manufacturer: XciteRC Modellbau GmbH & Co. KG
A
dresse/adress: Autenbachstr. 12
D- 73035 Göppingen
Tel: +49 7161 40 799 0
www.XciteRC.de
E
rklärt, dass das Produkt /
D
eclares that the product: Flybar 185S Coax, Flybar 270L Coax, Flybar 460XL Coax, Flybar
560XXL Coax, Flybar 270L Single Blade, Flybar 190E Easy,
Rocket 270M
B
est.-Nr. / Order No. 12017000, 12018000, 12020000, 12021000, 12030000,
12031000, 12040000, 12041000, 12500000, 12501000,
13008000, 13009000, 15005000
konform ist mit den folgenden Bestimmungen und Standards /
is in conformity with the following directives and standards:
EN 71-1:2011
EN 71-2:2011
prEN71-3:2012
EN 55014-1:2006+A1+A2
EN 62479:2010
EN 62115:2005+A11:2012
EN 300 440-2 V1.4.1
EN 301 489-1 V1.9.2
EN 301 489-3 V1.4.1
Göppingen, den 29.09.2013
Werner Bergbauer
Geschäftsführer/Managing Director
Page is loading ...
-
 1
1
-
 2
2
-
 3
3
-
 4
4
-
 5
5
-
 6
6
-
 7
7
-
 8
8
-
 9
9
-
 10
10
-
 11
11
-
 12
12
-
 13
13
-
 14
14
-
 15
15
-
 16
16
-
 17
17
-
 18
18
-
 19
19
-
 20
20
-
 21
21
-
 22
22
-
 23
23
-
 24
24
-
 25
25
-
 26
26
-
 27
27
-
 28
28
-
 29
29
-
 30
30
-
 31
31
-
 32
32
-
 33
33
-
 34
34
-
 35
35
-
 36
36
-
 37
37
-
 38
38
-
 39
39
-
 40
40


XciteRC 13009000 Operating instructions
- Category
- Remote controlled toys
- Type
- Operating instructions
- This manual is also suitable for
Ask a question and I''ll find the answer in the document
Finding information in a document is now easier with AI
in other languages
- français: XciteRC 13009000 Mode d'emploi
- Deutsch: XciteRC 13009000 Bedienungsanleitung
Related papers
-
XciteRC Flybar 180SC Operating instructions
-
-
-
-
-
-
-
-
-
Other documents
-
Reely 2356861 User manual
-
Carrera RC Micro Helicopter Operating instructions
-
 Reely 1542913 Operating instructions
-
Reely 2282651 User manual
-
Reely 2373337 User manual
-
 Reely 1991059 Operating instructions
-
Ripmax Sky Spy A-ARTF68713 User manual
-
 Reely 1577749 Operating instructions
-
 Reely 1302975 Operating instructions
-


