Page is loading ...

1
IRCM-DV+ • Setup Guide
This guide provides instructions for an experienced installer to install and connect an Extron IRCM‑DV+. The IRCM‑DV+ is a
hardwired remote control module for use with an Extron MediaLink
®
Controller (MLC) or System 5 IP Switcher. It replicates
the front panel controls on both a VCR and a DVD player or a combination VCR/DVD player and uses commands stored in the
MLC or sytem switcher to control those devices.
Up to two IRCM‑DV+ modules or one IRCM‑DV+ and up to two other control modules can be daisy chained together and
connected to an MLC or System 5 IP switcher for basic A/V source and room control from several locations. One IR Emitter is
included with each IRCM‑DV+. Additional IR Emitter and shield kits (part number 70‑285‑01) are available separately.
Installation
CAUTION: Installation and service must be performed by authorized personnel only. You must comply with the
following UL requirements:
1. This unit is not to be connected to a centralized DC power source or used beyond its rated voltage range.
2. The IRCM‑DV+ must be installed in a UL listed junction box.
3. The unit must be installed in accordance with the National Electrical Code and with local electrical and safety codes.
Step 1
Turn off all equipment and disconnect the equipment from the power source.
Step 2
Set the DIP switches on each control module as shown at right:
ON
12
ON
12
ON
12
ON
12
1 and 2 down (off)
= address 0 and 1
1 up (on), 2 down (off)
= address 1 and 0
1 down (off), 2 up (on)
= address 2 and 3
1 up (on), 2 up (on)
= address 3 and 2
or
Figure 1. Setting DIP Switches
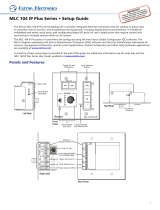
Figure 2. Connecting the IRCM‑DV+ to a System 5 IP or
an MLC and Another Control Module
NOTES:
• Each IRCM‑DV+ is assigned two addresses
simultaneously: 0 and 1, or 2 and 3. The higher
numbered address (1 or 3) address stores VCR
commands, the other (0 or 2) stores DVD commands
in the memory of the controller or system switcher.
If an IRCM‑DV+ is assigned addresses 0 and 1,
a different type of control module can be assigned
to address 2 or 3.
• Each module must have a unique address. If other
modules have the same addresses as the IRCM‑DV+,
then address conflicts may cause one or both modules
to not be recognized by the controller or switcher.
Each controller or system switcher can support four control
module addresses. Because each IRCM‑DV+ is assigned two
addresses, you can connect only one other IRCM‑DV+ or up
to two single‑address control modules to each controller or
system switcher.
Step 3
Attach the IRCM‑DV+ control module(s) to the Extron
faceplate(s) or Architectural Adapter Plate (AAP) wallplate(s).
The IRCM‑DV+ fits into a four space high opening.
Step 4
Connect the IRCM‑DV+ to the MLC or System 5 IP, and connect
any other control modules to each other (if applicable) and to
the IRCM‑DV+. See the diagram in figure 2 at right for details.
Both 5‑pole connectors are interchangeable. Wire both ends
of the cable the same (pin A to pin A, for example). Do not
connect more than one IR Link or two SCP control pads.
ADBC EADBC E
MLC 104 Plus
Series
1
IR IN
CM
SCP
A B C D E
COMM LINK
+V OUT
GROUND
MLC 226 IP
Series
CM/ IR/SCP
A B C D E
+12V OUT
GROUND
CONT MOD
IR IN
SCP COM
G+V
CM IR
SCP
CM/IR/SCP
ECBDA
System 5 IP
or
or
Control
Module
C
C
+12VDC
Control signal (IRCM)
Ground ( )
BB
A
A
To Another
Control
Module
(1 more
IRCM-DV+
or up to
2 control
modules
with single
DIP switch
addresses)
Total max. distance
to the farthest
control module:
200' (61 m)
DIP Switches
NOTE: When running cables
long distances, you must
use shielded cable and
ground the drain wire.
C
B
A

2
ExtronUSA ‑ West-
Headquarters
+800.633.9876
InsideUSA/CanadaOnly
+1.714.491.1500
+1.714.491.1517FAX
ExtronUSA ‑ East
+800.633.9876
InsideUSA/CanadaOnly
+1.919.863.1794
+1.919.863.1797FAX
ExtronEurope
+800.3987.6673
InsideEuropeOnly
+31.33.453.4040
+31.33.453.4050FAX
ExtronAsia
+800.7339.8766
InsideAsiaOnly
+65.6383.4400
+65.6383.4664FAX
ExtronJapan
+81.3.3511.7655
+81.3.3511.7656FAX
ExtronChina
+400.883.1568
InsideChinaOnly
+86.21.3760.1568
+86.21.3760.1566FAX
ExtronMiddle East
+971.4.2991800
+971.4.2991880FAX
© 2011 Extron Electronics All rights reserved. www.extron.com
IRCM-DV+ • Setup Guide (Continued)
Step 5
Connect IR Emitters (one per each VCR, DVD player, or other device
being controlled) to the MLC or System 5 IP, and affix each emitter head
near the IR receiver of the device (VCR, DVD player).
Step 6
Restore power to the devices and set up the MLC or System 5 IP.
NOTES: • The configuration should be created and uploaded to the MLC before the MLC is installed into the wall or
furniture.
• Configuration and IR command learning require an RS‑232 or IP/LAN connection to the System 5 IP or the
MLC 104/226. See the user or setup guide for the MLC or switcher and the software help file for details on
installing, operating, and setting up that device.
a. Associate the IRCM-DV+ with inputs on the MLC or System 5 IP. In Global Configurator, assign the DVD half of
the IRCM‑DV+ to an input button, then assign the VCR half to another input button. For detailed procedures, see
the Global Configurator Help file.
b. For the System 5 IP or MLC 104 Plus or MLC 226 IP Series, if an Extron‑created driver is available for the VCR and the
DVD or the combination VCR‑DVD player, download the device driver(s) to the PC and load the commands to
the Global Configurator project.
c. If needed, perform IR learning (the process by which the MLC or system switcher stores commands from an infrared
remote control) for each IRCM button for each device (VCR and DVD). See the the MLC or System 5 IP User Guide.
Step 7
Test the system.
• Verify that the DIP switches on the IRCM are set correctly.
• Verify that cables to and from the IRCM are wired the same at each end (pin A to pin A, pin B to pin B, and so forth).
• Verify LED function and check the responses of the VCR and DVD players.
NOTE: You must recycle power to an MLC in order for it to recognize an IRCM‑DV+ or any other control modules that
have been added after initial power‑on.
Step 8
Once configuration and testing are complete, mount the MLC and the control module(s) into the wall/furniture.
Front Panel Features and Operation
a
DVD LED (amber) — Lights while the MLC or switcher input associated with
the DVD player is selected.
b
VCR LED (amber) — Lights while the input associated with the VCR is
selected.
NOTES:
• When an input that is not associated with that part of the
IRCM‑DV+ is selected, LEDs
a
and
b
turn off.
• The MLC or System 5 IP input must be selected (active) before
either part (DVD or VCR) of the IRCM‑DV+ can be activated and
control the DVD or VCR.
c
Tx (transmit) LED — This LED lights whenever an IRCM‑DV+ button is
pressed.
d
Function buttons — These buttons replicate whichever VCR and DVD player
controls you assigned to them during configuration.
Ground (−)
IR Signal (+)
IR Port on
MLC or
System 5 IP
100'
(30.5 m)
Figure 3. IR Emitter Wiring
DVD & VCR CONTROL
PLAY NEXT/FWDPAUSE STOP
TUNER
Tx
PREV/REW
ENTER
TITLE MENU
TV/VCR
DVD VCR
1 2
3
4
Figure 4. Front Panel
68-689-50
Rev. A
0811
/