Page is loading ...

Copyright© 2016 Aqua Logic, Inc. Effective date of 1/2016
1
__________________________________________________________________________________________
Installation and Maintenance Manual
For
Delta Star Water-cooled Marine Duty
In-Line Water Chillers
(Models DS-4-WCMD thru DS-10-WCMD)
DS-9-WCMD shown
Use Quick Install page for easy setup.
Aqua Logic, Inc.
9558 Camino Ruiz.
San Diego, CA 92126
PH: 858.292.4773 Fax: 858.292.0537
Email: info@aqualogicinc.com
Website: www.aqualogicinc.com

Copyright© 2016 Aqua Logic, Inc. Effective date of 1/2016
2
Thank you for selecting an Aqua Logic Delta Star Chiller. We have endeavored to
manufacture the most reliable and efficient water Chiller available. Our highly trained
technicians use premium quality components to assemble equipment that will operate
faithfully for years. You can call us or visit us on the web for technical assistance before and
after the sale. We are committed to making sure that you are satisfied with your Aqua Logic
Chiller now—and in the future.
Please take some time to familiarize yourself with the information in this manual so that you
can get the most from your Chiller. Don’t hesitate to contact us if we can assist you further.

Copyright© 2016 Aqua Logic, Inc. Effective date of 1/2016
3
Quick Install for your Aqua Logic Delta Star chiller
Unpack your Delta Star Chiller:
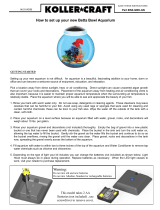
• Carefully remove the Chiller from the box by reaching underneath the Chiller and lifting it
by its base. NEVER lift the Chiller by its cover to avoid personal injury or damage to the
Chiller (See illustration).
• Use a Phillips head screwdriver to remove the two screws on opposite ends of the cover.
Place your Aqua Logic water Chiller:
• Place the water Chiller on a sturdy flat surface.
• Make sure that the unit is resting on its base to avoid damage.
• If you place the Chiller in a cabinet, allow at least ½” of space between the Chiller and the
walls of the cabinet to avoid vibration and noise.
Delta Star Plumbing:
• Your Aqua Logic flow-through Chiller requires an external water pump (not supplied) for
proper operation.
• The Chiller should be the last piece of equipment in the plumbing before the water is
returned to the tank or sump (after pump and filters).
• Use male-pipe-thread (MPT) fittings of the diameter below to connect your Chiller to your
system. Use the same or larger diameter pipe or hose for your plumbing for best water
flow.
• We suggest installing unions and ball valves (not included) on the inlet and outlet of the
Chiller for easier installation and removal of the Chiller from the system for maintenance
or repair (if necessary).
• Be sure that the water flow through your Aqua Logic Chiller goes into the water inlet
(bottom) and out the top to prevent potential damage (see illustration).
• If you use flexible hose to plumb your system or connect your Chiller, make sure that the
hose is not kinked to prevent restricted flow and potential damage to your Chiller.
• Avoid elbows in your plumbing to minimize flow loss through your system.
• For most efficient operation, we recommend the minimum and maximum flow rates listed
in the specifications sheet for each model.
• Do NOT operate the Chiller without adequate water flow.
Electrical Hookup:
• We suggest using a dedicated power circuit for best operation and longest life of the Chiller. The circuit must be rated to handle the maximum load
of the Chiller.
• We highly recommend that you use a ground-fault interrupter (GFI) to avoid electrical shock. You can obtain an inline GFI from Aqua Logic, a local
hardware store if the outlet in the wall does not have a GFI installed.
• Avoid using an extension cord on your Chiller.
• Temperature controller installation:
o Follow the instructions included with the controller to install it.
o Install the sensor for the controller “upstream” (ahead) of Chiller.
o Plug the Chiller into the controller.
o Plug the controller into the wall outlet.
o Program or adjust the controller to your desired temperature. (see Chiller Controller Programming)
Your Aqua Logic chiller is now installed and ready for operation!
YES
NO
How to lift your Aqua Logic chiller
Condenser and Evaporator
Water in and outlets

Copyright© 2016 Aqua Logic, Inc. Effective date of 1/2016
4
CHILLER SET-UP AJUSTMENTS
WARNING: DO NOT over tighten water fittings.
• Mount chiller on a flat pad and away for water spray.
• Give at least 1 ft all the way around unit for servicing.
• Install evaporator water inlet and outlet.
• Install condenser water inlet and outlet.
• Test water fittings for leaks.
• Apply electrical power to the chiller.
• Adjust the controller to the desired water temperature. (See "Operation and Programming")
• Important: Regulate condenser water until pressure on the pressure gauge reads between 115 to 125 PSIG for models
DS-4-WCMD thru DS-9-WCMD and 195 to 220 PSIG for model DS-10-WCMD. Check after 15 minutes of run time,
adjust the water flow (if needed) to the correct pressure.
Warning: This unit must have proper water flow rate both on the evaporator and
the condenser to operate correctly.

Copyright© 2016 Aqua Logic, Inc. Effective date of 1/2016
5
CHILLER CONTROL PROGRAMMING
Step
Enunciator
Description
Display
1 F or C Fahrenheit or Celsius
F
2 S1 (Blinking) Setpoint Temperature
S1 77
3 DIF (Blinking) Differential Temperature
DIF 1
4 C1 or H1 Cooling or Heating Mode
C1
Liquid Crystal Display (LCD)
The LCD display provides a constant readout of the sensor temperature and indicates if the output relay is energized. When the S1
enunciator is constantly Illuminated during operation, the relay is energized. the display is also used in conjunction with the keypad to
allow the user to adjust the set point temperature, differential and heating /cooling modes.
Programming Steps and Display
The control can be programmed in four simple steps using the LCD display and the three keys on the face of the control. (See photo
for display and keys.)
1. To start programming, press the SET key once to access the Fahrenheit/Celsius mode. The display will show the current status,
either F for degrees Fahrenheit or C for degrees Celsius. Then press either the up arrow or down arrow key to toggle between
the F or C designation.
2. Press the SET key again to access the set point temperature. The LCD will display the current set point temperature and the set
point enunciator will be blinking on and off to indicate that the control is in the set point mode. Then press either the up key to
increase or down key to decrease the set point to the desired temperature.
3. Press the SET key again to access the differential. The LCD will display the current differential and the DIF enunciator will be
blinking on and off to indicate that the control is in the differential mode. Then press either up key to increase or the down key
to decrease the differential to the desired setting (minimum 1°F, maximum 30°F).
4. Press the SET key again to access the heating mode. The LCD will display the current mode, C1 for chiller mode. Press the SET
key once more and programming is complete. Controller MUST in the C1 mode for correct operation.
Controller will automatically drop out of “program mode” and return to “operating mode” 30 seconds after last key press.
Troubleshooting Controller Error Messages:
Display Messages
• E1 - Appears when the up or down key is pressed when not in the programming mode.
To correct: If the E1 message appears even when no keys are being pressed, replace the control.
• E2 - Appears if the control settings are not properly stored in memory.
To correct: Check all settings and correct if necessary.
• EP - Appears when the probe and or flow switch is open , shorted or sensing a temperature that is out of range.
To correct: Check to see if the sensed temperature is out of range. If not , check for probe damage by comparing it to a known ambient
temperature between -30°F and 220°F. Replace the probe is necessary. Also check for proper water flow through heater. If water flow is correct,
flow switch.
• EE - Appears if the EEPROM data has been corrupted.
To correct: This condition cannot be field repaired. Replace the control.
• CL - Appears if calibration mode has been entered.
To correct: Remove power to the control for least five seconds. Reapply power. If the CL message still appears, replace the control

Copyright© 2016 Aqua Logic, Inc. Effective date of 1/2016
6
When Disaster Strikes
You may have a lot of money invested in your aquarium at home or in the office. Or you may have valuable
dollars invested in seafood for your store or restaurant. Unfortunately, equipment or electricity may fail at the
most inopportune time. What can you do to minimize the risk in such an event? Based upon our years of
experience in the aquatic life support industry, we recommend the following:
• Always have ALL of the electrical equipment connected to ground fault interrupt (GFI) circuits.
• Do not overload electrical circuits.
• Add the aquarium system and livestock to your homeowner’s or renter’s insurance policy if allowable.
• Monitor your system closely during the first few weeks of operation. Make sure that everything is working correctly. Call it a
shakedown cruise.
• Check the condition of your equipment regularly. Keep it clean. You don’t take your car on a long trip without first changing
the oil, checking the tires, etc. Why would you ignore maintaining the equipment on your aquarium?
• Keep blue ice or bags of ice in the freezer. If you use ice to help maintain water temperature, leave the ice in the bag so that
the water from the melting ice doesn’t dilute the water solution in your aquarium.
• Turn off aquarium lights if the Chiller fails. Livestock in the wild have periods of several days when they do not get intense
light. There ARE typhoons that can cover an area for days at a time. Limited use of VHO and halide lamps to avoid heat
build-up in the tank is far less harmful than extremely high water temperatures.
• Put a temperature controller on the lights to shut them off and to sound off an alarm if water temperature rises more than 5°F
above the Chiller set point.
• Keep a spare pump on hand in case your primary pump fails.
• Maintain a supply of ammonia-neutralizing chemicals such as Amquel
. You can use them to control ammonia in your system
during a prolonged power outage. Be sure to follow manufacturer’s dosage recommendations and compatibility with
organisms in your tank.
• Stock your aquarium sparingly. Then when disaster strikes (and it usually will sooner or later), you have more time to fix the
problem before you lose livestock.
• Oversize your filtration system. Water quality is the most critical element for maintaining healthy fish. On a reef tank, it is easy
to invest thousands of dollars for livestock (not including how sentimental you may be attached to your livestock). Why not
spend a little more up front for more life support reserve in case of a disaster?
• Have a battery-powered air pump on hand for extended power outages. It will provide aeration and move water in the
absence of power.
• In most areas of the country, our electrical grid is subjected to surges, spikes, brownouts and blackouts caused by high peak
usage, snowstorms, hurricanes, thunderstorms and more. A surge protector can help with the surges and spikes but they are
not effective in brownouts. Furthermore, even the best surge protector can’t protect against direct strikes of lightning. It takes
an uninterruptible power supply (UPS) or backup generators to protect against low voltage and blackouts. And it takes a
backup generator to adequately power a Chiller—especially a ½-HP unit needed on a 300-gallon tank.
It is very unfortunate when equipment fails. However, a prudent aquarist should have a disaster plan and follow the motto, “Be
prepared.”

Copyright© 2016 Aqua Logic, Inc. Effective date of 1/2016
7
Maintenance and Cleaning
Your Aqua Logic Chiller should provide years of efficient and reliable service with a minimum amount of
maintenance. There is no scheduled maintenance and there are only two procedures that can be performed
by the user.
Cleaning:
The condenser should be cleaned occasionally to remove accumulated organic material or minerals from the coil. To see whether the
condenser needs to be cleaned, shine a flashlight through in the water inlet side of the Chiller.
You may also need to remove accumulated organic material or minerals from the coil (Evaporator). Organic material may be removed
by using a mild chlorine bleach solution while minerals may be removed by using a dilute muriatic acid solution, Lime-A-Way
or other
hard water deposit remover.
Warning:
• Do NOT perform both procedures at the same time since the combination of chlorine and acid may cause serious injury or death.
• Be sure to wear appropriate protective gear.
• Use extreme caution when using caustic chemicals around your system.
To remove accumulated organics (slime):
• Remove power from the Chiller.
• Wear protective eyewear, clothing and gloves.
• Mix a solution of 1 part unscented chlorine bleach to 4 parts water.
• For a Delta Star Chiller, use a small pump, pail and hoses to run the solution through the heat exchanger for about 10 minutes to
flush the organic materials out.
• For a Cyclone Chiller, dip the coil into the solution and use a bottle brush to remove accumulated organic materials.
• Rinse the heat exchanger with clear unchlorinated water until you can no longer smell chlorine.
• Allow the heat exchanger to dry and then return the Chiller to service.
To remove accumulated minerals:
• Remove power from the Chiller.
• Wear protective eyewear, clothing and gloves.
• Prepare a solution according to cleaning product instructions.
• For a Delta Star Chiller, use a small pump, pail and hoses to run the solution through the heat exchanger for about 10 minutes to
flush the minerals out.
• For a Cyclone Chiller, dip the coil into the solution and use a bottle brush to remove accumulated minerals.
• Rinse the heat exchanger with clear unchlorinated water for at least 30 minutes.
• Allow the heat exchanger to dry and then return the Chiller to service.
NOTES:
If you have any questions or concerns about maintaining your Aqua Logic Chiller, please call us at (858) 292-4773.

Copyright© 2016 Aqua Logic, Inc. Effective date of 1/2016
8
Specifications
Aqua Logic Delta Star Chiller features:
• Titanium heat exchanger for use in fresh and saltwater applications.
• Included Protective cover
• Made in the USA
• Limited 1-year warranty
Model HP BTU Volts AMP Refrigerant Evaporator
Flow
(gpm)
Condenser
*Flow
(gpm)
Evaporator
I/O
FIPT
*
Condenser
I/O
FIPT
Dimensions
(LxWxH
inches)
Weight
(lbs)
DS-4-WCMD
1/3
4050 115 7.2 R-134A 10-20 3-5 ¾” ¾” 23 x 14 x 14
75
DS-5-WCMD
1/2
6000 115 9.5 R-134A 12-25 3-5 1½” 1½” / ¾” 24 x 16 x 16
125
DS-6-WCMD
1/2
6000 230 4.8 R-134A 12-25 3-5 1½” 1½” / ¾” 24 x 16 x 16
125
DS-7-WCMD
3/4
9500 115 13.0 R-134A 15-30 5-10 1½” 1½” / ¾” 25 x 21 x 15
155
DS-8-WCMD
3/4
9500 230 7.0 R-134A 15-30 5-10 1½” 1½” / ¾” 25 x 21 x 15
155
DS-9-WCMD
1 12000
230 7.2 R-134A 20-35 5-10 1½” 1½” / ¾” 27 x 24 x 15
165
DS-10-WCMD
1.5
21000
230 10.5 R-417A 25-40 10-15 1½” 1½” / ¾” 31 x 26 x 19
225
* The condenser seawater flow rate is based on 55-60 °F entering water temperature. The condenser
head pressure is maintained by metering the water flow via gate valve.

Copyright© 2016 Aqua Logic, Inc. Effective date of 1/2016
9
ONE YEAR LIMITED WARRANTY
All Aqua Logic Delta Star Water-Cooled Chillers are warranted against defects in parts and
workmanship for a period of one (1) year from the date of original end user purchase. The limited
warranty covers only parts and labor based upon Aqua Logic service cost. Aqua Logic is not liable for
field repair work performed without prior written or verbal agreement and a Repair Authorization (RA)
number with a fixed maximum charge.
• The warranty applies only to the original purchaser and is not transferable.
• The warranty covers only the repair or replacement of Aqua Logic products and is limited to Aqua Logic’s
cost of defective parts.
• Once Aqua Logic determines that the defect is due to parts or workmanship and that the product is under
warranty, Aqua Logic will repair or replace the product solely at their discretion.
Our warranty does not cover the following:
• Damage caused by freezing, inadequate water flow, or no water flow.
• Damage caused by improper installation or maintenance by user or their agent.
• Damage caused due to misapplication of product.
• Damage caused by corrosion, abuse, accident, alteration or improper use.
• Damage caused by flood, fire, earthquake, tornado, or other acts of God.
• Damage caused by electrical spikes, surges, brownouts, or improper voltage or amperage.
• Damage caused by failure of any third party equipment (ie. controller, pump, etc.)
• Incidental damage to other equipment, property or livestock.
• Warranty will be voided if product labels are removed or defaced.
In the event of a defect or failure of the product please contact Aqua Logic immediately for
assistance. Aqua Logic will at their discretion:
• Provide user with replaceable parts to restore their unit to proper operation.
• Provide a Repair Authorization (RA) number with a specified dollar limit so that a qualified
Technician can provide a field repair.
• Provide a Return Authorization (RA) number to return the chiller with original packaging to
Aqua Logic, Inc., 9558 Camino Ruiz, San Diego, CA 92126 by prepaid freight. You need to include
the serial number as well as proof of purchase and/or a copy of the original bill of sale along with the
RA number.
COD shipments will be refused. Aqua Logic shall not be responsible for shipping
damage or loss.
/