Page is loading ...

KEEP THIS INSTRUCTION BOOKLET FOR FUTURE REFERENCE
SANTEC has the right to make necessary design changes when applicable.
*Illustration may not depict actual product s

Parts Breakdown
0 1
* Please specify the nish when ordering the part.
** Please specify option code when ordering the part.
1
2
3
4
5
6
7
ITEM NO.
PART NUMBER
DESCRIPTION
1
PS-6_ _00-U **
Spout Body *
2
_ _ **
Handle Assembly *
3
PM-099
Teflon Washer
4
PM-020
Broach Extension
5
PM-017
O-Ring
6
PM-955
All Threads
7
PM-956
Bonnet Nut

Parts Breakdown
0 2
ITEM NO.
PART NUMBER
DESCRIPTION
1
WM-0020-1
SA Corner Valve
2
P0418
Hot Cartridge Estate
3
P0419
Cold Cartridge Estate
4
PM-1110
Mud Guard Stop Valve
2
1
3
4

Valve
0 3
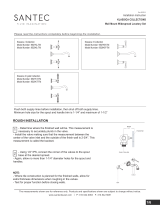
Valve Installation (1)
for extra thickness dimensions when roughing in the valves.
necessar y to accurately plumb in the valve.
Install the valve making sure that the measurement between the center
of the valve inlet and the outside
called the backseat. The MIN/MAX label on the mudguard can be used as a guide.
NOTE: Hole size for the spout and handle is 1-1/4”
2-3/4”
Backset Finished Wall
Center of Valve Inlet
MIN MAX
Mud Guard

Valve
0 4
Valve Installation (2)
Using 1/2” IPS, connect corner the valves to the spout base at the desired spread.
Again, allow no more than 1-1/4” diameter holes for the spout and handles.
BACKSET FROM FINISH WALL
NOTE: Test for proper function before closing walls.
HOT
CO L D

Spout
0 5
Spout Installation
should be no longer than 1/2”.
the spout onto the pipe until it is secured with the spout facing down-
ward.
WARNING: Do not use excessive force when threading the spout.

Handle Trim
0 6
Handle
Escutcheon
Broach Assembly
Bonnet Nut
All Thread
Bonnet Nut
Stem Key
Finished Wall
Diagram A
Step 1-Thread the bonnet nut, all thread, and insert the broach assembly onto the valve
and lightly tighten assembly with a 1” plumber’s socket Wrench. See Diagram A.
Step 2- Thread the escutcheon completely onto the all thread ensuring the broach prop-
erly engages the handle (orientation of the handle is not important at this point)
Step 3- Measure the distance remaining between the handle base and wall, remove all
trim items from the valve, and cut the excess distance from the end of the all thread and
broach assembly.
Step 4- Rethread the bonnet nut,all thread, and insert the broach assembly back onto
the valve and snugly tighten the assembly with a 1” plumber’s socket wrench.
Step 5- Ensure the valve is in the closed position and align the handle to its respective
“OFF” Position on the trim.
Step 6- Thread the escutcheon on the handle onto the all thread and broach assembly
ensuring The handle position remains in the closed position.
/