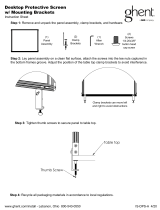
Grace Company GraceHoop 2 2005 User manual

Type
User manual

This manual is also suitable for

Quilting with The
GraceHoop²
2005
Table of Contents
Customer Service Information . . . . . . . . . . . . . . . . . . 2
Care, Finishing and Storage . . . . . . . . . . . . . . . . . . . . 2
Warranty . . . . . . . . . . . . . . . . . . . . . . . . . . . . . . . . . . . 2
Parts list (General Assembly and Hoop Assembly) . .3-4
Stand Assembly . . . . . . . . . . . . . . . . . . . . . . . . . . . . . 5-8
Hoop Assembly . . . . . . . . . . . . . . . . . . . . . . . . . . . . .9-10
Rotating and Adjusting the GraceHoop 2005™ . . . . .11-12
Folding the GraceHoop 2005™ . . . . . . . . . . . . . . . . . 13
EdgeTool™ Assembly . . . . . . . . . . . . . . . . . . . . . . . . 14
Using the EdgeTool™ . . . . . . . . . . . . . . . . . . . . . . . . 14
Installing Fabric . . . . . . . . . . . . . . . . . . . . . . . . . . . . . 14
Copyright December 2005
Jim M. Bagley, Gracewood, Inc.
Reproduction Prohibited
Printed on 6-5-06
1
Care of Your GraceHoop² 2005
The GraceHoop
2
2005 is made from the highest quality Baltic Birch Plywood. The wood may be
sealed and/or stained with an application of tung oil which will help preserve the wood and will help to prevent
warping. Test stain on an inconspicuous place. Many different nishes and/or stains may be suitable for sealing
and beautifying your hoop. You may want to consult your local paint retailer for nishes which will apply
easily and dry hard – not oily.
TIP: Store the hoop in a dry place – preferably with the stand in vertical position.
5 Year Warranty Information:
GraceWood, Inc. will replace or repair, at our discretion, any part of the GraceHoop
2
2005 with
problems due to manufacturing or workmanship. This warranty does not cover parts damaged through misuse,
improper storage, improper assembly, loss, natural events, and willful or accidental destruction. Parts must be
returned to The Grace Company, shipping prepaid
using a company-issued RMA#
, before we can replace them.
We will promptly return the repaired or replaced part at our expense. Customers will never have to pay the cost
of a part covered by the 5 year warranty.
Address for Shipping of Materials to Grace Co:
2225 South 3200 West
Salt Lake City, UT 84119
For Regular Correspondence:
PO Box 27823
Salt Lake City, UT 84127
Technical Support:
1-800-264-0644
Of ce Hours:
8:00 am – 4:30 pm MST*
*Leave a message after hours; all calls will be returned.
Please report any errors or make constructive comments regarding these instructions to the PO Box listed above
or by either of the following methods:
Fax (801)908-8888 ~ E-Mail: [email protected]
The GraceHoop
2
2005 is a new product with several original design innovations. Our products are superb
in functionality and ease of use, due in part to the feedback we have received from the thousands of customers
who use our products. If you have any suggestions that will help us improve our product or service, please
write or call The Grace Company with your suggestions.
2
1: Vertical Stand (1)
2: Front Foot (1)
3: Back Foot (1)
4: Height Adjust Arm (1)
5: Hoop and Arm Assembly (1)
6: 1/4” Hex Jam Nut (4)
7: Carriage Bolt 1/4” x 4” (2)
8: Fender Washer 1-1/4” (2)
9: Thin Nyloc Nut 1/4” (2)
10: 1/4” Plastic Knob (2)
11: Roller Bushing (10)
12: Flat Washer 5/16” (8)
13: Hex Bolt 5/16” x 4” (4)
14: Thin Nyloc Nut 5/16” (2)
15: 5/16” Plastic Knob (2)
16: Flat Washer 1/4” (4)
17: Connector Bolt 1/4” x 50mm (2)
GraceHoop² 2005 General Assembly Parts List
3
1: Ball Swivel Bottom (1)
2: Arm (1)
3: 2” Ball (1)
4: Ball Swivel Dowel (1)
5: Inner Hoop (1)
6: Carriage Bolt 1/4” x 1-1/2” (1)
7: Outer Hoop (1)
8: Bottom Bracket Clamp (1)
9: Bracket (4)
10: Top Bracket Clamp (1)
11: Flat Washer 3/16” (19)
12: Thumb Screw 1/4” x 1-1/4” (4)
13: Cap Nut 1/4” (1)
14: Carriage Bolt 1/4” x 3” (2)
15: Knurled Finger Nut (2)
16: Hex Jam Nut 1/4” (8)
17: Carriage Bolt 1/4” x 4” (1)
18: Ball Swivel Top (1)
19: Fender Washer 1-1/4” (3)
20: Thin Nyloc Nut 1/4” (4)
21: 1/4” Plastic Knob (2)
22: Carriage Bolt 1/4” x 2-1/4” (3)
23: Connector Bolt 1/4” x 30mm (2)
24: Connector Bolt 1/4” x 35mm (1)
25: Knob Spacer (1)
GraceHoop² 2005 Hoop Assembly Parts List
4
Assembly of the GraceHoop²™ 2005
Hoop Stand - Out of Box, in folded position
Step 1: Remove the stand from the box.
Remove the stand from the box. The stand is preassembled and shipped in a folded position.
(Shown above)
Hoop arm adjustment knob
Step 2: Unfold the arm of the stand
Loosen the hoop arm adjustment knob and raise the arm up and
out completely. Be sure the bolts rest in one of the slots in the
stand.
Re-tighten the hoop arm adjustment knob to secure the arm into
place.
Hoop arm adjustment knob
Step 3: Unfold the back foot of the stand
Next, loosen the knob on the back foot and slide the back foot
down until the bolts are in the position shown below.
Once the foot is in this position, pivot the foot clockwise.
NOTE: Do not pivot the foot too far! Both sides of the back foot should be
ush against the oor when the hoop stand is upright.
Slide Back Foot to this position, before
you begin to Pivot it clock wise.
Before You Begin:
Using the parts list as a
reference, make sure all
parts of your assembly are
present. If something is
missing or broken, contact
The Grace Company at 1-
800-264-0644. We will
promptly ship any needed
item.
Tools Needed:
Allen Wrench (provided)
5
With the back foot in the horizontal position, slide the leg up into the
notches indicated in the picture above.
Tighten the back foot adjustmnet knob to secure the foot into place.
Important!
Make sure that the back foot slides into the notches before you tighten
the hoop stand back foot knob. If the back foot is not tightened in the
correct position in the notches, the hoop stand front foot will not t
properly into place.
Back foot notches
NOTE!! It should not be necessary to use force in order to pivot the foot.
IF IT IS DIFFICULT TO PIVOT THE FOOT:
1. Check to make sure that you have moved the foot into the correct pre-pivot position
before attempting to pivot the foot (see picture at bottom of previous page). Hold the foot
in that position. Do not allow the foot to move from that position as you pivot the foot
clockwise. If the foot slips out of position during the pivoting motion, it may appear that the
foot has become stuck. Pivot the foot in the reverse direction, then try again to pivot the foot
clockwise while holding the foot in position at the same time.
2. Check to make sure that the bolt has not yet slipped into the grooved area. If the bolt
has slipped into this grooved area, make sure you hold the foot so that it does not allow the
bolt to slide into the grooved area and try to pivot the foot again. The foot will not pivot if the
bolt has slipped into the grooved area prematurely.
3. Check to make sure that you are attempting to pivot the foot in the correct direction.
The foot will pivot so that the knob will follow the track. Try to hold the foot even and pivot
the foot with a gentle steady motion.
6
Step 4: Unfold the front foot of the stand
Loosen the knob on the front foot of the stand and lower the front foot into the horizontal
position.
Slide the front foot back into the back foot. (The tabs on the heel
of the front foot will t into the notches cut into the back foot so that the
pieces will be interlocking).
Tighten the front foot adjustment knob to lock the foot into place.
NOTE!! It is important that you ensure the back and front
foot are interlocked as described in the steps above before
you tighten the front foot adjustment knob. This will
ensure that your hoop stand is stable.
7
Step 5: Position Ball Swivel
Loosen ball swivel lock knob.
Position ball swivel in vertical position as shown in the bottom picture.
Re-tighten the ball swivel lock knob to secure the pivot ball into position.
Ball Swivel Lock knob
The pivot ball shown in vertical position
Rotation Swivel Lock Knob
8
Step 6: Prepare the Stand for Hoop Placement
Disassemble the ball swivel unit as described below.
Using the allen wrench (provided) remove the
cap nut from the ball swivel unit.
Remove the top bracket clamp from the
ball swivel unit.
Remove the bottomw bracket
clamp from the ball swivel unit.
Set these parts aside momentarily.
Step 7: Assemble the hoop
Screw the brackets to the inner hoop using the thumb screws and washers.
Place the bottom bracket clamp onto the bottom of the brackets, hold in place.
Place the top bracket clamp onto the top of the brackets, hold in place.
Continue holding the bracket clamps in place on the brackets.
Bottom Bracket Clamp
Top Bracket Clamp
Thumb Screws
Washers
9
Brackets and clamps attached to
hoop.
NOTE: You should still be holding
the bracket clamps in to place.
Step 8: Attach Hoop To Stand
Attach the hoop to the ball swivel using the
cap nut previously removed from the ball
swivel unit in step #6.
NOTE: The cap nut goes through both the
top and bottom bracket clamps and onto the
bolt that comes out of the stem of the ball unit.
(Tighten the cap nut using the allen wrench
Congratulations!
Assembly of your GraceHoop
2
is now complete.
10
Rotating And Adjusting The GraceHoop²™ 2005
There are four main ways to adjust the GraceHoop²™ 2005 to customize your working area.
With the hoop swivel adjustment knob.
With the hoop rotation adjustment knob.
With the arm pivot adjustment knob.
With the arm height adjustment knob.
Each of the adjustment knobs listed above will allow you to adjust the GraceHoop²™ 2005 to the perfect
position that is just right for you personally.
Arm Pivot Knob
Arm Height Adjustment Knob
Hoop Rotation Adjustment Knob
Hoop Swivel Adjustment Knob
Before you begin quilting, we recommend that you install a quilt, sit at the stand, and experiment with the hoop
and its rotational abilities. You may even experiment sitting at different sides of the hoop or in different chairs
at different levels.
See next page for adjustment information in more detail.
The GraceHoop²™ 2005 is the most
versatile hoop ever made. It can be positioned to
make it possible for you to quilt while standing,
sitting on the oor, or even laying in bed!
11
The Hoop Swivel Adjustment Knob:
The hoop swivel adjustment knob allows you to angle the hoop. You may tilt it to the exact angle of comfort.
Just loosen the hoop swivel adjustment knob, swivel the hoop until you nd the desired position, and then
tighten the hoop swivel adjustment knob to secure the hoop at that angle.
The Hoop Rotation Adjustment Knob:
The hoop rotation adjustment knob allows you to rotate the entire hoop while keeping the hoop locked
securely in the exact angle you have selected by using the hoop swivel adjustment knob. This allows you more
versatility than you could have ever expected from a quilting hoop before.
The Arm Pivot Adjustment Knob:
The arm rotation knob allows you to rotate the arm of the hoop stand 180°. You can rotate the arm 90° to the
left, or 90° to the right or stop anywhere in between, while keeping the hoop in the exact position you have
set. This is particularly helpful in allowing you to get up from behind the hoop without a lot of hassle. The
adjustment can be made by loosening the arm pivot adjustment knob, pulling the arm out away from the stand,
then rotating the arm of the hoop in the desired direction. Righten the arm pivot adjustment knob to secure the
hoop arm into place. When putting the arm back in its orginal 90-degree position, push the arm back toward the
stand to lock it into place, then retighten the knob.
The Arm Height Adjustment Knob:
The arm height adjustment knob allows you to adjust the height of the hoop on the stand while keeping the
hoop swivel, hoop rotation and arm pivot adjustment settings locked into the desired position. The notched
stand allows you to choose from eight different height settings. Just loosen the arm height adjustment knob and,
while holding the hoop arm for support, guide the hoop arm either up or down to the desired height. Then allow
the hoop arm to slide into the notch at that position before tightening the arm height adjustment knob once again
to secure the arm into your personalized height setting. Be sure to tighten this adjustment knob well, to provide
stability for the hoop.
Note: Do not loosen the front or back foot adjustment knobs while attempting to adjust the hoop for use. The
adjustment knobs for the feet must be tightened during use for your safety and the stability of the stand.
12
Folding The GraceHoop² 2005 for Storage and Toting
Loosen the front foot adjustment knob.
Pull the front foot out just a bit, so that it is
no longer interlocked with the back foot.
Fold the front foot up to the stand.
Make sure that the foot folds up snuggly
against the stand leg to prevent movement in
storage.
Loosen the arm height adjustment knob.
Position the top screw within the arm into the
highest notch.
The bottom screw slides up the groov in the
stand allowing the hoop to slide in towards the
stand.
Once the hoop is collapsed into the stand, you
may tighten the hoop arm adjustment now to
prevent the arm from moving in storage.
Loosen the back foot adjustment knob.
Rotate the back foot counterclockwise so that the foot is parallel
with the leg of the stand as shown below.
Retighten the back foot adjustment knob to secure it into place
for storage.
* NOTE: You do not have to remove your hoop for storage. Simply fold the hoop stand as directed
above with the hoop attached for easy storage.
Bottom screw follows this
groove to fold arm in.
Position top screw in this notch
to fold hoop arm down
Bottom screw will slide up the
groove allowing the hoop to fold in.
13
EdgeTool
Assembly
Use the EdgeTool as an extension of your quilt while completing your borders and corners.
Parts Needed:
2 – Cloth Sleeves (Muslin recommended (not included)
Cut two pieces of fabric to the following dimensions:
12" X 24" (Finished Size: 11" x 23")
Serge around the edges of both pieces. Insert one end of the fabric through slot located on the EdgeTool™.
Pull the end of the fabric to the meet the other end of fabric, forming a loop with the EdgeTool™ in the center.
Serge or sew the edge together all the way around the loop.
Repeat this step for the second EdgeTool™.
The cloth on the EdgeTool™ is pinned to the edges of your fabric to create the desired amount of side-to side
tension. (See "Using the EdgeTools" below)
When the cloth on the EdgeTool™ needs to be replaced, simply cut the cloth from the EdgeTool™. Follow the
steps above to replace the fabric on the EdgeTool™.
Using The EdgeTools™
The EdgeTool™ will assist you in nishing your quilts along the edges. When you come to the edge of your
quilt, lay the quilt on a at surface and pin the EdgeTool™ cloth sleeve to all three layers at the quilt’s edge.
Pin as straight as possible.
Holding the EdgeTool™ and quilt, position them onto the inside hoop, letting the EdgeTool™ wood bar hang
over the inside hoop and act as a weight to assist in the positioning of your quilt. Apply the outside hoop so that
it clamps down over the EdgeTool™ cloth sleeve.
Insert cloth through this slot to make the
sleeve for the EdgeTool™.
Installing Fabric and Use of the GraceHoop²™ 2005
Installing Fabric and Using The GraceHoop²™ 2005
Remove the outside hoop and drape your basted quilt over the inside hoop. Position the quilt so the desired
work area is centered in the hoop. Place the outside hoop on the inside hoop, one corner at a time, until it rests
completely on lip on the inside hoop.
Applying the outside hoop will evenly pull the fabric top-to-bottom, and side-to-side, If greater tension is
desired, tighten the outside hoop using the outside hoop adjustment wheels.
After completing your work area, simply loosen the outside hoop, remove it and reposition your quilt. The
square boundaries will make determining your next work area easy.
14
  • Page 1 1
  • Page 2 2
  • Page 3 3
  • Page 4 4
  • Page 5 5
  • Page 6 6
  • Page 7 7
  • Page 8 8
  • Page 9 9
  • Page 10 10
  • Page 11 11
  • Page 12 12
  • Page 13 13
  • Page 14 14

Grace Company GraceHoop 2 2005 User manual

Type
User manual
This manual is also suitable for

Ask a question and I''ll find the answer in the document

Finding information in a document is now easier with AI