GreatCall Jitterbug Touch 3 Quick start guide

Category
Mobile phones
Type
Quick start guide

This manual is also suitable for

Quick-Start Guide
1 Quick-Start Guide
Quick-Starrt Guide
Welcome to GreatCall!
Thank you for choosing the GreatCall Touch3. We’ve made it easy for you to stay
connected to friends and family with the simplicity of GreatCall. Additionally,
our service professionals and health and safety services are designed to keep
you protected, connected and in control of your life. This helpful guide contains
information you need to start using your new smartphone. And if you have any
questions or need assistance, you can count on us to be here day and night.
Best Regards,
Your friends at GreatCall
For additional information about GreatCall or your new Touch3, visit greatcall.com.
2 Quick-Start Guide
Quick-Start Guide
Key Items in the Box
The GreatCall Touch3 box you received includes everything you need to get started:
Wall Charger
USB Cable
User Guides
The GreatCall Touch3
GET
BACK
For you & a friend.
$
25
With GreatCall Link,
families stay connected,
even when theyre apart.
TM
User Guide
3 Quick-Start Guide
Quick-Starrt Guide
GreatCall Touch3 – your easy-to-use smartphone with the Battery pre-installed
Wall Charger – allows you to charge your phone using any wall outlet
USB Cable – allows you to connect your phone to the Wall Charger or a computer
with a USB port
User Guides – contains important information about activating and using your
phone
4 Quick-Start Guide
Quick-Start Guide
The Front of your Touch3
Front-facing Camera Earpiece
Power/Lock Button
Back Button
Home Button
Display
Menu Button
5 Quick-Start Guide
Quick-Starrt Guide
Front-facing Camera – allows you to take pictures or videos
Earpiece – lets you hear the caller loud and clear
Power/Lock Button – allows you to lock and unlock your phone as well as power it
on and off
Display – shows all the information you need to operate your Touch3
Menu Button ( ) – displays additional options that may be available for the
current screen you are viewing
Back Button ( ) – takes you one step back from your last action
Home Button ( ) – takes you back to the Home Screen
6 Quick-Start Guide
Quick-Start Guide
The Back of your Touch3
Volume Button
Speaker
Battery Cover
Battery Cover Release
Microphone
Main Camera
Power Connector
Headset Jack
7 Quick-Start Guide
Quick-Starrt Guide
Headset Jack – allows you to connect a Stereo Headset to safely make calls hands-
free or listen to music
Battery Cover Release – allows you to remove the Battery Cover to replace the
Rechargeable Battery or insert a microSD
TM
card to expand storage capacity
Speaker – lets you hear the caller loud and clear when Speakerphone is enabled
Main Camera – allows you to take pictures or videos
Volume Button – allows you to adjust the volume of calls and notication sounds
Battery Cover – protects the Rechargeable Battery and the back of your Touch3
Microphone – picks up your voice loud and clear while on a phone call
Power Connector – allows you to charge your Touch3 with the provided Wall Charger
and USB Cable
8 Quick-Start Guide
Quick-Start Guide
Turning your Phone On and Off
Your phone is off if the Display does not turn on when
the Home Button or Power/Lock Button are briey
pressed.
Turning On your Phone
PRESS AND HOLD the Power/Lock Button on the right
side of your phone until the Display turns on.
NOTE: If your phone does not turn on, the battery
may need to be charged.
Power/Lock
Button
9 Quick-Start Guide
Quick-Starrt Guide
Turning Off your Phone
1. PRESS AND HOLD the Power/
Lock Button on the right side
of the phone until the “Phone
options” screen appears.
2. TAP the Power off ( ) option
on the Display. The phone will
ask if you want to proceed.
3. TAP the OK option on the
Display.
2
1
3
10 Quick-Start Guide
Quick-Start Guide
Activating your Touch3
Before using your phone for the rst
time, it needs to be activated. The
Setup Wizard built into your phone
will help guide you through this
process.
1. Power on your phone.
2. TAP Next at the
“Welcome” screen.
3. TAP the check box next to “I
understand and agree to the
terms and conditions above”
and then TAP Next.
2
3
11 Quick-Start Guide
Quick-Starrt Guide
4. IMPORTANT: TAP the “Easy-to-
use GreatCall” option and then
TAP Next.
5. TAP the option that best
describes where the phone was
purchased.
Continue following the on-screen
instructions until you have
successfully activated your phone.
5
4
12 Quick-Start Guide
Quick-Start Guide
IMPORTANT: To ensure you get started quickly, please select “Easy-to-use
GreatCall” at the “Choose your home screen” step before TAPPING Next.
Easy-to-use GreatCall gives you a simplied experience. If you accidentally
selected “Advanced Android”, you can TAP the Back Button ( ) to change your
selection.
NOTE: If you are instructed to go online or call to complete activation, please have
the following information ready:
Home and billing address
Phone number
Email address
Credit or debit card information
Emergency contact details
Serial NumberThis can be found on the Setup Wizard screen, printed on the
Activation Card included in the box or on the side of the Touch3 box .
13 Quick-Start Guide
Quick-Starrt Guide
Charging the Battery
Your phone is powered by a Rechargeable Battery which has been built-in for your
convenience. Before using your phone for the rst time, it is recommended that you
fully charge the battery. A Wall Charger is included with your phone.
1. Connect the larger end of the USB Cable
to the Wall Charger.
2. Insert the smaller end of the USB Cable
into the Power Connector located at the
bottom of the phone.
3. Plug the Wall Charger into a standard
wall outlet.
Wall Charger
Power
Connector
USB Cable
USB Cable
14 Quick-Start Guide
Quick-Start Guide
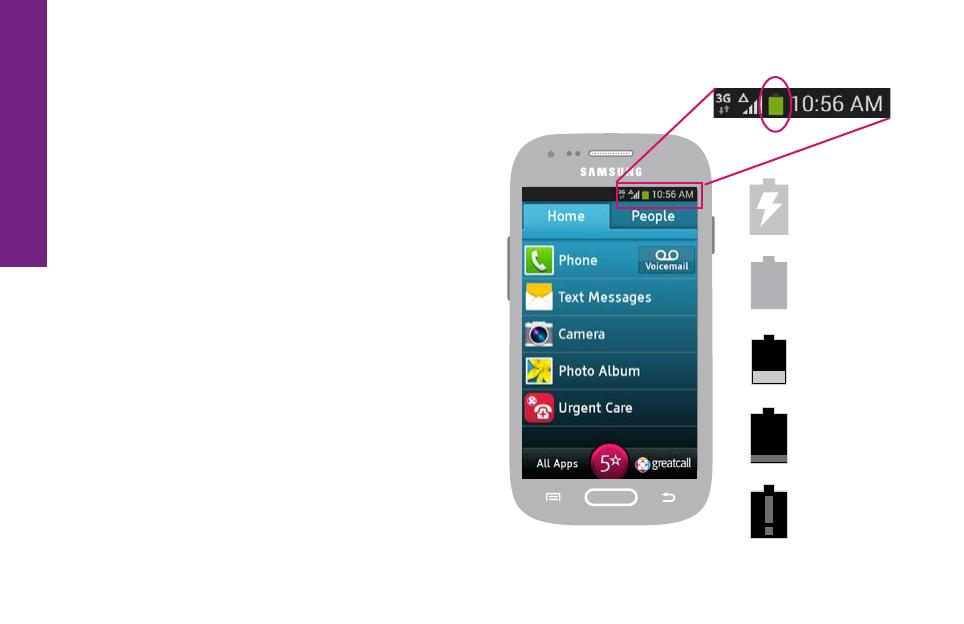
Battery Level Indicator
The battery level is represented as a
colored battery icon at the top right of
the Display in the Status Bar. You will
also nd a larger battery level indicator
on the Lock Screen (see page 18 for
more information).
The battery is fully charged when the
battery icon is completely green. When
the battery level is low, a warning tone
and a “Battery low” message will repeat
at regular intervals on the Display. When
the battery level becomes too low, the
device will automatically turn off. Charge
your phone when not in use so that it is
ready when you need it most.
Charging
Low
Very Low
Critical
Fully
charged
15 Quick-Start Guide
Quick-Starrt Guide
Navigation Buttons
At the bottom of your Touch3 you will nd three buttons that are used frequently to
navigate around your phone.
1. Menu Button (
) – this gives you additional options for the screen you are
actively viewing. Details on additional options available for certain screens will
be covered later in this User Guide.
2. Home Button (
) – no matter what you’re doing, this will take you back to
the Home Screen on your phone. If you ever get lost, you can press this button to
help you get back on track.
3. Back Button ( ) – this will take you one step back from your last action. This is
helpful if you need to revisit a screen you may have accidentally skipped.
16 Quick-Start Guide
Quick-Start Guide
Menu Button Home Button Back Button
NOTE: If you get lost while navigating through your phone, just PRESS the
Home Button to take you back to the Home Screen. If you PRESS AND HOLD the
Home Button your most recently opened Apps will appear. TAP the App you would
like to go to or tap the Back Button (
) to close.
17 Quick-Start Guide
Quick-Starrt Guide
Using the Lock Screen
Your phone is equipped with a Lock Screen that appears when your phone is not in
use to prevent accidental dialing.
Lock Screen Features
Current Time and Date
Your Phone Number
Battery Level – displays your current battery charge level
5Star Button – get access to help in any unsafe or uncertain situation
Missed Events – quickly see if you missed any calls or messages
Unlock Buttons – unlocks your phone
18 Quick-Start Guide
Quick-Start Guide
5Star Button
Battery Level
Unlock Buttons
Current Time, Date
and Your Phone Number
Missed Events
19 Quick-Start Guide
Quick-Starrt Guide
Unlocking your Phone
If the Display is off, you can PRESS the Power/Lock Button to display the Lock
Screen:
At the Lock Screen, TAP
1
,
2
, then
3
in order.
  • Page 1 1
  • Page 2 2
  • Page 3 3
  • Page 4 4
  • Page 5 5
  • Page 6 6
  • Page 7 7
  • Page 8 8
  • Page 9 9
  • Page 10 10
  • Page 11 11
  • Page 12 12
  • Page 13 13
  • Page 14 14
  • Page 15 15
  • Page 16 16
  • Page 17 17
  • Page 18 18
  • Page 19 19
  • Page 20 20
  • Page 21 21
  • Page 22 22
  • Page 23 23
  • Page 24 24
  • Page 25 25
  • Page 26 26
  • Page 27 27
  • Page 28 28
  • Page 29 29

GreatCall Jitterbug Touch 3 Quick start guide

Category
Mobile phones
Type
Quick start guide
This manual is also suitable for

Ask a question and I''ll find the answer in the document

Finding information in a document is now easier with AI