AiM TECH Srl.
Via Cavalcanti, 8
20063 Cernusco S/N (MI)
Italia
Tel. (+39) 02.9290571
www.aim-sportline.com
EVO5 Logger
USER GUIDE
Made in Italy

Thanks.
Dear Customer,
First, we would like to thank you for
choosing the EVO5 logger as the tool for
improving your racing craft setup and
ontrack performance.
EVO5 is an expandable new generation
logger with high sampling capabilities,
recording data from a variety of sensors
and sources.
Please, before digging into your new data
system, keep in mind that we are
constantly working on bettering our
software and firmwa
re.
So, be sure to check our website
periodically for any updates.
www.aim-sportline.com
02 03
04
06
08
10
11
12
12
12
14
14
14
14
15
16
18
20
25
28
30
31
34
35
36
40
41
42
43
44
45
46
47
47
48
49
50
50
52
54
54
54
55
56
58
EVO5 Logger
01 Introduction
02 What is in the kit
03 Layout and pushbuttons
04 RGB LED
05 ECU connection and CAN resistors
06 RPM
6.1 RPM from ECU
6.2 RPM via a 550 V square wave signal or coil 150400V
07 Speed
7.1 Speed read from the ECU
7.2 Speed read from the GPS receiver
7.3 Speed read from wheel sensor
08 Analog inputs
09 Digital outputs
10 WiFi configuration
10.1 Configuring your de
vice
as an AP
10.2 Joining your AiM system to an existing network
10.3 High performance WLAN setup
10.4 About Internet connectivity
10.5 Working with Mac
TM
OS and Virtualized Windows
TM
11 Race Studio 3 software
11.1 Configuration
11.1.1 Channels configuration
11.1.2 ECU Stream and CAN resistor configuration
11.1.3 CAN2 Stream
11.1.4 Math Channels
11.1.5 Parameters
11.1.6 Output Sign
als
1
1.1.7 CAN Output
11.2 Modify or delete an existing configuration
11.3 Connect your AiM system to a PC
11.3.1 Configuration transmission
11.3.2 Live Measures and calibration
11.3.3 Data download
12 GPS and track management
12.1 Tracks feature
12.2 Tracks collections
12.3 How to modify track data in the PC database
12.4 How to delete a track from the PC database
12.5 How to transmit
tra
ck information to EVO5
13 Expansions
14 EVO5 Pinout
15 Technical drawings

CHAPTER 1
04 05
INTRODUCTION EVO5
What is EVO5?
Which data does it
manage?
EVO5 is the evolution of the
traditional datalogger that, all over the
years, has become a standard de facto
acquisition system in a huge amount
of championships.
The top RGB LED, changing colour and
blinking frequency, tells you if EVO5 is
performing a firmUp, if it is in error, if it
is recording or not, is using a WiFi
connection or not.
EVO5 has two digital outputs you
can freel
y configure.
Y
ou can use a WiFi connection for
transmitting the data of your test,
sending data online and for
configuring the system.
Yes, MXL used to produce data in .DRK
format. EVO5 offers an improved data
management and produces .XRK
format that only Race Studio 3 can read.
Nevertheless, the last releases of
Race Studio 2 can detect .XRK files and
transform them into old .DRK format
files that are compatible with MXL1
and E
VO4 files.
Data come from a wide range of
sources, including your vehicle ECU,
the internal accelerometers and gyro,
the GPS module included in the kit, the
analog/digital inputs, the external
expansions as well as predefined math
channels.
Many times you wish to get data not
only from your ECU but also from
other electronic devices you have in
your car.
The extra CAN is intended to offer this
possibilit
y.
Why an extra CAN
connection?
.XRK, taking advantage of GPS
technology, associates absolute
time and GPS position to each data
with the precision of 1 millisecond.
In this way, it is possible to better
compare different laps and tests.
EVO5 stores data both in its memory
and on an SD card (not included in
the kit).
Download procedure can be easily
performed via WiFi or placing the SD
card in your PC.
What is the difference
between the old DRK
format and new .XRK?
What about Race Studio 3?
What are the differences
between the old .DRK
format and new .XRK?
How do I download
the data from my
EVO5
What is the LED
intended for?
Is there a digital
output ?
Why a WiFi connection?
Are EVO5 data compatible
with old MXL/EVO4
data?
Race Studio 3 is the new software for
managing configuration, data download
and data analysis for all the future AiM
systems.
It is going to substitute Race Studio 2,
which has accompanied us for almost 15
years.
Based on a totally new and much more
flexible architecture, it is a work in
progress as some features are
c
ontinuously improved.
We are going to upgrade it very often so,
please don't forget to check out website at
www.aim-sportline.com.

CHAPTER 2
06
Harness
2. What is in the kit
EVO5 logger
EVO5 kit includes:
GPS08 Module Software
WHAT IS IN THE KIT
EVO5

CHAPTER 3
08 09
LAYOUT AND PUSHBUTTONS
EVO5
RGB LED SD card slot
EVO5 Logger
Aluminum Body
Deutsch 37pin Deutsch 22pin

4. RGB LED
EVO5 features an RGB LED on top of it near
to the SD Card slot.
The LED shows the logger status as for the
following table:
CHAPTER 4 RGB LED CHAPTER 5 ECU CONNECTION
10 11
EVO5
LOGGER STATUS
Doing firmup
Logger in error
Recording
WiFi connected
WiFi available (but not connected)
Idle status
(WiFi off+EVO5 not recording)
The ECU has to be set when configuring
your system with RS3 configuration soft-
ware.
The steps are explained in the related sec-
tion.
CAN Resistors
EVO5 features two 120 Ohm ending
resistors on CAN1 and CAN2 Line whose
status by default is:
n
Enabled on CAN1
n
Disabled on CAN2
5. ECU connection and CAN resistors
The system can acquire data from the ECU
of your vehicle. The list of the available ECU
protocols is published on our site:
www.aim-sportline.com/download area,
ECU connections.
This list includes approximately more than
1000 different protocols and is constantly
updated with new protocols.
When possible documents explaining how
to configure your ECU to ensure compati-
b
ility between the data flow transmitted
are available, too.
From an hardware point of view, the system
is compatible with all currently available
connections: CAN, RS232 or K Line.
The steps to manage the data coming from
the ECU are the following:
1. Determine wich hardware connection is
available for your ECU
2. Read the documentation about your ECU
at www.aim-sportline.com and identify the
name of the software driver to be specified
3.
Using Race Studio 3, configure EVO5 set-
ting your ECU driver with the menu shown
here below, that appears when you create
a new configuration.
LED COLOUR BLINKING
Blue Quickly
Red Slowly
Cyan Still
Yellow Still
White Still
Green Still

CHAPTER 6 RPM
12 13
EVO5
6. RPM
The system can receive the RPM signal from three different sources:
n
From ECU
n
Through a square wave signal (8 to 50 V)
n
From the low voltage (from 150 to 400 V) of the coil
6.1 RPM from ECU
To get RPM from the ECU, please configure your device and enable RPM channel. RPM is one
of the many data flowing from your ECU.
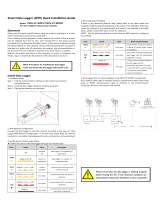
6.2 RPM via a 5-50 V square wave signal or coil (150-400 V)
In case your engine is not managed by any ECU, the device can read the signal from the low
voltage of the coil (whose peak can be from 150 to 400 V) or from a possible square wave (the
peak
can be from 5 to 50V). The pin labelled "RPM" reported in appendix “Pinout” receives
the signal.
The output, labelled “GRAY TACH” gives a
5-50V output that can be directly acquired
from EVO5.
If the output is not available from the
ignition system, the system has to be c
onnected to the low voltage of the coil, as
shown in the following schematic.
The image shows an example of wiring for the ignition system.
P
oint 1: Low voltage of the coil
Point 2: Connected to the spark plug
Point 3: Connected to the +12V of the
battery
After connecting the RPM signal, please use
the software Race Studio 3 for enabling the
RPM channel.
1
2
3
1
2
3

7.3 Speed read from wheel sensors
EVO5 has four wheel speed inputs, one in
the 37 pins connector and the other three
in the 22 pins connector:
The digital sensor X02SNVM00 detects
the presence of a metallic tooth placed at
a distance between 0.5 and 2 mm.
Please use the software Race Studio 3 to
load the sensor in the system configuration.
Just enter the program configuration panel
and, after enabling the desired speed chan-
nels, set the wheel circumference and the
number of pulses f
or revolution.
7. Speed
The system can receive the speed signal
from three different sources:
n
from the ECU
n
from the GPS receiver included in the kit
n
from the wheel sensors (digital channels)
It is therefore possible to receive and store
different values of speed at the same time;
the more powerful ECUs transmit up to four
wheel speed values.
7.1 Speed read from the ECU
If your ECU sends the value of speed in its
data stream, it is obviously possible to read,
record and show that value.
Simply enable it using Race Studio 3
software when setting the channels.
7.2 Sp
eed read from the GPS receiver
The GPS receiver you find in the kit is
configured in order to obtain the best
performance in term of reactivity and accuracy.
For getting GPS speed you don't need any
configuration.
Simply connect the GPS08 Module to your
system and after a setup period of some
seconds the data will be received and
automatically recorded.
CHAPTER 8 ANALOG INPUTS
14 15
EVO5
8. Analog inputs
EVO5 has 8 analog inputs, recorded up to
1000 times per second each.
You can connect:
n
0-5 Volt signals
n
Ratiometric potentiometers
n
Pressure sensors
n
Thermo-resistances
n
K-type thermocouples
Please follow these steps, using the soft-
ware Race Studio 3 to set the channels:
n
Connect the sensor to the desired input
n
Enable the channel in the Channels table
n
Select the proper sensor type; sensors of
many different types are properly handled
n
Set the sampling frequency
n
Set the unit of measure.
CHAPTER 7 SPEED

16 17
DIGITAL OUTPUT EVO5
You can configure them in order to turn
them on or off depending on the value of
the analog or digital inputs, ECU values, ex-
pansions values, GPS information or math
channels.
To each event you can associate an alarm
LED, a message and a digital output.
The system features two digital inputs on
the 22 pins connector.
Each of them can give an output of 1 amp
at 12 volts.
9. Digital output
Connecting examples
The digital output (Dout) is a LOW-SIDE
type with internal 10 Kohm weak pull-up
resistor.
Here below are some connecting examples.
You can configure it in order to turn them
off when the condition disappears, when
you turn EVO5 off, when you push a
pushbutton or when the data are
downloaded. Please refer to the related
section in order to see how to use Race
Studio 3 to manage the Output Signals.
CHAPTER 9

WiFi connectivity is set on AUTO by default. This means that if the vehicle is stopped WiFi is on
and goes OFF as the vehicle speed increases. Your system can be configured for WiFi commu-
nication in one of two ways.
In WLAN mode there are two layers of security available:
n
Network authentication: the network password
n
Device authentication: a unique device password
Using both network and device authentication allows for various security strategies where
multiple people, PCs and AiM devices are involved. For example a PC on a WLAN may see se-
veral AiM devices but can only communicate with AiM devices for which it has the password.
CHAPTER 10 WIFI CONFIGURATION
18 19
EVO5
10. WiFi Configuration
1) As an Access Point (AP)
This is ideal when you have one device and one computer.
In this configuration your AiM device creates its own WiFi network, which acts as an AP to
which you can connect your PC.
2) To join an existing Wireless Local Area Network (WLAN)
This is more complex and requires an external AP but is more flexible and powerful. In this way
you can communicate with more than one PC on the same network.
In this configuration both your system and your PC have to join a pre-existing WiFi network,
c
alled WLAN, in order to communicate with one another. The network is now created by a net-
work device, which is acting as an external AP by permitting the connectivity.

Follow these steps to create an AP, allowing
you to connect your PC to the device via
WiFi.
This is the most simple and direct WiFi con-
nection method and is ideal when you wish
to communicate with only one device
using one PC.
By default AiM system is configured as an
Access Point and creates a network without
a password completely accessible to
everyone.
So, for establishing the WiFi connection:
n
Be sure your AiM system has the WiFi
enabled.
n
Read its name in the lower part of the
Live Measures page.
n
Click the WiFi icon of Race Studio 3 and
select your AiM system.
CHAPTER 10 WIFI CONFIGURATION
20 21
EVO5
10.1 Configuring your device as an AP
In a few seconds the communication will be established.
For setting other parameters it is therefore recommended that you create a unique
password to secure your device/network immediately. With the use of a password, the
communication is secure and encrypted using the WPA2-PSK standard.

WIFI CONFIGURATION
22 23
EVO5
The name of this AP, or SSID, is unique to your device. An example is: "AiM-EVO5-5000999"
whereas:
n
“AiM” is the prefix for all AiM devices
n
“EVO5” is type of system identifier
n
“5000999” is a unique serial number for your device assigned at the factory.
To make your device more recognizable you can append a friendly name to the SSID. There
is a limit of eight characters.
For example if you add the driver's name, Tom Wolf, the resulting network name (SSID) will
be:
"AiM-EVO5-5000999-TomWolf".
After having set all the parameters click "Transmit" button. WiFi communicaton only will be
re
started with the new parameters.
To connect your EVO5 simply choose your device from the list of available WiFi connections.
If your EVO5 is protected by a password, as recommended, Race Studio 3 will then require
that password to authenticate.
Please note that it is also possible to make the same WiFi connection using the WiFi tools of
your operating system.
CHAPTER 10

24 25
WIFI CONFIGURATION EVO5
CHAPTER 10
Once the WiFi authentication with the device has been established, users can interact with the
device clicking on it.
In this scenario, both your AiM system and
the PC join an existing WiFi network
(WLAN).
This scenario is ideal for a race team with
multiple drivers and crewmembers that
communicate with one or more AiM devi-
ces using the same PC network.
Note again that each AiM system can have
a u
nique password, which is in addition to
the network password, thus adding an ad-
ditional layer of privacy and security.
Race Studio 3 will display all devices con-
nected to the same network.
Connected devices can be seen under the
"Connected Devices" header, just as if they
were connected via USB: simply click on
your device in the left panel under Connec-
ted Devices.
10.2 Joining Your AiM system to an existing
network
Go to the WiFi configuration tab and set the
mode to Existing Network. Then, enter the
network password and the device pas-
sword, should you choose to add one, in
the appropriate fields.
To commit the network settings to your de-
vice, click "Restart" button on this same tab.
Your device will restart and join the net-
work you specified.
Connect your PC to the same network and
you will see yo
ur device under Connected
Devices, just as if connected via USB.
If the AiM device is connected to your PC
using a WLAN, it is possible to have two dif-
ferent passwords: the device password and
the network password.
Please note that only passwords following
the WPA2-PSK code are admitted.

WIFI CONFIGURATION
26 27
EVO5
CHAPTER 10
In order to accomplish these tasks, Race Studio 3 has to be used as clarified in the following
figure.
As you can see in the picture above, one device called “EVO5 ID 5000999” is
switched from AP mode to WLAN mode.
The network name is “network_1,” and it is not working in open authentication mode
since it is protected by a network password.
In order to get the connectivity to the device, the user’s PC also has to be
authenticated to the same network, as clarified in the following figure.
Once the user’s PC is authenticated to the same network called “network_1,” it can
see the AiM device previously configured to gain access to the target network.
In the previous picture, two AiM devices are connected to the WLAN network_1.

WIFI CONFIGURATION
28 29
EVO5
CHAPTER 10
10.3 High performance WLAN setup
This chapter reports a basic description of one WLAN configuration having an AiM devices and
a user’s PC on it.
AiM suggests the use of a Linksys AS3200 device as the network device in order to provide a
WLAN. However, you can use any other network device that has at least both one 3x3 MIMO
and one DHCP server.
Moreover, in order to maximize the bandwidth, the Internet should not be allowed through
this
WLAN. Hence, the DHCP server has to be configured without both DNS and default gate-
way addresses.
A typical example of configuration is shown Below.
As you can see in the picture, the network device configuration parameters are the following:
n
Wireless network name: network_1
It states the network name belonging to the WLAN is "AiM-WLAN". Hence one user's PC needs
to be authenticated to this network in order to interact with any AiM device on this network.
n
Gateway address: 192.168.0.1
Primary DNS server: 0.0.0.0
Secondary DNS server: 0.0.0.0
These settings prevent internet connectivity through this WLAN.
n
Subnet mask: 255.255.255.224
Enable DHCP server: yes
DHCP IP address range: 192.168.0.3 to 192.168.0.31
These settings enable a DHCP server running on this WLAN. It gives IP addresses belonging to
the range 3-31. Hence, 29 network hosts are permitted on this network.
The number of network devices on one WLAN depends on the subnet mask.
This guide suggests the use of the following network masks and IP address range:
Subnet mask: IP addr
ess range: Number of devices:
255.255.255.0 192.168.0.1 - 254 254
255.255.255.128 192.168.0.1 - 126 126
255.255.255.192 192.168.0.1 - 62 62
255.255.255.224 192.168.0.1 - 30 30
255.255.255.240 192.168.0.1 - 14 14
255.255.255.248 192.168.0.1 - 6 6
T
he bold one is the configuration we suggest (if a greater number of devices is not needed),
as it makes it easier and quicker for Race Studio 3 to identify devices on the networ
k.

WIFI CONFIGURATION
30 31
EVO5
CHAPTER 10
10.4 About Internet Connectivity
For optimal network speed of your AiM de-
vice(s) we recommend not to allow an In-
ternet connection on the same network
and to provide WLAN settings that prohibit
an Internet connection.
Please know that it is certainly possible to
allow internet access on the same network
as your AiM device(s) but doing so can de-
grade the performance of AiM device com-
munication.
10.5 Working with Mac(™) OS and Virtualized
Windows (™)
Race Studio 3 software runs exclusively on
Windows operating systems but, if the OS
is virtualized on an Apple Mac OS too.
The main issue in this case is that the host
OS (Mac) shares the WiFi interface with the
virtualized OS (Windows) not as a WiFi
interface but as an Ethernet interface.
Configuring Parallels(™)
Choose “Configure…” option in Parallels
Me
nu.
In the window you’re prompted, select
Hardware icon and then choose "Network"
option on the left.
In the right part of the window, be sure to
choose "Wi-Fi" in "Type" field.
Then choose the device you want to
communicate with.
These slightly slower network speeds may
be suitable for your needs.
Also note that it is possible to have a se-
cond WiFi connection through an additio-
nal hardware (NIC – Network interface card
or WiFi adapter).
Such a configuration would provide opti-
mal data network speed for your AiM de-
vice(s) and simultaneously provide
Internet access via the second NIC.

WIFI CONFIGURATION
32 33
EVO5
CHAPTER 10
If you want to be sure the communication
is working, choose the
“Open Network Preferences…” menu.
In the window you are prompted verify that the status is shown as "Connected" and that the
given IP is, for example, 10.0.0.10 (it could be 10.0.0.11, 10.0.0.12 or generically 10.0.0.x).
In Race Studio 3 flag the checkbox you find
in "Preferences –> WiFi Settings"

RACE STUDIO 3 SOFTWARE
34 35
EVO5
CHAPTER 11
11.1 Configuration11. Race Studio 3 software
The configuration page is divided in two
sections.
The left side is dedicated to the folders that
you can create and manage in order to bet-
ter organize your configurations.
Simply push the setting icon in order to
create a new one. When you connect an
AiM logger, its serial number appears in the
Race Studio 3 is the powerful software that
you are going to use for all the activities
r
egarding your system.
It is provided on a CD included in the kit or
can be downloaded from Download area
of www.aim-sportline.com.
It offers the following features:
When you start Race Studio 3 with your
system connected and switched on, you
can see a row of pushbuttons top left of the
screen that give you different options:
n
Preferences
n
Custom sensors
n
Configurations
n
Tracks
n
Analysis
n
Movies
n
Devices
Preferences
For setting software measure units (pres-
sure, speed, temperature, brake and oil
pressure) and fixing download settings.
Custom sensors
Creates, imports, exports and modifies cu-
stom sensors.
left side of your screen. In the right side of
the screen you can see all the configura-
tions of the selected folder. Please click on
the desired one for editing it or push the
“NEW” pushbutton for creating a new one.
C
onfigurations
Create, modify, delete, export and import,
configurations with all channels, ECU dri-
vers, Math channels, digital outputs and all
the expansions.
Tracks
Creates, imports, exports and modifies the
map of your racing tracks.
Analysis
For looking at and comparing your data.
Movies
For watching and comparing up to two
track laps movies.
Devices
To establish the connection with the
loggers and t
o receive data.
Top right of the screen is a row of three
pushbuttons
They can be used to:
See available WiFi networks
Download web updates
It automatically detects which new
firmware and software releases are
available and let you download them
from our site www.aim-sportline.com.
Connect to AiM website

CHAPTER 11 RACE STUDIO 3 SOFTWARE
36 37
EVO5
After having entered the configuration page you can see different tabs, which are useful for
selecting one of the following configuration features:
By clicking on each line, a menu appears:
You can define:
n
The name of the channel
n
The function
n
The sensor connected
n
The sampling frequency
n
The measure unit
To configure the inertial platform
(three-axial accelerometers):
n
Click on the cell "Accelerometer" in
sensor column
n
The panel appears allowing you to
set the accelerometers
Push "Channels" tab.
The channel configuration page will appear.
n
Channels
n
ECU Stream
n
CAN2 Stream
n
Math channels
n
Parameters
n
Output Signals
n
SmartyCam Stream
n
CAN expansion
n
CAN Output
11.1.1 Channels Configuration
In this page you can define all the parameters for your analog inputs, speed inputs and digital
RPM inputs as well as enable/disable any channel.

Here you can:
n
configure channel name (afterwards,
that name will not be automatically modi-
fied)
n
configure parameters like measure unit,
decimals number and sampling frequency,
which will not be assigned just to that
channel but even to the remaining chan-
nels of the inertial platform of the same
type ( the 3 accelerometers or gyros)
n
configure the logger position within the
vehicle: this configuration is made clicking
the arrows close to the logger image, which
will make the logger rotate on the 3 spatial
axes (the circled letter on the logger surface
identifies the side currently shown, like in-
dicated in the legend on the right of the
image)
Logger position configuration automati-
cally applies to all inertial platform chan-
nels, and consequently also their default
n
ames.
CHAPTER 11 RACESTUDIO3 SOFTWARE
38 39
EVO5
In the images above you see the result ob-
tained selecting an accelerometer, chan-
ging the logger position and modifying
frequency (to 20Hz) and precision (1 deci-
mal).
To recap:
n
to configure the logger position, just
click any of the 6 inertial platform channels
and then move the arrows until the logger
image has reached the actual placement
within the vehicle
n
to change accelerometers or gyros sam-
pling frequency it is necessary to select one
of the accelerometers and change its fre-
quency, then do the same selecting one of
the gyro channels
n
to rename all 6 inertial platform channels
select each of them, one by one, change its
name and save
Page is loading ...
Page is loading ...
Page is loading ...
Page is loading ...
Page is loading ...
Page is loading ...
Page is loading ...
Page is loading ...
Page is loading ...
Page is loading ...
/