Page is loading ...

www.kregtool.com
www.kregtool.com
Kreg Jig HD
Owner's Manual
Guide d’utilisation
Manual del propietario
®

800-447-8638
Safety Guidelines
Read this manual and these safety guidelines. Learn the applications and limitations of the
tool as well as the hazards specic to it. Operating the tool before understanding safe and
proper use could result in personal injury. SAVE THIS MANUAL.
•Always wear eye, hearing, and respiratory protection specically designed and certied
as safety equipment.
•Keep the work area well-lit, un-cluttered, and clean.
•The drill bit is sharp. Handle with care.
•Avoid awkward hand positions where a sudden slip could cause contact with the
rotating bit.
•Properly secure your workpiece before drilling.
•Do not attempt to hold the drill guide in place by hand. Always use a clamp.
•Follow your drill manufacturer’s safety guidelines.
•An electric drill equipped with a three-prong plug must be plugged into a grounded
three-hole electrical receptacle. Never modify the provided plug in any way.
•Do not use power tools in damp or wet locations, or expose them to rain.
•Do not operate any tool while under the inuence of drugs, alcohol, or medications.
•Do not modify and/or use this tool for any application other than that for which it
was designed.
•Do not allow familiarity gained from frequent use of your tools to replace safe work
practices. A moment of carelessness is sufcient to cause severe injury.
WARNING:
!
This product can expose you to chemicals including Acrylonitrile and other
chemicals, which are known to the State of California to cause cancer and reproductive harm.
For more information go to www.P65Warnings.ca.gov.

www.kregtool.com
Drill Guide
Stop Block
Kreg Jig
®
HD Drill Bit
Kreg Jig
®
HD Driver Bit
HD Screw Sample Pack
Stop Collar and Hex Wrench
A
B
C
D
E
F
A
E
F
B
C
D
Parts

800-447-8638
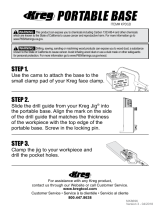
Introduction
Owning a Kreg Jig
®
HD opens up new outdoor project possibilities. This
manual shows you how to adjust your jig and drill pocket holes. You may
nd the following resources helpful:
Kreg Tool Online
kregtool.com. Find it all here: product information, videos, tips, project plans,
and more.
Kreg Owner’s Community
kregjig.ning.com. Join thousands of enthusiastic Kreg owners who swap tips and
advice, share their projects, and more.
Kreg Newsletters
Sign up for our free email newsletters at kregtool.com.
Kreg Plus: Your source for handy woodworking and DIY tips and tricks,
project ideas, and much more.
Kreg Tool News: Stay up to date on the latest Kreg tools and learn
about special offers.
Kreg Community News: Learn about projects being built in the
Kreg Owner’s Community, and get free plans.

www.kregtool.com
Railings
International Residential Code Guardrail Requirements
Whether manufactured or site-built, guardrail systems must be constructed and
installed to meet International Residential Code (IRC) live-load requirements. To be
compliant, guardrails must withstand a 200-lb. (91-kg) load applied in any direction.
Compared to manufactured guardrail systems, site-built guardrails constructed of
typical dimensional lumber are not as easy to build with certainty that the live-load
requirement is met. The Code sets performance standards but does not provide
proscriptive detailing for guardrail design. It is the responsibility of the designer,
builder, and local code ofcial to verify if a given guardrail design meets the
requirements.
Guardrail connections of the three styles shown here, constructed using the Kreg
Jig
®
HD and Kreg Jig
®
HD Screws, meet the live load requirements specied in
the IRC. (Testing covers only the connection of railing members to posts, not the
connection of the posts to the deck structure.) To meet requirements, builders
must execute these connections exactly as shown and use only structurally sound
materials. Materials with splits or excessive knots must not be used.
Guardrail materials and fasteners are exposed to the weather and are subject
to degradation over time. It is the homeowner’s responsibility to periodically
inspect the guardrail and perform any maintenance required to ensure continued
compliance with IRC live-load requirements.

800-447-8638
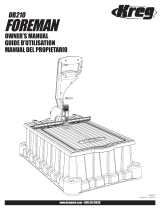
Railings
Style 1 Style 2
Style 3
Drill holes with the
Kreg Jig
®
HD centered
on the workpiece.
2x4 rail on
edge attached
to 4x4 post
2x4 rail at
attached to
4x4 post
4x4 post
attached to
2x6 rail
Pocket-holes drilled on
outside face.
!
ATTENTION

www.kregtool.com
Setup
1
Adjust the Stop Collar
Bit Shoulder
To create strong joints in 1½" [38mm]-thick
material, set up your jig in three simple steps:
4
3
⁄4"
(121mm)

800-447-8638
Setup
Attach the Stop Block
Kreg Wood Project Clamp (not included)
2
3
Check the Bit Setting
When using a Kreg Wood Project Clamp (not
included), slide the large clamp pad into the T-slot
recess on the back of the drill guide and lock it in
place with the end stop. When using an F-style
clamp or C-clamp, simply install the end stop.
These clamps do not lock onto the drill guide.
!
ATTENTION
3
⁄8"
(10mm)

www.kregtool.com
Pocket-Hole Placement
3½" [89mm]-wide material
1" 1"
1"1"
2-5/8"
1" 1"
For strong joints, space your pocket holes
evenly across the workpiece.
7¼" [184mm]-wide material
5½" [140mm]-wide material
2x4
2x6 2x8

800-447-8638
Drilling Pocket-holes
For best results, follow these steps:
Place the stop block against the end of the board, position the drill
guide, and clamp it in place. For 2x4s, simply center the drill guide
on the width of the workpiece. You’ll use both bit guides when
drilling the pocket holes. For 2x6s and wider material, mark pocket-
hole centerlines far enough from the end of the board to clear the
end of the drill guide (about 6" [152mm]). When drilling the pocket
holes, you’ll align one bit guide with each marked centerline.
Before turning on the drill, insert the drill bit into the drill guide until
the tip of the bit touches the workpiece. Withdraw the bit about ¼"
[6mm].
Turn on the drill and feed the bit into the workpiece, withdrawing
the bit as necessary to clear the chips.
Stop drilling when the stop collar contacts the drill guide. Wait until
the drill stops rotating to withdraw the bit.
1
2
3
4

www.kregtool.com
Repair Applications
For repair applications, remove the stop
block from the drill guide, and clamp
the guide directly to the workpiece. The
position of the stop collar on the drill bit
does not change. In situations where
using a clamp is not possible, fasten the
drill guide directly to the workpiece by
driving a screw through the hole in the
center of the guide, as shown.
The removable stop block allows you to use your Kreg Jig
®
HD to repair or
reinforce existing joints.

800-447-8638
Tips
To secure a miter joint with HD Screws, drill one
pocket hole about ½" [13mm] from the miter
“heel.” To get a screw close to the miter “toe” and
still have the pocket hole entirely on the face of the
part, remove the stop block from the drill guide.
Position the drill guide on the workpiece, angled
away from the miter toe. Clamp the drill guide in
place and drill the pocket hole. Where the distance
between pocket holes approaches 6" [152mm],
drill a pocket hole midway between the two. In
general, space pocket holes about 3" [76mm]
center-to-center along a joint. You can drill pocket
holes in both parts or drill them all in one part.
Mitered Corners
2x6
2x8
2x4
2-1/2"
(13mm)
(92mm)
(92mm)
1/2"
(64mm)
3-5/8"
3-5/8"

www.kregtool.com
Tips
Mitered Corners:
Securing the "toe"
(64mm)
1/2"
30
0
Toe
Heel
(13mm)
2-1/2"

800-447-8638
Additional Components
For more information,
please visit us online at kregtool.com
To keep the workpieces perfectly ush, center the clamp
pads on the joint line with the large pad on the face
opposite the pocket holes.
Kreg Wood Project Clamps
Kreg Jig
®
Base
The Kreg Jig
®
HD is compatible with Kreg Jig
®
and
Kreg Jig
®
Master System bases. The dust collection
attachment in the Master System helps you keep a
clean shop, and by efciently removing chips, enables
faster drilling and extends the life of your drill bit.

www.kregtool.com
Additional Components
Kreg Jig
®
HD Driver Bit
Replacement 6”-long #3 square drive bit.
Replacement drill bit, stop collar, and hex wrench.
Kreg Jig
®
HD Screws
30-count screws
125-count screws
Kreg Jig
®
HD Drill Bit
/