Page is loading ...

NDLED7 INSTALLATION INSTRUCTIONS
Thank you for buying RAB lighting xtures. Our goal is to design the best quality products to get the job done right. We’d like to hear your comments.
Call the Marketing Department at 888-RAB-1000 or email: marketing@rabweb.com
A
A
B B
C C
D D
4
1234
23
R
AB
SCALE 0.500
L I G H T I N G 170 LUDLOW AVE., NORTHVALE, NJ 07647
TITLE
27" C-CHANNEL
MATERIAL: PART No.: DRAWING NAME:
22 GA EC STL 15154-27 15154-27 C-CHANNEL
DATE: REV DATE: REV
3-9-12
DRAWN BY:
DH
SCALE
1/2
SHEET:
THIS DRAWING AND THE INFORMATION IT DISCLOSES IS THE EXCLUSIVE
PROPERTY OF RAB LIGHTING, INCORPORATED
ANY REPRODUCTION OR USE OF THIS DRAWING WITHOUT THE WRITTEN CONSENT OF
RAB LIGHTING, INC. IS STRICTLY PROHIBITED. RAB CONFIDENTIAL PATENT PENDING
REV DESCRIPTION DATE
1
QUOTATION DRAWING
11-14-12
SCALE 0.500
.500
[12,7]
1.500
[38,1]
27.000
[685,8]
.201 (2)
[5,11]
.250
[6,35]
.220
[5,59]
NDLED7
Cut-Out Diameter: 7-3/4”
ROUGHIN MOUNTING
1. Nailer bars are provided for use with wood joist
installations. Insert through Nailer Bar Slots in
Buttery Brackets and secure accordingly. C-Channels
are optionally available, consult factory. Consult local
building codes for nal support of xture.
2. Remove appropriate Knock out on Junction box. Press
Clip to open the Junction Box.
3. Use appropriate UL approved wire connectors as
required by code to complete wiring between conduit
whip and with supply wires. Be careful not to pinch wires.
WARNING: To prevent wiring damage or abrasion, do
not expose wiring to edges of sharp objects.
4. The xture can be adjusted to dierent heights above
the ceiling surface. For height adjustment, loosen the
Wing Nut and slide the Buttery Bracket. If necessary
remove the Wing Nut and insert in screw in dierent
hole provided on the Buttery Bracket as shown in Fig.
2.
5. Adjust both the Buttery Brackets such that the frame
of Rough-In Section is ush with the nished ceiling
surface. Tighten the Wing Nuts.
Rough-in Section
(Bottom of the
Rough-in Section
to be ush with
nished ceiling)
Buttery Brackets
Knock Out
Junction Box
Fig: 1
Buttery
Bracket (2)
Wing Nut (2)
Fig: 2
Nailer Bar Slot
IMPORTANT
READ CAREFULLY BEFORE INSTALLING FIXTURE. RETAIN THESE INSTRUCTIONS FOR FUTURE REFERENCE.
RAB xtures must be wired in accordance with the National Electrical Code and all applicable local codes. Proper grounding
is required for safety. THIS PRODUCT MUST BE INSTALLED IN ACCORDANCE WITH THE APPLICABLE INSTALLATION CODE BY A
PERSON FAMILIAR WITH THE CONSTRUCTION AND OPERATION OF THE PRODUCT AND THE HAZARDS INVOLVED.
WARNING: Make certain power is OFF before installing or maintaining xture. No user serviceable parts inside.
MOUNTING BARS
A
A
B B
C C
D D
4
1234
23
R
AB
SCALE 1.000
L I G H T I N G 170 LUDLOW AVE., NORTHVALE, NJ 07647
TITLE
13" NAILER BAR ASSEMBLY M & F
MATERIAL: PART No.: DRAWING NAME:
SEE NOTES 15153 15153 NAILER BAR ASSY
DATE: REV DATE: REV
3-9-12
DRAWN BY:
DH
SCALE
FULL
SHEET:
THIS DRAWING AND THE INFORMATION IT DISCLOSES IS THE EXCLUSIVE
PROPERTY OF RAB LIGHTING, INCORPORATED
ANY REPRODUCTION OR USE OF THIS DRAWING WITHOUT THE WRITTEN CONSENT OF
RAB LIGHTING, INC. IS STRICTLY PROHIBITED. RAB CONFIDENTIAL PATENT PENDING
REV DESCRIPTION DATE
1
13.375" REF
QUOTATION DRAWING
NOTES:
1. PART TO BE SUPPLIED BY TRIPAR INDUSTRIES
PART NUMBER 1287
2. MATERIAL: GALVANIZED STEEL
SCALE 1.000
A
A
B B
C C
D D
4
1234
23
R
AB
SCALE 0.500
L I G H T I N G 170 LUDLOW AVE., NORTHVALE, NJ 07647
TITLE
27" C-CHANNEL
MATERIAL: PART No.: DRAWING NAME:
22 GA EC STL 15154-27 15154-27 C-CHANNEL
DATE: REV DATE: REV
3-9-12
DRAWN BY:
DH
SCALE
1/2
SHEET:
THIS DRAWING AND THE INFORMATION IT DISCLOSES IS THE EXCLUSIVE
PROPERTY OF RAB LIGHTING, INCORPORATED
ANY REPRODUCTION OR USE OF THIS DRAWING WITHOUT THE WRITTEN CONSENT OF
RAB LIGHTING, INC. IS STRICTLY PROHIBITED. RAB CONFIDENTIAL PATENT PENDING
REV DESCRIPTION DATE
1
QUOTATION DRAWING
11-14-12
SCALE 0.500
.500
[12,7]
1.500
[38,1]
27.000
[685,8]
.201 (2)
[5,11]
.250
[6,35]
.220
[5,59]
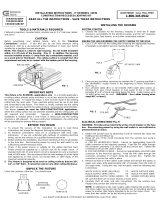
Nailer Bar
13” adjustable to 24”
(provided with xture)
C Channel-27”
(order Cat #: C-Chan 27)
Available upon request
C Channel-51”
(order Cat #: C-Chan 51)
Available upon request
WARNING: Suitable for wet locations and covered ceiling mount only - where the ambient temperature is 0°C minimum,
+40°C maximum.
WARNING: Suitable for installation in Non-Accessible and Accessible Ceilings.
WARNING: Suitable for installation in Non-Insulated Ceilings only.
WARNING: Do not install insulation within 76 mm (3 in) of any part of the Luminaire.
Clip

NDLED7 INSTALLATION INSTRUCTIONS
Thank you for buying RAB lighting xtures. Our goal is to design the best quality products to get the job done right. We’d like to hear your comments.
Call the Marketing Department at 888-RAB-1000 or email: marketing@rabweb.com
TROUBLESHOOTING
1. Check that the line voltage at the xture is correct. Refer
to wiring directions.
2. Be sure the xture is grounded properly.
3. For questions on compatibility of dimmers purchased
separately refer to www.rabweb.com
4. If the LED is blinking the xture may be overheating.
Remove the Trim assembly and if the xture is labeled
‘BLINKING LIGHT OF THIS THERMALLY PROTECTED
LUMINAIRE MAY INDICATE OVERHEATING’ allow the
xture to cool down. Determine cause of overheating
and remove. Fixtures with this label have a thermal
protector that turns xture o above a certain
temperature. It will automatically restart when cool.
CLEANING & MAINTENANCE
CAUTION: Be sure xture temperature is cool enough to
touch. Do not clean or maintain while xture is energized.
1. Do not open xture to clean the LED. Do not touch
the LED.
2. Do not touch lens, or trim cone.
3. Do not clean any xture surface with wood base cleaning
material such as paper towels or tissues. Only use micro
ber cleaning cloth.
Easy Installation & Product Help
Tech Help Line
Call our experts 888 RAB-1000
©2016 RAB LIGHTING Inc.
No
rthvale, New Jersey 07647 USA
rabweb.com
Visit our website for product info
email
Answered promptly sales@rabweb.com
NDLED7 IN-0216
TRIM CONE MOUNTING
Gently push Trim Cone in the Rough-In Section as shown
in Fig. 3. Jam Clips (3) will hold the Trim Cone in place.
Rough-in
Section
Trim Cone
Fig: 3
Note: These instructions do not cover all details or variations in equipment nor do they provide for every possible situation during installation operation or
maintenance.
Jam Clip (3)
WIRING
RISK OF FIRE. Universal voltage driver permits operation at
120V thru 277V, 50 or 60 Hz.
For Non-Dimming, Electronic Low Voltage (ELV) and Triac
Dimming, follow wiring direction in Fig. 4.
1. Connect the black xture lead to the LINE supply lead.
2. Connect the white xture lead to the COMMON supply
lead.
3. Connect the GROUND wire from xture to supply ground.
Do NOT connect the GROUND of the dimming xture to
the output.
4. Cap purple, gray and yellow leads. Do NOT connect.
Fig: 5
For 0-10V Dimming, follow the wiring directions as shown
below in Fig. 5. 0-10V control wires must be rated for 300V
minimum.
Fig: 4

NDLED7 INSTALLATION INSTRUCTIONS
Thank you for buying RAB lighting xtures. Our goal is to design the best quality products to get the job done right. We’d like to hear your comments.
Call the Marketing Department at 888-RAB-1000 or email: marketing@rabweb.com
DIMENSIONAL DRAWING
11.79”
11.68”
6.680”
9.12”
7.0”
7.73”
8.63”
9.47”
/