Page is loading ...

EN
LC502 control cubicle
for use in
ProFlex/MonoFlex/DuoFlex centralized lubrication systems
Original assembly instructions acc. to
EC Dir. 2006/42/EC for partly completed machinery
with associated operating instructions
Version 03
Schmierung
starten
Start lubrication
Fehler
Fault
1
2
3

Page 2
EN
LC502 control cubicle
Notes
Masthead
These original assembly instructions with
associated operating instructions in accordance
with EC Machinery Directive 2006/42/EC are
an integral part of the described product and
must be kept for future use.
These original assembly instructions with as-
sociated operating instructions were compiled
in accordance with the established standards
and rules for technical documentation,
VDI 4500 and EN 292.
© SKF Lubrication Systems Germany GmbH
This documentation is protected by copyright.
SKF Lubrication Systems Germany GmbH re-
serves all rights, including those to the photo-
mechanical reproduction, duplication, and distri-
bution by means of special procedures (e.g., data
processing, data media, and data networks) of
this documentation in whole or in part.
Subject to changes in contents and technical
information.
Service
If you have technical questions, please contact
the following addresses:
SKF Lubrication Systems Germany GmbH
Berlin Plant
Motzener Strasse 35/37
12277 Berlin
Germany
Tel. +49 (0)30 72002-0
Fax +49 (0)30 72002-111
www.skf.com/lubrication
Hockenheim Plant
2. Industriestrasse 4
68766 Hockenheim
Germany
Tel. +49 (0)62 05 27-0
Fax +49 (0)62 05 27-101
www.skf.com/lubrication
Danger!
Electrical voltage/current
The door (1) of the LC502 control
cubicle (2) must be opened only when
the basic switch is switched off (3,
position "OFF"). The basic switch (3)
must remain switched off until all
work of any kind on the control cu-
bicle is completed. The basic switch (3)
must not be switched on again even
temporarily while work is carried out.
Schmierung
starten
Start lubrication
Fehler
Fault
1
2
3
OFF
1
2
3

Page 3
EN
Table of contents
Assembly instructions
Information concerning EC Declaration of Conformity
and EC Declaration of Incorporation 4
1. Safety instructions 6
1.1 Intended use 6
1.2 Authorized personnel 6
1.3 Electric shock hazard 7
1.4 System pressure hazard 7
1.5 Assembly work 7
2. Lubricants 8
2.1 General information 8
2.2 Selection of lubricants 8
2.3 Approved lubricants 9
2.4 Lubricants and the environment 9
2.5 Lubricant hazards 10
3. Overview 10
4. Assembly 11
4.1 Setup and attachment 11
4.1.1 Installing the LC502 control cubicle 12
4.2 Connection dimensions, minimum
installation dimensions 13
4.2.1 Assembly drawing for LC502
control cubicle 13
4.2 Electrical connection 14
4.2.1 General information 14
4.2.2 Control cubicle (standard design) 15
4.3 Terminal block X1, power supply 16
4.3.1 Power supply 24 VDC 16
4.3.2 Power supply 230 VAC 16
4.3.3 Power supply
400 VAC 3
-phase
16
4.3.4 Connection of motor circuit breaker
(230VAC/400 VAC 3
-phase
) 17
4.3.5 Setting the mode of operation on
the motor circuit breaker
(230 VAC/400 VAC
3
-phase
) 17
4.4 Assignment of terminal block X2,
inputs 18
4.4.1 DuoFlex centralized lubrication system,
terminal block X2, assignment of the
inputs with analog pressure sensors 18
4.4.2 DuoFlex centralized lubrication system,
terminal block X2, assignment of
inputs with DDS50/1 20
4.4.3 ProFlex centralized lubrication system,
terminal block X2, assignment of
the inputs 22
4.4.4 MonoFlex centralized lubrication system,
terminal block X2, assignment of the
inputs with pressure switches 24
4.4.5 MonoFlex centralized lubrication system,
terminal block X2, assignment of the
inputs with analog pressure sensors 26
4.5 Assignment of terminal block X3,
outputs 28
4.5.1 Terminal block X3, outputs, 24 VDC 28
4.5.2 DuoFlex centralized lubrication system,
terminal block X3, outputs,
230/400 VAC
3
-phase
28
4.6 Finishing assembly work 29
4.7 Note on the rating plate 29
Instructions associated
1. Safety instructions 32
2. Lubricants 32
3. Transport, delivery, and storage 33
3.1 Lubrication units 33
3.2 Electronic and electrical devices 33
3.3 General notes 33
4. Assembly 34
4.1 Information on assembly 34
5. Design and function 34
5.1 General information 34
6. Control and display elements 34
6.1. Display and control elements of
the control screen 35
7. Commissioning 37
7.1 Setting parameters of the LC502
control unit 37
8. Shutdown and disposal 38
8.1 Temporary shutdown 38
9. Maintenance 39
9.1 General information 39
9.2 Changing defective fuses
(230/400 VAC
3
-phase
type only) 40
10. Malfunctions 41
10.1 Program malfunctions, LC502 41
10.2 Commissioning malfunctions 42
10.3 Operational malfunctions. 43
11. Technical data 44
12. Spare parts 44
Table of contents

Page 4
EN
EC Declaration of Incorporation according to Machinery Directive 2006/42/EC, Annex II Part 1 B
The manufacturer SKF Lubrication Systems Germany GmbH, plant Hockenheim, 2. Industriestraße 4, DE - 68766 Hockenheim, hereby declares that the partly
completed machinery:
Designation: control cubicle Type: LC502
Part no.:
24 V DC 230 VAC 400 V
DuoFlex 24-1074-2260 24-1074-2230 24-1074-2200
MonoFlex 24-1074-2270 24-1074-2240 24-1074-2210
ProFlex 24-1074-2280 24-1074-2250 24-1074-2220
Year of construction: See type identification plate
complies with the following basic requirements of the EC Machinery Directive 2006/42/EC at the time when first being launched in the market.
1.1.2 · 1.1.3 · 1.3.1 · 1.3.2 · 1.3.4 · 1.5.1 · 1.5.2 · 1.5.6· 1.5.8 · 1.6.1 · 1.6.2 · 1.6.3 · 1.6.4 · 1.7.1 · 1.7.2 · 1.7.3 · 1.7.4
The special technical documents were prepared following annex II part B of this directive. Upon justifiable request, these special technical documents can be forwarded
electronically to the respective national authorities. The person empowered to assemble the technical documentation on behalf of the manufacturer is the
head of
standardization; see manufacturer‘s address. Furthermore, the following directives and harmonized standards were applied in the respective applicable areas:
2011/65/EU RoHS II
2014/30/EU Electromagnetic compatibility | Industry
Standard Edition Standard Edition
Standard Edition Standard Edition
DIN EN ISO 12100 2011 DIN EN 60947-5-1 2010
DIN EN 61000-6-2 2006 DIN EN 61000-6-4 2011
DIN EN 50581 2013 DIN EN 61000-6-1 2007 Amendment 2011 DIN EN 60947-5-1 2010
DIN EN 60204-1 2007 DIN EN 61000-6-3 2011
DIN EN 61439
2012
Amendment 2010 Amendment 2012
The partly completed machinery must not be put into service until the final machinery into which it is to be incorporated has been declared in conformity with the
provisions of the EC Machinery Directive 2006/42/EC and any other applicable directives.
Hockenheim, 2017.10.13
Jürgen Kreutzkämper
Manager R&D Germany
SKF Lubrication Business Unit
Stefan Schürmann
Manager R&D Hockenheim/Walldorf
SKF Lubrication Business Unit

Page 5
EN
Informational symbols
Indicators used with safety instructions
and their significance
Hazard symbols
Explanation of symbols
Explanation of symbols and signs
You will find these symbols, which warn of
specific dangers to persons, material assets, or
the environment, next to all safety instructions
in these operating instructions.
Please heed these instructions and proceed
with special care in such cases. Please forward
all safety instructions to other users.
General hazard
DIN 4844-2-W000
Electrical voltage/current
Hot surface
Signal word Meaning
Danger! Danger of bodily
injury
Warning! Danger of damage to property
and the environment
Note! Provides additional informa-
tion
Note!
Prompts an action
Used for itemizing
Points out other facts,
causes, or consequences
Provides additional information
Instructions placed directly on the machines/
grease lubrication pump units, such as:
Rotation arrow
Labels for fluid connections
must be followed and kept in fully legible
condition.
You are responsible!
Please read the assembly and operating
instructions thoroughly and follow the safety
instructions.
Danger of being drawn into machinery
DIN 4844-2-W008
DIN 4844-2-W026
BGV 8A
Slipping hazard
DIN 4844-2-W028
Environmentally friendly disposal

Page 6
EN
Assembly instructions
1. Safety instructions
The operator of the described product
must ensure that the assembly instruc-
tions are read and understood by all
persons tasked with the assembly,
operation, maintenance, and repair of
the product. The assembly instructions
must be kept readily available.
Note that the assembly instructions
form part of the product and must
accompany the product if sold to a new
owner.
In addition to the assembly instructions,
statutory regulations and other general
regulations for accident prevention
and environmental protection must be
observed and applied.
1.2 Authorized personnel
Only qualified technical personnel may install,
operate, maintain, and repair the LC502 con-
trol cubicle described in the assembly instruc-
tions. Qualified technical personnel are per-
sons who have been trained, assigned and
instructed by the operator of the final product
into which the described product is incorpo-
rated. Such persons are familiar with the rel-
evant standards, rules, accident prevention
regulations, and assembly conditions as a re-
sult of their training, experience, and instruc-
tion. They are authorized to identify and per-
form necessary actions while avoiding any
risks which may arise.
The definition of qualified personnel and the
prohibition against employing non-qualified
personnel are laid down in DIN VDE 0105 and
IEC 364.
The described product is manufactured in ac-
cordance with the generally accepted rules and
standards of industry practice and with occu-
pational safety and accident prevention regu-
lations. Risks may, however, arise from its us-
age and may result in physical harm to
persons or damage to other material assets.
Therefore the product may only be used in
proper technical condition and in observance
of the assembly instructions. In particular, any
malfunctions which may affect safety must be
remedied immediately.
1.1 Intended use
The LC502 control cubicle and the compo-
nents integrated in it are designed for the
control and monitoring of an SKF ProFlex,
MonoFlex or DuoFlex centralized lubrication
system.
Any other usage is deemed non-compliant
with the intended use.
The control cubicle is referred to in the follow-
ing document as the LC502 control cubicle or
as the product.

Page 7
EN
Assembly instructions
1.4 System pressure hazard
Lubrication systems are pressurized
during operation. Centralized lubri-
cation systems must therefore be
depressurized before starting assembly,
maintenance or repair work, or any
system modifications or system repairs.
1.3 Electric shock hazard
Electrical connections for the described prod-
uct may only be established by qualified and
trained personnel authorized to do so by the
operator, and in observance of the local condi-
tions for connections and local regulations
(e.g., DIN, VDE). Significant bodily injury and
property damage may result from improperly
connected products.
Danger!
Performing work on an energized
pump or product may result in serious
injury or death.
Assembly, maintenance and repair work
may only be performed on products
that have been de-energized by
qualified technical personnel. The
supply voltage must be switched off
(at the basic switch, see page 2, Fig. 1)
before opening any of the product's
components.
1.5 Assembly work
Work on electrical control cubicles and their
components should only ever be carried out
when the power supply is disconnected. Be sure
to follow the procedure for turning off the
electrical switchgear prescribed in the operat-
ing instructions for the centralized lubrication
system. When performing any assembly work
on the electrical control cubicle and its com-
ponents, the local accident prevention regula-
tions as well as the specific operation and
maintenance specifications are to be followed.

Page 8
EN
Assembly instructions
2. Lubricants
2.1 General information
All products from SKF Lubrication
Systems Germany GmbH may be used
only for their intended purpose and in
accordance with the information in the
product's assembly instructions.
Intended use is the use of the products for the
purpose of providing centralized lubrication/
lubrication of bearings and friction points
using lubricants within the physical usage li-
mits which can be found in the documentation
for the devices, e.g., assembly instructions/
operating instructions and the product de-
scriptions, e.g., technical drawings and cata-
logs.
Hazardous materials of any kind, especially
the materials classified as hazardous by CLP
Regulation EC 1272/2008 may only be used
to fill SKF centralized lubrication systems and
components and deliv-ered and/or distributed
with the same after consulting with and recei-
ving written approval from SKF.
No products manufactured by SKF Lubrication
Systems Germany GmbH are approved for
use in conjunction with gases, liquefied gases,
pressurized gases in solution, vapors, or such
fluids whose vapor pressure exceeds normal
atmospheric pressure (1013 mbar) by more
than 0.5 bar at their maximum permissible
temperature.
Other media which are neither lubricant nor
hazardous substance may only be fed after
consultation with and written approval from
SKF Lubrication Systems Germany GmbH .
SKF Lubrication Systems Germany GmbH
considers lubricants to be a component of the
system design which must be factored into the
selection of components and the design of
centralized lubrication systems. The lubricating
properties of the lubricants are critically im-
portant in these considerations.
2.2 Selection of lubricants
Observe the instructions from the
machine manufacturer regarding the
lubricants that are to be used.
Warning!
The amount of lubricant required at
a lubrication point is specified by the
bearing or machine manufacturer. It
must be ensured that the required
quantity of lubricant is provided to the
lubrication point. The lubrication point
may otherwise not receive adequate
lubrication, which can lead to damage
and failure of the bearing.
The selection of a lubricant suitable for
the lubrication task is made by the machine/
system manufacturer and/or the operator of
the machine/system in cooperation with the
lubricant supplier.
The bearings/friction points that require lubri-
cation, their expected load during operation,
and the expected ambient conditions are taken
into account during selection, with consider-
ation of economic and environmental aspects.

Page 9
EN
Assembly instructions
2.4 Lubricants and the environment
Lubricants can contaminate soil and
bodies of water. Lubricants must be
properly used and disposed of. Observe
the local regulations and laws regarding
the disposal of lubricants.
It is important to note that lubricants are envi-
ronmentally hazardous, flammable substances
which require special precautionary measures
during transport, storage, and processing.
Consult the safety data sheet from the lubri-
cant manufacturer for information regarding
transport, storage, processing, and environ-
mental hazards of the lubricant that will be
used.
The safety data sheet for a lubricant can be
requested from the lubricant manufacturer.
SKF Lubrication Systems Germany
GmbH supports customers
in the selection of suitable components
for feeding the selected lubricant and in
the planning and design of a centralized
lubrication system.
Please contact SKF Lubrication Systems
Germany GmbH if you have further questions
regarding lubricants. Lubricants can be tested
in the company's laboratory for their suitability
for pumping in centralized lubrication systems
(e.g., "bleeding").
You can request an overview of the lubricant
tests offered by SKF Lubrication Systems
Germany GmbH from the company's Service
department.
2.3 Approved lubricants
Only lubricants approved for the prod-
uct may be used. Unsuitable lubricants
can lead to failure of the product and to
property damage.
Different lubricants cannot be mixed, as
mixing may result in damage and ne-
cessitate costly and complicated clean-
ing of the product/lubrication system.
It is recommended that an indication of
the lubricant in use be attached to the
lubricant reservoir in order to prevent
accidental mixing of lubricants.
The product described here can be operated
using lubricants that meet the specifications in
the technical data. Depending on the product
design, these lubricants may be oils, fluid
greases, or greases.
Oils and base oils may be mineral, synthetic,
and/or rapidly biodegradable. Consistency
agents and additives may be added depending
on the operating conditions.
Note that in rare cases, there may be lubri-
cants whose properties are within permissible
limit values but whose other characteristics
render them unsuitable for use in centralized
lubrication systems. For example, synthetic lu-
bricants may be incompatible with elastomers.

Display and controls, Fig. 1
Page 10
EN
Assembly instructions
3. Overview
Display and controls
Item Description
1 LC502 control cubicle
2 Basic switch
3 LC502 control display
4 Red fault indicator light
5 "Start control" button
(230/400 VAC type only
Schmierung
starten
Start lubrication
Fehler
Fault
1
2
3
1
3
2
4 5
2.5 Lubricant hazards
Centralized lubrication systems must
always be free of leaks. Leaking lu-
bricant is hazardous due to the risk of
slipping and injury. Be mindful of any
lubricant leaking out during assembly,
operation, maintenance, and repair of
centralized lubrication systems. Leaks
must be sealed off without delay.
Lubricant leaking from centralized lubrication
systems is a serious hazard. Leaking lubricant
can create risks that may result in physical
harm to persons or damage to other material
assets.
Follow the safety instructions on the
lubricant's safety data sheet.
Lubricants are a hazardous substance. The
safety instructions on the lubricant's safety
data sheet must be strictly followed. The safety
data sheet for a lubricant can be requested
from the lubricant manufacturer.

Page 11
EN
Assembly instructions
4. Assembly
4.1 Setup and attachment
The product should be protected from humid-
ity and vibration, and should be mounted so
that it is easily accessible, allowing all further
installation work to be done without difficulty.
Make sure there is adequate air circulation to
prevent the product from overheating. For the
maximum permissible ambient temperature,
see "Technical data."
The product is mounted in a vertical position.
The LC502 control cubicle is supplied either as
a separate product or already connected to the
pump unit.
The following points must be observed for
both versions:
During assembly and especially when drilling,
always pay attention to the following:
Existing supply lines must not be dam-
aged by assembly work.
Other units must not be damaged by as-
sembly work.
The product must not be installed within
range of moving parts.
The product must be installed at an ad-
equate distance from sources of heat.
Maintain safety clearances and comply
with local regulations for assembly and
accident prevention.
Ensure the display is easily visible
Ensure there is enough space to open the
control cubicle door

Page 12
EN
Assembly instructions
The LC502 control cubicle is installed either
with 4 socket-head screws (with washers) or
with an external wall mount, SKF order No.
24-0850-2010.
If the unit is to be fastened using M8 thread
holes, the screws must have a minimum
length of 15 mm.
Fastening material to be provided by the
customer:
Socket-head screws (4x) to
DIN 912-M8x-8.8
Washers (4x) to DIN 125-B10.5-St
Hexagon nuts M8 (4x) to DIN 934
Drill assembly holes (or thread M8) accord-
ing to the assembly drawing (Fig. 3) and
the conditions on the surface.
Clean surface to remove drilling chips.
Open the LC502 control cubicle, place it on
the installation surface, and roughly align it
Guide the socket-head screws (4x) (size 6
mm) with their washers (4x) through the
fastener holes on the cubicle inside wall and
bring into contact with the M8 thread/nut
of the installation surface.
Gently tighten the socket-head screws,
and align the LC502 control cubicle
Tighten the socket-head screws (size
6 mm) to following torque:
Torque 25 Nm
4.1.1 Installing the LC502 control cubicle
(separate product)
See following page, Figure 2
The LC502 control cubicle must be installed
on a level surface. The flanging surface must
not be under stress. During installation, be
sure to comply with the minimum installation
dimensions (sufficient clearance) for later service
and maintenance work (see following page).
Warning!
When drilling the assembly holes, you
must be careful of any supply lines or
other units, as well as of other hazards
such as moving parts.
Maintain safety clearances and comply
with local regulations for assembly and
accident prevention.
Warning!
Do not tilt or drop the LC502 control
cubicle.

Page 13
EN
Assembly instructions
300
300
2
3
1
210
ca. 220
ca. 330
ca. 340
Schmierung
starten
Start lubrication
Fehler
Fault
260
260
Ø 8
20
20
Connection dimensions, minimum installation dimensions, Fig. 2
4.2 Connection dimensions, minimum installation dimensions
4.2.1 Assembly drawing for LC502 control cubicle
Power supply to control cabinet
Power supply to pump motor
Input 4 (LC502 control)
Input 3 (LC502 control)
Input 2 (LC502 control)
Input 1 (LC502 control)
Fault output
Output 2 (LC502 control)
Output 1 (LC502 control)
Dimension for outer edge of control cubicle
Clearance/minimum installation dimensions
Dimension Min. installation
dimension
[mm]
Width 400
Height 400
Depth 600

Basic switch, Fig. 3
Page 14
EN
Assembly instructions
4.2 Electrical connection
4.2.1 General information
The LC502 control cubicle is designed for a
power supply (input voltage) of 230 VAC or
400 VAC 3
-phase
. The LC502 control cubicle
is supplied either as a separate unit or already
connected to an SKF pump unit.
The LC502 control cubicle is supplied either as
a separate unit or already connected to an
SKF pump unit. How the control cubicle is in-
tegrated into a lubrication system depends on
the customer's specific application, as does the
configuration of the technical ratings and
characteristics. Responsibility and liability for
these matters lies with the customer or the
system manufacturer.
Danger!
Electrical connections for the LC502
control cubicle may only be established
by qualified and trained personnel au-
thorized to do so by the operator, and
in observance of the local conditions
for connections and local regulations
(e.g., DIN, VDE). Significant bodily injury
and property damage may result from
improperly connected products.
Danger!
The available mains voltage
(supply voltage) must be in accordance
with the specifications on the rating
plate of the motor or of the electrical
components. Check the fuse protection
of the electrical circuit. Use only fuses
with the prescribed amperage, else
bodily injury and property damage may
result.
Consult the rating plate or technical documen-
tation of the motor to be connected for the
electrical characteristics of the motor, such as
rated voltage, rated frequency, and rated
current.
Danger!
Electrical voltage/current
The power supply to the LC502 control
cubicle (1) must be connected only
when the basic switch is switched off
(2, position "OFF"). Other work on the
control cubicle must always be car-
ried out by qualified technical person-
nel. The basic switch (2) must not be
switched on again even temporarily
while work is carried out.
Schmierung
starten
Start lubrication
Fehler
Fault
1
2
3
OFF
1
2
3

Positioning of connections for control cubicle, types with 24 VDC, 230 VAC, 400 VAC 3
-phase
, Fig. 4
X 2
X 3
X 1
1 2 3
4 5 6
PEPE
5 6
1 2 3
4
1 2 PE 3 4 PE PE
24
9 10 11 12
2322212019181716151413
1 2 3 4 5 6 7 8
242322212019181716151413
9 10 11 121 2 3 4 5 6 7 8
PE PE
8-K4
8-K1M
6-Q2
6-F1
6-Q1
X 2
X 1
X 3
24
9 10 1112
2322212019181716151413
1 2 3 4
5 6 7 8
PE PE
5 6 7 8
1 2 3 4
1 2 3 4 5 6 7 8
242322212019181716151413
9 10 11121 2 3 4 5 6 7 8
L1 L2 L3 N PE U V WPE PE
PE PE
6-K2
8-K4
8-K1M
6-Q2
6-T1
6-F1
6-F2
6-Q1
X 2
X 1
X 3
24
9 10 1112
2322212019181716151413
1 2 3 4
5 6 7 8
PE PE
5 6 7 8
1 2 3 4
1 2 3 4 5 6 7 8
242322212019181716151413
9 10 11121 2 3 4 5 6 7 8
L1 N PE 1 2 PE PE
PE PE
6-K2
8-K4
8-K1M
6-Q2
6-T1
6-F1
6-F2
6-Q1
24 VDC 230 VAC 400 VAC
X2
X1
X3
Page 15
EN
Assembly instructions
4.2.2 Control cubicle (standard design)
Guide individual cable harnesses as shown on Fig. 2 through the cable glands (conduit thread screw unions) (Fig. 3, item 3)

400 VAC 3
-phase
24 VDC
Assignment of terminal block X1, 400 VAC
L1 Power supply (L1)
L2 Power supply (L2)
L3 Power supply (L3)
N Power supply (N)
PE Protective (earth) conductor
L1 Motor (L1)
L2 Motor (L2)
L3 Motor (L3)
PE Protective (earth) conductor
PE Protective (earth) conductor
Assignment of terminal block X1, 24 VDC
1 Power supply (+)
2 Power supply (-)
PE Protective (earth) conductor
3 Motor (+)
4 Motor (-)
PE Protective (earth) conductor
PE Protective (earth) conductor
Cabletype
Cabletype
Terminal block: X1
Aim 1
Terminal-No.
Bridge
BMK
Connector
Position
Feed in
Power supply
3G2,5
3G2,5
1 2
grge
1 2
grge
Feed in
Feed in
Feed in
Motor
Motor
Motor
Customer
Customer
Customer
6-M1
6-M1
6-M1
+
-
PE
1
2
PE
3
4
PE
PE
PE
+
-
230 VAC
Assignment of terminal block X1, 230 VAC
L1 Power supply (L1)
N Power supply (N)
PE Protective (earth) conductor
L1 Motor (L1)
N Motor (N)
PE Protective (earth) conductor
PE Protective (earth) conductor
Cabletype
Cabletype
Terminal block: X1
Aim 1
Terminal-No.
Bridge
BMK
Connector
Position
Feed in
Power supply
3G2,5
3G1,5
sw bl
grge
1 2
grge
Feed in
Feed in
Feed in
Motor
Motor
Motor
Customer
Customer
Customer
6-M1
6-M1
6-M1PE
L1
N
PE
1
2
PE
PE
L1
N
PE
L1
N
Cabletype
Cabletype
Terminal block: X1
Aim 1
Terminal-No.
Bridge
BMK
Connector
Position
Feed in
Power supply
5G2,5
4G1,5
sw br sw bl
grge
1 2 3
grge
feed in
feed in
feed in
feed in
feed in
Motor
Motor
Motor
Motor
Customer
Customer
Customer
Customer
Kunde
6-M1
6-M1
6-M1
6-M1
U
V
W
PE
L1
L2
L3
N
PE
U
V
W
PE
PE
L1
L2
L3
N
PE
Page 16
EN
Assembly instructions
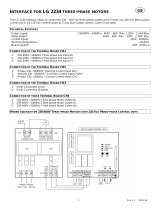
4.3.1 Power supply 24 VDC 4.3.2 Power supply 230 VAC 4.3.3 Power supply
400 VAC 3
-phase
4.3 Terminal block X1, power supply

Settings on the motor circuit breaker, Fig. 5
Page 17
EN
Assembly instructions
4.3.4 Connection of motor circuit breaker
(230VAC/400 VAC
3
-phase
)
The motor circuit breaker is integrated
in the LC502 control cubicle only in the
230 VAC and 400 VAC
3
-phase
types.
Consult the rating plate or technical docu-
mentation of the motor to be connected for
the electrical characteristics of the motor,
such as rated current.
Determine the maximum permissible
rated current of the pump unit to be
connected
Set the rated current value according to
the rated current specified for the pump
motor on the dial of the thumb wheel
On the thumb wheel (1) on the motor cir
cuit breaker (2), set the maximum permis-
sible rated current value (from the pump
motor).
Check the functioning of the motor circuit
breaker using the test button (4)
1
2
4.3.5 Setting the mode of operation on the
motor circuit breaker
(230 VAC/400 VAC
3
-phase
)
The protection mode of the motor circuit
breaker (automatic/manual) must be set by
the customer. It is set using the
thumb wheel (3) on the motor circuit
breaker.
Set the mode of operation by turning
the thumb wheel (3) to one of these
two positions on the wheel (3):
Position A = automatic
Position H = manual
3
4

Page 18
EN
Assembly instructions
4.4.1 DuoFlex centralized lubrication system, terminal block X2, assignment of the
inputs with analog pressure sensors
4.4 Assignment of terminal block X2,
inputs
The assignment of the inputs and outputs
varies depending on the lubrication system in
use.
This may be:
DuoFlex for a dual-line
centralized lubrication system with analog
pressure sensors (Chapter 4.4.1)
DuoFlex for a dual-line
centralized lubrication system with differen-
tial-pressure switch DDS50/1
(Chapter 4.4.2)
ProFlex for a progressive
centralized lubrication system
(Chapter 4.4.3)
MonoFlex for a single-line
centralized lubrication system with pressure
switches (Chapter 4.4.4)
MonoFlex for a single-line
centralized lubrication system with analog
pressure sensors (Chapter 4.4.5)
2-wire switch
• Switches, buttons, etc.
(machine contact)
• Cycle switch
(2-wire cycle switch only)
{177-300-091, -092, -096}
• Pressure switch
• Differential-pressure switch
(requires 2 inputs)
• Mech. fill level switch (FF and FB
pumps)
3-wire switch
• Ultrasonic fill level switch
• W2 fill level control
(capacitive proximity switch)
Analog sensor
• Pressure sensor
• Analog fill level switch
*) When analog sensors are used,
a BES6 plug-in jumper (fitted with
a 1.0 kΩ, 0.5W resistor) must be
inserted between "Signal (-)" and
"Power supply (-)" in order to adapt
the measurement range.
Terminal diagram X2, 24 VDC/230 V AC/400 VAC
Terminal block X2
Input No. Function 2-wire
switch
3-wire
switch
Analog
sensor
Input
1
1 Not connected
2 Pressure sensor 1 (+24V) X
3 Not connected
13 Pressure sensor 1 (signal) X | *)
14 Pressure sensor 1 (0V) X | *)
15 Not connected
Input
2
4 Not connected
5 Pressure sensor 2 (+24V) X
6 Not connected
16 Pressure sensor (signal) X | *)
17 Pressure sensor 2 (0V) X | *)
18 Not connected
Input
3
7 Delay extension (+) X
8 Not connected
9 Delay extension (-) X
19 Not connected
20 Not connected
21 Not connected
Input
4
10 Not connected
11 Fill level (+24V) X
12 Not connected
22 Fill level (signal) X
23 Fill level (0V) X
24 Not connected

Page 19
EN
Assembly instructions
DuoFlex centralized lubrication system, terminal block X2, inputs with analog pressure sensors
Cabletype
Cabletype
Terminal block: X2
Aim 1
Terminal-No.
Bridge
BMK
Connector
Position
1
2
3
4
5
6
7
8
9
10
11
12
PE
PE
13
14
15
16
17
18
19
20
21
22
23
24
PE
PE
Pressure sensor, line 1
Pressure sensor, line 2
Delay extension
Fill level
3X0,75
3X0,75
2X0,75
3X0,75
1 2 3
1 2 3
1kΩ 1kΩ
1 2
+ Delay extension
- Delay extension
Customer
Customer
+
-
+24V Fill leve
Signal Fill level
OV Fill level
1 2 3
Fill leve1
2
3
Fill level
Fill level
1
3
4
1
3
4
Pressure, line 1
Pressure, line 1
Pressure, line 1
Pressure, line 2
Pressure, line 2
Pressure, line 2
Pressure sensor 1
Pressure sensor 1
Pressure sensor 1
Pressure sensor 2
Pressure sensor 2
Pressure sensor 2
DuoFlex centralized lubrication system, terminal diagram X2, assignment of the inputs with analog pressure sensors

Terminal diagram X2, 24 VDC/230 VAC/400 VAC
Terminal block X2 (400V, 230V, 24V)
Input No. Function 2-wire
switch
3-wire
switch
Analog
sensor
Input 1
1 Differential-pressure switch (1) X
2 Not connected
3 Differential-pressure switch (2) X
13 Not connected
14 Not connected
15 Not connected
Input 2
4 Differential-pressure switch (3) X
5 Not connected
6 Differential-pressure switch (4) X
16 Not connected
17 Not connected
18 Not connected
Input 3
7 Delay extension (+) X
8 Not connected
9 Delay extension (-) X
19 Not connected
20 Not connected
21 Not connected
Input 4
10 Not connected
11 Fill level (+24V) X
12 Not connected
22 Fill level (signal) X
23 Fill level (0V) X
24 Not connected
2-wire switch
• Switches, buttons, etc. (machine contact)
• Cycle switch (2-wire cycle switch only)
{177-300-091, -092, -096}
• Pressure switch
• Differential-pressure switch
(requires 2 inputs)
• Mech. fill level switch
(FF and FB pumps)
3-wire switch
• Ultrasonic fill level switch
• W2 fill level control
(capacitive proximity switch)
Page 20
EN
Assembly instructions
4.4.2 DuoFlex centralized lubrication system, terminal block X2, assignment of inputs with DDS50/1
/