Page is loading ...

HOMEDEPOT.com
Please contact 1-877-297-6069 for further assistance.
Installation
1
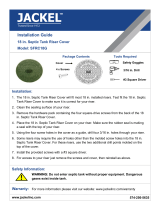
PREPARING FOR INSTALLATION
□ This 24 in. septic tank riser cover (A) will t most 24 in.
installed risers. Test t the riser cover (A) to ensure it is
correct for your riser.
□ Clean the sealing surface of your riser.
□ Remove the hardware pack containing the four square-drive
screws (B) from the back of the riser cover (A).
A
B
2
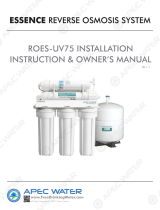
INSTALLING THE RISER COVER
□ Place the riser cover (A) on your riser. Ensure the rubber seal
is making a seal with the top of your riser.
□ Using the four screw holes in the riser cover (A) as a guide,
drill four 3/16 in. holes through your riser.
NOTE: Some risers may require the use of holes other than the molded
screw holes in the riser cover. For these risers, use the two additional
drill points molded on the top of the cover.
□ Install the screws (B) with a #3 square driver.
□ For access to your riser, remove the screws (B) and cover (A),
then reinstall.
A
B
Safety Information
WARNING: Failure to properly secure the riser cover will create a serious safety risk. Follow these installation instructions carefully.
Warranty
This product is warranted to the original consumer purchaser to be free from defects in material and workmanship for a period of one year from the date of
purchase. For additional details and questions, please contact Everbilt Customer Service at 1-877-297-6069.
TOOLS REQUIRED
Drill with 3/16 in. drill bit #3 Square Driver
PACKAGE CONTENTS
A - Riser Cover x1 B - Square drive screws x4
Use and Care Guide
2 in. ABS Heavy Duty
Sewage Pump Check Valve
Item # 1001091726
Model # THD1026
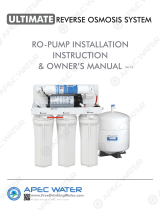
WARNING: Always disconnect power to your pump and release system pressure before servicing.
Check Valve Body
2 x Compression
Seals
2 x Compression
Nuts
Safety Goggles
Hacksaw or PVC Cutter
Tape Measure
NOTE: This check valve is not intended for ground burial or outdoor
use.
1. Unplug your pump.
2. Close the shut off valve above your check valve if you have one.
3. Disconnect the discharge pipe below your existing check valve.
4. Drain the discharge pipe above the check valve into and remove
the old check valve.
5. Remove the compression nuts and seals from your new check
valve.
6. Ensure the space between the two pipe ends is 3 inches.
7. Slide the nuts and seals on the pipe ends as shown.
8. Install your new check valve, with the flow arrow pointing away
from the pump, by inserting each pipe end into the check valve.
9. Slide the compression nuts and seals onto the check valve, and
hand-tighten the nuts to ensure a water tight seal. Do not
overtighten.
10. Plug in your pump. Cycle your system a few times and check for
leaks. Retighten any nuts if necessary. Do not overtighten.
NOTE: This check valve should be installed in a vertical position only.
This check valve is not intended for ground burial or outdoor use.
1. Unplug your pump.
2. Close the shut off valve above your check valve if you have one.
3. Disconnect the discharge pipe below your existing check valve.
4. Drain the discharge pipe above the check valve into and remove the
old check valve.
5. Remove the compression nuts and seals from your new check valve.
6. Ensure the space between the two pipe ends is 3 inches.
7. Slide the nuts and seals on the pipe ends as shown.
8. Install your new check valve, with the flow arrow pointing upward,
away from the pump, by inserting each pipe end into the check
valve.
9. Slide the compression nuts and seals onto the check valve, and
hand-tighten the nuts to ensure a water tight seal. Do not
overtighten.
10. Plug in your pump. Cycle your system a few times and check for
leaks. Retighten any nuts if necessary. Do not overtighten.
NOTE: This check valve is to be installed in a vertical position only.
This check valve is not intended for ground burial or outdoor use.
1. Unplug your pump.
2. Close the shut off valve above your check valve if you have one.
3. Disconnect the discharge pipe below your existing check valve.
4. Drain the discharge pipe above the check valve into and remove the
old check valve.
5. Remove the compression nuts and seals from your new check valve.
6. Ensure the space between the two pipe ends is 3 inches.
7. Slide the nuts and seals on the pipe ends as shown.
8. Install your new check valve, with the flow arrow pointing upward,
away from the pump, by inserting each pipe end into the check
valve.
9. Slide the compression nuts and seals onto the check valve, and
hand-tighten the nuts to ensure a water tight seal. Do not
overtighten.
10. Plug in your pump. Cycle your system a few times and check for
leaks. Retighten any nuts if necessary. Do not overtighten.
/