Page is loading ...

Email: [email protected]
Web: www.freshairscreens.com
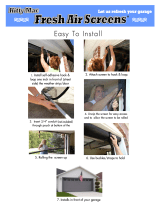
Instructions for Model D with Rope and Pull Kit
If your order does not include a Rope and Pull kit (sold separately), please refer to Basic Instructions.
Tools and supplies required for installation of your hand roll-up Fresh Air Screen®:
Included
Roll of Self-adhesive hook/loop
4 Mounting Brackets
6 Eyelets
4 Cords (different lengths)
2 Cord Cleats
Not Included
Hammer and step ladder
5/8 inch roofing nails (optional for step 8)
¾ inch plastic conduit or galvanized pipe cut to
width of garage door opening (Step 5)
Proudly Made In the USA!
Step 1 – Cut roll of self-adhesive hook/loop material into 3 strips, -two lengths equal to the height of the
door jambs, and one long strip for the header (measurements vary to screen).
Step 2 – install and align the self-adhesive hook/loop strips on both door jambs, about 1 inch in front
(street side) of the door stops/weather strips. Then add the hook/loop strip to the header, so that it
allows a smooth surface edge with both door jamb strips.
Step 3 – starting at either upper corner, attach the Fresh Air Screen® to the hook/loop strip which is
mounted on the header. Then attach the Fresh Air Screen® to the hook/loop strips that are mounted on
either of the door jambs of the garage door opening.
Step 4 – Attach the enclosed cleats to the door jabs, between the garage door and the screen, about 5 feet
high using the wood screws provided.
Step 5 – Install the enclosed eye screws. (Refer to illustration below.) All 6 eye screws should go into the
header on the garage side of your screen approximately 1 inch from the screen as follows:
Eye Screw 1 and 2 – place 1 on each side, 6 inches from the center zipper
Eye Screw 3 and 4 – Place 1 on each side, 12 inches in from the outside zipper
Eye Screw 5 and 6 – place 1 on each side, 6 inches from the outside zipper
Step 6 – Attach the brackets to the header (street side) across from eye screws # 1, 2, 3 and 4. (See Step 5).

Step 7 – Inserting the enclosed cords according the following:
1.) Long Cord #1 – Insert the knotted end into the bracket across from Eye Screw #1. Run the cord
down and under the screen, then back up to Eye Screw #1. Run the cord through eye Screws
#1, #3 and #5 then down to the cleat.
2.) Long Cord #2 – Insert the knotted end into the bracket across from Eye Screw #2. Run the cord
down and under the screen, then back up to Eye Screw #1. Run the cord through eye Screws
#2, #4 and #6 then down to the cleat.
3.) Short Cord #1 – Insert the knotted end into the bracket across from Eye Screw #3. Run the
cord down and under the screen, then back up to Eye Screw #3. Run the cord through eye
Screws #3 and #5 then down to the cleat.
4.) Short Cord #2 – Insert the knotted end into the bracket across from Eye Screw #4. Run the
cord down and under the screen, then back up to Eye Screw #4. Run the cord through eye
Screws #4 and #6 then down to the cleat
With the Screen pulled all the way down, tie the cords together about 12 inches below the cleat and cut
off the excess cord. Do this for each side.
Step 8 (Optional/Highly recommended) – after fastening the screen to the header and door jambs, apply
roofing nails (not included) through the ends of the hook/loop strips and every 12-18 inches along the
length, to create a long term, permanent bond.
Step 9 – Insert a ¾ in. rod (3/4 inch plastic electrical conduit or galvanized pip recommended) into the
pouch sewn into the bottom of the screen to maintain desired position and shape of the screen when
rolled up.
Rolling up – For each side, pull the two cords simultaneously to the desired height.
Cleaning – Wash the Fresh Air Screen® with a mild soap and water. Allow to thoroughly dry before
storing.
Warranty – The Fresh Air Screen® is warranted to be free of manufacturing and material defects for a
period of one year from the date of purchase and workmanship and materials. This warranty excludes
damage to screen caused by sharp objects, pet or animal damage or vehicle damage.
Ordering Instructions – the standard sizes of the Fresh Air Screen® are 8’ x7, 9’ x7’, 9’ x 8’, 16’ x7’, and
16’x 8’. Visit us at www.freshairscreens.com or visit your local home improvement store for more
ordering information.
Consumer Warning: The Fresh Air Screen® has been engineered to keep insects, pests, and trash out
while letting fresh air and sunlight in. It is not designed to be a security wall and will not prevent children,
adults, or aggressive animals from getting in or out of the garage and therefore into the home.

Cleat
Cleat
/