Page 12
Step 1: Parts List and Bike Preparation
Wiring
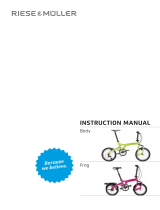
Wire Routing:
• While routing wires be sure that they cannot become tangled or caught in
either suspension or steering parts. Check movement of both steering and
suspension before riding the bike.
• Mount the harness on the right side of the bike (right side faring will need
to be removed).
• The Darla light wires will need to be routed up to the Clearwater Lights
harness. Darla light extensions may need to be used.
• Connect the green connector from the Clearwater Lights harness to the
green connector to the CANopener. Use the green connector extension
cable.
• Remove the fuse from the fuse holder on the Clearwater Lights power
wire. Route the power wires from the Clearwater Lights harness to the
battery, connect the BLACK wire ring terminal to the negative battery
terminal, then the RED ring terminal to the positive battery terminal.
Reinsert the fuse into the fuse holder of the Clearwater Lights system.
Page 11
Note: To test/run the Clearwater Lights, the bike must be fully running. The
Darlas should go to 100% brightness when the high-beam is pressed. Refer
to the CANopener Manual to learn how to adjust the brightness of the lights
and for further setting options.
Be sure all wires are tucked out of the way, securing where needed with
the included zip ties. Reinstall side and battery covers, verify that no wires
interfere with the steering or suspension parts of your bike and enjoy!
Clearwater Lights Harness Clearwater Lights Harness
Mounting LocationMounting Location
Clearwater Lights Clearwater Lights
Power WiresPower Wires
Clearwater Lights Clearwater Lights
Green Data CableGreen Data Cable
Darla Light Darla Light
WIresWIres