Page is loading ...
TRENDnet User’s Guide
Cover Page

© Copyright 2012 TRENDnet. All Rights Reserved.
TRENDnet User’s Guide
Table of Contents
i
Contents
Product Overview ........................................................................... 1
Package Contents .......................................................................................................... 1
Features ......................................................................................................................... 1
Product Hardware Features........................................................................................... 2
Application Diagram ...................................................................................................... 4
Basic Router Setup .......................................................................... 5
Creating a Home Network ............................................................................................. 5
Router Installation ......................................................................................................... 6
Virtual Private Networking (VPN) .................................................. 12
Creating a Virtual Private Network .............................................................................. 12
IPsec (Internet Protocol Security) ................................................................................ 13
Site-to-Site VPN ....................................................................................................... 13
Client-Server VPN (Server Mode) ............................................................................ 17
PPTP (Point-to-Point Tunneling Protocol) ................................................................... 19
Client-Server VPN (Server Mode) ............................................................................ 19
Client-Server VPN (Client Mode) ............................................................................. 21
L2TP (Layer 2 Tunneling Protocol) ............................................................................... 24
Client-Server VPN (Server Mode) ............................................................................ 24
Client-Server VPN (Client Mode) ............................................................................. 25
Access Control Filters .................................................................... 29
Access control basics ................................................................................................... 29
MAC Control ............................................................................................................ 29
URL Filters ............................................................................................................... 30
Keyword Blocking .................................................................................................... 31
Packet Outbound/Inbound Filters ........................................................................... 31
Advanced Router Setup ................................................................ 34
Access your router management page ........................................................................ 34
Set your router date and time ..................................................................................... 35
Clone a MAC address ................................................................................................... 36
Change your router IP address .................................................................................... 37
Set up the DHCP server on your router ....................................................................... 37
Set up DHCP reservation ............................................................................................. 39
Enable/disable UPnP on your router ........................................................................... 40
Allow/deny VPN connections through your router ..................................................... 41
Allow/deny multicast streaming through your router ................................................ 41
Enable/disable DoS (Denial of Service) Prevention ..................................................... 42
Allow/deny ping requests to your router from the Internet ....................................... 42
Identify your network on the Internet ........................................................................ 43
Allow remote access to your router management page ............................................. 44
Open a device on your network to the Internet .......................................................... 45
DMZ ......................................................................................................................... 45
Virtual Computers ................................................................................................... 45
Virtual Server .......................................................................................................... 46
Special Applications ................................................................................................ 47
Prioritize traffic using QoS (Quality of Service) ........................................................... 48
Create schedules ......................................................................................................... 49
Add static routes to your router .................................................................................. 50
Enable dynamic routing on your router ...................................................................... 51
Enable route mode on your router.............................................................................. 52
Using WoL (Wake on LAN) on your router .................................................................. 52
Router Maintenance & Monitoring ............................................... 53
Reset your router to factory defaults .......................................................................... 53

© Copyright 2012 TRENDnet. All Rights Reserved.
TRENDnet User’s Guide
Table of Contents
ii
Router Default Settings ............................................................................................... 53
Backup and restore your router configuration settings .............................................. 54
Upgrade your router firmware .................................................................................... 55
Restart your router ...................................................................................................... 56
Check connectivity using the router management page ............................................. 56
Check the router status information ........................................................................... 57
View your router log .................................................................................................... 59
Configure your router log ............................................................................................ 60
Enable SNMP on your router ....................................................................................... 61
Router Management Page Structure ............................................. 63
Technical Specifications................................................................. 64
Troubleshooting ............................................................................ 65
Appendix ...................................................................................... 66

© Copyright 2012 TRENDnet. All Rights Reserved.
TRENDnet User’s Guide
TW100-BRV214
1
Product Overview
TW100-BRV214
Package Contents
In addition to your router, the package includes:
• Muti-Language Quick Installation Guide
• CD-ROM (User’s Guide)
• Network cable (1.5m / 5ft)
• Power adapter (12V DC, 1A)
If any package contents are missing or damaged, please contact the retail store, online
retailer, or reseller/distributor that the item was purchased.
Features
The 4-Port VPN Router, model TW100-BRV214, manages up to 80 Virtual Private
Network (VPN) tunnels. IPSec, L2TP, and PPTP VPN pass-through sessions are supported
and a configurable firewall ensures the highest level of security.
Four Fast Ethernet ports on the back of the router help extend a wired network.
Advanced Stateful Packet Inspection (SPI) and Network Address Translation (NAT)
encryption protects your digital network. Advanced features include advanced Quality
of Service (QoS) controls, Domain filtering, and packet filtering.
• 4 x 10/100 Mbps Auto-MDIX LAN ports
• 1 x 10/100 Mbps WAN port (Internet)
• On/off button
• Compatible with most popular cable/DSL Internet service providers using
Dynamic/Static IP, PPPoE, PPTP and L2TP protocols
• Firewall protection with Network Address Translation (NAT), Stateful Packet
Inspection (SPI), and Denial of Service (DoS) prevention
• Supports up to 80* PPTP/L2TP/IPsec tunnels
• Supports up to 100 PPTP/L2TP/IPsec VPN pass through sessions
• Access Control: Virtual Servers, MAC/IP Packet Filters, URL/Keyword Filters,
Demilitarized Zone (DMZ) host, and Multi-DMZ
• Set device time using Network Time Protocol (NTP) and define schedules for
Virtual Server, Packet Filters, and Quality of Service (QoS)
• Quality of Service (QoS) traffic prioritization via IP/(TCP/UDP) ports with 3
priority queues
• Universal Plug and Play (UPnP) for auto discovery and support for device
configuration of Internet applications
• Supports Internet Group Multicast Protocol IGMPv1/2 pass through for
multicast applications
• Supports static and dynamic RIP v1/2 routing
• Dynamic DNS Client for dynamic Internet IP resolution
• Device monitoring using the Internal System Log, External Syslog, E-mail Alert,
and SNMPv1/2c
© Copyright 2012 TRENDnet. All Rights Reserved.
TRENDnet User’s Guide
TW100-BRV214
2
• Local/Remote management via Web browser, upgrade firmware, and
backup/restore configuration
*The number of supported concurrent VPN tunnels is dependent upon available bandwidth.
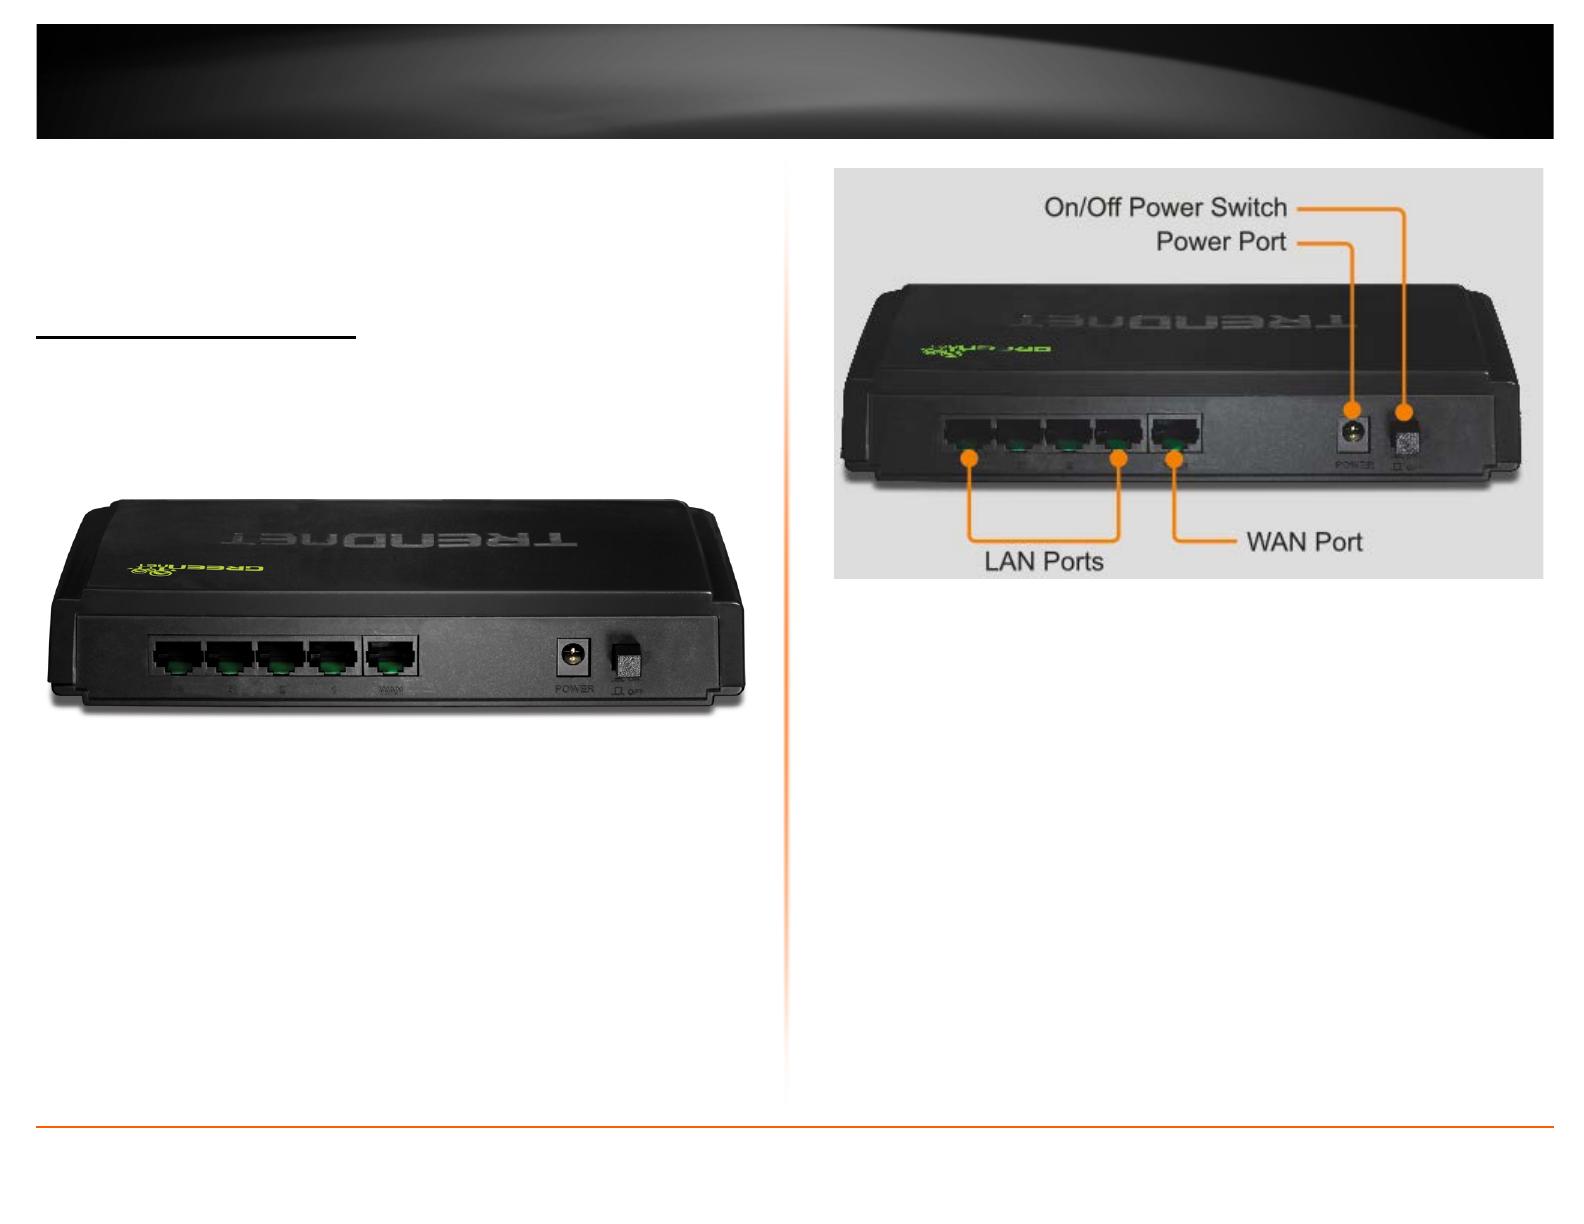
Product Hardware Features
Rear Panel View
• LAN Ports – Connect Ethernet cables (also called network cables) from your
router LAN ports and to your wired network devices.
• WAN Port - Connect an Ethernet cable (also called network cable) from your
router WAN port and to your xDSL/Cable modem.
• Power Port – Connect the included power adapter from your router power
port and to an available power outlet.
Note: Use only the adapter that came with your router.
• On/Off Power Switch – Push your router On/Off push button power switch to
turn your router “On” (Inner position) or “Off” (Outer position).
© Copyright 2012 TRENDnet. All Rights Reserved.
TRENDnet User’s Guide
TW100-BRV214
3
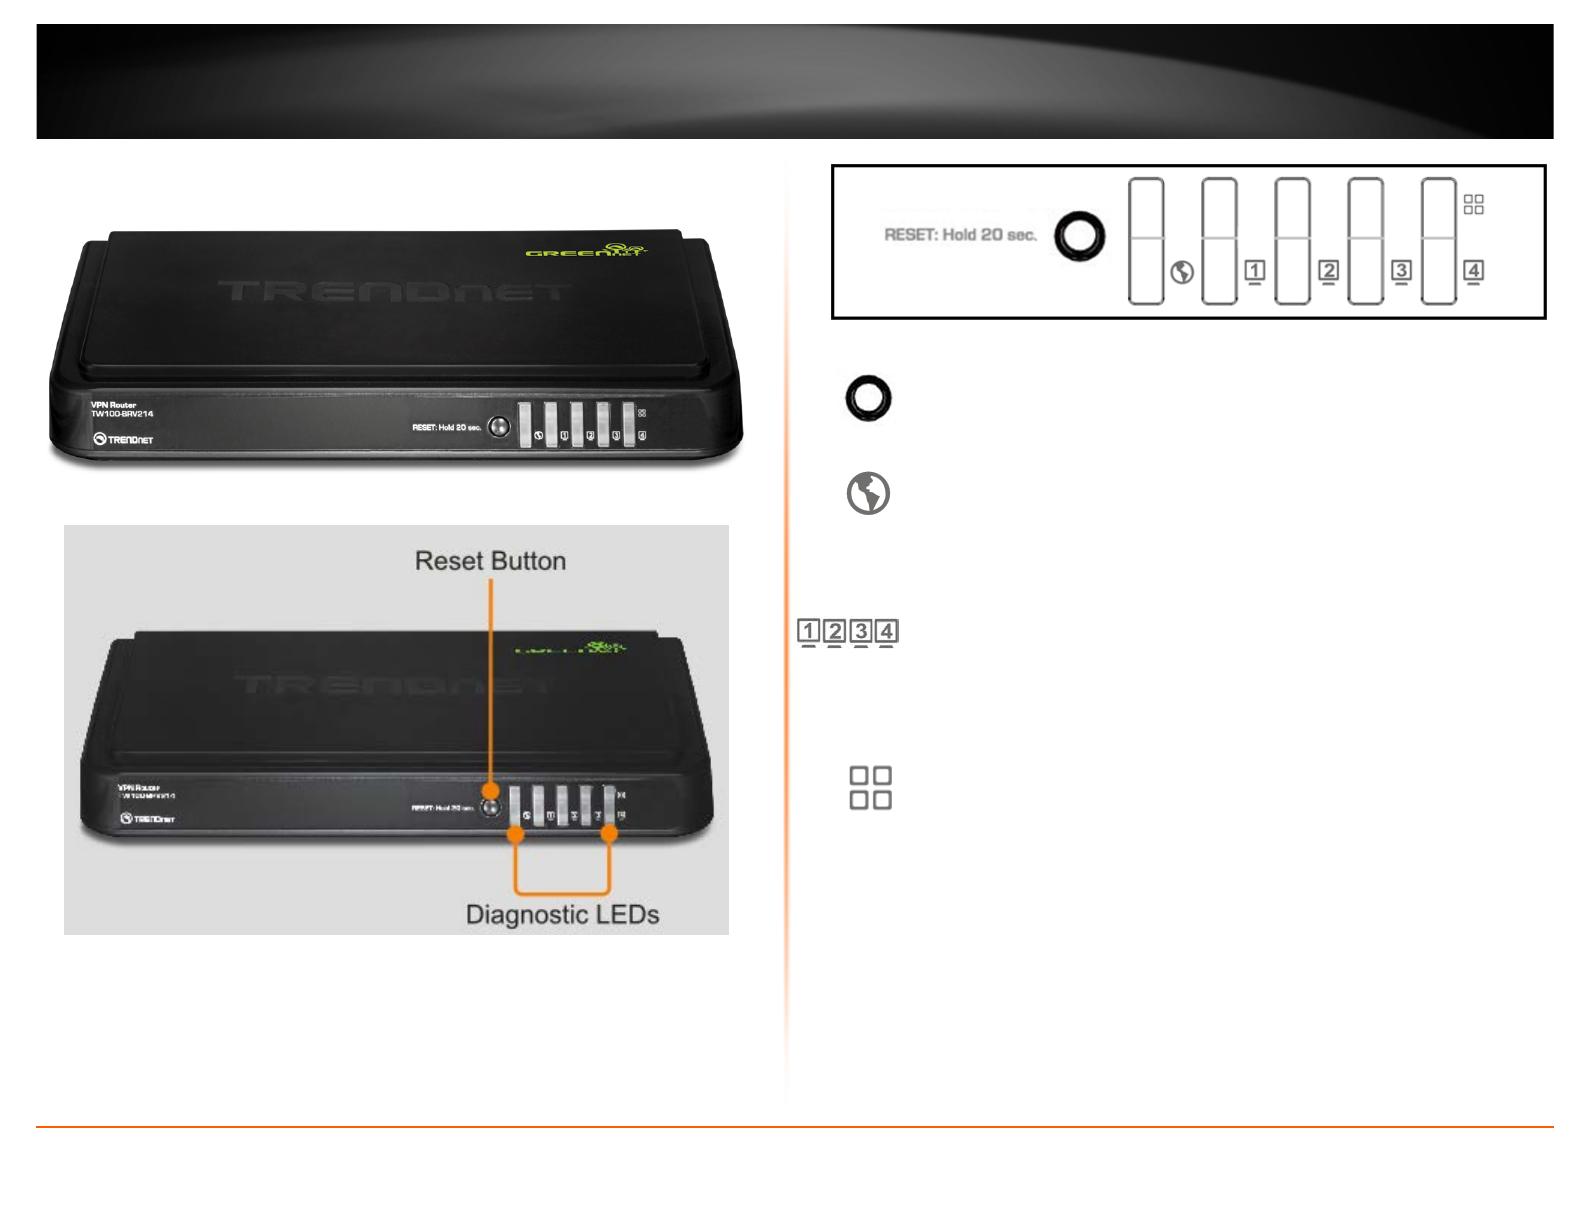
Front Panel View
Front Panel Button and LEDs
Reset Button – Push and hold this button for 20 seconds and release to reset
your router to its factory defaults. The LEDs will blink rapidly when the reset
process is activated.
WAN (Link/Activity) – This LED indicator is solid green when your router WAN
port is physically connected to the xDSL/Cable modem Ethernet port (also
called network port) successfully with an Ethernet cable (also called network
cable). The LED indicator will be blinking green while data is transmitted or
received through the WAN port of your router.
LAN 1-4 (Link/Activity) – These LED indicators are solid green when the LAN
ports are physically connected to your wired network devices successfully with
an Ethernet cable (also called network cable). These LED indicators will be
blinking green while data is transmitted or received through your router LAN
ports.
Status - This LED indicator is blinking green when your router is ready and
working successfully. If this LED indicator is solid green on or off, your router is
not receiving power or not working properly.
© Copyright 2012 TRENDnet. All Rights Reserved.
TRENDnet User’s Guide
TW100-BRV214
4
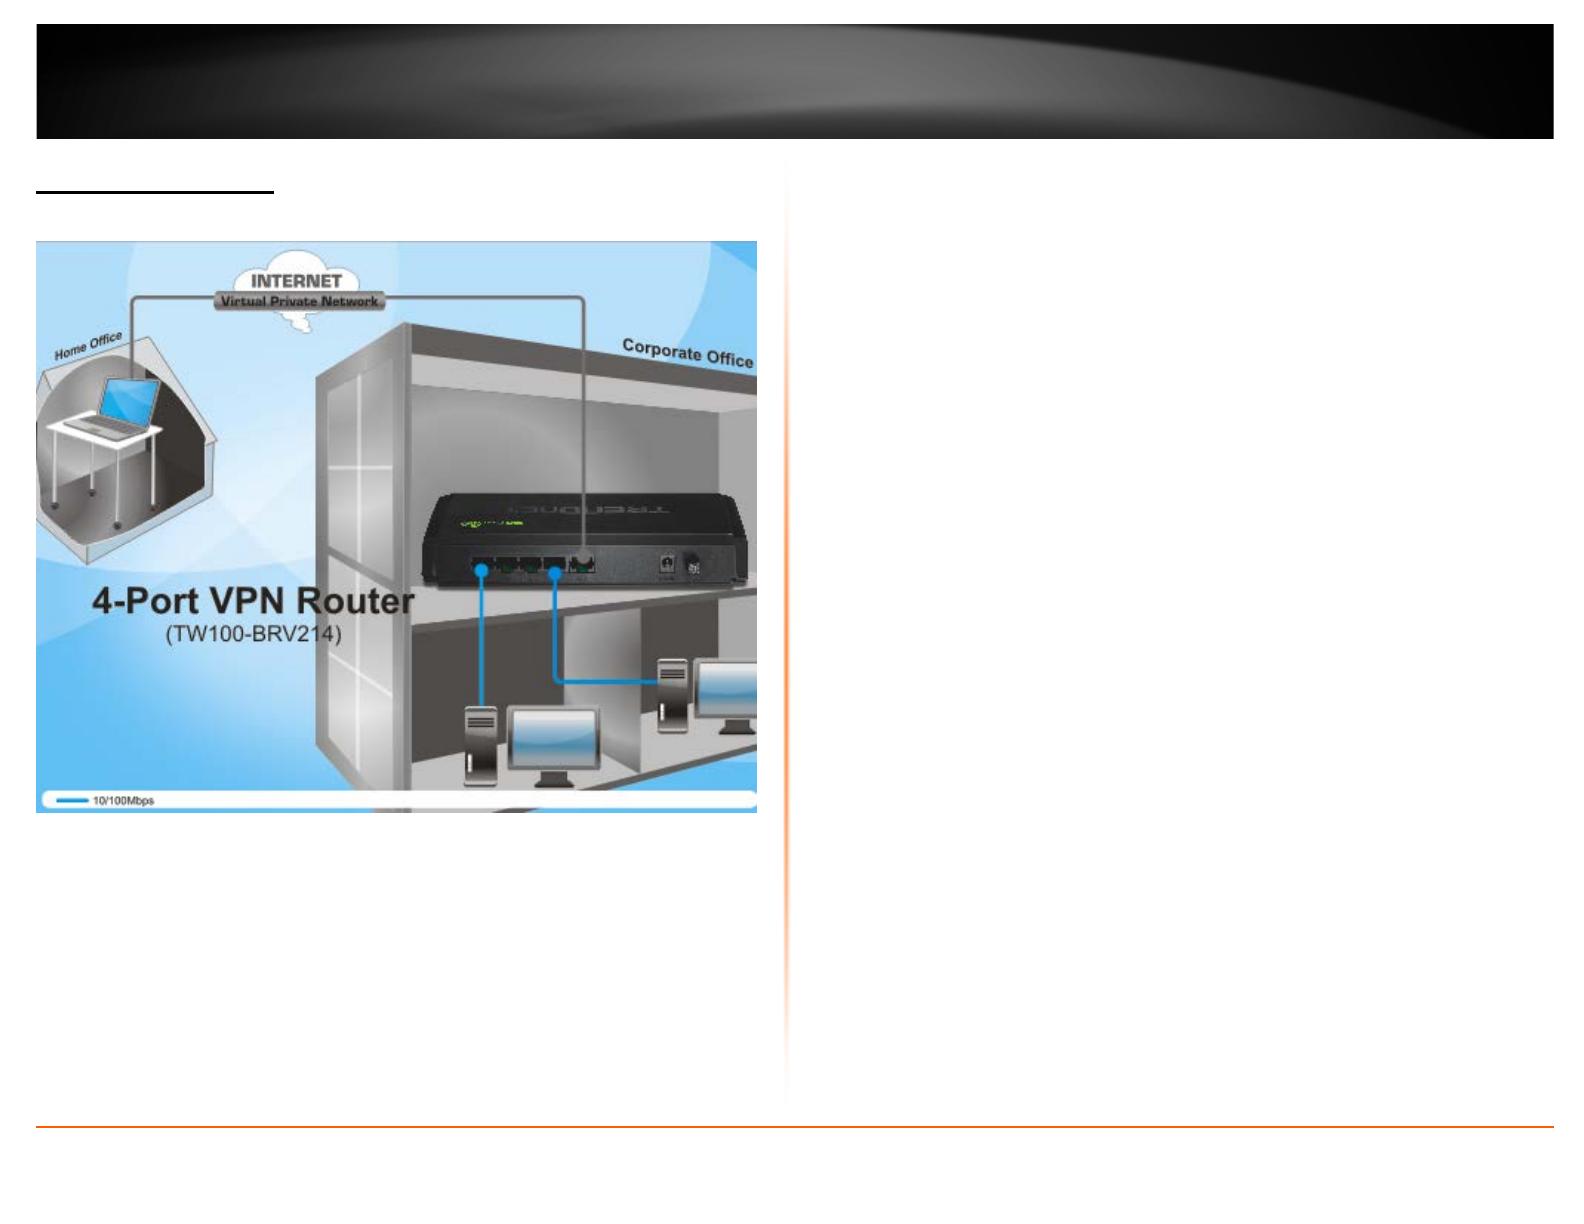
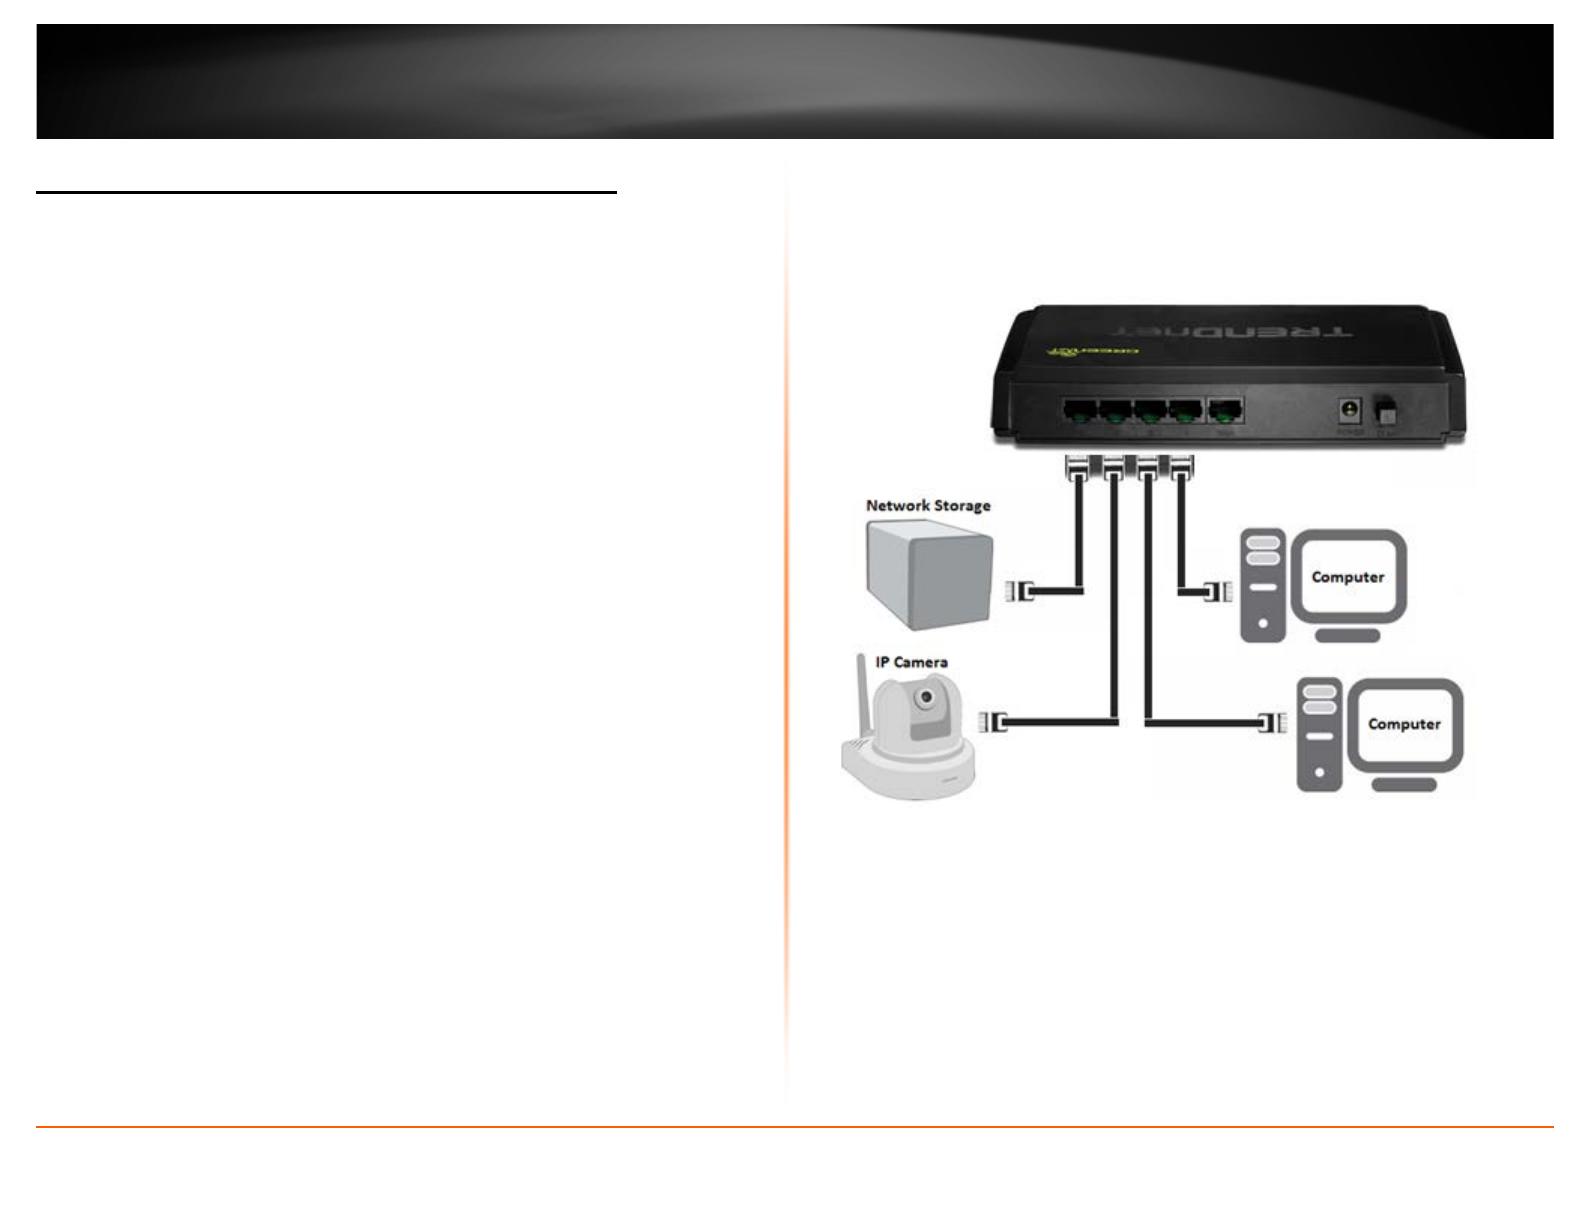
Application Diagram
The router is installed in a main office location which is connected to the Internet.
Desktop computers are connected to the four LAN ports of the router using Ethernet
cables (also called network cables) allowing these computers to access the Internet. The
router is also configured as a Virtual Private Network (VPN) server to allow secure
remote access (over the Internet) to work related files and media located at the main
office to an employee working from an outside home office location.

© Copyright 2012 TRENDnet. All Rights Reserved.
TRENDnet User’s Guide
TW100-BRV214
5
Basic Router Setup
Creating a Home Network
What is a network?
A network is a group of computers or devices that can communicate with each other. A
home network of more than one computer or device also typically includes Internet
access, which requires a router.
A typical home network may include multiple computers, a media player/server, a
printer, a modem, and a router. A large home network may also have a switch,
additional routers, access points, and many Internet-capable media devices such as TVs,
game consoles, and web cameras.
• Modem – Connects a computer or router to the Internet or ISP (Internet
Service Provider).
• Router – Connects your wired network devices to each other and to the
modem.
• Switch – Allows you to connect several wired network devices to your home
network. Your router has a built-in network switch (the LAN port 1-4). If you
have more wired network devices than available Ethernet ports on your router,
you will need an additional switch to add more wired connections.
How to set up a home network
1. For a network that includes Internet access, you’ll need:
• Computers/devices with an Ethernet port (also called network port)
• A modem and Internet service to your home, provided by your ISP (modem
typically supplied by your ISP)
• A router to connect your computers and devices and also connects to the
modem.
2. Make sure that your modem is working. Your ISP can help you set up your modem
and verify that it’s working correctly.
3. Set up your router. See “How to setup your router” below.
4. To connect additional wired computers or wired network devices to your network,
see “Connect additional wired devices to your network” on page 11.
How to setup your router
The easiest way and fastest way to follow the included Quick Installation Guide or
continue to the next section “Router Installation” on page 6, and complete the
remaining sections of “Router Installation”.
Where to find more help
In addition to this User’s Guide, you can find help below:
• http://www.trendnet.com/support
(documentation, downloads, FAQs, how to contact technical support)
• Internet service to your home, provided by an ISP (Internet Service Provider)
• Autorun CD (Quick Installation Guide)

© Copyright 2012 TRENDnet. All Rights Reserved.
TRENDnet User’s Guide
TW100-BRV214
6
Router Installation
Before you Install
It is recommended, that you verify your Internet connection type with your ISP (Internet
Service Provider) and ensure you have all the information for one of the following
connection types below before proceeding with the router installation.
1. Obtain IP Address Automatically (DHCP)
Host Name (Optional)
Clone Mac Address (Optional)
2. Fixed IP address
WAN IP Address: _____. _____._____._____
(e.g. 215.24.24.129)
WAN Subnet Mask: _____. _____._____._____
WAN Gateway IP Address: _____. _____._____._____
DNS Server Address 1: _____. _____._____._____
DNS Server Address 2: _____. _____._____._____
3. PPPoE to obtain IP automatically
User Name: _________
Password: ________________
4. PPPoE with a fixed IP address
User Name: _________
Password: ________________
IP Address: ____. _____._____._____ (e.g. 215.24.24.129)
5. PPTP
Type (Dynamic IP or Static IP )
My IP Address: _____. _____._____._____
(e.g. 215.24.24.129)
Subnet Mask:_____. _____._____._____
Gateway:_____. _____._____._____
Server IP: _____. _____._____._____
PPTP Account: ________________
PPTP Password: ________________
6. L2TP
Type (Dynamic IP or Static IP)
My IP Address: _____. _____._____._____
(e.g. 215.24.24.129)
Subnet Mask:_____. _____._____._____
Gateway:_____. _____._____._____
Server IP: _____. _____._____._____
L2TP Account: ________________
L2TP Password: ________________
© Copyright 2012 TRENDnet. All Rights Reserved.
TRENDnet User’s Guide
TW100-BRV214
7
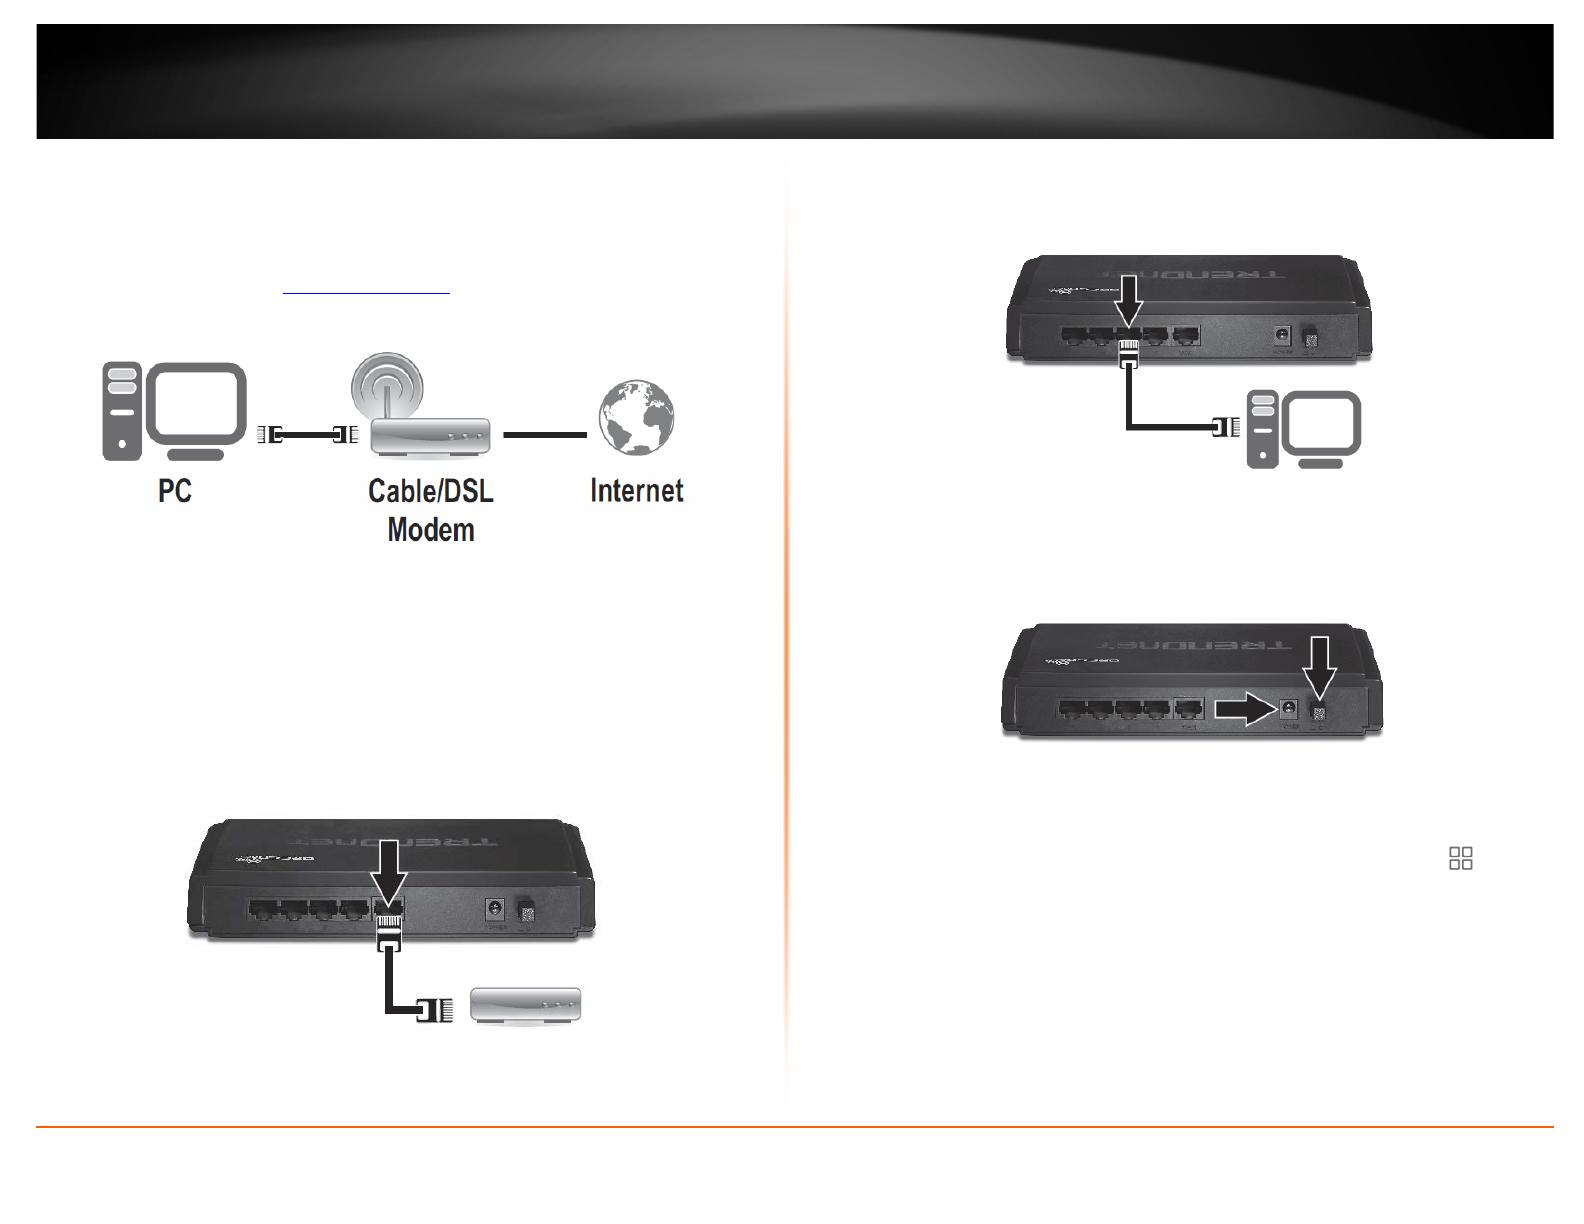
Hardware Installation
1. Verify that you have an Internet connection when connecting your computer directly
to the modem. Open your browser (e.g. Internet Explorer, Firefox, Chrome, Safari, or
Opera) and type in a URL (e.g. http://trendnet.com
) in the address bar.
2. Turn off your modem.
3. Disconnect the Ethernet cable (also called network cable) from your modem and your
computer.
4. Connect one end of a network cable to your router WAN port. Connect the other end
of the network cable to your Cable modem network port.
5. Connect one end of a network cable to one of your router LAN ports (1-4). Connect
the other end of the network cable to the computer Ethernet port (also called network
port).
6. Connect the included power adapter to your router Power Port and then to an
available power outlet. Push the On/Off Power Switch on your router to the “On”
(inner) position.
7. Turn on your modem.
8. Verify that the following front panel LED indicators on your router (Status
and
WAN is solid green, and the LAN port for which your computer is connected is solid
green.
© Copyright 2012 TRENDnet. All Rights Reserved.
TRENDnet User’s Guide
TW100-BRV214
8
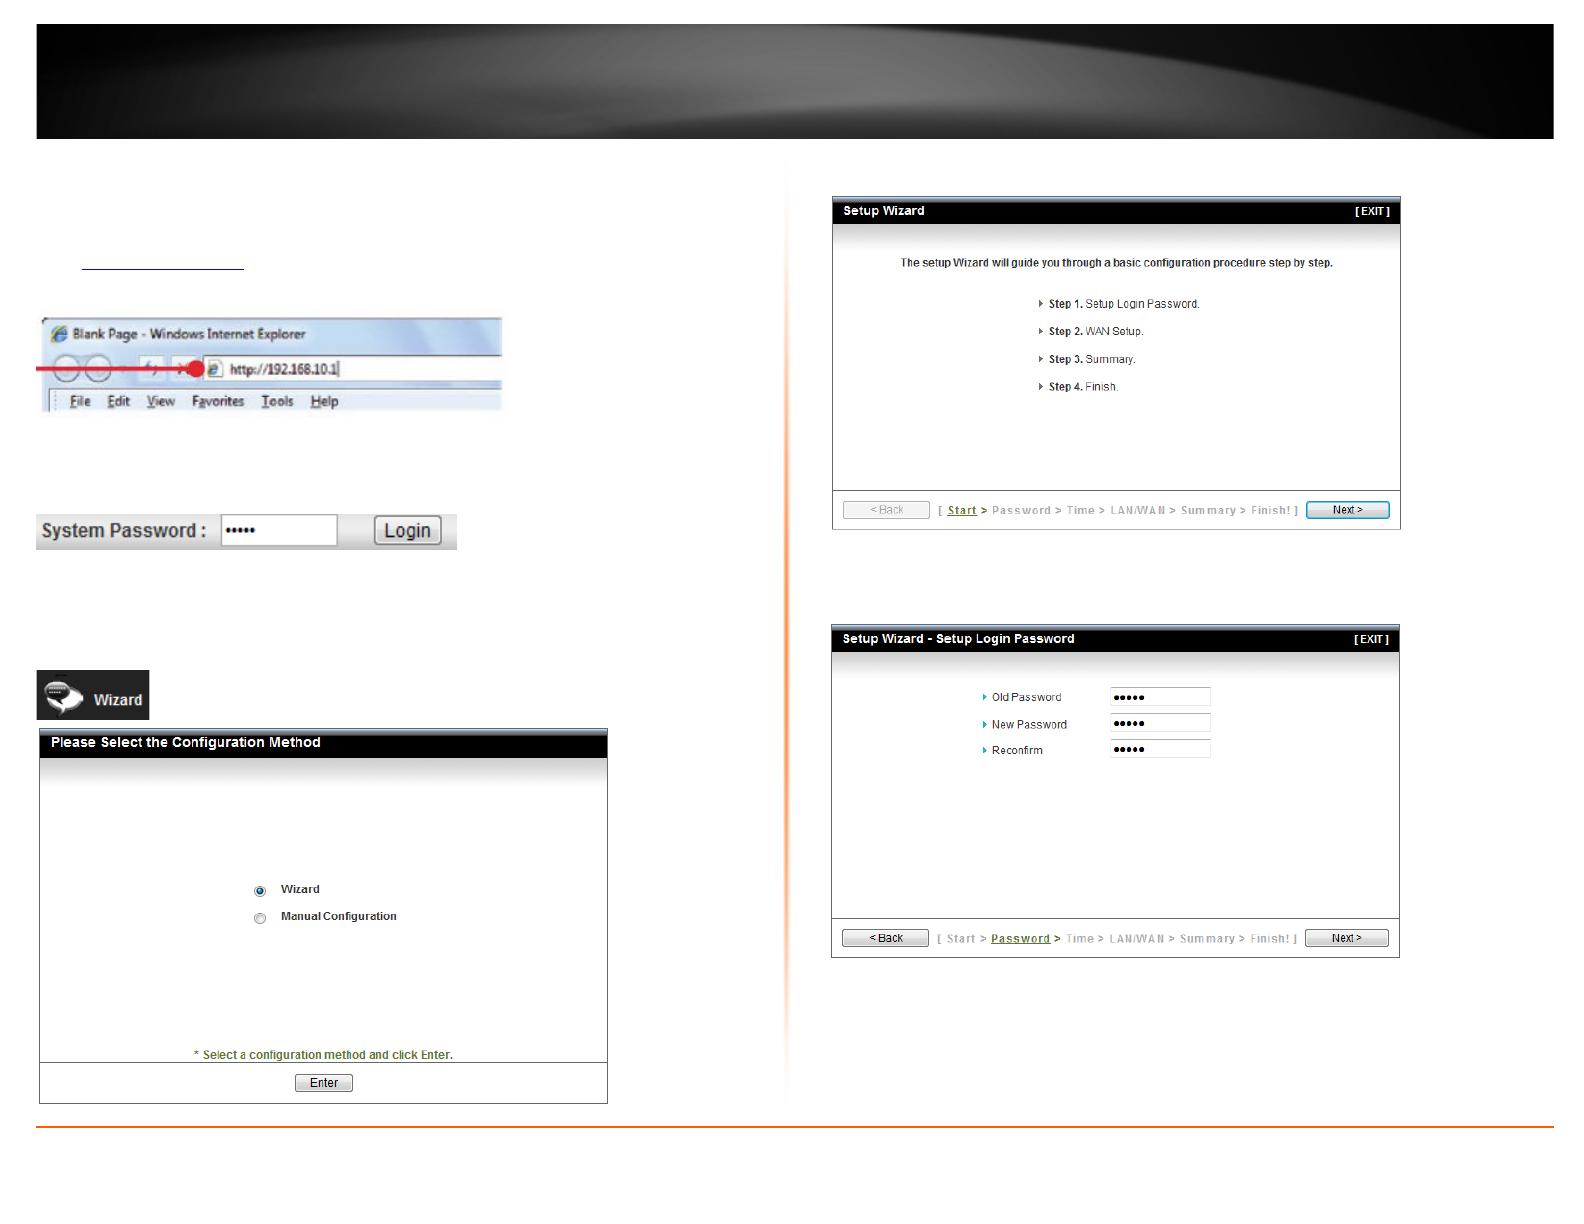
Setup Wizard
1. Open your web browser (e.g. Internet Explorer, Firefox, Safari, Chrome, or Opera) and
go to http://192.168.10.1
. Your router will prompt you for a password.
2. Enter the System Password and click Login.
Default System Password: admin
3. Make sure the Wizard option is selected and then click Enter.
Note: If the Setup Wizard does not automatically appear, click Wizard at the top of the
page.
4. Click Next.
5. Enter the Old Password (Default: admin), enter a New Password and enter the
password again next to Reconfirm to verify the New Password.
Note:
1. Setting a password prevents other users from accessing the router management page.
2. It is recommended that you enter a new password. If you decide to change the default
password, please write down the new password.
3. Password is limited up to 9 characters.
© Copyright 2012 TRENDnet. All Rights Reserved.
TRENDnet User’s Guide
TW100-BRV214
9
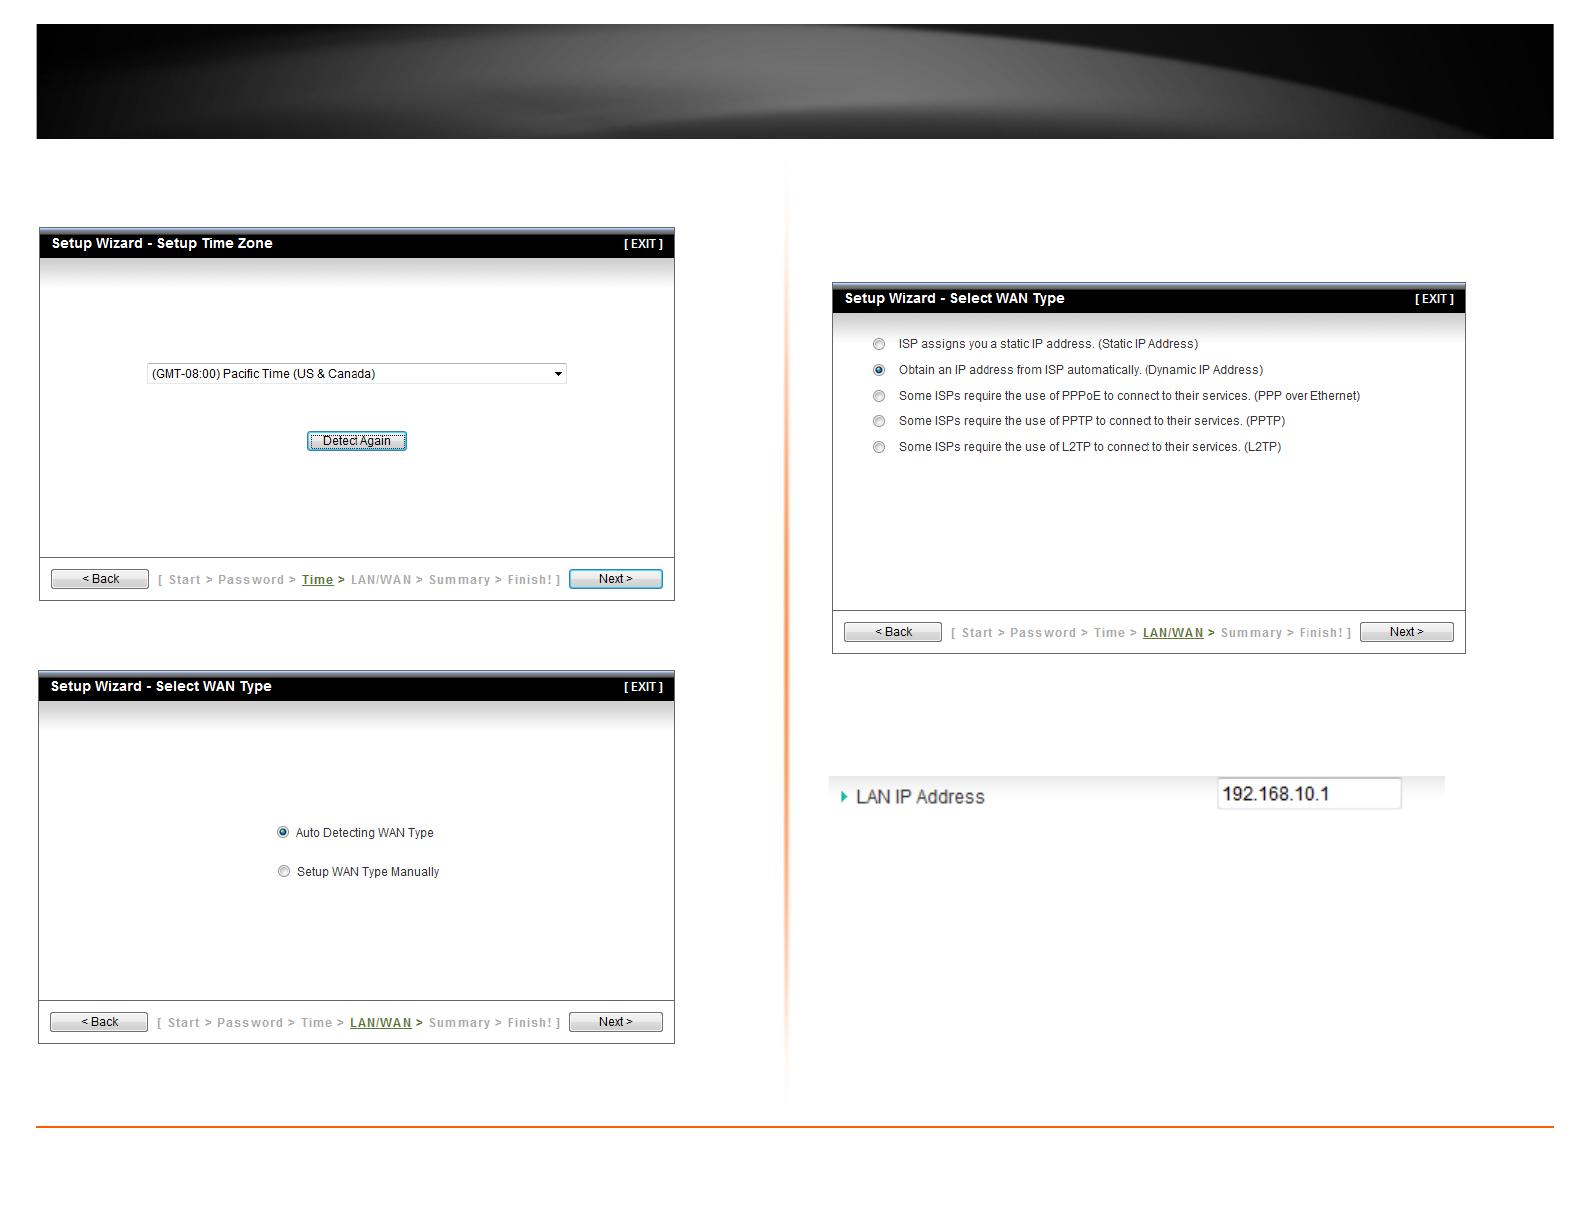
6. Click the drop-down list and select your Time Zone. Click Next.
7. Select Auto Detecting WAN Type and the click Next.
8. Configure the settings based on information provided by your Internet Service
Provider (ISP). Follow the wizard instructions to complete your configuration.
Note: Each Internet connection type may have different options.
Note: When configuring your Internet connection settings. It is optional to change your
LAN IP network settings. It is recommended to leave this setting at default.

© Copyright 2012 TRENDnet. All Rights Reserved.
TRENDnet User’s Guide
TW100-BRV214
10
11. Click Apply Settings.
Note: You can check the network testing option to run an Internet connection test before
applying the settings.
12. Please wait until the router applies the changes and reboots.
Note: If you checked the option to run network testing (Internet connection test), you
will see the status message below.
13. Click Finish.
Note: If you checked the option to run network testing (Internet connection test) and the
test is success, you will receive the message below along with your Internet connection
settings.
© Copyright 2012 TRENDnet. All Rights Reserved.
TRENDnet User’s Guide
TW100-BRV214
11
Connect additional wired devices to your network
You can connect an additional computer or device to your network by connecting one
end of an Ethernet cable (also called network cable) from your computer or device
Ethernet port (also called network port) to one of the available LAN ports labeled 1,2,3,4
on your router. Check the status of the LED indicators (1, 2, 3, or 4) on the front panel of
your router to ensure the physical cable connection from your computer or device.
Note: If you encounter issues connecting to your network, there may be a problem with
your computer or device network settings. Please ensure that your computer or device
network settings (also called TCP/IP settings) are configured to obtain IP address settings
automatically (also called dynamic IP address or DHCP) and to Obtain DNS Server
address settings automatically.

© Copyright 2012 TRENDnet. All Rights Reserved.
TRENDnet User’s Guide
TW100-BRV214
12
Virtual Private Networking (VPN)
Creating a Virtual Private Network
What is a VPN?
A VPN provides secure communications typically over the Internet by creating a secure
tunnel between two or more VPN routers (gateways) also known as a site-to-site VPN or
between a single client computer and a VPN router (gateway) also known as a client-
server VPN.
On your VPN router, the following types of tunnels can be created:
• Site-to-Site VPN – Connects two or more VPN routers (gateways) allowing the
LAN network from each router to securely communicate to each other over the
Internet.
• Client-Server VPN – A single client computer or device with VPN client software
installed connects to a VPN router (gateway) allow the single client computer
or device to securely communicate to the LAN network of the VPN router over
the Internet.
Tunneling methods supported by your router:
• IPsec (Internet Protocol Security) VPN – This type of VPN can be used for
either Site-to-Site VPN or Client-Server VPN however, the most common
application for this type is a Site-to-Site VPN. This type of VPN can provide
highest degree of security. For a Client-Server VPN, typically, a third party VPN
client software is required to be installed and configured and can be difficult
when installing and configuring on VPN client computers. This VPN type can
provide the highest degree of security.
• PPTP (Point-to-Point Tunneling Protocol) VPN – This type of VPN can be used
for Client-Server VPN only however both server mode and client mode are
supported on your router. Most computer operating systems already include a
pre-installed PPTP VPN client software that can be easily configured which
eliminates the need for an additional third party VPN client software to be
purchased and installed. Since it provides less security overall than IPsec VPN, it
is not recommended for a Site-to-Site VPN.
• L2TP (Layer 2 Tunneling Protocol) VPN – This type of VPN is very similar to
PPTP VPN as it is most commonly used for a Client-Server VPN, pre-installed on
most computer operating systems and easy to configure, and provides less
overall security than IPsec VPN. Most of the current operating systems with
L2TP VPN client software pre-installed use L2TP VPN in conjunction with IPsec
VPN to improve the overall security provided. This router does not support the
L2TP over IPsec VPN method.
• GRE (Generic Routing Encapsulation) Tunneling – This is strictly a tunneling
protocol as it does not provide any security mechanisms and it can only be
used for Site-to-Site tunneling to another router with GRE tunneling support
but in most current implementations can be used in conjunction with IPsec or
PPTP/L2TP to add security mechanisms. Because of the nature of how GRE
works, the benefits include allow multicast traffic and allowing dynamic routing
protocols to pass through the tunnel compared to IPsec VPN. This router does
not support GRE over IPsec VPN or GRE over PPTP/L2TPVPN methods.
Important Note: For any tunneling or VPN method used, to avoid IP address conflict and
to ensure connectivity, it is required that each end (LAN IP network or single client) of the
VPN tunnel is configured with a different IP network or subnet.

© Copyright 2012 TRENDnet. All Rights Reserved.
TRENDnet User’s Guide
TW100-BRV214
13
IPsec (Internet Protocol Security)
Site-to-Site VPN
Configuration > Security Setting >VPN-IPsec
To configure an IPsec Site-to-Site VPN tunnel between two VPN routers:
• Ensure that your router is connected to the Internet and computers and
devices are able to access the Internet through your router and make note of
the WAN (Internet) IP assigned to both routers under the Status page. See page
57 for checking the status page.
Example:
VPN Router A WAN (Internet) IP Address: 10.10.10.10
VPN Router B WAN (Internet) IP Address: 10.10.10.20
• Make sure the LAN IP network on each VPN router is different.
Note: Changing the LAN IP address of your router will change the LAN IP
network of your router. See page 37 for changing the LAN IP address.
Example:
VPN Router A LAN IP Settings: 192.168.10.1 / 255.255.255.0
VPN Router B LAN IP Settings: 192.168.100.1 / 255.255.255.0
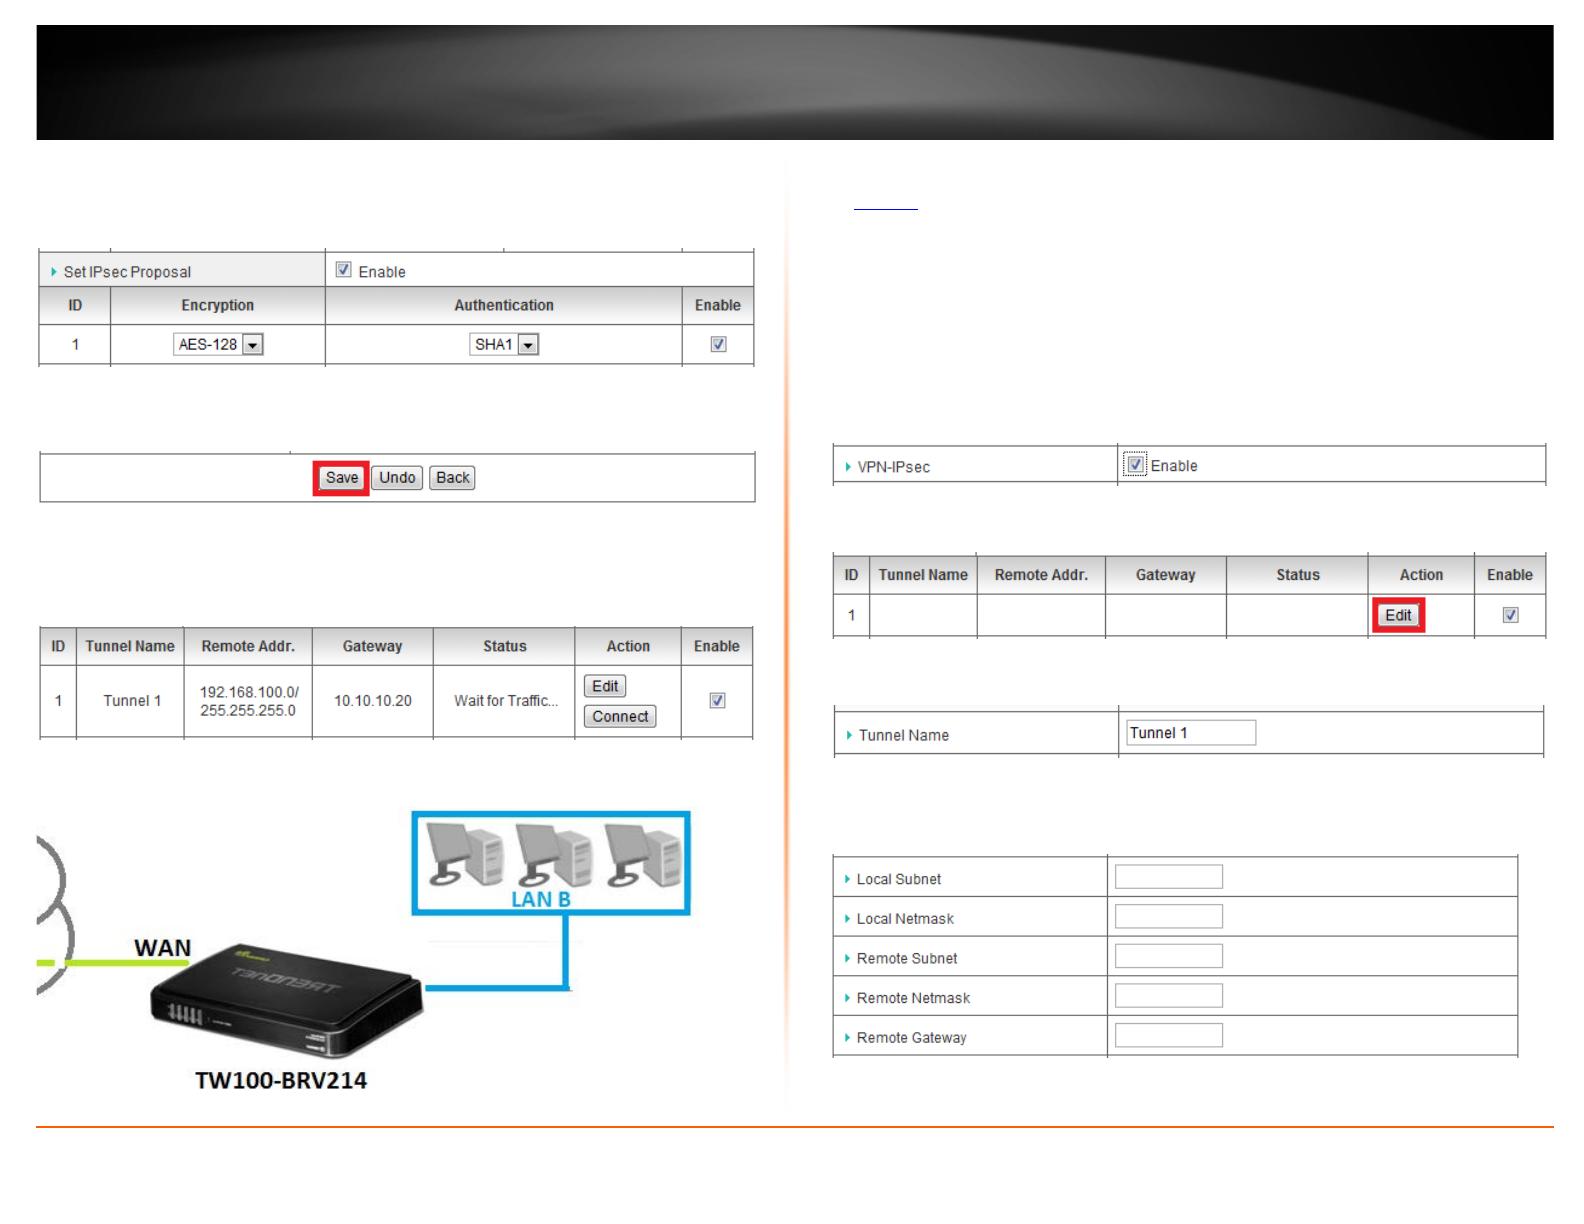
VPN Router A Configuration
1. Log into your router management page (see “Access your router management page”
on page 34
).
2. Click on Configuration at the top of the page, click on Security Setting, and click on
VPN-IPsec.
3. Next to VPN-IPsec, check the Enable option to enable IPsec.
Note: If Enable is not checked, then this will disable all IPsec functionality on your router.
4. For ID 1, check the Enable option and then click Edit.
5. Next to Tunnel Name, enter the tunnel name in the field. (e.g. Tunnel 1)

© Copyright 2012 TRENDnet. All Rights Reserved.
TRENDnet User’s Guide
TW100-BRV214
14
6. Enter the network settings for the IPsec Site-to-Site VPN tunnel.
Note: Generally speaking if the LAN IP address setting of the router is 192.168.X.1 /
255.255.255.0, then the IP network will be identified as 192.168.X.0, X being any number
from 0-254.
• Local Subnet – The local LAN IP subnet or network of your local VPN router.
(e.g. 192.168.10.0)
• Local Netmask – The local LAN subnet mask of your local VPN router.
(e.g. 255.255.255.0)
• Remote Subnet – The remote LAN IP subnet or network of your remote VPN
router.
(e.g. 192.168.100.0)
• Remote Netmask – The remote LAN subnet mask of your remote VPN router.
(e.g. 255.255.255.0)
• Remote Gateway – The remote WAN (Internet) IP address of your remote VPN
router. (e.g. 10.10.10.20) Note: If the remote router is using dynamic DNS, you
can enter domain for the remote gateway instead of the WAN IP address.
Based on the example, the network settings will be the following:
7. Next to Preshare Key, enter the preshared key for your IPsec tunnel.
Note: The value 1234567890 is shown as an example. It is strongly recommended to
enter your own preshared key for the IPsec VPN tunnel. Write down the preshared key
you enter as it will also need to be entered when configuring VPN Router B.
Note: The preshared key can consist of alphanumeric characters (a,b,C,?,*, /,1,2, etc.)
8. Click the PFS Group drop-down list, and select Same as Phase 1.
9. Next to Dead Peer Detection (DPD), check the Enable option.
10. Next to IKE Proposal, check the Enable option. Next to ID 1, click the Encryption
drop-down list and select AES-128 and click the DH Group drop-down list and select
Group 2. Check the Enable option.
Note: The IKE proposal settings must match the setting configured in VPN Router A.
© Copyright 2012 TRENDnet. All Rights Reserved.
TRENDnet User’s Guide
TW100-BRV214
15
11. Next to IPsec Proposal, check the Enable option. Next to ID 1, click the Encryption
drop-down list and select AES-128. Check the Enable option.
Note: The IPsec proposal settings must match the setting configured in VPN Router A.
12. Click Save at the bottom of the page to save the changes.
Note: If you would like to discard the changes, click Undo before you click Save.
To view the status of the IPsec Site-to-Site VPN tunnel, click Back at the bottom of the
page to go back to the main IPsec VPN configuration page.
VPN Router A Tunnel Status
VPN Router B Configuration
1. Log into your router management page (see “Access your router management page”
on page 34
).
Note: If you changed router LAN IP address, you will need to log into the remote router
using the new IP address instead of the default 192.168.10.1.
2. Click on Configuration at the top of the page, click on Security Setting, and click on
VPN-IPsec.
3. Next to VPN-IPsec, check the Enable option to enable IPsec.
Note: If Enable is not checked, then this will disable all IPsec functionality on your router.
4. For ID 1, check the Enable option and then click Edit.
5. Next to Tunnel Name, enter the tunnel name in the field. (e.g. Tunnel 1)
6. Enter the network settings for the IPsec Site-to-Site VPN tunnel.

© Copyright 2012 TRENDnet. All Rights Reserved.
TRENDnet User’s Guide
TW100-BRV214
16
Note: Generally speaking if the LAN IP address setting of the router is 192.168.X.1 /
255.255.255.0, then the IP network will be identified as 192.168.X.0, X being any number
from 0-254.
• Local Subnet – The local LAN IP subnet or network of your local VPN router.
(e.g. 192.168.100.0)
• Local Netmask – The local LAN subnet mask of your local VPN router.
(e.g. 255.255.255.0)
• Remote Subnet – The remote LAN IP subnet or network of your remote VPN
router.
(e.g. 192.168.10.0)
• Remote Netmask – The remote LAN subnet mask of your remote VPN router.
(e.g. 255.255.255.0)
• Remote Gateway – The remote WAN (Internet) IP address of your remote VPN
router. (e.g. 10.10.10.10) Note: If the remote router is using dynamic DNS, you
can enter domain for the remote gateway instead of the WAN IP address.
Based on the example, the network settings will be the following:
7. Next to Preshare Key, enter the preshared key for your IPsec tunnel.
Note: The preshared key entered must be the same as the preshared key configured in
VPN Router A.
Note: The preshared key can consist of alphanumeric characters (a,b,C,?,*, /,1,2, etc.)
8. Click the PFS Group drop-down list, and select Same as Phase 1.
9. Next to Dead Peer Detection (DPD), check the Enable option.
10. Next to IKE Proposal, check the Enable option. Next to ID 1, click the Encryption
drop-down list and select AES-128 and click the DH Group drop-down list and select
Group 2. Check the Enable option.
Note: The IKE proposal settings must match the setting configured in VPN Router A.
11. Next to IPsec Proposal, check the Enable option. Next to ID 1, click the Encryption
drop-down list and select AES-128. Check the Enable option.
Note: The IPsec proposal settings must match the setting configured in VPN Router A.
12. Click Save at the bottom of the page to save the changes.
Note: If you would like to discard the changes, click Undo before you click Save.
© Copyright 2012 TRENDnet. All Rights Reserved.
TRENDnet User’s Guide
TW100-BRV214
17
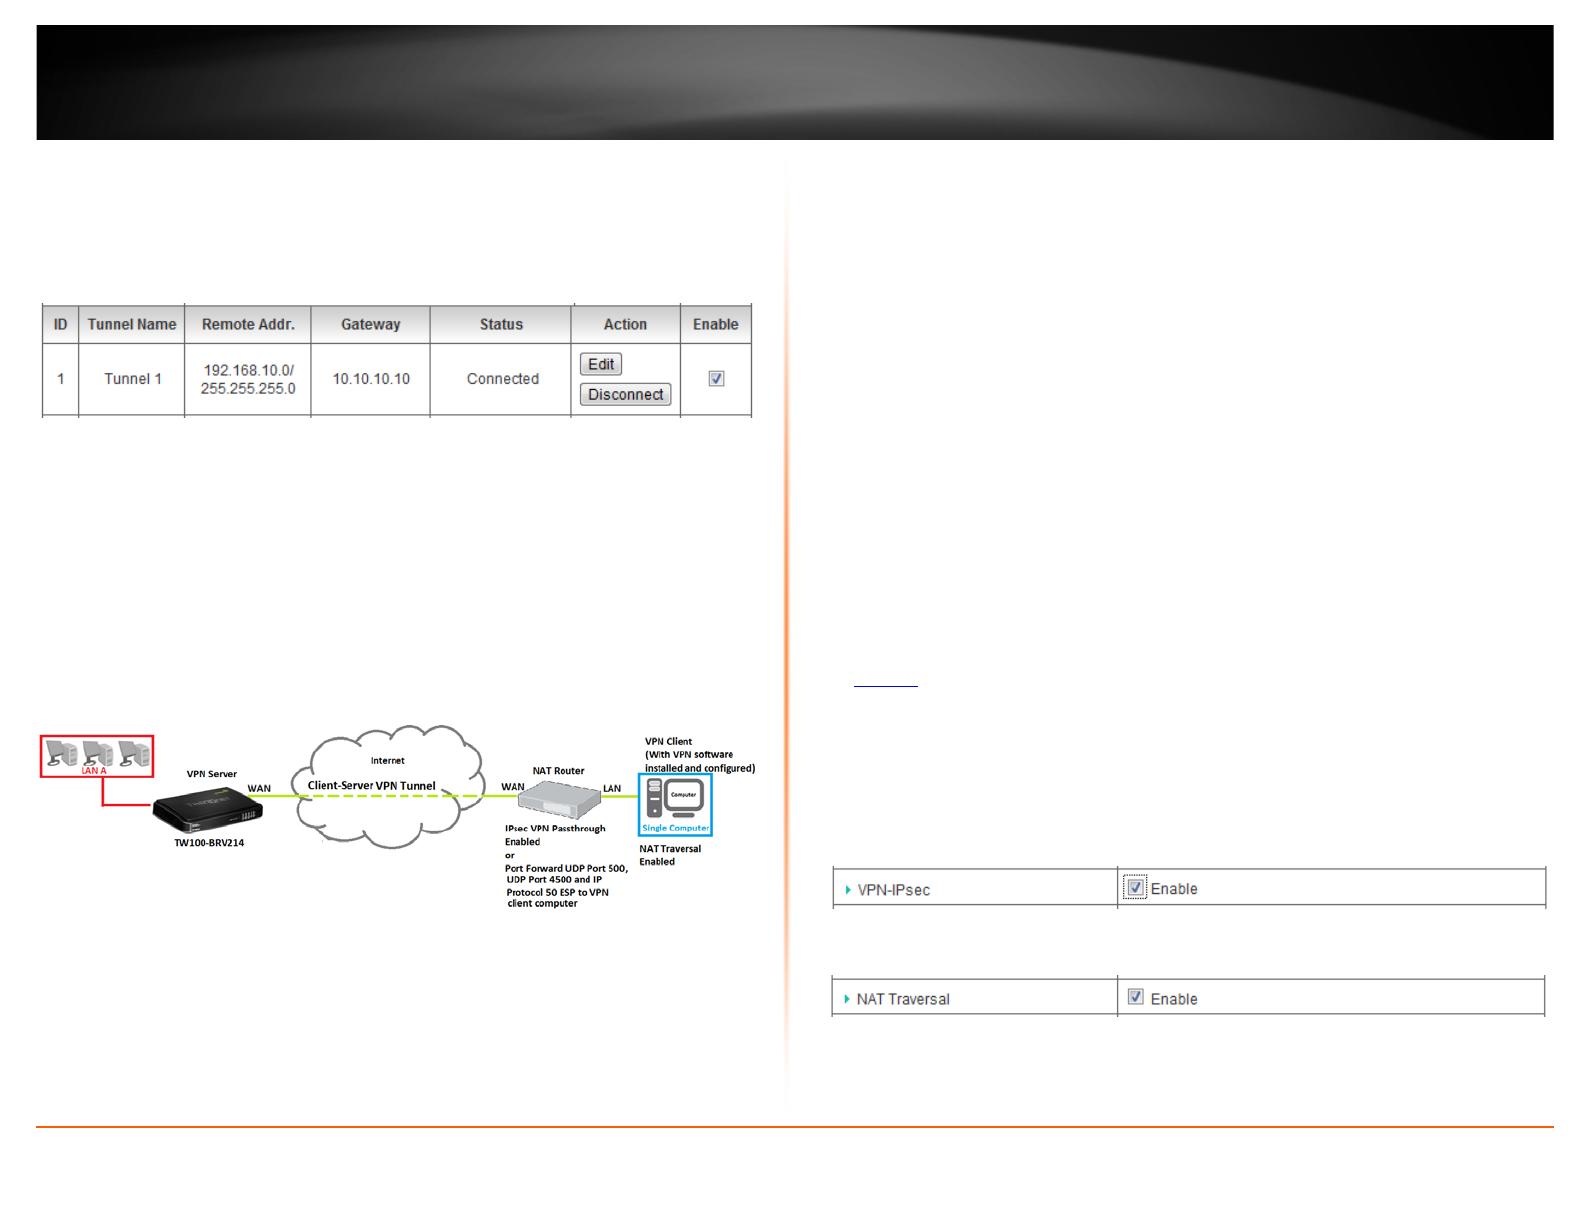
To view the status of the IPsec Site-to-Site VPN tunnel, click Back at the bottom of the
page to go back to the main IPsec VPN configuration page. Under Action, click Connect
to establish the VPN tunnel.
VPN Router B Tunnel Status
For details on configuring additional IPsec VPN options, see the Appendix.
Client-Server VPN (Server Mode)
Configuration > Security Setting >VPN-IPsec
To configure your router to allow IPsec VPN connections from remote VPN client
computers or devices:
• Typically, the single client computer is connecting to the Internet through a
router with NAT enabled. To establish an IPsec VPN tunnel when one of the
VPN endpoints is behind a router with NAT enabled, enable NAT-T (NAT
Traversal) to establish VPN connections through devices with NAT enabled. If
the router with NAT enabled does not support IPsec VPN pass through, ports
(UDP 500, UDP 4500, IP Protocol 50: ESP) may need to be forwarded to your
VPN client computer.
• If the single client computer is connecting to the Internet through a router with
NAT enabled, make sure the LAN IP network of the router NAT enabled is
different from the LAN IP network of your VPN router.
Note: Changing the LAN IP address of your router will change the LAN IP
network of your router. See page 37 for changing the LAN IP address.
Example:
VPN Router A LAN IP Settings: 192.168.10.1 / 255.255.255.0
Router with NAT enabled LAN IP Settings: 192.168.100.1 / 255.255.255.0
• Ensure that your router is connected to the Internet and computers and
devices are able to access the Internet through your router and make note of
the WAN (Internet) IP assigned to your routers under the Status page. See page
57 for checking the status page.
Example:
VPN Router A WAN (Internet) IP Address: 10.10.10.10
1. Log into your router management page (see “Access your router management page”
on page 34
).
2. Click on Configuration at the top of the page, click on Security Setting, and click on
VPN-IPsec.
3. Next to VPN-IPsec, check the Enable option to enable IPsec.
Note: If Enable is not checked, then this will disable all IPsec functionality on your router.
4. Next to NAT Traversal, check the Enable option.
/