Celestron HomeCast Lite Weather Station User manual
- Category
- Weather stations
- Type
- User manual

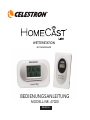
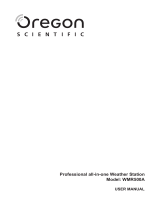
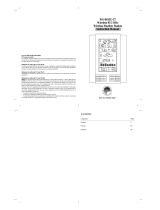
USERS MANUAL
MODEL #47020
ENGLISH
WEATHER STATION
WITH REMOTE SENSOR

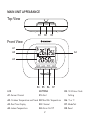
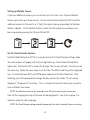
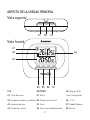
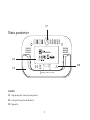
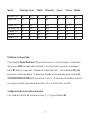
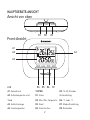
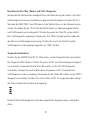
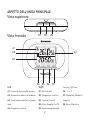
Front View
Top View
A1
B4 B5 B6 B7
A4
B1 B3B2
A2
A3
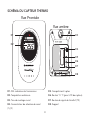
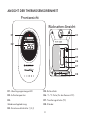
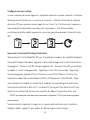
MAIN UNIT APPEARANCE
LCD
A1- Sensor Channel
A2- Outdoor Temperature and Trend
A3- Real Time Display
A4- Indoor Temperature
BUTTONS
B1- Alert
B2- Max/Min Temperature
B3- Channel
B4- Alarm On/Off
B5- 12/24 Hour Clock
Setting
B6- °C or °F
B7- Mode/Set
B8- Reset
2
ALERTM IN/MAX CHANNEL

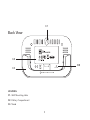
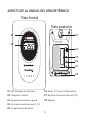
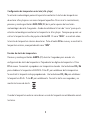
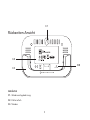
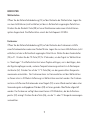
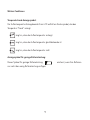
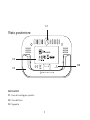
Back View
C2
B8
C3
C1
HOUSING
C1- Wall Mounting Hole
C2- Battery Compartment
C3- Stand
3

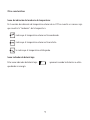
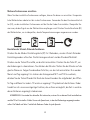
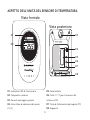
THERMO SENSOR UNIT APPEARANCE
Front View
Back View
D1- Transmission Indication LED
D2- Outdoor Temperature
D3- Wall Mount Hole
D4- Channel Selecting Switch (1,2,3)
D5- Battery Compartment
D6- °C/ °F Button (for sensor LCD)
D7- Transfer Signal Button (TX)
D8- Stand
D1
D3
D4
D5
D6
D7
D8
D2
4
TX

SET UP
Weather Station
Open the battery compartment door (C2) on the rear of the Weather Station. Then insert
two AA batteries (user supplied) with polarity as indicated in the battery compartment.
Press the reset button (B8), using a paperclip or a similar small pointed device. The
Weather Station will begin to scan the 433MHz radio frequency.
Remote Sensor
Open the battery compartment door (D5) on the rear of the Remote Sensor using a screw
driver or a thin coin. Insert two AAA batteries (user supplied) with polarity as indicated
in the battery compartment. Set the Channel Switch (D4) to 1. Press the TX button (D7)
and hold for 2 sec. to “transmit” signal to Weather Station. The Weather Station will
beep, confirming the signal has been received and a temperature readout will appear in
the outdoor temperature window (A2). Press the °C/°F button (B6) to set your desired
temperature reading mode. The Sensor can be mounted up to 100 feet (30 meters) in an
open area from the Weather Station to communicate with it. The Sensor can be mounted
to a wall with a screw or nail (D3) or set on a flat level surface using the fold-out stand (D8).
The Sensor has a small LCD screen that displays the outdoor temperature (D2). To select
the °C or °F temperature reading press button (D6).
5

Setting up Multiple Sensors
If you have additional sensors you can set them up at this time. Your Personal Weather
Station works with up to three sensors. Use the Channel Selecting Switch (D4) to set the
additional sensors to Channels 2 or 3. Verify the signal is being acquired by the Weather
Station as before. On the Weather Station, check that the temperature readings have
been acquired by pressing the Channel Button (B3).
Set the Clock/Calendar Features
Hold the Mode/Set button (B7) for 3 seconds to enter the Clock/Calendar settings mode.
The clock readout will appear with the hour digit blinking. Press buttons B5 and B6 to
adjust time. Press button B7 to accept the change. The minutes will blink. Set the minutes
the same way. Follow the same steps to set the Year. The Month and Day will be displayed
now. To switch between M/D and D/M display mode press the B5 or B6 button. After
selecting, you will be prompted to change the day and month number. TZ will now be
displayed. TZ represents Time Zone. This is a unique feature which allows you to see the
time in different time zones.
NOTE: You will have to return to this spot and set the TZ to 0 to return to your current time.
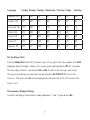
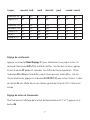
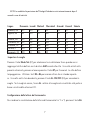
Next set the language the day of the week will be displayed in. See chart on page 7 to
reference codes for each language.
NOTE: The Clock/Calendar setting mode will automatically exit after 5 seconds if there is no activity.
6

Set the Alarm Clock
Press the Mode/Set button (B7) to select view until you get to the time readout with ALM
displayed about the digits. When in this screen, press and hold button B7 for 3 seconds.
The hour digit will blink. Use buttons B5 and B6 to scroll to the time you want to set.
Once you have chosen your desired time, press button AL ON/OFF (B4) to turn the
alarm on. The alarm icon AL will be displayed on the lower left of the LCD screen if the
alarm is “on”.
Thermometer Readout Setting
To switch the display thermometer reading between °C and °F, press button B6.
German, GE SO MO DI MI DO FR SA
English, EN SU MO TU WE TH FR SA
Denmark, DA SO MA TI ON TO FR LO
Dutch, NE ZO MA DI WO DO VR ZA
French, FR DI LU MA ME JE VE SA
Italian, IT DO LU MA ME GI VE SA
Spanish, ES DO LU MA MI JU VI SA
Language Sunday Monday Tuesday Wednesday Thursday Friday Saturday
7

Max/Min (High and Low) Temperature Setting
Your Personal Weather Station allows you to monitor the high and low outdoor
temperature reading within a desired time frame. To start monitoring, press and hold the
MAX/MIN button (B2) on the top of the Weather Station for 3 seconds. You have just
reset the “start” time for the Weather Station to monitor the high and low temperatures.
Anytime you want to see what the high or low temperature is press button B2. The
“MAX” icon will be displayed atop the outside maximum temperature readout. Press
button B2 again and the minimum temperature will be displayed, accompanied by the
“MIN” icon.
Temperature Alert Function
Press and hold the ALERT (B1) button for 3 seconds to enter the temperature alert
setting. The temperature digits will blink. Press B1 again. A high temperature will now
begin to blink. Use buttons B5 and B6 to set the HIGH temperature. Press B1 to set that
temperature. A blinking low temperature will be displayed. Use button B5 and B6 to set
the LOW temperature. Press B1 to set. The alert will sound for a few seconds and the
alert icon will be displayed:
When the outside temperature meets one of the set temperatures, the alarm will sound.
8

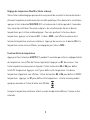
Other Features
Temperature Trend Display Icon:
In the outdoor temperature display section of your LCD, there is a box icon displayed that
shows how the temperature is “trending”.
indicates the outdoor temperature is on the rise.
indicates the outdoor temperature is steady.
tells you the temperature is decreasing.
Low Battery Indicator Icon:
This low battery icon will appear when your batteries are running low on power.
9

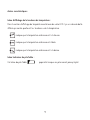
12/24 Hour Clock Reading:
Press the 12/24 (B5) button on the front of the unit to switch between a 12 hour or 24 hour
clock reading.
Notes:
• Always use the manual when rst setting up your Personal Weather Station
• If the unit should malfunction, press the reset button (B8) using a paperclip or a similar
small pointed device
• Avoid placing your Weather Station near interference sources such as metal frames,
computers or TV sets
• The clock will need to be reset if you change the batteries on your Weather Station
• Remember to always set your TZ (time zone) to zero (0)
• When the Weather Station is scanning for outside temperature signals from the Sensor,
all buttons will be disabled
10

Features:
•433MHzRFReceivingFrequency
•MaximumThreeSelectableRFChannelswithWirelessSensor
•TransmissionRange:30Meters(un-obstructed)
•MeasuringRange:
- Indoor Temperature: 0°C ~ +50°C
- Outdoor Temperature: -20°C ~ +50°C
- Outdoor Temperature Alert Function
•Max/MinMemoryforIndoorandOutdoorTemperature
•Low-BatteryIndicatorforOutdoorRemoteSensor
•PerpetualCalendarUptoYear2069
•12/24HourTimeDisplaySelectable
•DayofWeekin7LanguagesSelectable
•TableStandorWallMountSelectable
•Battery:
- Main Unit: DC 1.5 V AA size x 2 pcs
- Thermo Sensor Unit: DC 1.5 V AAA size x 2 pcs
11

www.celestron.com
2835ColumbiaStreet•Torrance,CA90503U.S.A.
Telephone:310.328.9560•Fax:310.212.5835
©2012 Celestron
Allrightsreserved.•PrintedinChina•01-12
FCC Statement
This device complies with Part 15 of FCC Rules. Operation is subject to
the following two conditions:
1. This device may not cause harmful interference, and
2. This device must accept any interference received, including
interference that may cause undesired operation.
Designed and intended for those 13 years of age and older.
NOTE: THE MANUFACTURER IS NOT RESPONSIBLE FOR ANY RADIO OR
TV INTERFERENCE CAUSED BY UNAUTHORIZED MODIFICATIONS TO THIS
EQUIPMENT. SUCH MODIFICATIONS COULD VOID THE USER AUTHORITY
TO OPERATE THE EQUIPMENT.
Page is loading ...
Page is loading ...
Page is loading ...
Page is loading ...
Page is loading ...
Page is loading ...
Page is loading ...
Page is loading ...
Page is loading ...
Page is loading ...
Page is loading ...
Page is loading ...
Page is loading ...
Page is loading ...
Page is loading ...
Page is loading ...
Page is loading ...
Page is loading ...
Page is loading ...
Page is loading ...
Page is loading ...
Page is loading ...
Page is loading ...
Page is loading ...
Page is loading ...
Page is loading ...
Page is loading ...
Page is loading ...
Page is loading ...
Page is loading ...
Page is loading ...
Page is loading ...
Page is loading ...
Page is loading ...
Page is loading ...
Page is loading ...
Page is loading ...
Page is loading ...
Page is loading ...
Page is loading ...
Page is loading ...
Page is loading ...
Page is loading ...
Page is loading ...
Page is loading ...
Page is loading ...
Page is loading ...
Page is loading ...
-
 1
1
-
 2
2
-
 3
3
-
 4
4
-
 5
5
-
 6
6
-
 7
7
-
 8
8
-
 9
9
-
 10
10
-
 11
11
-
 12
12
-
 13
13
-
 14
14
-
 15
15
-
 16
16
-
 17
17
-
 18
18
-
 19
19
-
 20
20
-
 21
21
-
 22
22
-
 23
23
-
 24
24
-
 25
25
-
 26
26
-
 27
27
-
 28
28
-
 29
29
-
 30
30
-
 31
31
-
 32
32
-
 33
33
-
 34
34
-
 35
35
-
 36
36
-
 37
37
-
 38
38
-
 39
39
-
 40
40
-
 41
41
-
 42
42
-
 43
43
-
 44
44
-
 45
45
-
 46
46
-
 47
47
-
 48
48
-
 49
49
-
 50
50
-
 51
51
-
 52
52
-
 53
53
-
 54
54
-
 55
55
-
 56
56
-
 57
57
-
 58
58
-
 59
59
-
 60
60


Celestron HomeCast Lite Weather Station User manual
- Category
- Weather stations
- Type
- User manual
Ask a question and I''ll find the answer in the document
Finding information in a document is now easier with AI
in other languages
Related papers
Other documents
-
 Oregon Scientific WMR500 User manual
-
Technoline Model User manual
-
Terraillon EQUINOXE Owner's manual
-
 La Crosse Technology WS-8035U-IT User manual
-
-
 Oregon Scientific WRB603 / WR602 User manual
-
National Geographic 9070710 Owner's manual
-
Bresser 7060200 Owner's manual
-
Denver TRC-1480MK2 User manual
-


