Page is loading ...

Thank you for choosing Rough Country for all your vehicle needs.
Please read instructions before beginning installation. Check the kit hardware against the kit contents shown below. Be
sure you have all needed parts and know where they go.
If question exist, please call us @1-800-222-7023. We will be happy to answer any questions concerning this product.
Check all fasteners for proper torque. Check to ensure for adequate clearance between all components.
Periodically check all hardware for tightness.
KIT CONTENTS:
Driver LED Headlight x1
Pass LED Headlight x1
In-Line Headlight Adapters x2
DRL Wiring harness x1
Fuse-able Link x1
TOOLS NEEDED:
10mm Socket
Auto Trim Puller / Flat Head Screwdriver
Wire Crimpers
Torque Specs:
Size Grade 5 Grade 8 Size Class 8.8 Class 10.9
5/16” 15 ft/lbs 20ft/lbs 6MM 5ft/lbs 9ft/lbs
3/8” 30 ft/lbs 35ft/lbs 8MM 18ft/lbs 23ft/lbs
7/16” 45 ft/lbs 60ft/lbs 10MM 32ft/lbs 45ft/lbs
1/2” 65 ft/lbs 90ft/lbs 12MM 55ft/lbs 75ft/lbs
9/16” 95 ft/lbs 130ft/lbs 14MM 85ft/lbs 120ft/lbs
5/8” 135ft/lbs 175ft/lbs 16MM 130ft/lbs 165ft/lbs
3/4” 185ft/lbs 280ft/lbs 18MM 170ft/lbs 240ft/lbs
JEEP 2018-UP JL / 2020-UP JT 9” LED Headlight Kit
RCH5100

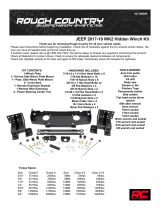
1. Remove the (6) push pins securing the top of the grille using an auto trim puller or flat head screwdriver. See Photo
1. Retain the push pins.
2. Lean the top of the grill out and release the clips at the bottom of the grille with a flat head screwdriver. See Photo 2.
3. Remove the grill and set aside in a safe location.
4. Using a 10mm socket remove the (3) bolts in each of the head lights. See Photo 3. Retain hardware.
5. Remove the headlights from the mount and disconnect the plug from the headlight. See Photo 4.
6. Remove the fuse box lid. Using the fuse box cover as a guide, locate fuse in location F52 in the center / right of the
fuse box. Remove fuse F52 (20 amp fuse -cigarette lighter). See Photo 5.
7. Install the removed fuse into the new fuse-able link. Then plug into the fuse box, making sure the link is fully pressed
into the fuse box. See Photo 6.
8. Connect the positive wire of the DRL wiring harness to the fuse-able link and crimp. Ground the negative wire to the
negative battery post.
Photo 1 Photo 2
Photo 3 Photo 4
Photo 5 Photo 6
Remove the 6 push pins in the grille. Release the clips at the bottom of the grille.
Remove the 3 bolts in the headlight. Disconnect the plug from the headlight.
Remove fuse F52. Install the new fuse-able link.
INSTALLATION INSTRUCTONS

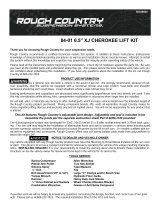
9. Identify the new passenger side head light. Align the tab and connect the plug to the DRL wiring harness. See Photo
7.
10. Locate the headlight in-line adaptor and connect the head light plug to the adaptor and then the OE harness to the
adaptor. See Photo 8.
11. Tuck the wires out of harms way and install the headlight using the OE hardware. Tighten using a 10mm socket. See
Photo 9.
12. Route the DRL wire across the vehicle to the drivers side out of harms way and repeat the headlight installation on
the drivers side of the vehicle. Check all connections to insure proper function of the lights See Photo 10.
13. Install the grille by pressing in the clips at the bottom of the grille, then install the (6) clips in the top of the grille. See
Photo 11.
14. Check the height and the alignment of the lights. Perform this in a dark room with the front of the vehicle facing 25
feet away from a wall or flat surface with the lights on the low setting. See Photo 12.
Photo 7 Photo 8
Photo 9 Photo 10
Photo 11 Photo 12
Connect the DRL plug to the headlight. Connect the adaptor and headlight.
Install the headlight. Install the opposite headlight.
Install the grille. Check the height and alignment of lights.

By purchasing any item sold by Rough Country, LLC, the buyer expressly warrants that he/she is in compliance with all
applicable, State, and Local laws and regulations regarding the purchase, ownership, and use of the item. It shall be the
buyers responsibility to comply with all Federal, State and Local laws governing the sales of any items listed, illustrated
or sold. The buyer expressly agrees to indemnify and hold harmless Rough Country, LLC for all claims resulting directly
or indirectly from the purchase, ownership, or use of the items.
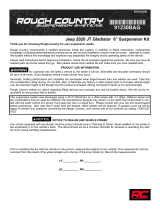
15. If adjustment is needed, remove the rubber adjustment cap from the back of the head light. See Photo 13.
16. Adjust the driver and passenger headlight to the desired angle. See Photo 14.
17. Install rubber adjustment cap.
Photo 13 Photo 14
Remove the adjustment cap Adjust the headlight.
/