Page is loading ...

Please read these instructions carefully before using this product, and save this manual for future use.
Read Me First Getting Started Troubleshooting Useful Information
OPERATING INSTRUCTIONS
Rugged Tablet Computer
M101 Series
Contents
Chapter 1: Read Me First 1
Safety Information 1
Handling and Maintenance 2
Chapter 2: Getting Started 3
Unpacking 3
Description Of Parts 4
First-time Operation 6
Turning On / Off 8
Chapter 3: Useful Information 9
HotTab Operation 9
Hot Swapping Batteries 16
Barcode Scanner Configuration (Code Type Selection) 17
Accessories 20
Chapter 4: Troubleshooting 21
Troubleshooting (Basic) 21

M101B User Guide 1
Read Me First
Chapter 1: Read Me First
Safety Information
Follow and adhere to all warnings and
instructions in this manual. For your safety,
please read all safety and operating
instructions before using the product. Keep
this manual for future reference.
Precaution on
Battery Pack
Do Not Expose the Battery Pack to
Excessive Heat, or Extreme Heat (Near
Fire, in Direct Sunlight for example)
Generation of heat, ignition or rupture may
result
Do Not Disassemble, Modify, or Insert
Sharp Objects Into the Battery Pack.
Electrolyte leakage, generation of heat,
ignition or rupture may result.
Do Not Short the Positive (+) and Negative
(-) Terminals of the Battery. Generation of
heat, ignition or rupture may result. When
carrying or storing the device, do not place
the battery pack together with articles that
may contact electricity.
Do Not Apply Shocks to the Battery by
Dropping It or Applying Strong Pressure to
It. Electrolyte leakage, generation of heat,
ignition or rupture of battery may occur.
Do Not Charge the Battery Other Than
Methods Those Specified In This Manual.
If the battery is not charged using one of
the specified methods, electrolyte leakage,
generation of heat, ignition or rupture may
result.
When the Battery Pack Has Deteriorated,
Replace It with a New Battery. Continued
use of a damaged battery pack may result
in heat generation, ignition or battery
rupture.
Do Not Use the Battery Pack With Any
Other Products. The battery pack is
rechargeable and is only designed for this
specific product. If it is used with a product
other than the specified product, electrolyte
leakage, generation of heat, ignition or
rupture may result.
Do Not Use This Product With Battery
Other Than the One Specified.
General Product
Safety
This product should not be used near
water such as bathtubs, sinks, swimming
pools, wet basement, etc.
Do not block any ventilation openings. Do
not place the product against a wall or in
an enclosed space as doing so might
impede the flow of cooling air.
Do not place the product near any heat
sources such as radiators, warm air
intakes, stoves or other heat-generating
devices (including amplifiers or other heat
producing equipment).
Do not disregard the safety that a polarized
or grounded connection can provide. A
polarized connection consists of two plugs,
one of which is larger than the other. A
grounded connection has two blades and a
third one that is grounded. If the main plug
provided cannot be inserted into your
outlet, consult an electrician to replace
your obsolete outlet.
Protect the power cord from being crushed
or pinched, particularly in the area of the
plugs, any receptacles used, and the point
of exit from the apparatus. Do not break off
the ground pin of the power cord.
Use only accessories specified by the
manufacturer.

2 M101B User Guide
Read Me First
Use only with its transport carriage, stand,
tripod, console or table specified by the
manufacturer or sold with the product.
When using a carriage, move the carriage
assembly with the product carefully to
avoid damage from falling over.
Unplug this apparatus during lightning
storms or when it is not being used for long
periods.
Refer all servicing to qualified service
personnel. A technical intervention is
required when the apparatus has been
damaged in any way, for example if the
power cord or plug is damaged, liquid has
been spilled or objects have fallen inside
the unit, if the product has been exposed to
rain or moisture, if it does not operate
normally or if it has been dropped.
Handling and Maintenance
Follow and adhere to all warnings and
instructions in this manual. For you’re the
longevity of the product usage, please read
all operating instructions before using the
product. Keep this manual for future
reference.
General Guideline
Keep the product at least 13 cm (5 inches)
away from electrical appliances that can
generate a strong magnetic field such as
TV, refrigerator, motor, or a large audio
speaker.
Do not place heavy objects on top of the
tablet computer as this may damage the
display.
The screen surface can be easily
scratched. Use with care. Do not use paper
towels to clean the display but use the
included cleaning cloth. Avoid touching it
with a pen or pencil.
To maximize the life of the backlight in the
display, allow backlight to automatically
turn off as a result of power management.
Avoid using a screen saver or other
software that prevents the power
management from working.
Cleaning Guideline
Use a soft cloth moistened with water or a
non-alkaline detergent to wipe the exterior
of the product.
Gently wipe the display with a soft, lint-free
cloth. Do not use alcohol or detergent on
the product.
Touchscreen
Guideline
Use your finger or the stylus on the display.
Using sharp or metallic object may cause
scratches and damage the display, thereby
causing errors.
Use a soft cloth to remove dirt on the
display. The touchscreen surface has a
special protective coating that prevents dirt
from sticking to it. Not using a soft cloth
may cause damage to the special
protective coating on the touchscreen
surface. To clean off hard to remove dirt,
blow some steam on the particular area
and gently wipe away using a soft cloth.
Do not use excessive force on the display.
Avoid placing objects on top of the display
as this may cause the glass to break.
When there is a noticeable discrepancy in
the operation of the touchscreen function
(your touch does not correlate to the
proper location on the screen), recalibrate
the touchscreen display.

M101B User Guide 3
Getting Started
Chapter 2: Getting Started
Congratulations on purchasing this rugged Tablet Computer. The rugged design allows you to
use it in harsh outdoor environments.
This chapter tells you step by step how to get the Tablet Computer up and running. You will find
instructions for the following procedures:
Unpacking
Description of Parts
First Time Operations
Turning On/Off
Unpacking
Check and identify the supplied accessories:
Tablet Computer
Standard Battery
Power Adapter
Power Cord and Plugs
Capacitive Touch Stylus

4 M101B User Guide
Getting Started
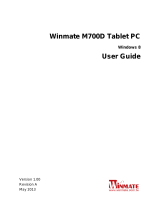
Description Of Parts
Front:
Right:
No Item Description
1
Front Camera 2 Megapixel Webcam
2
LED Indicators: Show the current status of
the Tablet Computer
RF
Green - WiFi/BT/3G/GPS
ON
No light - None of
WiFi/BT/3G/GPS is ON
HDD Green - Harddrive Activity
No light - Harddrive Idling
Battery
Orange – Charging in
progress
Green – Battery in use
Blinking Red – Battery
removed while tablet ON
Solid Red - Low Battery
(<10%)
Not lit – Battery is fully
charged when AC adapter
is plugged in
Power
Blue – Tablet is ON
No light – Tablet is OFF
3
Touch Screen Displays and act as one of
the inputs for the Tablet
Computer
4
Fn1 Button Programmable function
key configured by HotTab
Utility. Default: Web
Browser
5
Menu Button HotTab Quick Access
6
Power Button Turns on/off tablet
Front LED Indicators Detail:
No Item Description
7
I/O Cover Protects I/O ports
8
Micro HDMI HDMI output to external
display
9
LAN/RS232 Adapter port for
LAN/RS232 connector
10
USB 3.0 High speed USB port
connects to USB
devices, such as USB
flash drive, mouse,
keyboard, printer, etc.
11
Mic In/Line Out Headset or headphone
can be connected
12
Power Jack DC-IN power input jack
13
MicroSD Card
Reader
Memory card reader
port for MicroSD Card
Side I/O Details:
Front Buttons Details:

M101B User Guide 5
Getting Started
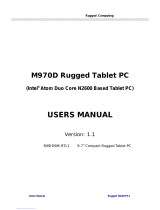
Rear:
Bottom:
No Item Description
14
Kensington
Lock Port
Provides lock access for
Kensington Lock.
15
Optional
Barcode
Barcode Scanner for
reading of 1D/2D
barcode.
16
Optional RFID RFID reader for reading
of RFID tags.
17
Rear Camera 5MP Autofocus Camera.
Captures photos and
videos.
18
Camera Flash LED camera flash to
provide flash lighting
when use with camera.
19
Expansion Port Provides optional
connectivity to custom
modules for special
application (USB2.0 x 1 ,
RS232 x 1).
20
Fn2 Button Programmable function
key configured by
HotTab Utility. Default:
Camera
21
Volume Buttons Volume Control.
(+) Raises volume,
(-) Lowers volume.
22
Battery Lock
Latch
Latch to lock the battery
in place once battery is
inserted. Not spring-
loaded.
23
Battery Release
Slider
Spring-loaded slider that
latches the battery in.
24
Touch Pen Slot Pen holder slot to store
touch pen
25
3G Module/SIM
card slot
Service window to insert
Micro SIM card. Also
provide access to 3G
Module.
26
Speakers Emits sounds.
No Item Description
27
Docking
Connector
Port to docking solutions
such as vehicle docking
to provide power and
external antenna
Docking Connector Detail:
Expansion Port Detail:
Rear Buttons
Detail:
Battery Lock Latch
Detail:

6 M101B User Guide
Getting Started
First-time Operation
Insert SIM card (For Optional 3G/LTE equipped device)
The Tablet Computer supports data connection using 3G/LTE SIM cards and fits Micro-SIM card.
(Note: 3G/LTE feature is optional). Perform the following to install the SIM card to your Tablet
Computer:
1. Remove the service window in the rear by unscrewing four screws.
2. Remove the screw that is securing the 3G/LTE module.
3. Carefully lift the 3G wireless module up, and be cautious not to damage the connected
cable.
4. Make sure the SIM card IC contact patch is faced down, notch is in the direction of
insertion (towards right).
5. Insert the 3G SIM card into the slot located near the right side of the service window.
6. Reposition the removed 3G/LTE module screw to secure the 3G/LTE module.
7. Reposition the removed service window screw to secure the service window.
Inserting Battery Pack
To insert the included standard battery pack into the Tablet Computer:
1. Disconnect any cords connected to the tablet computer.
2. Turn the tablet computer over, back facing up.
3. Locate the Battery Lock Latch and push it to the “Unlocked” position.
4. Locate the Battery Release Slider that is spring-loaded. Pull back and hold.
5. Insert the battery on the connector-pins side first, and then lower the battery into the
battery compartment. Continue to hold the Battery Release Slider before battery is fully
inserted.

M101B User Guide 7
Getting Started
6. Make sure the battery is completely lowered into the compartment before letting go the
Battery Release Slider. Battery will be flat against the housing once fully inserted
Removing the Battery Pack
1. Shut down the tablet computer (or put it to sleep). Disconnect any cords connected to the
computer.
2. Turn the tablet computer over, back facing up.
3. Locate the Battery Lock Latch and push it to the “Unlocked” position.
4. Locate the Battery Release Slider that is spring-loaded. Pull back and hold.
5. Lift the battery out using the opening on side of battery compartment.
Connecting to Power Supply
The Tablet Computer operates either on external AC power or internal battery power. It is
recommended to use AC power when you start up the Tablet Computer for the first time.
Caution
Use only the AC adapter included with your Tablet Computer.
Using other AC adapters may damage the Tablet Computer and
the Battery.
Perform the following to connect the Tablet computer to AC Power:
1. On the side of the Tablet computer, lift the I/O protective cover by pulling on the latch
2. Plug the DC cord of the AC adapter into the Power Jack of the tablet computer.
3. Plug the AC power cord into the AC adapter.
4. Finally, Plug the AC power cord into the electrical outlet.

8 M101B User Guide
Getting Started
When the AC Adapter is connected, the battery pack starts charging. The battery LED indicator
on the tablet computer would show different states. Please refer to description of LED indicator
on Description of Parts.
Turning On / Off
Turning On
Press and hold the power switch for 3 seconds until the blue LED power indicator light lid up.
Note:
Do not press the power switch repeatedly.
Do not perform the following operations until the hard drive indicator turns off
o Connecting or disconnecting the AC adapter
o Pressing the power switch
o Touching the tablet buttons, screen, or external keyboard/mouse
Turning Off
Perform the following procedure to shutdown the Tablet Computer:
1. Make sure you have closed any programs that are open on the Desktop. Start Screen
apps don’t need to be closed.
2. Open the Charms Bar by swiping your finger from the far right of the screen towards the
middle of the screen.
3. Tab on the Settings charm.
4. Tab on Power.
5. Tab on Shut Down.
6. Wait for Tablet Computer to power off.
Note:
The computer will forcibly be turned off if the power switch is pressed and held for six
seconds or longer.

M101B User Guide 9
Useful Information
Chapter 3: Useful Information
HotTab Operation
HotTab provides quick access to the tablet’s functions and features, such as turning on/off Wifi,
Bluetooth, GPS, programming function key, and changing power management.
As Windows starts up, HotTab starts and runs in the background. To display the HotTab control
utility, press the (Menu) Button located on the front panel, OR launching the HotTab Utility
application.
(Menu) Button on the Front Panel:
HotTab Utility Icon:
HotTab is designed to be a quick access uility, therefore the main user interface will be on the
right side of the screen without blocking the content on screen. There are 4 main menu options:
Short cut, Camera, Device and Settings. Operations and functions on each menu options is
explained in detail in the coming section.
HotTab Utility
User Interface:

10 M101B User Guide
Useful Information
Shortcuts
This HotTab menu option allows users to configure short cut to quickly access programs with a
few tabs. The Shortcuts menu offers 8 empty slots to store user’s desired quick access.
Shortcuts can be mapped to any of the executable files (.exe) installed on the tablet.
Short Cut Menu:
To store a new shortcut:
1. Tab on button of any empty slot.
2. An on screen file browser will appear.
3. Browse to find the desired application to have shortcut.
4. Click “Open” to save the shortcut.
To remove an saved shortcut:
1. Tab on the button of any saved slot to remove
2. Shortcut will be removed, and once again show “Empty” to indicate slot
is empty.
Tab on the button will hide the HotTab Utility Menu.
Camera
This HotTab menu option allows users take a picture or record a video. Before use, make sure
the Camera is turned on under Devices menu option. The Camera user interface will take up the
entire screen as shown below:

M101B User Guide 11
Useful Information
Description of Camera User Interface Buttons:
No Item Description
1 Camera Switch
Switch between front camera or rear camera.
2 Settings
Brings up Camera settings page.
Available Settings:
Picture Save: modify/inspect saved location for pictures.
Video Save Folder: modify/inspect saved location for
video recordings.
Picture Quality: Picture compression quality.
3 Flash Control
Disables LED Flash when taking picture.
LED flash fires regardless of condition when taking pictures.
LED Flash fires automatically in low light condition when taking
pictures.
4 Resolution
Pictures will be saved at resolution of 640 x 480.
Pictures will be saved at resolution of 1024 x 768.
Pictures will be saved at resolution of 1600 x 1200.
Pictures will be saved at resolution of 2592 x 1944.
5 Exit
Exits the Camera and hide HotTab Utility.
6 Picture/Video
Mode Switch
Switches between picture taking or video recording.
7 Shutter/Record
(automatically
switch base on
mode)
Camera Shutter Button. Tap to take picture.
Video Record Button. Tap to Start, and press again to stop
recording.
8 Open Saved
Location
Opens the location where pictures and videos are saved in a
window.

12 M101B User Guide
Useful Information
Device
This HotTab menu option enables/disables tablet computer’s hardware functions:
Item Status Color Description
Orange Wi-Fi is enabled.
White Wi-Fi is disabled.
Orange WWAN (3G/4G) is enabled.
White WWAN (3G/4G) is disabled.
Orange GPS is enabled.
White GPS is disabled.
Orange Bluetooth is enabled.
White Bluetooth is disabled.
Orange Camera is enabled.
White Camera is disabled.
Orange Enables Front LED indicators.
White Disables Front LED indicators.
Orange Barcode Reader is enabled. Reading will need to triggered
manually thru Fn button.
White Barcode Reader is disabled.
Orange RFID Reader is enabled. Reading will occur without trigger.
White RFID Reader is disabled.
Orange Expansion Port 5V Power is enabled.
White Expansion Port 5V Power is disabled.

M101B User Guide 13
Useful Information
Orange External GPS antenna is used for GPS.
White Built-in GPS antenna is used for GPS.
Setting
This HotTab menu option provides users information such as PC Information, Battery status,and
also device settings such as power management setting, and function key mappings.
PC Information:
This section provides user device information in regards to
BIOS Version, EC Versions, HotTab Versions, OS Versions,
as well as Unit Serial Number, shown in the picture sample.
Battery Information:
This section provides user battery Information.
Main Battery:
The main battery Icon displays the battery level in percentages (0 to
100%).
Backup Battery:
The backup battery used for battery hot swapping displays its state
in text with the following meanings.
Status Description
High
Backup battery is fully charged, and can be used for
hot swapping
Medium
Backup battery level is intermediate, but can be
used for hot swapping
Low
Backup battery level is low, and hot swapping is not
recommended.
Battery Charge Time:
The Battery Information also displays estimated time needed to fully
charge the main battery when AC adapter is plugged in.

14 M101B User Guide
Useful Information
Power Management (Performance):
The power management (performance) feature allows user to switch to different power
modes of power consumption.
Power supply to different components is controlled on an as-needed basis. This allows
maximum power conservation and performance at the same time.
Your Tablet Computer comes with the HotTab
power management scheme which has pre-defined
power options for you to select.
To switch to a different power management scheme,
tab on the Power Management Icon, and four
different schemes will be displayed on the HotTab
Utility Pane
Item Description
Saving
Screen brightness is at its lowest. Uses the least battery
power.
Office
Low screen brightness. Suitable when using typical
applications, such as word processing and managing
documents. Uses less battery power.
High
High screen brightness. Suitiable for application that need
better visibilty of screen.
Extreme
Maximum screen brightness. The battery power drains easily.

M101B User Guide 15
Useful Information
Function Key Mapping
The function key mapping menu option allows user to change the
physical function buttons, Fn1 and Fn2. Users can change what
application will be launched with short press or long press of keys.
To configure function key mapping, perform the following:
1. Tap on function key icon for the corresponding key that you
want to change.
2. At top of utility, it will say “Short Press” or “Long Press” to
indicate what type of press is being configured
3. You can switch what type of press you want to configure by
tapping on the “Short Press” or “Long Press” icon at the
bottom of the utility window.
4. Pick from list of preset applications by tapping on the
application icons OR customize which application to execute
using the picker.
Using the Custom picker:
1. Tap the icon to reveal browser window
2. Navigate to the desired executable to map to function key
3. Tap on “Done” to save selection.
To map the function key to another application:
4. Tap on the icon to remove connection to the original
application, and pick again tapping on icon.

16 M101B User Guide
Useful Information
Hot Swapping Batteries
The tablet computer supports hot-swapping of batteries, meaning the tablet doesn’t need to be
powered off in order to replace the main battery. To support such mechanism, there is a backup
battery inside the tablet that is charged up with the main battery. This backup battery cannot be
removed, and needs to have adequate power for hot swapping of main battery to be done
without issue. When the backup battery is fully charged, it can sustain up to 5 minutes of runtime
to allow for battery hot-swapping.
Perform the following to hot swap the batteries:
1. While the tablet is powered on, go to HotTab utility to check on the power level of the
Backup battery.
2. If the Backup battery level is at “Low”, please charge the tablet with AC Power until the
Backup battery level is at “Medium” or “High”, and do not remove the main battery.
3. If the Backup battery level is at “Medium” or “High”, continue to remove the main battery.
4. Insert a new charged up removable battery into the battery compartment.
5. Go to HotTab utility to check if Main battery level can be correctly read. If not, check if the
new removable battery is inserted properly.
6. If Main battery level can be read, continue to use the tablet computer.

M101B User Guide 17
Useful Information
Barcode Scanner Configuration (Code Type Selection)
For M101 tablet computer equipped with the optional barcode scanner, this section of user
manual explains how the barcode scanner can be configured differently via software (Intermec
EasySet) to read different standards of barcode types. The barcode scanner is configured with
Intermec EasySet application. The latest version can be downloaded at the following link:
http://intermec.custhelp.com/app/answers/detail/a_id/5760
Barcode Scanner Configuration Instruction
In order to configure the barcode scanner, the tablet device needs to be restarted to reset the
hardware devices on-board to allow for configuration.
Note:
Throughout the barcode scanner configuration, DO NOT try and trigger the barcode
scanner by press the Function button on the device. Doing so will prevent the barcode
scanner from being correctly configured.
Perform the following to configure barcode scanner for different code types:
1. Turn-off all the running applications and restart the tablet.
2. Once the tablet boots up, wait for the HotTab utility to start up.
3. Open HotTab utility, and tap on the “Device” icon.
4. Turn on the “Barcode” device by tapping on the Icon. Make sure the “Barcode” icon is
orange to indicate barcode scanner is on. DO NOT try and trigger the barcode scanner by
press the Function button on the device at this point. Doing so will prevent successful
configuration.
5. Execute the “Easyset” barcode scanner configuration application by tapping on its icon:

18 M101B User Guide
Useful Information
6. When “Easyset” application launches, a “Select product” on-screen prompt will show up.
Select “Scan engines” and pick “ED40”. Make sure the “Online setup” option is checked,
and select “OK” as shown in the screen capture below:
7. Another “Device Selection” on-screen prompt will show up. Select “Communications
Port (COM15)” and select “OK” as shown in the screen capture below:

M101B User Guide 19
Useful Information
8. At this point, the barcode scanner device is selected and next step is barcode code type
selection.
9. On the navigation pane on the left, select the option “5. Symbologies”. A full list of available
code types will be listed in this navigation pane.
10. Navigate to the code type of interest and double click to show its configuration options as
shown in the screen capture below (i.e. screen capture selects code type “Code 11”):
11. Double click on “Enable” to enable the code type for barcode scanner or double click on
“Disable” to disable the code type for barcode scanner.
12. Go through the entire code type list and enable/disable each barcode code type of interest.
13. Once all the code types of interest are configured, close the “EasySet” application to finish
barcode scanner configuration.
Note:
For more information on how to use the “EasySet” application, please refer to the complete
EasySet User Manual from Intermec: http://intermec.custhelp.com/app/answers/detail/a_id/5760
/