Page is loading ...

Deck Tile Planter Box Installation Guide
v20191125US

Deck Tile Planter Box Installation Guide / v20191125US 1
Important Note 2
Deck Tile Planter Box Components for 1x3 3
Single Layer Installation 4 - 5
CONTENTS

Deck Tile Planter Box Installation Guide / v20191125US 2
IMPORTANT:
Read All Sections Before You Start
For the most up to date information, please visit our website @ www.newtechwood.com
Prior to installing any composite product, it is recommended that you check with local building codes
for any special requirements or restrictions. The diagrams and instructions outlined in this guide are
for illustration purposes only and are not meant or implied to replace a licensed professional. Any
construction or use of NewTechWood must be in accordance with all local zoning and/or building codes.
The consumer assumes all risks and liability associated with the construction and use of this product.
Safety
When dealing with any type of construction project, it is necessary to wear appropriate safety equipment
to avoid any risk of injuries. NewTechWood recommends but is not limited to the following safety
equipment when handling, cutting, and installing the product: gloves, a respiratory protection, long
sleeves, pants, and safety glasses.
Tools
Standard woodworking tools may be used. It is recommended that all blades have a carbide tip.
Environment
A clean, smooth, at, and strong surface is needed to install the Deck Tile Planter Box correctly. Please
check with local building codes before ever installing any type of decking. If installation does not occur
immediately, NewTechWood's products need to be put on a at surface at all times. It should NEVER be
put on a surface that is NOT at.
Static
Static can also be more prevalent in areas that are of higher altitude because the humidity is lower. For
these areas, be careful of using conducive objects such as metal railing and chairs as static shocks might
occur more often. A potential way to lower the amount of static shocks occurring is to apply Staticide
(www.aclstaticide.com) on your deck or use anti-static mats before doorways.
Layout
Before installing the Deck Tile Planter Box, always make sure that you are installing it on a clean smooth
at surface.
The Deck Tile Planter Box CANNOT be installed on places such as dirt, soil, or raised structure. It must
be laid out on a at solid surface.

Deck Tile Planter Box Installation Guide / v20191125US 3
Deck Tile Planter Box Components for 1x3
A - QD0101
(X4)
D - QD0104
(X1)
E - UH36
(X4)
C - UH08-224
(X2)
B - UH08-832
(X2)
F - QD0102
(X4)
G - QDG
(X3)
IMPORTANT POINTS:
• Parts B, C, D will be different depending on the planter box kit model.
• Parts D, G quantity will be different depending on the planter box kit model.

Deck Tile Planter Box Installation Guide / v20191125US 4
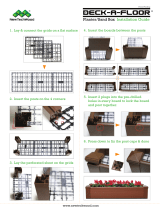
1
Lay & connect the grids (G-QDG) on a flat
surface as shown in Diagram 1, 2.
2
Insert the post legs (F-QD0102) on the 4
corners from the bottom of the grids as
shown in Diagram 3, 4.
Note: The side with the arc of the post
legs should be facing inward.
Lay the perforated sheet (D-QD0104) on the
grids as shown in Diagram 5 and 6.
3
Single Layer Installation
The following installation is for the 1x3 planter box. Other planter boxes will be installed in the same
manner, the only difference being the length of the boards (B-UH08-832, C-UH08-224) and the size of
the perforated sheet (D-QD0104).
DIAGRAM 3
DIAGRAM 1
DIAGRAM 2
DIAGRAM 5
Insert the posts (E-UH36) into the post legs
as shown in Diagram 7, 8.
Note: The groove side of the post should
be facing inward for inserting the boards.
4
DIAGRAM 6
Arc
DIAGRAM 4

Deck Tile Planter Box Installation Guide / v20191125US 5
Insert the boards (B-UH08-832, C-UH08-224)
between the posts as shown in Diagram 9, 10.
5
DIAGRAM 8
DIAGRAM 9
DIAGRAM 10
DIAGRAM 7
DIAGRAM 12
Place and press down to x the post caps
(A-QD0101) as shown in Diagram 11, 12.
6
DIAGRAM 11
Notice: Planter box can be used in conjunction
with Deck Tiles.
DIAGRAM 13
DIAGRAM 14

Deck Tile Planter Box Installation Guide
v20191125US
©2019 Huidong Meixin Plastic Lumber Products Manufacturing Co., Ltd.
NewTechWood is a registered trademark of Huidong Meixin Plastic Lumber Products
Manufacturing Co., Ltd. To obtain a copy of the most current version of this installation guide,
visit us online at www.newtechwood.com.
®
/


