Page is loading ...

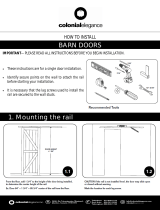
IMPORTANT: BEFORE YOU BEGIN
IF INSTALLING DIRECTLY INTO A NON-CONCRETE WALL, DO NOT ATTEMPT TO INSTALL THE RAIL SOLELY TO THE
DRYWALL OR ANY WALL SURFACE AS THIS MAY NOT SUPPORT THE WEIGHT OF THE RAIL AND MOUNTED DOOR. THE
RAIL MUST BE INSTALLED ONTO A PIECE OF SOLID WOOD BLOCKING (SOLD SEPARATELY). USING MOUNTING SCREWS
(ALSO SOLD SEPARATELY) ENSURE THE SOLID WOOD BLOCK IS SECURED INTO THE STRUCTUAL SURFACE. USE A STUD
FINDER WHERE NECESSARY TO LOCATE STUDS AND SECURE SAFELY. TYPICAL SOLID WOOD BLOCKING SHOULD BE
1" X 4" TO THE LENGTH OF THE RAIL.
NOTE, THE MAXIMUM THICKNESS OF THE DOOR MUST BE 1 3/8". IF INSTALLING WITH THE FLOOR-MOUNTED DOOR
GUIDE, THE DOOR MUST BE MORTICED 1/4" WIDE X 3/4" DEEP CENTRALLY. A SECONDARY WALL-MOUNTED DOOR GUIDE
HAS ALSO BEEN PROVIDED FOR NON-MORTICED DOOR INSTALLATION.
BARN DOOR HARDWARE KIT
INSTALLATION GUIDE
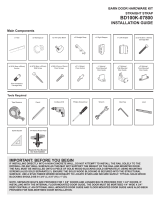
Main Components
Tools Required
Tape Measure
Cordless Drill Drill Bit 5/16 (8mm) Drill Bit 3/8 (10mm)
Phillips Screwdriver Wrench
Pencil
x1 Right Stopper
x1 Rail x5 Wall Spacer
x2 Anti-jump Block
x5 5/16 (8mm x 60mm)
Carriage Bolt
x5 5/16 (8mm x25mm)
Anchor
(Pre-mounted to
Carriage Bolt)
x5 5/16 (8mm x 90mm)
Wall Screw
x1 Floor-Mounted
Door Guide
x5 5/16 (10mm)
Wall Anchor
x2 #8 (4.2mm x 25mm)
Floor Screws
Allen Key
x1 Left Stopper
Level
x2 5/16 (8mm)
Floor Anchor
x1 Optional Secondary
Wall-Mounted
Door Guide
1/4" Mortice Router Head
Speed Square
Required for Floor-Mounted
Door Guide Installation
x2 Bent Strap

BARN DOOR HARDWARE KIT
ASSEMBLY INSTRUCTIONS
Step 1. Door Preparation
Note, a second optional wall-mounted door guide has
also been provided in this kit should you not wish to
mortice your door.
Mortice 1/4" wide x 3/4" deep groove centrally to the bottom
will ensure smoothness of door travel side-to-side and will
prevent the door from swinging in and out.
If you prefer, you can also have your door morticed at
the store you have purchased your door (typically, for an
additional charge). See your store for details.
3/4
" (19 mm)
1/4"
(6.3 mm)
Step 3. Door Preparation - Anti-jump block Installation
Position each anti-jump block at least 1" from the edge of the
Straps. Tighten slightly to secure in place.
Step 2. Door Preparation – Strap Installation
Position each strap to the front of the door centre to the
stile or a minimum of 2" from the edge of the door.
Cut a piece of cardboard 2" high and place between the
wheel (inner groove) and the top of the door to correctly
position the height of the straps.
Mark holes with a pencil and pre-drill 3/8" holes, then
secure into place. Repeat for second strap.
Centre to Stile or
minimum of 2" (51 mm)
drill out
3/8" (10mm)
2" (51 mm)

Step 4. CONCRETE Wall Preparation
IF INSTALLING INTO DRYWALL – PLEASE PROCEED TO STEP 7.
Position the rail by measuring up from the door
height (H) + 1 3/4" to the centre of the track. Also ensure
a gap of 3/8" at the bottom. Ensure the rail is level and
leave a minimum of 2" from the end of the rail to the side
of the opening (as shown).
If installing with an opening for 80" standard door size,
remove the top trim and cut the side trim horizontally along
the height of the opening.
BARN DOOR HARDWARE KIT
ASSEMBLY INSTRUCTIONS
Step 5. CONCRETE Wall Preparation
Position the rail in place ensuring that it is level, mark the
holes on the rail using a pencil and pre-drill 5/16" holes
into the concrete.
Step 6. CONCRETE Rail Installation
When installing directly into concrete, insert using the
provided anchors and carriage bolts (with washers).
Ensure to un-screw to separate the carriage bolt and
anchor to install correctly, securing with a wrench.
Ensure to insert both stoppers either side of the rail inside
Door Height + 1 3/4"
3/8" (9.5 mm)
Gap under
the door
78 3/4" (2000 mm)
Minimum
2"
(51mm)
1 3/8" (30 mm)
5/16" (8mm)

BARN DOOR HARDWARE KIT
ASSEMBLY INSTRUCTIONS
Step 7. DRYWALL Wall Preparation
When installing into drywall, a piece of 1" x 4" solid wood
blocking is required to be mounted to the wall before
proceeding with the rail installation.
Position the solid wood blocking by measuring up from
the door height (H) + 1 3/4" to the centre of the track. Also
ensure a gap of 3/8" at the bottom. Lastly, ensure the solid
wood blocking is level and leave a minimum of 2" from the
end of the blocking to the side of the opening (as shown).
If installing with an opening for 80" standard door size,
remove the top trim and cut the side trim horizontally along
the height of the opening.
Step 8. DRYWALL Wall Preparation
Position the rail on top of the wood blocking ensuring
levelness, mark the holes using a pencil and pre-drill
5/16" holes into the wood blocking.
1 3/8" (30 mm)
5/16" (8mm)
Step 9. DRYWALL Rail Installation
When installing into the solid wood block and wall, insert
using the provided wall anchors and wall screws. Align each
spacer to the rail holes, inserting anchors, spacers and bolts
(with washers), securing with a wrench.
Ensure to insert both stoppers either side of the rail inside
Door Height + 1 3/4"
1” x 4” solid wood blocking
78 3/4" (2000 mm)
Minimum
2"
(51mm)
3/8" (9.5 mm)
Gap under
the door

BARN DOOR HARDWARE KIT
ASSEMBLY INSTRUCTIONS
Step 10. Hanging the Door
Place the assembled door onto the secured rail and tighten
each anti-jump block. Ensure all parts are operating correctly
by sliding the door side-to-side.
1
2
Step 11. Floor-Mounted Door Guide Installation
guide inside the morticed door, line up close to the opening.
placement then mark holes with a pencil and pre-drill 1/4"
the provided anchors.
1 3/16" (30 mm)
1/4" (8mm)
Step 12. OPTIONAL Wall-Mounted Door Guide Installation
Line up close to the opening, position and secure the
wall-mounted door guide directly into the wall or trim,
extending the guide as necessary to allow the door to
travel side-to-side. Tighten to secure in place.
1 3/16" (30 mm)
1/4" (8mm)

BARN DOOR HARDWARE KIT
ASSEMBLY INSTRUCTIONS
Step 13. Stopper Installation
Slide the door closed and to correct position of both
stoppers. Using the provided Allen key, tighten into position
to complete the installation of the Barn Door Kit.
(X2)
/