Page is loading ...

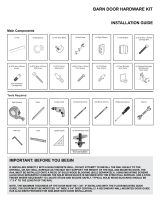
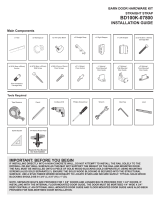
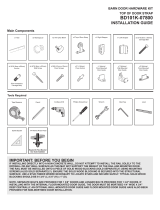
Rolling Door Hardware
A. Face-mount roller strap
1. The distance between the top of the door and the outer diameter of
the wheel should be 1-7/8” (this will achieve approximately 3/32” gap between
the top of the door and the rail),
2. Using the fasteners provided, attach the strap to the door.
Side to side placement of the straps is based on the aesthetic look
desired. The screws must be installed into solid wood, not
recommended for hollow-core doors. It is recommended that the
screw holes in the door are predrilled.
3. Make sure that proper vertical alignment of the strap is achieved
before fastening the strap to the door.
Installation Instructions
Rail Installation
Rails must be mounted into solid wood (framing studs, header or securely attached trim).
1. The location of the rail is dependent on the height of the door, desired gap between the oor
and the bottom of the door and the desired over lay of the top of the door to the door opening.
2. Recommended spacing for the wall mounting brackets is approximately 16”
3. On the wall determine the desired location of the mounting brackets (p/n QG.FR201.08)
4. Transfer the location of the studs and mounting brackets to the backside of the rail by placing
the rail at on the wall and marking the stud/bracket locations on the back of the rail.
5. Use mounting bracket as a guide (as shown in picture) to hold the drill bit from “walking”, drill
the mounting hole in the center groove of the rail.
6. Mount the rail to the wall using the lag bolts and washer provided in the kit.
1-7/8”
}
Roller Strap
installation
Center Guide Installation
1. Route a ¼” wide by ½” deep groove, centered in the bottom of the door.
2. Install the door onto the rail.
3. With the door hanging in the correct position on the rail (plumb and square to the wall, with a consistent
gap between door and wall. Make a mark on the oor that lines up with the center of groove on the bottom of
the door.
4. Locate the door guide along the line marked on the oor so that the door guide is engaged in the groove in
the door when the door is both in the closed position and opened position.
5. Secure the door guide to the oor with the supplied fasteners
Transfer the location of the studs and mounting brackets to the backside of the rail by placing
Recommended Rail
Positioning Formula
Centering guide

Door Stop Installation
1. With the straps installed on the door, slide the door onto the rail that is
installed on the wall.
2. Position the door in the desired location for the closed position. Place the
door stop (p/n QG.FR40.08) against the rail and the door. Mark the location of
the mounting hole.
3. Now position the door in the desired location for the opened position.
Mark the location of the mounting hole.
4. Using a 5/16” drill bit drill the holes for the door stop bolts.
5. Install door stops onto the rail, using the bolt and washer on the front side and lock washer and
nut on the back side.
Optional
Bi-Parting Door Installation
Two separate rolling Barn Door kits as well as the optional rail splice kit (p/n QG.
FR41.08) will be required for most bi-parting door installations.
When 2 or more rails are required:
1. Slide the rail splice kit into the grooves on the back of the rail, locating
the center of the splice kit between the 2 rails.
2. Tighten the set screws to secure the rails together.
3. Continue following the installation instructions for the rails, door stops
and center-guides outlined above.
Speci cations:
Maximum door thickness = 1-3/4”
Maximum door weight = 250 lbs
Gap between the wall (or surface where the brackets are mounted) and the door =
1-15/16” minus door thickness
9/9/14
QG.FR41.08
/