Unbranded QG.1300.TM-96.02 Installation guide
- Type
- Installation guide

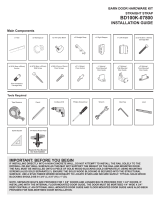
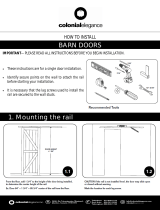
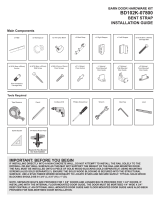
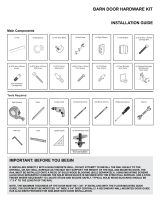
• Rolling Barn Door Instructions
10/22/19
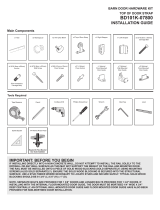
Roller Strap Installation
1. Install the roller straps onto the top edge of the door. The location of these straps is
critical for the proper, safe use of the rolling door.
2. The distance between the top of the door and the outer diameter of the back of the
wheel (measured from the back of the door) should be 13/16” – 7/8” (this will achieve
approximately 3/32” gap between the top of the door and the rail).
3. Using the screws provided attach the strap to the door. It is very important that the
screws are installed into solid wood, not hollow-core doors with thin veneer skins. It is also
recommended that you pre-drill the screw holes. Make sure that proper vertical alignment
of the strap is achieved before fastening the strap to the door.
Rail Installation
Warning: DO NOT fasten rail brackets directly onto the drywall. Rail brackets
MUST
BE installed into a solid wood header that is mounted above the doorway and is securely
fastened into the wall studs behind the drywall.
(Brackets that are fastened directly onto the drywall surface will, over time, crush the
drywall leading to a failure of the barn door system)
1. Calculations for typical rail placement:
Height of door + desired gap at the bottom of the door + 5/8” = Center of rail
2. Using a level, mark a line on the trim or wall where the center of the rail will be located.
3. Mark on this line where the rail mounting brackets will be located (recommended
spacing for the wall mounted brackets is 16”)
4. Slide all the brackets onto the rail
5. Line up the brackets with the marks on the trim or wall. Beginning at one end, secure
the brackets to the trim or wall. Use a long drill bit for the screws above the rail so that
you don’t damage the finish on the rail with the drill.
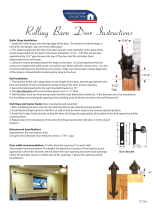
6. The Long Bracket will accommodate up to 2-1/4” wide.
End Stops and Center Guide ( oor mounted & wall mounted)
1. After installing the door onto the rail, slide the door to the desired opened position.
2. Install the End Stop bracket to the fl oor or wall so that the door stops in the desired
opened position.
3. Install the Center Guide bracket so that the door will always be captured by this
bracket in the fully opened and fully closed position.
4. Repeat step #2 for installation of the other End Stop bracket when the door is in the
closed position.
13/16” - 7/8”
3/32”
Gap
5/8”
Gap between
wall and door
23/32”
2”CC
2-5/8”
Protrusion
2-3/8”
1-3/4”
7/8”
Long Bracket
13/16” - 7/8”
Dimensional Specifi cations
Gap between the wall and the door
Using the Long Bracket: Door Thickness minus 2-1/2” = gap
Door width recommendation: 4” wider than the opening (2” on each side)
Door height recommendation: The height will depend on location of the bracket, but in
applications where the brackets are not above the door opening (narrower door
openings where the brackets can be on either side of the opening) 1” above the opening
would be suff icient.
-
 1
1

Unbranded QG.1300.TM-96.02 Installation guide
- Type
- Installation guide
Ask a question and I''ll find the answer in the document
Finding information in a document is now easier with AI
Related papers
Other documents
-
Quiet Glide QG1310HS02 Installation guide
-
 TRUporte BD100K-07800-BR Installation guide
-
 Colonial Elegance RDSHK-37 User manual
-
 TRUporte BD102K-07800-SS Installation guide
-
 Lemieux Z020073 Installation guide
-
 TRUporte BD101K-07800-SS Installation guide
-
Jeff Lewis 65976 Installation guide
-
Genie M-4700 User manual
-
Quiet Glide QG13060208 Installation guide
-
 American Home Collection QG1310EHS086S Installation guide


