Page is loading ...

Date Issued: 06/15/2017 IS-43896-US
We’re here to help 866-558-5706
Hrs: M-F 9am to 5pm EST
CAUTION – RISK OF SHOCK –
Disconnect Power at the main circuit breaker panel or main
fuse box before starting and during the installation.
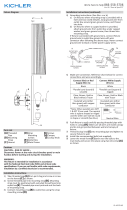
1) Passxtureelectricalwireandgroundwirethroughdesired
amountofstemsB&Candscrewtogetherusingsupplied
threadednipples.NOTE:Useadropofthreadcompound(sup-
plied)onthethreads.Installthestemstothe(2)twocouplers
onthetopoftheA-xturebyrotatingclockwise.
2) Usingthetwo(2)strapmountingscrews,attachthemounting
straptooutletbox.
3) Screwthreadedpipeintomountingstrap.Mountingstrapmust
bepositionedwithextrudedthreadfacingintotheoutletbox.
Threadedpipemustprotrudeoutofthebackofmountingstrap.
4) Installone(1)hexnutunderthemountingstrapandone(1)on
topofthemountingstraponthethreadedpipe;thiswillsecure
thethreadedpipeinplace.Placethirdhexnutontothethreaded
pipe.
5) Connectthefour(4)D-loops,E-chainlinkwithtwo(4)threaded
nipplesandinspectioncabletothecanopyusingthelockwash-
erandhexnutsupplied.
6) Routewiresandgroundwirethroughchainlinkandthrough
canopyintotheelectricalbox.Attachinspectioncabletooutlet
box.
7) Hooktheinspectioncablesecurelytothebox.
8) Movethecanopyuptotheceilingontothethreadednippleand
usingtheknullednutthreadontothethreadednippletosecure
intoplace.Threadonthenial.
9) Installthe(6)glassbracketsusingthe(12)screwsandball
knobsasshown.
10) Placecurvedglasspanelsintoplaceandsecureintoplacewith
the(24)thumbscrews,acrylicwashers,ballknobsasshown.
11) Installtherecommendedbulbs.
12) Attachmountingstraptooutletboxwithstrapmountingscrews.
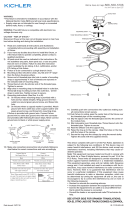
13)Groundinginstructions:(SeeIllus.AorB)
A) Onxtureswheremountingstrapisprovidedwitha
holeandtworaisedimples.Wrapgroundwirefrom
outletboxaroundgreengroundscrew,andthreadinto
hole.
B) Onxtureswhereacuppedwasherisprovided.Put
groundwirefromoutletboxundercuppedwasherand
greengroundscrewandthreadscrewintoholein
mountingstrap.
Ifxtureisprovidedwithgroundwire.Connectxtureground
wiretooutletboxgroundwirewithwireconnector,afterfollow-
ingtheabovesteps.Neverconnectgroundwiretoblackor
whitepowersupplywires.
14)Makewireconnections.Referencechartbelowforcorrectcon-
nectionsandwireaccordingly.
GREEN GROUND
SCREW
CUPPED
WASHER
OUTLET BOX
GROUND
FIXTURE
GROUND
DIMPLES
WIRE CONNECTOR
OUTLET BOX
GROUND
GREEN GROUND
SCREW
FIXTURE
GROUND
A
B
Connect Black or
Red Supply Wire to:
Connect
White Supply Wire to:
Black White
*Parallel cord (round & smooth) *Parallel cord (square & ridged)
Clear, Brown, Gold or Black
without tracer
Clear, Brown, Gold or Black
with tracer
Insulated wire (other than green)
with copper conductor
Insulated wire (other than green)
with silver conductor
*Note: When parallel wires (SPT I & SPT II)
are used. The neutral wire is square shaped
or ridged and the other wire will be round in
shape or smooth (see illus.)
Neutral Wire
LOOP - 1/8-27 NPSM x .375 [9.53]
(2) LOCKWASHER
INSPECTION CABLE
(2) HEXNUT
A-FIXTURE
D
E
F
COUPLER
B
C
GEMSTRAP W/GROUND SCREW
(2) STRAP MOUNTING SCREWS
(3) HEXNUT
THREADED
NIPPLE
OUTLET BOX
WIRE CONNECTOR(S)
KNURLED NUT
FINIAL
H-GLASS (6)
(12) SCREWS
(24) THUMB SCREWS
(24) ACRYLIC WASHERS
(6) GLASS BRACKETS
(24) THUMB SCREWS
TO SECURE GLASS
(12) SCREWS
FOR GLASS BRACKETS
(24) ACRYLIC WASHERS

Date Issued: 06/15/2017 IS-43896-CB
We’re here to help 866-558-5706
Hrs: M-F 9am to 5pm EST
CAUTION – RISK OF SHOCK –
Disconnect Power at the main circuit breaker panel or main
fuse box before starting and during the installation.
1) Passxtureelectricalwireandgroundwirethroughdesired
amountofstemsB&Candscrewtogetherusingsupplied
threadednipples.NOTE:Useadropofthreadcompound(sup-
plied)onthethreads.Installthestemstothe(2)twocouplers
onthetopoftheA-xturebyrotatingclockwise.
2) Usingthetwo(2)strapmountingscrews,attachthemounting
straptooutletbox.
3) Screwthreadedpipeintomountingstrap.Mountingstrapmust
bepositionedwithextrudedthreadfacingintotheoutletbox.
Threadedpipemustprotrudeoutofthebackofmountingstrap.
4) Installone(1)hexnutunderthemountingstrapandone(1)on
topofthemountingstraponthethreadedpipe;thiswillsecure
thethreadedpipeinplace.Placethirdhexnutontothethreaded
pipe.
5) Connectthefour(4)D-loops,E-chainlinkwithtwo(4)threaded
nipplesandinspectioncabletothecanopyusingthelockwash-
erandhexnutsupplied.
6) Routewiresandgroundwirethroughchainlinkandthrough
canopyintotheelectricalbox.Attachinspectioncabletooutlet
box.
7) Hooktheinspectioncablesecurelytothebox.
8) Movethecanopyuptotheceilingontothethreadednippleand
usingtheknullednutthreadontothethreadednippletosecure
intoplace.Threadonthenial.
9) Installthe(6)glassbracketsusingthe(12)screwsandball
knobsasshown.
10) Placecurvedglasspanelsintoplaceandsecureintoplacewith
the(24)thumbscrews,acrylicwashers,ballknobsasshown.
11) Installtherecommendedbulbs.
12) Attachmountingstraptooutletboxwithstrapmountingscrews.
13)Groundinginstructions:(SeeIllus.AorB)
A) Onxtureswheremountingstrapisprovidedwitha
holeandtworaisedimples.Wrapgroundwirefrom
outletboxaroundgreengroundscrew,andthreadinto
hole.
B) Onxtureswhereacuppedwasherisprovided.Put
groundwirefromoutletboxundercuppedwasherand
greengroundscrewandthreadscrewintoholein
mountingstrap.
Ifxtureisprovidedwithgroundwire.Connectxtureground
wiretooutletboxgroundwirewithwireconnector,afterfollow-
ingtheabovesteps.Neverconnectgroundwiretoblackor
whitepowersupplywires.
14)Makewireconnections.Referencechartbelowforcorrectcon-
nectionsandwireaccordingly.
GREEN GROUND
SCREW
CUPPED
WASHER
OUTLET BOX
GROUND
FIXTURE
GROUND
DIMPLES
WIRE CONNECTOR
OUTLET BOX
GROUND
GREEN GROUND
SCREW
FIXTURE
GROUND
A
B
Connect Black or
Red Supply Wire to:
Connect
White Supply Wire to:
Black White
*Parallel cord (round & smooth) *Parallel cord (square & ridged)
Clear, Brown, Gold or Black
without tracer
Clear, Brown, Gold or Black
with tracer
Insulated wire (other than green)
with copper conductor
Insulated wire (other than green)
with silver conductor
*Note: When parallel wires (SPT I & SPT II)
are used. The neutral wire is square shaped
or ridged and the other wire will be round in
shape or smooth (see illus.)
Neutral Wire
LOOP - 1/8-27 NPSM x .375 [9.53]
(2) LOCKWASHER
INSPECTION CABLE
(2) HEXNUT
A-FIXTURE
D
E
F
COUPLER
B
C
GEMSTRAP W/GROUND SCREW
(2) STRAP MOUNTING SCREWS
(3) HEXNUT
THREADED
NIPPLE
OUTLET BOX
WIRE CONNECTOR(S)
KNURLED NUT
FINIAL
H-GLASS (6)
(12) SCREWS
(24) THUMB SCREWS
(24) ACRYLIC WASHERS
(6) GLASS BRACKETS
(24) THUMB SCREWS
TO SECURE GLASS
(12) SCREWS
FOR GLASS BRACKETS
(24) ACRYLIC WASHERS
/