English
Watch and Record TV shows on CD or DVD
Hardware User's Guide
Instant TV Deluxe USB
Instant TV Deluxe USB
ADS Tech
website: www.adstech.com
Support: www.adstech.com/support/support.asp

page 3

page 3
Table of Contents
© 2004 ADS Technologies. All Rights Reserved
Revision 4 March 2004
Apple and Macintosh are registered trademarks of Apple Computer, Inc. Microsoft, Windows, & Windows 98 are registered trademarks of Microsoft
Corporation. IBM is a registered trademark of the International Business Machines, Inc.
ADS is a registered trademark of ADS Technologies Inc. ADS Technologies (ADS) makes no warranty of any kind with regard to this material, including but
not limited to, the implied warranties of merchantability and tness for a particular purpose. The information furnished within this written document is for
information purposes only and is subject to change without notice. ADS Technologies assumes no responsibility or liability for any errors or inaccuracies
that may appear herein. ADS makes no commitment to update or to keep current information contained within this document. (rtt)
Quick Installation Guide . . . . . . . . . . . . . . . . . . . . . . . . . . . . . . . . . . . . . . . . 4
Driver Installation . . . . . . . . . . . . . . . . . . . . . . . . . . . . . . . . . . . . . . . . . . . . . . 5
IR Blaster Installation. . . . . . . . . . . . . . . . . . . . . . . . . . . . . . . . . . . . . . . . . . . 7
Capture Wizard. . . . . . . . . . . . . . . . . . . . . . . . . . . . . . . . . . . . . . . . . . . . . . . . 8
Service and Warranty. . . . . . . . . . . . . . . . . . . . . . . . . . . . . . . . . . . . . . . . . . . 28

page 4
page 5
Quick Installation Guide:
This Quick Installation Guide should be used as a reference guide only. It is highly recommended
that you read the complete Instant TV Deluxe Manual before using this product to help ensure you
get the most of your Instant TV Deluxe.
Follow these instructions when using the Instant TV Deluxe for the rst time.
Instant TV Deluxe Hardware Installation
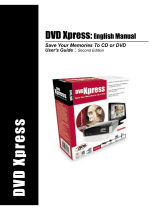
1) Connect the Coaxial cable or Audio/Video cables from your video source to the Instant TV Deluxe.
2) Insert the Instant TV Deluxe CD into your CD-ROM drive.
3) Plug in the Power and connect the Instant TV Deluxe to an open USB port on the back of
your computer.
4) Drivers for the Instant TV Deluxe are located on the root of the CD. When prompted for drivers,
direct the driver installation to your CD-ROM.
(USB Instant TV Deluxe connection diagram image)
ADS IR Blaster Hardware Installation:
1) Insert the Instant TV Deluxe CD into your CD-ROM drive.
2) Connect the ADS IR Blaster into an open USB port on the back of your computer.
3) Drivers for the IR Blaster will be located on the Instant TV Deluxe CD. When prompted for drivers,
direct the driver installation to your CD-ROM.

page 4
page 5
Step by Step Driver Installation:
Step 1:
Insert the Instant TV Deluxe CD into your CD ROM drive, then plug the USB cable from the Instant
TV Deluxe to an open USB port on the back.
Step 2:
After plugging in the USB Instant TV Deluxe into an open USB port on the back of your computer,
the “Found New Hardware Wizard” will come up, click “Next” to proceed with the driver installation.
Step 3:
Please wait for the computer to search for the proper drivers and once the “Next” button is
highlighted, click on “Next” to go to the next step of the driver installation.
Step 4:
You now have nished installing the drivers, click the “Finish” button to nalize the driver
installation.

page 6
page 7
IR Blaster
The IR Blaster is an infra-red transmitter and receiver. As an IR Receiver the IR Blaster acts as a
receiver for the Instant TV Deluxe remote control. As an IR Blaster the device gives you the power to
control external TV receiver devices.
The IR Blaster is a very powerful addition to a TV Capture card. Today many people do not receive
TV signals over conventional analog cable systems. Many households today get TV content
delivered via digital cable or satellite TV receivers. Instant TV Deluxe, the IR Blaster and included
software allow you to schedule recordings of your favorite TV shows and capture those programs
to your computer hard drive, no matter how the TV signal is delivered to your home. The IR Blaster
communicates with these external tuning devices and allows you to record TV shows to your
computer via the RCA or S-Video cables instead of the cable ready tuner.
Important Note: The IR Blaster is a powerful IR transmitter/receiver device but please keep
in mind that Infra-red signals are a line of sight technology. IR signals cannot pass through walls.
The IR Blaster can control devices that are in the same room or proximity to the IR Blaster device.
IR Blaster as a Remote Control Receiver
The Remote control and IR Receiver function of the IR Blaster gives you complete navigation and
control of the Beyond TV and Quick DVD applications.
(See the Remote Control overview section for complete remote control review.)
Applications supported by IR Blaster receiver and Remote Control
- SnapStream Beyond TV 3.5 SE
- ArcSoft Quick DVD
- CapWiz – coming soon via a free internet download.
Note: Currently only the on-screen remote control is available for CapWiz. We will have a free
download patch that adds remote control to CapWiz in the near future.
IR Blaster as an IR Code Transmitter – Blaster function
The IR Blaster is also a transmitter. It has been designed to allow you to control external TV tuning
devices such as Cable Set Top boxes and Satellite receivers.
Applications supported by IR Blaster function:
- SnapStream Beyond TV 3.5 SE
When you run the Beyond TV Setup Wizard and choose Cable box or Satellite receiver as your TV
source the IR Blaster will send codes to your tuning device to change channels. The Beyond TV
setup Wizard lists several remotes in it’s database. If your device is not in the list you can “Teach”
the IR Blaster your remote control codes. The IR Blaster will learn your TV Remote TV tuning codes
so that the IR Blaster can change the channels on your Cable Set Top box or satellite receiver so
you can schedule recordings and automatically change channels to record the correct show.
(see instructions on Beyond TV Setup Wizard for complete setup instructions)

page 6
page 7
IR Blaster and the Instant TV Deluxe Remote
Once you have programmed the IR Blaster to send TV channel changing codes to your set top box,
you can use the Instant TV Remote in conjunction with the IR Blaster to control your set top box.
1) Point the Instant TV Deluxe remote at the IR Blaster – press 4 and Enter – the IR Blaster
will receive the code and then transmit the correct code to change to channel 4 on your
set top box.
2) Use the computer keyboard to change channels on your set top box – press 4 followed by
enter and the IR Blaster will send a code to change your set top box to channel 4.
Note: The Instant TV Deluxe Remote is not a learning remote. The IR Blaster is a learning IR Blaster
when used in conjunction with the Beyond TV software. The Instant TV Remote cannot directly
control your TV or set top box….the IR Blaster does.
IR Blaster Installation:
NOTE: Make sure that you have the Instant TV Deluxe CD inserted into your CD-ROM drive when
plugging in your hardware.
The ADS IR Blaster is a plug ‘n’ play USB Device, so it’s easy to setup. Simply plug it into any PC
running Windows and you will automatically be prompted for the driver disk.
Step 1:
Plug the USB IR Blaster into an open USB port on the back of you computer; and a “Found
New Hardware Wizard” window will come up to start the driver install, click “Next” to
continue on.
Step 2:
The Windows Logo testing window will come up, to continue with the driver install click on
“Continue Anyways”.

page 8
page 9
Step 3:
You are now nished with the hardware driver install of the ADS IR Blaster, click “Finish”
to nalize the installation.
This USB device creates a wireless, infrared connection between your cable box or satellite
receiver and the PC running Beyond TV.
The USB IR Blaster,” allows any USB-equipped PC to exchange infrared signals with common
audio/video equipment. For Beyond TV users who receive their television signal via satellite or
cable boxes, the USB IR Blaster completes a critical link: it allows the PC running Beyond TV to
tune to the channels received on your receiver box so you can watch live TV and make recordings.
Best of all...the infrared signal means that the connection between PC and receiver box is wireless.
Additionally, this USB device does away with the hassles of similar devices that use a serial
connection.
Capture Wizard
Capture Wizard: Easy Video Capture and Playback
Introduction:
This is the fastest and easiest way to Watch TV, capture MPEG-1 (VCD), MPEG-2 (SVCD, DVD)
and DivX video on your PC. Use the Capture Wizard screens to verify your video connections,
video compression format and where you want to store your captured video les on your computer
drive.
Use CapWiz to quickly capture Video or just watch TV. CapWiz also allows you to set timed
recordings, schedule a recording and delayed recordings. You can also easily set capture
quality settings with DVD Good, Better and Best Settings or use the custom settings to capture
video just the way you want. CapWiz also features advanced controls such as variable bit rates,
preprocessing temporal and spatial lters to help clean up noisy TV signals or old VHS tapes.
With CapWiz you can even use the Direct to Disc feature (for DVD, SVCD or VCD) to capture and
burn directly to a CD or DVD disc. Direct to Disc can save hours in your effort to convert old VHS
tapes to DVD disc or record your favorite show direct to disc and watch in your home theatre DVD
player.

page 8
page 9
Step One: Open Capture Wizard (Cap Wiz.)
Click the Cap Wiz icon on your Desktop
Or Click “Start” -> “Programs” -> “ADS Tech Instant TV
Deluxe” and click on “Capwiz”
Choose worldwide video standard based on country –
For Users in North America, you will select NTSC.
For Users in Europe and many other countries you
will select PAL.
For more information on these standards, click on
“Learn more about worldwide video standards”
Step Two: Select Video Inputs
Choose RCA or S-Video or TV Tuner based upon your
video source.
Step Three: Create le name and select le location
We will automatically select ‘My Documents\My Videos” as
the default location to store your video les. You can select
a different location if you desire.
Type in the le name for your video capture.
Step Four: Choose video format
In this step you will select between MPEG-1 and MPEG-2
video compression formats. Select MPEG-2 if you wish to
capture video in the highest quality DVD format. Select
MPEG-1 if you want to capture video in the VCD format.
The Disk Space indicator shows the amount of disk space
you have available and an example of how much video
you can capture if you selected MPEG-2 at 3 Mb/sec.
For more information on these MPEG, click on “Learn
more about video formats”.

page 10
page 11
Menu Options
File Name
Auto-Naming/
Unique Name
Playback List Box
Status Indicator
Application Links
Record/Play Controls
Application Links
Record/Play Controls
Status Indicator
Ready
Now you are ready to start viewing and capturing video.
You will need to start your camcorder or VCR playing.
Press Play on your video source (VCR, DVD player, etc.).
Click Finish and the Wizard screen will disappear and
you will see the full Capture Wizard interface.
Using Capture Wizard Video Capture/Playback tool for the rst time:
You have just completed the Wizard screens to ensure that you have connected your video cables,
selected your video format and now you are ready to capture video.
The Capture Wizard Interface
Preview and Record Video
1) Be sure your video device is playing a video
2) Click “Preview” and you will see video playing in the preview window. You will notice the
status indicators are Blue and are displaying “Preview”.
3) Click the “Stop” ( ■ ) button or press the “esc” key on your keyboard to stop video
preview.
4) If you Click the Red “Record” ( ● ) button while previewing video, the video will stop
momentarily, then start again. When the video preview starts again, you are recording.
You will notice the status indicators have turned red and are displaying “Record”.
5.) To Stop recording, press the “Stop” ( ■ ) button or press the “esc” key on your keyboard.
6.) You will notice that the le name has been added to the playback list box.

page 10
page 11
Ways to begin Recording
1. You can start recording from the Stop or idle status in CapWiz or while you are previewing video.
2. Click the red record( ● ) button to begin recording at any time.
3. To Stop recording, Click the “Stop” ( ■ ) button or the “esc” key on your keyboard.
4. The video will be displayed in the resolution you selected for the video capture:
a. VCD 352 x 240 NTSC / 352 x 288 PAL
b. SVCD 480 x 480 NTSC / 480 x 576 PAL
c. DVD 720 x 480 NTSC /720 x 576 PAL
Playback Captured Video
This is the default setting. Video will be played back at the resolution it was captured in.
1) Click on the le name in the Playback List Box, then click on the “Play” (►) button. You may
also double click on the le name for Instant Playback. You will notice that the status indicator
turns Green and the display changes to Play.
2) To Stop Playback, Click the Stop ( ■ ) button or press the “esc” key on your keyboard.
Seek through the video
If you have recorded a long video, you may want to jump ahead to a specic point in the video le
and continue playback from that point.
1) Use your mouse to drag the playback position slider to the point you desire.
2) Click the “Play” (►) button, or press the “Space” bar on your keyboard to resume
playback.
Keyboard Short Cuts:
Preview = Enter key
Record = “R” key
Instant Playback = double click le name
Play/Pause = space bar
Stop Record = esc key
Stop Preview = esc key
Advance 1 second (in Pause mode) = right arrow key
Rewind 1 second (in Pause mode) = left arrow key
TV Tuning and the Remote Control Button
You can tune TV channels by clicking on the Remote Control button.
This launches an on screen remote control.
The on screen remote displays:
- Time of day
- Cable or Antenna
- Current channel tuned
- Date
2
1

page 12
page 13
Channel Number pad – You can click the number pad to change channels.
Click the TV channel you want to watch, and then click Enter.
Mute – Click the Mute button to mute audio
Jump – The Jump button lets you toggle between TV channels. Click Jump and you will tune to the
previously tuned station.
Close Remote – Click the X at the upper Right of the remote to close the On-Screen Remote
Control.
Click the Remote Control button on CapWiz to launch the remote again.
Keyboard commands – you can change channels and move up and down the channel list via the
computer keyboard.
Please note: You can use keyboard commands only when the Remote Control is active (look for
the blue icon on the remote). If the blue dot is not lit, click anywhere on the remote to make it the
active application.
- Number Keys on keyboard - enter the channel desired and press Enter
- Up button – tune Up
- Down button – tune down
TV Settings
Click the TV Settings button on the remote - Here you can:
• Scan Channels – scan the active channels. All channels that
can be properly tuned will have a check mark by them. If you
wish to remote a channel from the channel list, un-check it.
• Cable – Antenna – Choose either cable TV or antenna.
• Click OK or Cancel to close the TV Settings box.
Capture Wizard Features and Functions
Recording File Name:
Before Recording, check the Recording Filename box in the upper left hand corner of the applica-
tion. The le name you selected in the Wizard Screen is listed here.
1. Keep this le name if you wish or run the Wizard to use a new le name.
2. Check the “Auto Naming” box and CapWiz will automatically name each captured le in
sequential order; i.e. if your video le is “My Video”, the rst le captured will be named “My
Video-000”, the second “My Video-001” and so on.
3. Every time you stop a capture, the new le name will be displayed in Playback List box.
4. You can also uncheck “auto-naming” and click the “Unique” button and CapWiz will use the le
name you enter in the lename box. You need to provide a new le name for each video clip
captured. If you do multiple captures without changing the unique le name, the le will be
written over each time you capture.

page 12
page 13
Playback List Box
The Playback list box shows the le names of your video captures. This list will match the directory
location you selected in the Capture Wizard screens. If you are unsure of the location you selected,
run the Wizard again.
Browse: The Browse button will allow you to browse to other le directories or hard drives. If you
select another directory, any MPEG video les located there will appear in the Playback list box.
Details: The Details button will allow you examine the details of the les in the Playback List box.
Click on the Details Button and a dialog box will open showing detailed information about each le
such as: Date, File Size, File Name and location on your system.
Click on any le in this dialog box and then click Details again and you will see more details about
this individual les such as:
1) Video bit rate
2) Audio sampling rate
3) Audio bit rate
4) Frame rate
Deleting a File:
From the detailed information box you can delete a le by clicking the “Remove” button.
CapWiz will ask you if you are sure, click OK and the le is deleted from your system.
Application Links
The icons at the side of the CapWiz screen allow you to easily jump from CapWiz to the bundled
applications that came with your product. You can quickly jump to VideoStudio or review the Capture
Wizard screens anytime video is not playing in the preview area. When you click on an application
icon, that application will start and CapWiz will automatically close.
Disable Wizard
You can repeat the Wizard steps and make changes to your settings by clicking the Capture Wizard
icon anytime video is not playing. The Wizard will run every time you start CapWiz unless you can
disable this by clicking Options at the top of the application and click on “Show Wizard” to uncheck
this selection.
1) Click or uncheck - Show Splash Screen to not have splash screen appear at startup
2) Click or uncheck - Show Wizard to not have Wizard screens appear at startup.
You can re-enable these features at anytime by re-selecting the options.

page 14
page 15
CapWiz Direct to Disc
Direct to Disc Wizard Overview
Capture Direct to Optical Disc:
CapWiz now includes the ability to capture directly to VCD, SVCD or DVD disc.
Burn an MPEG le to Optical Disc:
You can also load a previously captured MPEG-1 or MPEG-2 video le and burn to disc. You can
select and burn a single video le only to disc, so if you want to edit several clips and join them
together on a disc, you can use the other software applications included with your product (Video
Studio or DVD Movie Factory). While writing a le to a disc, you will see the video progress bar
advance to let you know the DVD writing progress.
No Hard disc space used…no worries about deleting les after your project or lling
your hard disc.
The most exciting and revolutionary capability is the real-time direct to disc capability. You can
create a VCD, SVCD or DVD without ever storing the video on your computer hard drive. Many
users have expressed the desire for a fast and simple way to archive video tape to optical disc and
the Direct to Disc Wizard in CapWiz 3.5 will allow customers to accomplish that goal. Just capture
and burn to disc without having to store on your hard drive rst. No worries about hard disc space,
le maintenance; just capture and burn.
Support for All Media Types:
You can capture to any type of optical media (CD-R, CD-RW, DVD+R, DVD+RW, DVD-R, DVD-RW).
Simple DVD Authoring:
Direct to Disc capture in CapWiz has been designed to be very simple so don’t expect too many
fancy DVD Authoring tools. We always include either DVD Movie Factory or Ulead Video Studio
for users who want to be more creative. CapWiz and the DTD feature are meant to be the fast and
easy ways to capture video to the PC or to get video on disc.
Single Session only:
In speaking with Customers we found that most people just want a fast and simple way to archive
video tape to DVD. We have excluded features such as leaving a disc open for mulit-session
recording (adding more video les at a later time), editing the DVD, and other features found on full
featured DVD Authoring packages. You do have those capabilities with other software bundled with
your Instant DVD or DVD Xpress product. Again, the goal was to keep the Direct to Disc capability
in CapWiz very fast, simple easy and un-confusing.

page 14
page 15
What is Single Session?
Single Session means that once you have recorded to the disc, the disc cannot be appended or
added to. You can record only one time to a disc, one home movie one video capture session. You
can only record video to a blank disc. If there is existing video content or some other type of le on
the disc, you cannot capture video to that disc. The disc must be blank. Therefore if you are using
a re-writable disc with video content on the disc, you will have the ability to playback the le (so you
can see what is on the disc) but if you want to capture to that RW disc, you will be forced to erase
the video le before capturing, or you can choose a different disc to record.
DVD Authoring Features:
Record to any type of Optical Media
Select Optical drive
Conrmation of Optical drive capabilities
Conrmation of media type in drive and media condition (disc must be blank to allow recording)
Select video compression format
Display of available video record time based on video compression settings and disc type
Create Movie Title (Volume name)
Create Video Clip name
Set record duration time (display of available time)
Set Chapter point interval
Select menu Background template
Quick Guide – CapWiz Direct to Disc Wizard
We have tried to make the Direct to Disc Wizard simple to use. You can begin recording video
directly to a disc in as few as 4 Clicks. Here are the quick step by step instructions to start
recording to disc in real time.
1) Insert a Blank CD or DVD disc into your disc drive.
2) Click the Direct to Disc Wizard button.
3) Select Capture Direct to Disc or load a le to write to disc.
4) Select the Video format you want to record (VCD, SVCD, DVD)
5) Choose the disc drive you want to use for recording.
6) Check disc status information on the Step 1 Screen.
7) Click NEXT
8) Type in the name your movie title and video clip
9) Set Duration time or choose “None” for manual control
10) Set Capture point time intervals or “None”
11) Click Record to Disc
12) Click Yes to begin recording after disc has been initialized.
Direct to Disc Wizard Instructions
Direct to Disc Wizard:
You will notice that we have added a link button on the lower left
hand corner of the CapWiz screen called “Direct to Disc” –

page 16
page 17
Clicking the Direct to Disc button launches the Direct to Disc (DTD) Wizard. The DTD Wizard can be
launched while CapWiz is idle (no video preview) or wheil video is being previewed. You cannot start the DTD
Wizard while you are recording to the hard drive or if you are playing back a previously recorded video le.
Splash Screen:
The splash screen introduces the user to the DTD capabilities. This splash screen can be disabled so it will
not appear again. Click NEXT to Continue
DTD Wizard Step 1:
In Step one you select if you want to capture and burn or load a le to burn, select your drive and video format
you want to capture and burn and verify the drive capabilities and your optical media.
Capture and Burn or Load a le to burn.
The default setting is to capture and burn. If you want to burn a previously captured le, choose this setting
and browse for the le.
Video Compression Settings:
Select the video format (VCD, SVCD or DVD) and compression setting (Good, Better or Best for DVD or
choose Custom). You will be shown the amount of time availablefor recording on the disc based on the disc
media and quality setting.

page 16
page 17
These settings over-ride any capture setting you have previously selected in CapWiz. However, If
you choose “Custom” - the DTD Wizard will use the custom capture settings you have selected in
CapWiz.
Select Disc Drive:
If you have more than one Optical drive you can select the drive you want to use for disc burning.
The DTD Wizard will examine the drive and show the type of media supported by the drive. This
will show the capabilities of your drive. Not all optical drives support burning to all media types.
You must have a blank CD or DVD disk in the disc drive before starting the DTD Wizard. When
you select the drive the DTD Wizard not only examines the capability of your drive, but also detect
the type of media in the drive. The Media Type will be displayed and the type of contents on the
disc (if any) will also be displayed. You need to use a Blank disc for recording, so be sure that the
“Contents detected on the disc” message shows that the disc is Blank.
What can I burn to what?
Type of Drive Common Media Type Video Format on Disc
CD burners CD-R or CD-R/RW VCD or SVCD
DVD Burners CD-R, CD-R/RW VCD or SVCD
DVD-R, DVD-RW, DVD
DVD+R, DVD+RW DVD
Check the capabilities of your drive and the type of media you have before starting your video
project.

page 18
page 19
Error Proof :if you select a drive with a CD-R inside the video format will automatically change to
the best video format for this media, which would be SVCD. You cannot capture DVD to a CD-R
disc. You cannot capture VCD to a DVD disc. These are formats that are incompatible with the
media type and we don’t want you to make a mistake…..so we will try our best to make you Error
Proof.
DTD Wizard Step 2:
In step 2 you customize your video disc with Movie and video clip titles, set video capture duration
times, auto chapter timing points and back ground template.
Background Template:
You can select from several background templates. CapWiz 3.5 includes a dozen templates to
choose from. Scroll through the background menus. The menu that is visible is the one that will be
created on your video disc.
Movie title Name:
You type in the main title of your DVD movie. Movie Title name has a limit of 10 characters.
Video Title Name:
You can also name the video clip to customize your video disc. The Video Title name has a limit of
12 characters.
Capture Duration:
The DTD Wizard shows you the approximate record time available on the disc and also allows
you to select preset record duration times or you can click the Custom button to set your own
exact record time settings. If you want to have manual control of the record time, use the “None”
selection choice in the duration time drop down menu.
Stop Recording:
If you have selected a Record duration time, recording will stop when the record time duration has
been met. At this point the disc will be nalized and after a few seconds or up to a few minutes
(depends on your drive speed and media type) the nished disc will be ejected.

page 18
page 19
You can also click the Stop button on CapWiz or press the Escape key (ESC) on your keyboard
to stop recording at any time. Please BE AWARE that if or when you stop recording, the disc will
be nalized and you will have a CD or DVD with a background menu and a video le recorded on
the disc even if you stop capture after a few seconds.
The disc will have been written to and will no longer be recordable. Avoid mistakes and wasted
discs with a bit of pre-planning to know what you want to capture before you get started.
Error Proof: If you do not set a capture duration time you can possibly capture beyond the
capacity of the disc space. CapWiz monitors how much video is recorded on the disc and the
available disc space. When you reach 99% capacity CapWiz will automatically stop recording
and nalize your disc.
Auto Chapter Setting:
When creating DVD movies, the DTD Wizard allows you to select how often you want to set a
chapter point. You can set a chapter point to occur at specic time intervals (1minute, 3 minutes, 10
minutes, etc.). Chapter points make it easier to navigate through a long movie. When playing the
video on your DVD player, you can use the NEXT or PREVIOUS buttons to jump from one chapter
to the next.
Note that on the DVD Templates you will see a space for only one (1) video thumbnail. This is
because there is only one (1) video title (video clip) recorded to each disc. The chapters you set
are spaced within this video clip. You will not see a video thumbnail for each chapter point, but
you will be able to use the NEXT and PREVIOUS buttons on your DVD player remote control to
jump from chapter to chapter.
Auto chapter setting is not supported for VCD or SVCD disc formats – so this selection will be
grayed out when you are creating a VCD or SVCD.
Record to Disc:

page 20
page 21
Click the Record to Disc button to begin the recording process. Before actual direct to disc
recording can take place, the CD-R or DVD disc must be initialized. The initialization process
can take from a couple of seconds or up to a minute depending upon your disc drive and media
type. When you click the Record to Disc button you will be presented with the “Disc Initialization
Advisory” message. This message is to advise you of the initialization process. After you are
familiar with this process you can select “Don’t show again” and the message will not appear in
future recording sessions.
Ready to Record:
Once the disc has been initialized you will see the record conrmation dialog box. Recording will
not start until you click the “YES” button. This provides you the opportunity to cue up your video to
the exact start position. Once you click YES, recording will start in approx. 1 second. If you decide
you are not ready or you want to make a change to any record settings, click NO to return to the
Step 2 Wizard screen.
Recording to Disc:
Once you have started to capture directly to optical disc you will see the preview video screen
appear and the CapWiz indicator will display “Recording DTD”.
CapWiz will also display the current record time as well as audio and video formats being recorded.
After 30-40 seconds you will see the indicator LED on your optical drive begin to ash. This
indicates that audio and video are being written to your disc.
Once the duration time has been reached or after you have stopped capture the navigation menu
will be written to disc and the disc will be nalized so it is ready to play in a DVD player or with DVD
player software on your PC.
Page is loading ...
Page is loading ...
Page is loading ...
Page is loading ...
Page is loading ...
Page is loading ...
Page is loading ...
Page is loading ...
Page is loading ...
/