Page is loading ...

PIPETMAX® 268
Setup Guide
OVERVIEW
I Unpacking
II Install Removable Tray
III Make Connections and Power On
IV Run PIPETMAX Alignment Utility
V Prepare to Run Protocol
VI Run Protocol
gilson.com/contactus

2
I UNPACKING
PIPETMAX is delivered with most major components already assembled. Keep the original packaging
if PIPETMAX must be returned to the factory.
Installation Site Requirements
Power Requirements (External Power Supply)
Voltage Input
Frequency: 50 to 60 Hz
Voltage: 100–240V AC
Voltage Output
Voltage: 24V DC
Current rating: 6.25A, 150W
Temperature Range
5°C–40°C
Stable, level surface
Maximum Dimensions (W x D x H)
PIPETMAX with Rotating Cover Installed on
Optional Riser Assembly for Off-Bed Tip Disposal
54.4 x 65.5 x 69.6 cm (21.4 x 25.8 x 27.4 in)
Accessories and Documentation
● Allen wrench
(for removing shippingbracket)
● Removable Tray
● Pipette Head(s)
● Black Plug
● Power Supply
● Power Cord
● USB Cable
● Tip Reload Block
● Tip Disposal Bin
● USB Drive
● Installation Qualification Procedure
● Declaration of Conformity
● Quality Control Checklist
● Items Included Checklist
● Packing List

3
Instructions
These instructions assume that you have already cut the shipping straps and tape and have cut open
the box.
1 Remove the open-ended cardboard box.
2 Remove the box of accessories and open it.
3 Lift the printed, outer cardboard box up to remove.
CAUTION
It is recommended that two people lift PIPETMAX out of the box as it weighs approximately
24.9 kg (55lbs.).
4 Grip PIPETMAX at the recesses near the base. There is one recess in the front, one in the
back, and one on each side. Use these recesses when lifting PIPETMAX out of the foam-lined,
cardboard tray.
NOTICE
Do not attempt to lift PIPETMAX from the cover or from the X-arm (the horizontal arm).
Always lift the instrument from its base.

4
5 Place PIPETMAX with cover on a lab bench.
PIPETMAX is configured with one of two safety interlocks. One interlock is internal to the
rotating cover installed on the instrument, and the other interlock is an external sensor used
when the instrument is located in a hood. The safety interlocks prevent the instrument from
operating when the rotating cover or hood door is open. If PIPETMAX was ordered without a
rotating cover, it must run in a hood. When the instrument is installed in the hood, the external
sensor must face the door of the hood and be located within 15 cm (6 in) of the door.
PIPETMAX Configured with External Safety Interlock Sensor and Placed in Hood
6 Remove the film protecting the rotating cover (ifinstalled).

5
7 Remove the shipping screws and bracket using the
tool provided and then store the shipping screws and
bracket in the rear panel for future use if PIPETMAX
needs to be shipped or transported.
8 Remove the shipping brace from the rear panel by
loosening the thumb screws securing the shipping brace
to PIPETMAX. After removing and storing the shipping
brace, tighten the thumb screws.
Shipping Brace
(Rear View of PIPETMAX®)
9 Remove the foam block preventing the tray from moving.
10 Remove the tape securing the alignment cable.
Shipping Screws
(Front View of PIPETMAX®)

6
II INSTALL REMOVABLE TRAY
A removable tray for placement of labware and tip racks is required.
There are two removable tray options:
● 9-position removable tray (microplate footprints, but not for 384-well microplates)
● 9-position removable tray for 384-well microplates
1 While holding the handles on the sides of the tray, lower the removable tray onto the fixed tray.
It is keyed and will only mount one way.
2 Grip the removable tray and then gently rock it back and forth.
Removable Tray Installation on PIPETMAX with Rotating Cover

7
If it seems that the removable tray is shifting position on the fixed tray, use a 3 mm Allen wrench
and gentle pressure to adjust the spacers on either side of the fixed tray. Spacers should just barely
contact the removable tray. Remove and then place the removable tray again to ensure there is not
any significant interference.
Spacer Adjustment
LEFT RIGHT

8
III MAKE CONNECTIONS AND POWER ON
PIPETMAX® Rear Panel Connections
1. Input/Output
2. USB host (Not Supported)
3. USB host
4. Ethernet (Not Supported)
5. USB device
6. RS-232 (Not Supported)
7. HDMI (Not Supported)
8. Power receptacle
9. Power switch (MAINS)

9
1 Use the USB cable supplied in the accessory package to make the connection between the USB
device port on PIPETMAX and a USB port on the supplied tablet or PC.
2 The connection from the external power supply to PIPETMAX uses a connector with a locking
collar. Use the power cord from the external power supply to make the connection between the
power receptacle on PIPETMAX and the external power supply. Check the alignment of the pins
and then push in until it clicks and locks in place.
3 Use the supplied power cord to make the connection between the external power supply and
the AC power source.
4 Turn PIPETMAX power on using the power switch located on the rear panel. The indicator light
on the front panel illuminates.
5 Connect the supplied tablet or PC to a power source and power it on. Install
TRILUTION® micro Software on the PC per the supplied installation instructions.
TRILUTION micro is factory-installed on the tablet.

10
IV RUN PIPETMAX ALIGNMENT UTILITY
The PIPETMAX Alignment Utility is installed as part of the TRILUTION micro installation.
Run the PIPETMAX Alignment Utility to ensure proper alignment. It is only necessary when setting up
the instrument for the first time, or if instructed to do so by your local Gilson representative.
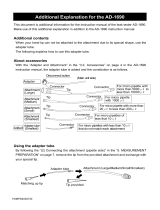
1 If your PIPETMAX does not have a rotating
cover and uses the external safety interlock
sensor, disconnect the BOTTOM terminal
block connector from the input/output ports
on the rear panel.
2 Pass the end of the alignment cable with
pre-wired connector through the access hole
at the back of PIPETMAX.
3 The connector is labeled BOTTOM because it
connects to the bottom set of input/output
ports on the rear panel of PIPETMAX. Make
the connection.

11
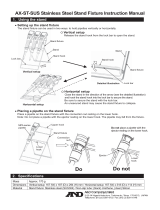
4 The clips to secure the tip racks on the tray can interfere with the alignment. Ensure that the
clips ( ) are positioned as shown in the diagram below, and that the thumbscrews have been
tightened.
Clip Locations
5 Close the rotating cover or the fume hood door.

12
6 Start the PIPETMAX Alignment Utility. On the PC or tablet, select the
Start
button and then
select (
All apps
) >
Gilson Applications
>
PIPETMAX Alignment Utility
.

13
7 Select
Start Alignment
. A message box appears:

14
8 Select
Yes
to start running the utility.
Wait approximately six minutes while the alignment runs.
NOTE
If the rotating cover or fume hood door is opened while running, the alignment is canceled.
A notification appears when the alignment is complete. Remove the alignment head.

15
9 Remove the alignment head by disconnecting the terminal block connector from the rear panel,
and then removing the thumb nuts securing it to the upper pipette head assembly.
Alignment Head Removal

16
10 Cover the hole on the rear panel from the exterior using the black plug supplied in the
accessory package.
black
plug

17
11 If your PIPETMAX does not have a rotating cover, it requires an external safety interlock. The
external safety interlock was disconnected prior to running the alignment. Reconnect the
BOTTOM terminal block connector to the input/output ports on the rear panel.
12 Close the PIPETMAX Alignment Utility.

18
V PREPARE TO RUN PROTOCOL
1 Start TRILUTION micro. Click the
Start
button and then select (
All apps
) >
Gilson Applications
>
TRILUTION micro x.x
.
The first time you start the software, no login or password is required. Optionally, set up users
with permissions and require a password.
2 Set the serial number. If the serial number is not entered, then the software will not be able to
communicate with PIPETMAX. The serial number is set on the tablet by Gilson. PC installations
require the user to enter the serial number.
a. On the Protocol Selection screen, select to access the Settings screen.

19
b. On the Settings screen, select
Protocol settings
.
c. Enter or verify the serial number for PIPETMAX in the Serial number field. The serial
number for PIPETMAX is located on the inside panel of the right support.
d. Select
Back
and then do one of the following:
● If the serial number was not changed, select
Back
to return to the Protocol Selection
screen.
● If you changed the serial number, you will be prompted to restart the
software. First , select
X
to close the message box. Next, select
X
in the
upper right corner to close the software. Select
Yes
when asked to confirm
and then restart the software. (Select the
Start
button and then select
(All apps) > Gilson Applications > TRILUTION micro x.x
.)

20
3 Build a protocol list.
Import Protocol or Create Protocol or Labware
/