Page is loading ...

USER’S GUIDE
A
V
A
I
L
A
B
L
E
I
N
SINGLE &
MULTICHANNEL
Progress made simple!

- 2 -
Contents Page
1 INTRODUCTION 3
2 PARTS CHECK LIST AND ACCESSORIES 4
3 GETTING STARTED 4
4 DESCRIPTION 5
5 PIPETTING JUST LIKE WITH PIPETMAN 6
6 PIPETTING MODES 7
7 PIPETTING SPEED CONTROL 11
8 PIPETMAN TIPS 11
9 GUIDELINES FOR GOOD PIPETTING 12
10 PERSONALIZE YOUR PIPETMAN M 14
11 GOOD LABORATORY PRACTICE FEATURES 15
12 PIPETMAN M POWER MANAGEMENT 15
13 CONFIGURATION 17
14 MAINTENANCE OF YOUR PIPETMAN M 18
15 CLEANING AND DECONTAMINATION 22
16 LEAK TEST 25
17 TROUBLESHOOTING 25
18 SPECIFICATIONS 26
19 SAFETY PRECAUTIONS AND LIMITATIONS OF USE 27
20 REPLACEMENT PARTS 28
APPENDICES 29
EC DECLARATION OF CONFORMITY 33
WARRANTY 35

ENGLISH
- 3 -
1 INTRODUCTION
Congratulations on the purchase of PIPETMAN
®
M the natural evolu-
tion of PIPETMAN, the world standard for pipetting.
PIPETMAN M is a new motorized member of the PIPETMAN
®
family
from Gilson. It is a fusion of PIPETMAN’s renowned accuracy, precision
and robustness as well as user-friendly functions to simplify your
professional life.
PIPETMAN M is so easy to use that you will have the feeling that you
are using a PIPETMAN Classic:
• Push-button: set the volume by turning the button left or right and
pipette with a simple push.
• Mode-button: to access additional features like repetitive mode, mix
function or easy readjustment.
That’s all you need to perform your pipetting tasks easily!
PIPETMAN M is nothing less than a PIPETMAN and much more:
• Easytouse: only one push-button for all pipetting functions.
• More pipette techniques for a large number of applications:
standard pipetting, repetition, mixing and reverse.
• Maximalcomfort: motorized aspiration and dispensing, easy ejection
of tips to avoid repetitive strain injuries (RSI).
• Minimaleort: PIPETMAN M is much lighter than other motorized
pipettes (RSI).
• “Nouser”eect: high reproducibility and accuracy due to motorized
pipetting.
• Morefunforbetterperformance.
PIPETMAN M is available in 10 models covering a range
from 0.5 µL to 1000 µL:
Model Reference Range Color code
P10M F81001 0.5 µL to 10 µL Red
P20M F81002 2 µL to 20 µL Pale yellow
P200M F81003 20 µL to 200 µL Yellow
P1000M F81004 100 µL to 1000 µL Blue
P8x20M F81005 1 µL to 20 µL Pale yellow
P12x20M F81006 1 µL to 20 µL Pale yellow
P8x200M F81007 20 µL to 200 µL Yellow
P12x200M F81008 20 µL to 200 µL Yellow
P8x300M F81011 10 µL to 300 µL Green
P12x300M F81012 10 µL to 300 µL Green
Push-button
Mode-button

- 4 -
2 PARTS CHECK LIST AND ACCESSORIES
Contents:
Just take a moment to verify that the following
items are present:
• PIPETMAN M pipette,
• PowerSupply5VwithACadapterandcable,
• 4BatteryTags,
• 4EjectorTags,
• Tipejectorextension(P10Mmodelonly),
• User’sGuide,
• QuickGuide,
• Safetybag,
• Certicateofconformity(includingbar-code
sticker),
• Lubricant(exceptforP10M,P8x20M,P12x20M,
P8x200M,P12x200M,P8x300M,P12x300M)).
3 GETTING STARTED
PIPETMAN Misprovidedwithaminimalbatterycharge.BeforeusingyournewPIPETMAN M, we strongly
recommend you to fully charge the battery. PIPETMANMcharges80%ofitsfullbatterycapacityin
less than an hour, it takes three hours to fully charge the battery. Please refer to PIPETMANM Power
Management(Chapter12)forchargingprocedure.
Switch on your PIPETMAN M:
Press the push-button to activate the pipette. The start-up screen appears:
Thepipettewilldoaselfcalibrationtest,thermwareresetsthepiston.
During initialization, displayed on the screen, you will see the volume
range,versionofrmwareandthenumberofreadjustments.
Your PIPETMAN M is preset on PIPET mode and isnowreadytopipette
(see Chapter 5).
PIPETMANMgoes intosleepmode after 3 minutes of inactivity.The
display will shut o. Just press the push-button to reactivate the pipette,
your last setting and pipetting mode will appear on the screen.
Accessories:
The following items are available separately:
• POWERCARROUSEL5-positionchargingcar-
rousel for single and multichannel models
FB1001
• BatteryTags(setof4)
F807013
• EjectorTags(setof4)
F807014
Please contact your Gilson Distributor for
theseaccessories.
Volume range
Version of
firmware
Number of readjustments

ENGLISH
- 5 -
4 DESCRIPTION
PIPETMAN M Single and Multichannel
models
Upperpart
Push-button and volume adjustment knob
Mode-button: direct access to all menu
functions
Tip ejector button
Display
Elastomer plug to cover the battery
charging port
Identity-tag clip
Identity-tag window
Connecting nut – attaches handle to
lower part
Tip ejector: removable to access tip-holder
Optimizedtip-holdertoreducetiptting
and ejection forces, removable for clean-
ing and servicing
Ejector clip
Ejector support
Cover
Ejector spacer
Reset:
To reinitialize your pipette, simultaneously
press on the push- and mode- button
for at least 5 seconds
Switch O:
To switch o your PIPETMAN M, press the
push-button for at least 5 sec.
Display
The PIPETMANMdisplayisanOLEDscreen.
Usually, it shows the current mode and opera-
tion step, pipetting volume, battery indicator
and piston status (aspirated and dispensed
volume) in real time.
Pipetting Mode
Indicator for aspiration
and dispense
Batterystatus
Purge
Volume
Warning messages appear in the
place of volume.

- 6 -
5 PIPETTING JUST LIKE WITH PIPETMAN
Using PIPETMAN M is as easy as using a mechanical PIPETMAN. Your PIPETMAN
M is set by default on “PIPETMode”, that means forward pipetting. You can
select a volume and start to pipette.
Switch on
Press push-button.
Adjust the volume setting
• HoldyourPIPETMAN M in pipette position.
• Turnthepush-buttonhalfway,thescreenwilldisplay:“clicktochangevol.”
• Nowpressthepush-button;thevolumeonthedisplaywillstartblinking,
you can now adjust the volume:
• Turn the push-button either clockwise to decrease volume or counter
clockwise to increase volume, like indicated on the button.
• Pressthepush-buttononetimewhennished.Thevolumeislocked.
Youarereadytopipette!
PIPET Mode
This is the classic pipette mode (forward pipetting), your pipette is simply
aspirating and dispensing.
Application note: You can use the PIPET Mode for all standard applications like DNA extraction, Plasmid Isolation,
Cloning, Dilution, PCR, qPCR and many others. You can easily pipette aqueous liquids like buffer, chemical solutions
(MgCl2, KCl …) and biological samples like blood, DNA and RNA.
• Fitatipsuitableforthemodelof
PIPETMAN M that you are using
(preferably use PIPETMAN TIPS for
assurance of accurate and precise
results;refertoChapter8).
• Pressthepush-buttontoaspiratetheselectedvolume.
• Todispense:
Click (press and release) the push-button. Three things happen: sample
dispense, automatic purge and piston reset to zero.
or
Keep your thumb pressing the push-button until the end of the dispense
cycle: The piston reset takes place after releasing the push-button again.
START button
Optional STOP
0
V
Purge
You must always fit a tip
before using any pipette!
The tip can be emptied at any time during a pipetting cycle. To do
so, turn the push button quickly: the message “click to abort” will
appear on the screen. Click on the push button to validate: the liquid
will be dispensed and an automatic purge followed by piston reset
to zero will occur.

ENGLISH
- 7 -
This feature enables you to remove the tip from the liquid, without aspirating anything.
• Ejecttipbypressingtheejectionbutton.
Your PIPETMANMisreadyagain for next pipetting cycle while maintaining the volume and the last
settings!
YouhavebeenpipettinglikewithyourmechanicalPIPETMANandonlyneeded2pushesonthe
push-button!
6 PIPETTING MODES
PIPETMAN M oers more pipette techniques for a large number of
applications:Youwillndallpipettingmodesinthemenu(forsystem
settingsrefertotheChapters7and13).Accessthemenubypushingthe
Mode-button. Tochooseoneofthepipettingmodes,turnthepush-
buttonandconrmyourselectionbyasimpleclick!
REPETITIVE Mode
TheREPETITIVEModeallowsyoutodistributea
samevolumerepeatedlyinpredenednumber
(N) of equal aliquots. You supply the aliquot
volume(AV)andthepipetteautomaticallycal-
culates the number of aliquots possible from the
nominalvolume(NV)ofthepipetteasfollows:
N = NV/AV (e.g. 100 L x 10 for P1000M).
You also can decrease the number of repetitions (e.g. 100 L x 10-(n≥1) for P1000M).
Application note: The REPETITIVE Mode is ideal for dispensing aliquots, e.g.; dispensing a PCR master mix into PCR
tubes or 96 plates, pipetting elution buffer for DNA extraction, preparing a target for spectrometric analyses, distributing
loading buffer into samples, etc.
•
Press Mode-button to access system menu, where you can choose between
dierent pipette modes.
Select REPETITIVEModebyturningthepush-button.Toconrmyourselectionclickonthepush-button.
• Turnthepush-buttonhalfway,thescreenwilldisplay:“clicktochange
vol.”
• Nowpressthepush-button;thevolumeonthedisplaywillstarttoblink,
you can now adjust the volume:
• Setthealiquotvolume:clickthepush-button,setthevolumebyturningthepush-buttonandclick
againtoconrmyoursettings.
• Setthealiquotnumber:ThemaximalnumberofaliquotshasbeencalculatedbyyourPIPETMAN
M. The number of aliquots ashes and you can decrease this number (N–(n≥1)) by turning the
push-button.Clickagaintoconrmyoursettings.
Youarereadytopipette!
Push-button
Mode-button

- 8 -
1. Fit a tip suitable for the model of PIPETMAN M that you
are using (preferably use PIPETMAN TIPS for assurance of
accurateandpreciseresults;refertochapter8).
2. Click push-button to aspirate total
volume. The volume aspirated will be
a little bit more than required (extra
volume). The extra volume is necessary
to ensure equal operating conditions
for each dispensed aliquot.
3. To dispense: click the push-button.
DISCARD appears on the screen. Dis-
card the extra volume and continue
dispensing the aliquots. PIPETMAN
M distributes the aliquot volume each
time you click the push-button. The
number of aliquots left to dispense is
displayed on the screen.
A warning beep indicates the last aliquot!
4. Topurge:Pressthepushbutton,PURGE appears on the screen, click again to purge and reset the
piston. Keep your thumb pressing the push-button until the end of the purge: the piston reset
takes place after you release the push-button again. This feature enables you to remove the tip
from the liquid, without aspirating anything.
5. Eject tip by pressing the ejection button.
MIX Mode
This is the classic pipette mode (forward pipetting) followed by a mixing
phase, composed of repeatedly aspirating and dispensing, as well as an
optional forward pipetting step.
Application note: The Mode MIX can be used to prepare a PCR master mix, enzyme restriction mix, protein solution, oligo-
nucleotide dilution and to mix samples with gel loading buffer and so on…you can mix two different solutions or homogenize
one solution. If you work with higher viscosity than water (e.g. restriction enzyme) you may change the aspiration speed
(refer to chapter 7). If you work with genomic DNA you should always pipette very carefully to avoid shearing and nicking.
• PressMode-buttontoaccessmenu,whereyoucanchoosebetweendierentpipettemodes.Select
MIXModebyturningthepush-button,toconrmyourselectionclickonthepush-button.
• Settherstvolume,namedVOLUME 1: click the push-button, set the volume by turning the push-
buttonandclicktoconrmyourselection.Thisistherstvolumeyouwillaspirateanddispense.
Set the second volume, named VOLUME2: click the push-button, you can now set the second
volumebyturningthepush-button.Clickagaintoconrmyoursettings.
You can set the VOLUME 1 or VOLUME 2= 0 µL the step will not appear. If you set the VOLUME 1 and 2 = 0 µL the
cycle will start directly with the MIX step.
• SettheMIXvolume:clickthepush-button,setthevolumebyturningthepush-button.Conrm
your settings by a simple click. It is the volume which will be aspirated and dispensed repeatedly.
“MIX” as long as you press the push-button.
You must always fit a tip
before using any pipette!
START button Optional STOP
V (+ extra vol)*
Purge
Start Purge
V (vol)
0
DISCARD
ALIQUOTES
PURGE
Click to Purge
Discard

ENGLISH
- 9 -
• Settheadditionalpipettingvolume,namedVOLUME 3: You can choose a volume to be aspirated
and dispensed after the mixing step, so you can continue pipetting! Click the push-button, set the
volumebyturningthepush-button.Conrmyoursettingsbyasimpleclick.
If you set the VOLUME 3 = 0 µL the cycle will stop after the MIX step.
Youarereadytomix!
1. Fit a tip suitable for the model of PIPETMAN M that you
are using (preferably use PIPETMAN Tips for assurance of
accurateandpreciseresults;refertochapter8).
2. ToaspirateVOLUME 1 press the push-button
3. Todispense:
Click (press and release) the push-button: Three things happen: sample dispense, automatic
purge and piston reset to zero
or
Keep your thumb pressing the push-button until the end of the dispense cycle: The piston reset
takes place after you release the push-button again. This feature enables you to remove the tip
from the liquid, without aspirating anything.
4. Toaspirateanddispensethesecondvolume“VOLUME2”,repeatsteps2and3.
5. Tomix:Pressthepush-button;aslongasyoukeepyourthumbpressingthebutton,thepipette
continues mixing. Release the push-button to complete the current mixing cycle.
6. To purge: press push-button, PURGE appears on the screen, click again to purge and reset the
piston.
7. Topipette:IfyouhavechosenaVOLUME3>0youcannowaspirateanddispensethisvolumeby
repeatingsteps2and3.
If you choose VOLUME1 = 0, step 2 won’t occur, if you choose VOLUME 2 = 0 µL, step 4 won’t occur, as well if you set
VOLUME 1 and 2 = 0 µL, step 1-4 will disappear. If you set VOLUME 3 = 0 µL step 7 will not occur.
You must always fit a tip
before using any pipette!
START button Optional STOP
0
V
Purge
Start Purge
Push-button pressed
V1
V2
V3

- 10 -
REVERSE Mode
TheREVERSEModeislike reversemodepipettingwithamanualpipette.
During aspiration an amount of liquid is added. After delivery the excess
volume remains in the tip and is discarded.
Application note: The REVERSE Mode is ideal for pipetting viscous liquids; liquids with high vapour pressure or those
which tend to foam. Your PIPETMAN M aspirates a selected volume and an excess. This excess compensates for the liquid
that remains as a film inside the tip during dispensing. For example: protein extraction, cell lysis, plasmid isolation, cell
culture, buffer preparation and many others…
Electrophoresis gels loading protocol: First change the pipetting speed of your pipette (see chapter 7). Aspiration can
be done by using the standard speed (by default speed 6). Dispensing should be done very slowly and carefully, to prevent
swirling and spilling of the samples, so select the lowest speed 1. Your pipette is now ready to load your gel! Please be
aware that if you purge without pulling out the tip air bubbles could get into your gel!
• PressMode-buttontoaccesssystemmenu,whereyoucanchoosebetweendierentpipettemodes.
Select REVERSEModebyturningthepush-button,toconrmyourselectionclickthepush-button.
• Setthevolume:clickthepush-button,setthevolumebyturningthepush-buttonandclickagain
toconrmyoursettings.
Youarereadytodoreversepipetting!
1. Fit a tip suitable for the model of PIPETMAN M that you
are using (preferably use PIPETMAN TIPS for assurance
ofaccurateandpreciseresults;refertoChapter8).
2. Clickpush-buttontoaspiratetheselectedvolume.An
amount of liquid equal to the amount of purged air is
added, the volume aspirated will be a little bit more
than the set volume.
3. Clickpush-buttontodispensethevolume,theaddition-
ally amount of liquid remains in the tip.
4. Topurge:presspush-button,PURGE appears on the
screen, click again to purge and reset the piston. Keep
your thumb pressing the push-button until the end
of the purge: the piston reset takes place after you
release the push-button again. This feature enables you
to remove the tip from the liquid, without aspirating
anything.
5. Eject tip by pressing the ejection button.
0
Purge
START button
Optional STOP
Start Purge
V (+ extra vol)*
Click to Purge
You must always fit a tip before
using any pipette!

ENGLISH
- 11 -
7 PIPETTING SPEED CONTROL
PIPETMAN M is set by default on speed 6. You may need to change the speed of aspiration or dispensing
depending on your application. You can change aspiration speed and dispensing speed independently
of one other: from very slow to very fast (speed 1 – speed 6). Your speed selection is memorized for
each pipetting mode until you change it again.
• PressMode-buttontoaccesssystemmenu,whereyoucanndthedierentpipettemodes,the
speedmenuandcongurationmenu.
• SelectSPEEDbyturningthepush-button,toconrmyourselectionclickonthepush-button.
• SetASPIRATIONSPEED: aspiration speed is blinking, set the speed by turning the push-button and
clicktoconrmyourselection.
• SetDISPENSINGSPEED: dispensing speed is blinking, set the speed by turning the push-button
andclicktoconrmyourselection.
• Afterselectingthespeedyougoautomaticallybacktopipettingmode.
8 PIPETMAN TIPS
PIPETMAN TIPSaremadetothehighestspecications;strictqualitycontrolismaintainedthroughout
the manufacturing process. These tips are used to calibrate PIPETMAN M, therefore for optimum per-
formance we recommend using PIPETMAN TIPS with your PIPETMAN M.
However, PIPETMAN M also oers you a high compatibility with a large
number of other tips. For more information please feel free to contact your
Gilson Distributor.
PIPETMAN TIPS have the Gilson logo engraved on their collar, ensuring that
you have a genuine Gilson product. To ensure accuracy and precision, Gil-
son’sQualityAssuranceSystemfocusesonthefollowingcriticalparameters.
• PIPETMANTIPS are made from pure polypropylene (virgin, metal-free,
toavoidthepossibilityofcontamination).Theyareavailablesterilizedandwithlters.
• SterilizedPIPETMANTIPSarecertiedfreeofdetectableRNases,DNases,DNA,RNA,andproteases.
• Optimizedshape(revisedcollarforoptimumsealing,thinwalls,andnepoint),makingthemeasier
to mount, more exible, with no vortexing, and improved precision.
• PIPETMANTIPSarefreefromevenmicroscopicdefects,especiallyatthe orice.All surfacesare
smooth and hydrophobic, thereby avoiding the excessive retention of liquids that causes poor ac-
curacy and a lack of precision.
• Moldandcavityreferencesaremarkedonthecollar,ensuringthetraceability.Forqualityassurance
purposes batch numbers appear on all packages (bags and boxes).
Gilson logo ID Number

- 12 -
1) FitnewPIPETMANTipforthebestresults(seeChapter18).
For single channel models, push the tip-holder into the
tipusing a slight twisting motion toensure a rm and
airtight seal.
For multichannel models,PIPETMANTipsarebesttted
from the patented ROCKY RACK available only in our
TIPACKs and TOWERPACKs. ROCKY RACK is the dome-
shaped part of the pack that contains the tips. ROCKY
RACKmakesiteasytosecurelytthetipstoamultichannel
pipette, ensuring an airtight seal on all channels without
the need to use undue pressure or to touch the tips.
2) Pre-rinsethetip.Pre-rinsingconsistsofaspiratingtherst
volume of liquid and then dispensing it back into the same
vessel (or to waste). Subsequent volumes that you pipette
willhavelevelsofaccuracyandprecisionwithinspecica-
tions. Some liquids (e.g. protein-containing solutions and
organicsolvents)canleavealmofliquidontheinsidethe
9 GUIDELINES FOR GOOD PIPETTING
Aspirate and dispense
• They form an air-tight seal with the tip-holder,
preventing the leaks that cause poor accuracy and
a lack of precision.
• PIPETMANTIPS (exceptlter tips) may be auto-
clavedat121°Cfor20minutesat0.1MPa.
Do not autoclave PIPETMAN Filter Tips, they
have been sterilized!
To ensure the best performance from
your Gilson pipette, you shoud ALWAYS
use PIPETMAN Tips (in accordance with
ISO8655) system, because PIPETMAN Tips
were used to establish the specifications.
PIPETMAN Tips to use for best results
Pipette model Tips model Range Color code
P10M D10* 0.1 – 10 L Red
DL10 0.1 – 20 L
DF10 0.1 – 10 L
DFL10 0.1 – 10 L
P20M D200 2 – 200 L Pale yellow
DF30 2 – 30 L
P200M D200 2 – 200 L Yellow
DF200 2 – 200 L
P1000M D1000 100 – 1000 L Blue
D1200 100 – 1200 L
DF1000 100 – 1000 L
DF1200 100 – 1200 L
P8x20M, P12x20M DL10 0.1 – 20 L Pale yellow
DFL10 0.1 – 10 L
DF30 2 – 30 L
D200 2 – 200 L
P8x200M, P12x200M D200 2 – 200 L Yellow
D300 20 – 300 L
DF200 20 – 200 L
DF300 20 – 300 L
P8x300M, P12x300M D300 20 – 300 L Green
DF300 20 – 300 L
* A plastic adapter is required to eject D10 and DF10
tips (short tips). The adapter is supplied with P10M.
No adapter is required when using DL10 and DFL10
tips (long tips).

ENGLISH
- 13 -
wallofthetip;pre-rinsingthetipminimizesanyerrorsthatmayberelatedtothisphenomenon.
3) Holdthepipetteverticallyandimmersethetipintheliquid(seepage13).Pressthepush-button
toaspiratethesetvolumeofliquid.Waitafewseconds(timedependsonmodel,seepage13);
then withdraw the pipette-tip from the liquid. You may wipe any droplets away from the outside
of the tip using a medical wipe, however if you do so takecaretoavoidtouchingthetip’sorice.
4) Placetheendofthetipagainsttheinsidewalloftherecipientvessel(atanangleof10°to40°).
Pressthepush-button.Waitforatleastafewsecondsbeforereleasingthepush-buttontoexpel
anyresidualliquidfromthetip.Whileremovingthepipettedrawthetipalongtheinsidesurface
of the vessel.
5) Eject thetipbypressingrmlyonthetipejectorbutton.
General Guidelines for Good Pipetting
a.Makesurethatyoutnewtips.
b. Each new tip should be pre-rinsed with the liquid to be pipetted.
c.Whenaspirating,keepthetipataconstantdepthbelowthe
surface of the liquid (refer to Table).
d. Change the tip before aspirating a dierent liquid, sample, or
reagent.
e. Change the tip if a droplet remains at the end of the tip from
the previous pipetting operation.
f. Liquid should never enter the tip holder. To prevent this:
•Neverturnthepipetteupsidedown,
•Neverlaythepipetteonitssidewhenthereisliquidinthetip(s),
g.TheGilsonStandAdapter(seeChapter2)isrecommendedforusewiththeCARROUSEL and SINGLE
PipetteHoldertostoreyourPIPETMANMpipetteintheverticalposition.AlternativelythePOWER
CARROUSELcanbeusedtostoreandchargeupto5PIPETMANMpipettes.
h.Whenpipettingliquidswithtemperaturesdierenttotheambienttemperature,pre-rinsethetip
several times before use in order to reach equilibrium between the temperatures of the liquid and
the pipette’s dead-volume.
i. For volatile liquids you should saturate the dead-volume by aspirating and dispensing the liquid
repeatedly before aspirating the sample.
j. After pipetting acids or other corrosive liquids that emit vapors, clean the pipette, as described in
Chapter 15.
k.Thepipettecanbeusedbetween+4°Cand+40°C,butthe
specicationsmayvary(seeChapter18).
l. Donotpipetteliquidshavingtemperaturesabove50°Cor
below4°C.
Immersion Depth and Wait Time
Model Immersion Depth Wait Time
(mm) (seconds)
P10M 1 1
P20M 2-3 1
P200M 2-4 1
P1000M 2-4 2-3
P8x20M, P12x20M 2-3 1
P8x200M, P12x200M 2-3 1
P8x300M, P12x300M 2-3 1
Extreme temperatures
can affect accuracy and
precision!

- 14 -
10 PERSONALIZE YOUR PIPETMAN M
Tip-ejector Extension for use with P10M
In order to eject D10 tips, tip ejector extensions are supplied with P10M
pipettes.
Thetip-ejectorextensionwhichismadeofPVDF(polyvinylideneFluo-
ride), is autoclavable.
To fit a tip-ejector extension:
• Holdthepipettewiththepush-buttonupright.
• Holdtheextensionwiththeslotupright.
• Slidetheextensionoverthetip-holder.
• Pushtheextensionrmlyontotheendofthetip-ejectoruntilitclicks
into place (see opposite).
To remove a tip-ejector extension (see opposite):
• Holdthepipetteinonehandandgriptheextensionwiththeother.
• Gentlytwisttheextension(eitherdirection)andpullitawayfromthe
pipette.
Personal Label – Name and/or Application Tag:
Your PIPETMAN M oers you two options to mark your pipette. You can
personalize your pipette with a name tag and/or an application tag:
Window-Tag:
•
Remove the window by inserting a small screwdriver in the access slot.
•
Position the name tag on the pipette
•
Clip the window back in place.
Clip-Tag:
•
Pull o the clip.
•
Position the name tag into the clip
•
Clamp the clip back in place.
Window-tag
Clip-tag
Short tips Long tips
To fit To remove
Slot

ENGLISH
- 15 -
11 GOOD LABORATORY PRACTICE FEATURES
Your PIPETMANMisfullycomplianttoISO8655standardandisCEmarked(forIVDandEMCdirectives).
PIPETMAN M includes the following GLP features.
General
• Lockablevolume.
• Usefulvolume-rangeisprintedonthepush-button.
• Volumerangeisdisplayedonthescreen.
• Serialnumberisengravedonthebody(handle)ofthepipetteandencodedinthermware.
• Barcode:ontheboxandwiththecerticate(canbetransferred).
• Personalizationbynametags(formarkingapplicationand/orusername),seeChapter10.
Cycle counters
• Fromlastvolumesetting(tocountthenumberofcyclesinthecurrent“run”).
• Frommanufactureandsincethelastservice(seeChapter14).
• Byindicators(R1,R2,R3…Rx)eachtimepipetteisreadjusted.
• Maintenanceintervalscanbespeciedbyweeksornumberofcycleselapsed.
Alarms
• Lowbatterywarning.
• Serviceisoverduewarning(seeChapter14).
• ServiceAlertcanbeset“On”or“O”.
12 PIPETMAN M POWER MANAGMENT
The PIPETMANMbatteryhasbeendesignedtoensure900pipettingcycles(750forPIPETMANMMulti
200µLand300µL)atmaximumspeed(uptonine96wellplates)betweentwochargecycles.Forser-
vice continuity when needing more capacity, your PIPETMAN M can also be used while charging with
the same performance as a fully charged pipette!
Battery Charging
PIPETMANMcharges80%ofitsfullbatterycapac-
ity in less than an hour, it takes three hours to fully
charge the battery.
Charge your pipette by using the power supply:
- Connect the AC adapter to a suitable AC
power supply
- Plugthe adapter intotheUSBport of the
pipette.
- The pipette starts charging.
Stand adapter
Plug
USB port

- 16 -
Charge your pipette by using stand adapter
(seeChapter2):
- First place the stand adapter on your Gilson
SINGLE pipette holder or CARROUSEL.
- Remove the plug. Now place your pipette
on the stand adapter and plug the power
transformer into the stand adapter.
- The pipette starts charging.
Batterychargingof PIPETMANM using the
POWERCARROUSEL:
- First install the POWER CARROUSEL as
described above.
- Remove the plug. Now place your pipette
on the charging position, please ensure that
thepipetteisproperlyttedtothecontacts
ontthetopofthecarrousel(apropertting
will trigger a beep sound).
- The pipette starts charging.
Working with charger connected to the pipette
PIPETMAN M can also be used for pipetting while
charging.
- Plug the power supply into your pipette.
- Press the push-button to start your pipette.
- PIPETMAN M is ready to pipette.
You can also recharge PIPETMAN M by USB with your com-
puter; however it will take much longer than by power supply.
Low Battery Warning:
PIPETMAN M has a low battery alert. As the battery runs down, the LOW
BATTERY message appears.The warning is replaced by a blinking symbol
of an empty battery. If it is not recharged, the pipette will switch o after a
while. Settings will not be lost.
If the battery is completely discharged (= black screen, no operation) please connect the pipette to
thechargerforatleastveminutes,thena“batt.toolow”messagewillappear.Thepipettewilldisplay
the last settings used a few minutes later and will continue charging.
Changing the battery
If the following symptoms occur, please contact
your Gilson Service Center for battery change:
Never work with PIPETMAN M while
charging by computer!
PIPETMAN M uses Lithium-Ion battery.
Operation on the battery is done at
user’s risk only. Opening the pipette
voids the warranty!
Use only the original power
transformer supplied by Gilson. Use
of an incompatible power supply can
damage your PIPETMAN M!

ENGLISH
- 17 -
PIPETMAN M battery won’t charge or will not operate even if connected to the charger at least for
10 minutes.
PIPETMAN M battery provides you very short cycle time or permanently needs to be used in con-
nected mode.
13 CONFIGURATION
EnterthemenuusingtheMode-button.Youwillndnotonlythepi-
pettingprograms(PIPET,REPETITIVE,MIXandREVERSE)andthespeed
controlbutalsothemenu“CONFIGURATION”,including“SERVICE”and
“ADJUSTMENT”(refertoChapter14).
Thenavigationofthemenusisalwaysdoneinthesameway Make
yourselectionbyrotatingthepush-button,enterandconrmwith
asimpleclick!
The congurationmenu allows you to set up the following items:
1. Volumelimit: Hereyoucanxthemaximalvolumeofthepipette
(by default = nominal volume). For example you
have a P200M pipette, but you would like to use it with
your PIPETMAN DIAMOND Filter tips DF100, you can
set the maximal volume at 100 µL and you won’t risk
contamination of your pipette.
2. Beeper: You can switch the tone of your pipette on or o.
3. Contrast: You can choose between values of 1 to 5 to set up the contrast of the screen.
4. Service seeChapter14.
5. Adjustment seeChapter14.
14 MAINTENANCE OF YOUR PIPETMAN M
PIPETMANMrequiresverylittle maintenance.However,toensurepipetteaccuracy,precisionand
robustness for timeless use please proceed periodically with a Two-minute Inspection as recom-
mended by Gilson.
Your PIPETMAN M allows you to:
• Getserviceinformation.
• Readjustthepipettetousersettings.
• Returntofactorysettings.
• Replacespareparts(fordetailedinformationseeChapters14and19).
• Preparethepipetteforcleaningorautoclavingby“disassembly”ofthepartsspecied(seeChapter15).
Push-button
Mode-button

- 18 -
Service Information
PIPETMAN M provides you with all required service information. It will help you establish an easy
diagnosis and plan any service operation with your accredited Gilson Service Center.
Youwillndinthe“service”menufollowingsubmenus:
a. Disassembly
b. Service Info
c. Service Settings
d. Pipette Info
Thenavigationofthemenusisalwaysdoneinthesameway Makeyourselectionbyrotating
thepush-button,enterandconrmwithasimpleclick!
a.Disassembly:
The Multichannel models should not be disassembled: only the push-button and the tip-ejector can
be replaced.
OnlythelowerpartoftheSinglemodelscanbedisassembled,thepush-button,theconnectingnut
and the tip-ejector can be replaced.
This option allows you to disassemble the lower part safely (protection of the piston and the actuator).
If you select DISASSEMBLY, the following screen appears:
Now, you can remove the lower part of your pipette with complete security.
b.ServiceInfoprovidesyouwithmaintenanceinformation;youcannotmodifyanyoftheitems:
• Numberofpipettingcyclessincelastmaintenance.
• Numberofweekssincelastmaintenance.
c.ServiceSettings gives you the option to organize your maintenance, you can set following service
points:
• Numberofcyclesuntilnextmaintenance.
• Numberofweeksuntilnextservice.
• Servicedate.
• ActivateordeactivatetheServicealert.
Changes of service settings will reset all the service info to zero.
d.PipetteInfo provides information about your pipette, you cannot modify any of the items:
• Versionofrmware.
• Serialnumber.
• Totalnumberofcycles(onecycle:upanddownofthepiston).
• Numberofreadjustmentscarriedoutbythispipette.

ENGLISH
- 19 -
Adjustment
Pressthemode-buttontoenterthemenu.Select“conguration”byrotatingthepush-buttonandclick
toconrmyourselection.Enterthesub-menuinthesamewayandselectthe“adjustment”menu.
The adjustment menu allows you to access the following items:
• StandardReadjustment
• ResetSettings
Standard Readjustment
Thismenuallowsyoutoadjustthepipetteusing3calibrationpoints:10%,50%and100%ofnominal
volume(inaccordingwithISO8655recommendations).
You may want to calibrate your pipette for solutions with a density, viscosity, surface tension or vapour
pressure that are dierent to that of water. To return to the factory settings, choose “ResetSettings”,
your PIPETMAN M will be reset to the three factory calibration values which are permanently stored
inthepipette’srmware.
InaccordancewithISO8655Gilsonrecommendsagravimetricprocedureforpipettecalibration.This
gravimetric method is used to establish the mean mass of a given volume of water (taking into account
evaporation losses, where necessary). After converting the mean mass to a volume (using the Z factor,
see appendix II), enter the measured volumes(s) into the pipette’s memory and the software readjusts
the pipette accordingly. This method requires the strict monitoring of environmental conditions and
the use of routinely controlled equipment that is adapted to the volume being measured.
Conversion to volume must take into account the density of the liquid as well as evaporation during
thecycletime.Foreachmeasurement,thecorrespondingvolume(Vi)canbecalculatedasfollows:
Wiistheweightasreadonthebalance
e is the mean evaporation loss during the cycle time
Z expressed in L/mg, is a conversion factor incorporating density of water buoyed in air,
at test temperature and barometric pressure (see Appendix II)
Forvolumesgreaterthan20μL,theevaporationfactorcanbedisregarded.
Formoreinformationpleasereferto“VericationProcedureforAccuracyandPrecision”whichyoucan
download from the Gilson website (www.gilson.com).
Maintenance operations
(disassembly of your PIPETMAN M to change and clean parts)
It is best to inspect your pipette regularly and to routinely
clean and change parts as required. To help you to keep
up a regular schedule and in the interests of GLP, you can
congureyourpipettetodisplayanalarmbeforeservicing
isdue(refertoServiceSettings,page18).
Vi=(Wi+e)Z
The following maintenance
operation should only be done
when the pipette is in Mode
DISASSEMBLY (see page 18)!

- 20 -
Maintenance Warning
PIPETMANM noties you,when maintenanceis
due (service alert is set by default to“ON”).The
following message will appear:
after validation by a click, the following message
appears:
Ifyouclicktoconrmwithin10sec.thepipettewill
automatically switch to “disassembly” mode so you
can carry out your maintenance safely.
Waitlongerthan10secondsandtheoptiontohave
a reminder in one week will appear:
Clicktoconrm.Yourpipettewillbeoperationalagain.
Maintenance operation for Single channel models
Tip-Holder and Tip-ejector
These parts must be changed if they are damaged. You may also
remove these parts for cleaning or decontamination purposes.
Changing the Tip-ejector
1) Keep the tip-ejector button depressed and grip the top of
the tip-ejector with the other hand.
2) Gentlyrotatethetip-ejectorcounterclockwiseandseparate
its connector from the operating rod.
3) Pullthetip-ejectorawayfromthebodyofthepipette.
4) Cleanorautoclavethetip-ejectorandretorreplaceitby
reversing the procedure.
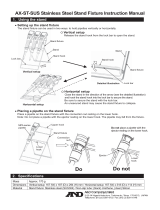
Changing the Tip-holder (lower part)
After removing the tip-ejector, you may remove the lower part of the tip-holder, which is more likely
tobecomecontaminatedordamagedthantheupperpart.Removalofthelowerpartisshownbelow;
for the upper part see “Removing the Piston” (special precautions are necessary).
1) Gently rotate the lower part of the tip holder counterclockwise to unscrew it from the upper part.
2) SeparatethepartsandremovetheO-ring(see“Changing
O-ring”)
3) Cleanandifrequiredautoclavethelowerpartofthetip-
holder(autoclaving:20min.at121°Cand0.1MPa)
4) Ifrequired,lubricatethepiston(see“HowtoLubricatethe
Piston”)andtanewO-ring.
5) Screw the two parts together, making sure that the two
parts are fully tightened, by hand.
6) Retthetip-ejector.
After autoclaving the tip-holder and tip-ejector may change color, however this has no impact on the performance.
Piston
Tip-holder
(lower)
Tip-holder
(upper)
/