Page is loading ...

USER’S GUIDE
pipetman L
sinGLe, muLtichanneL & Fixed modeLs
Comfortable and Secure by Nature!

- 2 -
1 INTRODUCTION
PIPETMAN L is an air displacement pipette and is used with
disposable tips. To answer the current needs of intensive use
of pipettes, and still being conform to Gilson brand qualities,
improvements have been implemented to our mechanical series:
Light and comfortable body, both for right and left handed.
All forces necessary to pipetting task dramatically decreased*.
Lockable volume, except for the Fixed models.
2D code for traceability.
Name tag.
For the single variable volume models, you have the choice
for an ejector plastic or a stainless steel ejector.
* Implementation of new features to improve dramatically pipetting
comfort has no impact on the legendary robustness, accuracy and
precision of PIPETMAN.
Eight single channel models cover a volume range from 0.2 µL
to 10 mL.
Fixed models cover a volume range from 1 µL to 5000 µL with
15 models.
Eight multichannel models cover a volume range from 0.5 µL
to 300 µL.
2 PARTS CHECK LIST
Just take a moment to verify that the following items are present:
Contents Page
1 INTRODUCTION 2
2 PARTS CHECK LIST 2
3 DESCRIPTION 3
4 SETTING THE VOLUME Only for Single & Multichannel models 4
5 USER ADJUSTMENTS Only for Fixed models 4
6 PIPETTING 5
7 GENERAL GUIDELINES FOR GOOD PIPETTING 7
8 ACCESSORIES 8
9 GLP FEATURES 8
10 TROUBLESHOOTING 8
11 LEAK TEST 9
12 MAINTENANCE 9
13 CLEANING AND DECONTAMINATION 11
14 SPECIFICATIONS 11
15 SPARE PARTS 14
EC DECLARATION OF CONFORMITY 15
WARRANTY 15
Decreased pipetting forces are due to the new
designed piston assembly including the use of a
very high quality of lubricant. The use of other
lubricant cancels the warranty of your pipette.
This lubricant is available under the reference:
5440011070. Please contact your Gilson distributor.
Single models
PIPETMAN L,
User’s Guide,
Safety bag,
Certificate of conformity (including
bar-code sticker).
Fixed models
PIPETMAN L Fixed,
User’s Guide,
Safety bag,
Adjustment key,
Certificate of conformity (including
bar-code sticker).
Multi channel models
PIPETMAN L,
User’s Guide,
Safety bag,
Ejector spacer for D10 tips,
Certificate of conformity (including
bar-code sticker).

ENGLISH
- 3 -
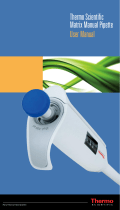
3 DESCRIPTION
PIPETMAN DIAMOND® tip(s)
Ejector spacer
Ejector clip
Handle
Tip-ejector button
Color-coded push-button
Thumbwheel
Connecting nut
Tip-ejector
Cover
Ejector support
Tip-holders
Ejector lock
Please refer to the following chapters for a full description of the different parts and functions of the pipette.
PIPETMAN DIAMOND® tip
Tip-ejector
Tip-holder
Handle
Tip-ejector button
Color-coded push-button
Thumbwheel
Connecting nut
Single models
Multichannel models Fixed models
Tip-ejector
Graduated cover
Tip-holder
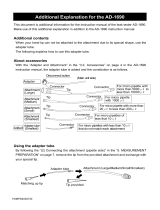
Personal label
You can identify your pipette with a name tag:
Pry out the window by inserting a small
screwdriver in the access slot.
Position the name tag in the slot.
Clip the window back into place.
Single &
Multichannel
models
Fixed
models

- 4 -
4 SETTING THE VOLUME Only for Single and Multi-
channel models
The volume of liquid to be aspirated is set using the volumeter. The
dials are colored either black or red to indicate the position of the
decimal point, depending on the model (see examples).
Lock System
For additional safety, the volume selected is lockable.
With the left or right thumb, unlock the thumbwheel by push-
ing it up.
The volume is set by turning the thumbwheel.
The thumbwheel may be turned using only one hand to slowly
reach the required setting.
Push down the thumbwheel; the new volume selected is locked.
To obtain maximum accuracy when setting the volume, proceed
as follows:
when decreasing the volume setting, slowly reach the required
setting, making sure not to overshoot the mark.
when increasing the volume setting, pass the required value by
1/3 of a turn and then slowly decrease to reach the volume, mak-
ing sure not to overshoot the mark.
5 USER ADJUSTMENTS Only for Fixed models
PIPETMAN L Fixed is factory calibrated using distilled water and
very high precision balances. The nominal value of the PIPETMAN L
Fixed may be slightly adjusted to compensate for liquids of dierent
density or viscosity.
To accomodate for density or viscosity, an adjustment with one full
turn of the calibration key in either direction equals:
± 0.05 µL (models F1L to F2L)
± 0.2 µL (models F5L to F10L)
± 0.5 µL (models F20L to F25L)
± 2.0 µL (models F50L to F100L)
± 5.1 µL (models F200L to F250L)
± 20 µL (models F300L to F1000L)
102 µL (model F5000L).
The cover is graduated in tenths of the key revolution (letters A, B,... J) and is read
from left to right. Each small graduation mark represents 0.25 of the distance
between each letter.
To adjust the volume setting to compensate for a specic density or
viscosity, engage the two hooks of the spanner tool inside the two
small holes on the top of the body, then turn the key slowly:
Clockwise to decrease the volume ; making sure not to overshoot
the mark.
Counterclockwise to increase the volume; pass the required
value by 1/4 turn, then slowly decrease the volume to reach the
required setting.
Model
Color of volumeter numbers
Black Red Increment
P2L µL 0.01 µL 0.002 µL
P10L to P20L - Lx10 µL 0.1 µL 0.02 µL
P100L - P200L - Lx200 - Lx300 µL - 0.2 µL
P1000L 0.01 mL mL 0.002 mL
P5000L 0.01 mL mL 0.002 mL
P10mlL mL 0.1 mL 0.02 mL
Protection of your pipette and your work:
If step is forgotten, the volume selected will
be automatically locked during the next purge.
Adjustment of the factory calibration must only
be performed using a special calibration key.
1
5
P2L
1.25 µL
2
0
7
5
P10L
7.5 µL
1
2
5
P20L
12.5 µL
P100L
0
7
5
75 µL
P200L
1
2
5
125 µL
P1000L
0
7
5
0.75 mL
P5000L
1
2
5
1.25 mL
P10mlL
0
7
5
7.5 mL
0
7
5
Lx10
7.5 µL
1
2
5
Lx20
12.5 µL
Lx200
1
2
5
125 µL
Lx300
1
2
5
125 µL
Single models
Multichannel
models
Graduations
Please hold the key in the highest position to
avoid banging it into the hook.
Counterclockwise
Clockwise

ENGLISH
- 5 -
Example: When using a PIPETMAN L Fixed100 to aspirate a particularly viscous solu-
tion, you may determine gravimetrically that the volume delivered is 98.8 µL, and the
display reads “H”. Therefore, you wish to increase the volume dispensed by 1.2 µL. As the
interval between each letter on the calibration display represents 0.2 µL for the F100L
(1/10 of 2 µL), the calibration tool must be turned 3 units until the display reads “B”.
It is possible to alter the volume by more than one full turn in the counter-
clockwise direction. In this case, remember to readjust the same number
of turns when it is necessary to return to the original setting.
Check the new volume gravimetrically. If the volumes delivered are still
not suciently close to the desired value, make another slight adjust-
ment in the relevant direction. Be sure to change tips between volume
setting adjustments and to pre-rinse each new tip.
When the PIPETMAN Fixed is readjusted to compensate for a particular
solution, the nature of the liquid can be noted on the labels inserted in
the slot under the counter.
Liquids of high density, vapor pressure,
or viscosity are best pipetted by the
MICROMAN positive displacement pipette.
Gilson Logo ID Number
Short tips Long tips
To t To remove
PIPETMAN DIAMOND Tip compatibility
for Fixed models
F1L, F2L, F5L, F10L D10, DL10, DF10, DFL10
F20L, F25L D200, DF30
F50L, F100L D200, DF100
F200L D200, DF200
F250L D300, DF300
F300L, F400L, F500L, F1000L D1000, DF1000
F5000 D5000
6 PIPETTING
For optimum performance, use of PIPETMAN DIAMOND Tips with your PIPETMAN L is strongly
recommended. These tips, made from pure polypropylene have the Gilson logo engraved on their
collar, ensuring that you have a genuine Gilson product. Plastic tips are for a single application –
they must not be cleaned for reuse.
PIPETMAN L can also be used with the main tip brands.
Fitting the tips - only for Single and Fixed models
To t a new PIPETMAN DIAMOND Tip, push the tip-holder into the tip using a slight twisting mo-
tion to ensure a firm, airtight seal.
PIPETMAN DIAMOND Tip compatibility
for Single models
P2L, P10L D10, DL10, DF10, DFL10
P20L D200, DF30
P100L D200, DF100
P200L D200, DF200, D300, DF300
P1000L D1000, D1200, DF1000, DF1200
P5000L D5000
P10mlL D10mL
For the P2L and P10L models equipped with stainless steel tip-ejector,
A dual-position adapter (plastic) is required to t DL10 tips (long tips) or D10 tips (short tips).
P2L and P10L models are delivered with the adapter
in place, ready to use DL10 tips. If D10 tips
are used, the adapter must be repositioned in the shorter slot as follows:
Pull the adapter down from the metallic rod.
Turn the adapter through 180°.
Refit the adapter so that the end of the metallic rod engages the shorter slot of the adapter.
For the F1L, F2L, F5L, F10L, P2L and P10L models equipped with plastic tip-ejector,
A tip-ejector extension is supplied to t with D10 tips (short tips).
To t a tip-ejector extension:
Slide the extension over the tip-holder.
Push the extension rmly onto the end of the tip-ejector until it clicks into place.
To remove a tip-ejector extension:
Gently twist and pull the extension.
Pull it away from the pipette.
Both dual-position adapter and tip-ejector extension are autoclavable .

- 6 -
Fitting the tips - only for Multichannel models
PIPETMAN DIAMOND Tip: TIPACK™ and TOWERPACK™
– ROCKY RACK™
PIPETMAN DIAMOND Tips are best fitted from the
patented ROCKY RACK available only in our TIPACKS
and TOWERPACKS.
ROCKY RACK is the dome-shaped part of the pack
that contains the tips. ROCKY RACK makes it easy to
securely fit the tips to a multichannel pipette, ensuring
an airtight seal on all channels without the need to use
undue pressure or to touch the tips.
Ejector spacer for PIPETMAN L Multichannel 10 µL
According to the tip used, D10 or DL10, you might have to
exchange the ejector spacer; the broad one is dedicated to
D10, and the small one is dedicated to DL10:
• Removethetip-ejector,keepbothejectorlocksdepressed;
pull the tip-ejector down.
• Gentlypressthetabsfromtheejectorspacer,andremove
it from the tip-ejector.
• Insertthealternativeejectorspacerandclickittothetip-
ejector.
• Toretthetip-ejector,gentlyre-insertthetip-ejectorverti-
cally into the rails of the ejector support.
Pre-rinse the tips
Some liquids (e.g. protein-containing solutions and organic
solvents) can leave a lm of liquid on the inside wall of the tip
; pre-rinse the tip to minimize any errors that may be related
to this phenomenon.
Pre-rinsing consists of aspirating the rst volume of liquid and
then dispensing it to waste. Tips will not fall o nor will they
have to be manually positioned.
Subsequent volumes that you pipette will have levels of ac-
curacy and precision within specications.
Aspirate
Press the push-button to the first stop (this corresponds
to the set volume of liquid).
Hold the pipette vertically and immerse the tip in the liquid
(see immersion depth table, page 7). Release the push-
button slowly and smoothly (to top position) to aspirate
the set volume of liquid. Wait one second (time depends
on model, see table page 7); then withdraw the pipette-tip
from the liquid. You may wipe any droplets away from the
outside of the tip using a medical wipe, however if you do
so take care to avoid touching the tip’s orifice.
For the Multichannel models, use a Gilson reagent reservoir.
Dispense
Place the end of the tip against the inside wall of the recipient
vessel (at an angle of 10° to 40°).
Press the push-button slowly and smoothly to the rst stop.
Wait for at least a second, then press the push-button to
the second stop to expel any residual liquid from the tip.
* Thanks to the new ejector spacer, you can adapt a D10
tip (see below).
Short tips
Ejector spacer D10
Long tips
Ejector spacer
PIPETMAN DIAMOND Tip compatibility
for Multi channel models
L8x10, L12x10 D10*, DL10, DF10, DFL10
L8x20, L12x20 DL10, DFL10, DF30, D200
L8x200, L12x200 D200, D300, DF200, DF300
L8x300, L12x300 D200, D300, DF200, DF300
The patented ROCKYRACK
system available on TOWER-
PACK and TIPACK makes it
extremely easy to t tips on a
multichannel pipette.
First stop
Second stop
Keep the push-button pressed fully down and (while
removing the pipette) draw the tip along the inside
surface of the vessel.
Release the push-button, smoothly. Eject the tip by press-
ing rmly on the tip-ejector button.
For the Multichannel models, use a Gilson reagent reservoir.

ENGLISH
- 7 -
Ejecting the tip
Before you start to pipette, you can adjust the tip-ejector button
according to your preferences.
Position the tip-ejector button. Simply rotate the tip-ejector
button to the most comfortable position: left, right or middle.
Activate the tip-ejector. You can either push the tip-ejector
button with the tip of the thumb as usual, or with the base
of your thumb for more comfort. Please note the P5000L and
P10mlL are not equipped with a tip-ejector.
Left
Middle
Right
Single & Multichannel models
Fixed models
The PIPETMAN L should be held in
the vertical position.
Table - Immersion Depth and Wait Time
Model
Immersion Wait Time
Depth (mm) (seconds)
P2L 1 1
P10L 1 1
P20L 2-3 1
P100L 2-4 1
P200L 2-4 1
P1000L 2-4 2-3
P5000L 3-6 4-5
P10mlL 5-7 4-5
L8x10, L12x10 1 1
L8x20, L12x20 2-3 1
L8x200, L12x200 2-3 1
L8x300, L12x300 2-4 1
F1L, F2L, F5L, F10L 1 1
F20L, F25L 2-3 1
F50L, F100L, F200L, F250L 2-4 1
F300L, F400L, F500L, F1000L 2-4 2-3
F5000L 3-6 1
SingleMultichannelFixed
7 GENERAL GUIDELINES FOR GOOD PIPETTING
Make sure that you operate the push-button slowly and smoothly.
When aspirating, keep the tip at a constant depth below the surface of the
liquid (refer to the table).
Change the tip before aspirating a dierent liquid, sample, or reagent.
Change the tip if a droplet remains at the end of the tip from the previous
pipetting operation.
Each new tip should be pre-rinsed with the liquid to be pipetted.
Liquid should never enter the tip-holder; to prevent this:
- press and release the push-button slowly and smoothly,
- never turn the pipette upside down,
- never lay the pipette on its side when there is liquid in the tip.
If you use the same tip with a higher volume, pre-rinse the tip.
For volatile solvents you should saturate the air-cushion of your pipette
by aspirating and dispensing the solvent repeatedly before aspirating the
sample.
When the pipetted liquid is not at room temperature, pre-rinse the tip
several times before use.
You may remove the tip-ejector (see Chapter 12 - Maintenance) to aspirate
from very narrow tubes.
After pipetting acids or other corrosive liquids that emit vapors, remove
the tip-ejector, the tip-holder, rinse, dry and lubricate the piston (
see
Chapter 12 - Maintenance
). For the model P1000L, by using a specic tip
holder equipped with a lter, you can increase the lifetime of the piston
(see Chapter 8 - Accessories).
Do not pipette liquids having temperatures above 70 °C or below 4 °C.
The pipette can be used between + 4 °C and + 40 °C but the specifications
may vary according to the temperature (refer to the ISO 8655-2 standard for
conditions of use).

- 8 -
8 ACCESSORIES
To make pipetting more comfortable and more secure, Gilson has developed
several accessories:
To avoid the possibility of
liquid running back into the
pipette, store the pipette
vertically.
Universal Multichannel Stand
is for Multichannel only.
To identify or personalize your
pipette, COLORIS™ clips are
available.
To protect the piston when
pipetting corrosive liquids,
you can use a specific tip
holder and lter for the model
P1000L.
9 GLP FEATURES
The Serial Number is engraved on the body of the pipette. It provides unique
identication of your pipette and the date of manufacture. Example : GB58672
The Bar Code on the box and the certificate of conformity provide traceability
of your pipette.
In addition a 2D code is engraved next the Serial number: this code includes the
ordering reference, the end date, the serial number and the nominal volume.
Example: FA10006 201103 GB58672 1000
If you are equipped of a reader, you can integrate this information in your own
traceability system.
Ordering reference: 7 characters - Blank - Manufacturing date (year and month):
6 characters - Blank - Serial number: 7 characters - Blank - Nominal volume in
µL: up to 5 characters
CARROUSEL™ Pipette stand (7 pipettes) F161401
TRIO™ stand (3 pipettes) F161405
Universal Multichannel Stand F161417
SINGLE™ pipette holder F161406
Corrosion protection kit
(tip holder + a bag of 10 lters)
F144570
SINGLE™CARROUSEL™
TRIO™
COLORIS™
Universal Multichannel Stand™
Corrosion protection kit
COLORIS™ clips (mixed colors set of 10) F161301
COLORIS™ clips (red, set of 10) F161302
COLORIS™ clips (yellow, set of 10) F161303
COLORIS™ clips (green, set of 10) F161304
COLORIS™ clips (blue, set of 10) F161305
COLORIS™ clips (white, set of 10) F161306
Symptom Possible Cause Action
Pipette is leaking sample Damaged tip-holder Replace the tip-holder
Worn O-ring or seal Replace both parts and lubricate
Pipette won’t aspirate Worn O-ring Replace both parts and lubricate
Damaged tip-holder Replace the tip-holder
Connecting nut is loose Tighten connecting nut
Damaged or corroded piston Return pipette to supplier
Improper repair or assembly See Chapter 12 - Maintenance
Pipette is inaccurate Improper repair or assembly See Chapter 12 - Maintenance
Unscrewed tip-holder Tighten connecting nut
Connecting nut is loose Tighten connecting nut
Pipette is not precise
Tip-holder is loose Tighten connecting nut
Connecting nut is loose Tighten connecting nut
Incorrect operator technique Operator training
Damaged or corroded piston(s) Return pipette to supplier
Damaged tip-holder(s) Replace the tip-holder
Worn O-ring or seal Replace both parts and lubricate
Tips fall o or Low quality tips Use PIPETMAN DIAMOND tips
do not t correctly Dirty tip-holder
Clean the tip-holder with isopropanol or ethanol
Damaged tip-holder(s)
Replace the tip-holder
Damaged tip-ejector Replace tip-ejector
The tip-ejector is loose Assemble the tip-ejector properly
The ejector lock is misaligned Align the ejector lock
Pipetting seize up Piston need lubricant Lubricate piston assembly
For Single and Fixed models
10 TROUBLESHOOTING
A quick inspection of the pipette may help
you to detect a problem.
You may download from the Gilson website
(www.gilson.com) the “2 minute inspection”,
which shows how to perform a quick diagnosis
of your pipette.
The following tables may help you to
identify and correct the problem you might
encounter.
For any other symptom or if you can’t solve
the problem, please contact your Gilson
distributor.
Before returning any pipette to
your local Gilson Service Center,
ensure that it is completely free of
chemical, biological, or radioactive
contamination. Refer to Chapter
13 - Cleaning and Decontamination.
Please use the included safety bag
to return the pipette to your local
Gilson Service Center.

ENGLISH
- 9 -
11 LEAK TEST
This test may be performed at any time to check that the pipette does not leak,
especially after performing a maintenance or decontamination procedure. If a pi-
pette fails this test, replace the O-ring and seal. After making sure that the pipette
is correctly reassembled, repeat this test.
Symptom Possible Cause Action
Tips fall o or Low quality tips Use PIPETMAN DIAMOND tips
do not t correctly Tip-ejector damaged
Replace tip-ejector
Ejector spacer damaged Replace ejector spacer
Dirty tip-holder Clean them with ethanol or isopropanol
Damaged tip-holder Contact your local Gilson authorized service center
Pipette won’t aspirate Connecting nut is loose Tighten connecting nut
Pipette is inaccurate Connecting nut is loose Tighten connecting nut
Pipette is not precise
Connecting nut is loose Tighten connecting nut
Incorrect operator technique Operator training
For Multichannel models
no leak
For the P2L to P200L Single models,
and the F1L to F250L Fixed models:
Fit a PIPETMAN DIAMOND Tip.
For the variable volume, set the pi-
pette to the maximum volume given
in the specifications, and pre-rinse.
Aspirate the set volume from a beaker
of distilled
water.
Maintain the pipette in the vertical
position and wait for 20 seconds.
If a water droplet appears at the end
of the tip there is a leak.
If you see no droplet, re-immerse
the tip below the surface of water.
The water level inside the tip should
remain constant; if the level goes
down there is a leak.
For the P1000L, P5000L and P10mlL
Single models, for the F300L to F5000L
Fixed models:
Fit a PIPETMAN DIAMOND tip.
For the variable volume, set the
pipette to the maximum volume
given in the specifications.
Aspirate the set volume from a
beaker of distilled water.
Maintain the pipette in the vertical
position and wait for 20 seconds.
If a water droplet appears at the end
of the tip, there is a leak.
For the Multichannel models (8x - 12x):
Fit the PIPETMAN DIAMOND tip.
Set the pipette to the maximum
volume given in the specifications,
and pre-rinse.
Aspirate the set volume from a
reagent reservoir of distilled water.
Maintain the pipette in the vertical
position and wait for 20 seconds;
uid level in tips shoulds remain
constant.
If a water droplet appears at the end
of the tip, there is a leak.
If you see no droplet, for volumes
below 200 µL, re-immerse the tip
below the surface of water.
The water level inside the tip should
remain constant; if the level goes
down there is a leak.
12A MAINTENANCE FOR THE SINGLE AND FIXED MODELS ONLY
Routine maintenance will help keep your pipette in good condition, ensuring a
continued high level of performance.
Maintenance is limited to:
Cleaning or decontamination (see Chapter 13 - Cleaning and Decontamination)
Replacing spare parts
Greasing the piston assembly.
PIPETMAN P2L and P10L, F1L, F2L, F5L and F10L should not be disassembled,
so you may only replace the push-button, tip-ejector, dual position tip-ejector and
its adapter. With these pipettes if the tip-holder is damaged, the piston may also
be damaged.
After replacing any parts you
should verify the performance
of your pipette following the
verification procedure available
on the Gilson website (www.
gilson.com). If the pipette needs
to be readjusted, please contact
your local Gilson authorized
Service Center.

- 10 -
Changing the Tip-ejector
To remove
Push the ejection button.
Push laterally the tip-
ejector.
Slide and remove the tip-
ejector.
Single models Fixed models
P10L, P20L
P100L, P200L
P5000L
P10mlL
P1000L
Tip-holder
Tip-ejector
stainless steelplastic
Connecting nut
Color coded push-button
Piston
assembly
Thumbwheel
Single models
Fixed models
F10L, F20L
F100L, F200L
F5000L
F1000L
Tip-holder
Tip-ejector
Piston
assembly
Connecting nut
To ret
Push the ejection button.
Slide the tip-ejector along
the tip-holder.
Clip the tip-ejector on the
body of the pipette.
Changing the Tip-holder – no tools required
Remove the tip-ejector (see above).
Unscrew the connecting nut by turning it
clockwise.
Carefully separate the lower and upper parts.
Remove the piston assembly and the seals.
Clean, autoclave, or replace the tip-holder.
If necessary, lubricate lightly the piston and its seals (see below).
Reassemble the pipette (refer to the figure, page 10).
Tighten the connecting nut (turn counterclockwise).
Refit the tip-ejector (see above).

ENGLISH
- 11 -
Servicing the Piston Assembly
You may remove the piston assembly for cleaning purposes
only. If the piston assembly is changed, the pipette must be
adjusted and calibrated in a Gilson authorized Service Center.
As the models P2L and P10L, F1L, F2L, F5L and F10L contain
miniaturized parts, it is best not to disassemble these pipettes
yourself.
The piston assembly must not
be autoclaved.
Remove the tip-ejector (see above).
Unscrew the connecting nut by turn-
ing it
clockwise.
Carefully separate the lower and up-
per parts.
Remove the piston assembly, O-ring
and seal.
Leave exposed the piston, clean it with isopropanol or
ethanol and lubricate lightly.
For P20L, P100L, P200L, F20L, F25L, F50L, F100L, F200L,
F250L: lubricate only the useful part of the piston (20 ±5
mm length) and the O-ring.
For P1000L, F300L, F400L, F500L and F1000L: lubricate
the piston.
For P5000L, P10mlL and F5000L: disassemble the seals,
lubricate their internal part and lubricate the piston. Do
not lubricate the O-ring.
The use of other lubricant cancels the warranty
of this pipette.
Reassemble the pipette (refer to the figure, page 10).
Tighten the connecting nut (turn
counter-
clockwise).
Refit the tip-ejector (see above).
Changing the seals
The O-ring and seal are on the piston; they must not be auto-
claved, if worn or damaged in any way (chemical or mechani-
cal), they must be replaced. As the models P2L and P10L, F1L,
F2L, F5L and F10L contain miniaturized parts, it is best not to
disassemble these pipettes yourself, please contact your local
Gilson authorized Service Center.
The dimensions of the O-ring vary depending on the model
of pipette.
Remove the tip-ejector (see above).
Unscrew the connecting nut by turning it
clockwise.
Carefully separate the lower and upper parts.
Remove the piston assembly, O-ring and seal.
If necessary clean the piston and replace the seal; lubricate
them lightly. Please place them in the correct order.
Reassemble the pipette (refer to the figure, page 10).
Tighten the connecting nut (turn
counter-
clockwise).
Refit the tip-ejector (see above).
12B MAINTENANCE FOR THE MULTICHANNEL MODELS ONLY
Routine maintenance will help keep your pipette in good condition, ensuring a
continued high level of performance.
Maintenance is limited to:
Cleaning or decontamination (see Chapter 13 - Cleaning and Decontamination)
Replacing spare parts
Greasing the piston assembly.
Changing the Tip-ejector
To remove the tip-ejector, keep both ejector locks depressed. Pull the tip-ejector down.
To ret the tip-ejector, gently re-insert the tip-ejector vertically into the rails of the
ejector support. Pull lightly on the tip-ejector to check the position.
Tip-ejector
Ejector lock
Ejector spacer
You may refer to the decontami-
nation procedure available on the
Gilson website (www. gilson.com).
Liquid must never enter the up-
per part (handle) of any pipette.
13 CLEANING AND DECONTAMINATION
PIPETMAN L is designed so that the parts normally in contact with liquid contaminants,
can easily be cleaned and decontaminated. However, because the models P2L and
P10L, F1L, F2L, F5L and F10L contain miniaturized parts, it is best not to disassemble
these pipettes yourself; please contact your local Gilson authorized Service Center.

- 12 -
For the Multichannel Models only
The pipette must be cleaned, as described below, before it is
decontaminated. Soap solution is recommended for cleaning
PIPETMAN L.
Cleaning
The following components only can be immersed in a cleaning solution: tip-ejector,
ejector locks and ejector spacer.
Remove the tip-ejector and the ejector spacer.
Immerse the tip-ejector, ejector locks and ejector spacer in the cleaning solution
or wipe them with a soft cloth or lint-free tissue impregnated with the cleaning
solution.
Rinse the components with distilled water.
Wipe the entire pipette with a soft cloth or lint-free tissue impregnated with the
cleaning solution.
Wipe it with distilled water.
Leave the parts to dry by evaporation or wipe them with a clean soft-cloth or
lint-free tissue.
For the Single Models and Fixed Models only
The pipette must be cleaned, as described below, before it is
decontaminated. Soap solution is recommended for cleaning
PIPETMAN L.
Cleaning External
Remove the tip-ejector.
Wipe the tip-ejector with a soft-cloth or lint-free tissue
impregnated with soap solution.
Wipe the entire pipette with a soft-cloth or lint- free tis-
sue impregnated with soap solution, to remove all dirty
marks. If the pipette is very dirty, a brush with soft plastic
bristles may be used.
Wipe the entire pipette and the tip-ejector with a soft cloth
or lint-free tissue soaked with distilled water.
Refit the tip-ejector and allow the pipette to dry.
Cleaning Internal
The following components only can be immersed in a cleaning
solution: connecting nut, tip-ejector, tip-holder, piston assembly,
seal and O-ring.
Disassemble the pipette as described in the Chapter 12A
- Maintenance.
Set aside the upper part in a clean, dry place.
Clean the individual components of the lower part of the
pipette using an ultrasonic bath (20 minutes at 50°C) or
with a soft-cloth and brushes. Note that the piston assembly
and seals must be degreased with isopropanol or ethanol
before being immersed in another ultra sonic bath. Small
round brushes with soft plastic bristles may be used to
clean the interior of the tip-holder.
Rinse the individual components with distilled water.
Leave the parts to dry by evaporation or wipe them with
a clean soft-cloth or lint-free tissue.
Reassemble the pipette as described in the Chapter 12A
- Maintenance.
Autoclaving
The upper part (body) and the piston assembly of the
pipette are not autoclavable. Only the following parts may
be autoclaved: tip-ejector, tip-holder and connecting nut.
The O-ring and seal are not autoclavable; they may be cleaned
or replaced with the one specified in Chapter 15 - Spare Parts.
Clean the parts to be autoclaved, especially the tip-holder.
Put the parts in an autoclaving sack.
Autoclave for 20 minutes at 121°C, 0.1 MPa.
Check that the parts are dry before re-assembling the
pipette.
Set the pipette aside to stabilize at room temperature.
Chemical Decontamination
You may choose to decontaminate your pipette chemically, in
accordance with your own procedures. Whatever decontami-
nant you use, check with the
supplier of the decontaminant that
it is compatible
with stainless steel and the plastics used in the
construction of the pipette: PA (Polyamide), PBT (Polybutylene
Terephtalate), PC (Polycarbonate), PC/PBT (Polycarbonate/
Polybutylene Terephtalate), POM (Polyoxymethylene), PVDF
(Polyvinylidene Fluoride), or PP (Polypropylene).
Upper Part (handle)
Wipe the upper part (handle) of the pipette with a soft-
cloth or lint-free tissue impregnated with the chosen
decontaminant.
Wipe the upper part of the pipette with a soft- cloth or
lint-free tissue soaked with distilled water or sterile water.
Lower Part (Volumetric module)
The following components only can be immersed in a de-
contaminant solution: connecting nut, tip-ejector, tip-holder.
Piston assembly and seals must be degreased with methyl
alcohol before being immersed in decontamination solution
in separate vessel.
Disassemble the pipette as described in the Chapter 12A.
Immerse tip-ejector, tip-holder and connecting nut in the
cleaning solution.
Degrease the piston assembly, the seals and immerse
them in another vessel.
Rinse each component with distilled water.
Leave the parts to dry by evaporation (or wipe with a soft
cloth the tip-ejector, the tip-holder and connecting nut).
Lubricate the piston assembly and the seals.
Reassemble the piston assembly, the tip-holder and the
tip-ejector.
Ret the tip-ejector as described in
“Changing the tip-ejector”.
Please note that although the lower part
of PIPETMAN L multichannel can with-
stand a few number of autoclaving cycles,
we do not recommend autoclaving it.
Ejector spacer
Ejector lock
Tip-ejector

ENGLISH
- 13 -
Chemical Decontamination
You may choose to decontaminate your
pipette chemically, in accordance with your
own procedures. Whatever decontaminant
you use, check with the
supplier of the
decontaminant that it is compatible
with
stainless steel and the plastics used in the
construction of the pipette: PA (Polyam-
ide), PBT (Polybutylene Terephtalate), PC
(Polycarbonate), PC/PBT (Polycarbonate/
Polybutylene Terephtalate), POM (Polyoxy-
methylene), PVDF (Polyvinylidene Fluoride),
or PP (Polypropylene).
The following components only can be immersed in a decontamination solution:
tip-ejector, ejector locks and ejector spacer.
Remove the tip-ejector and the ejector spacer.
Immerse the tip-ejector, ejector locks and ejector spacer in the decontamina-
tion solution or wipe them with a soft-cloth or lint-free tissue impregnated
with the decontamination solution.
Rinse the components with distilled water.
Wipe the entire pipette with a soft cloth or lint-free tissue impregnated with
the decontamination solution.
Wipe it with distilled water.
Leave the parts to dry by evaporation or wipe them with a clean soft-cloth
or lint-free tissue.
Refit the tip-ejector as described in “Changing the tip-ejector”.
14 SPECIFICATIONS
PIPETMAN L is a high quality pipette that oers excellent accuracy and
precision. The figures given in the “Gilson Maximum Permissible Errors”
table were obtained using PIPETMAN DIAMOND Tips. These figures are
guaranteed only when genuine PIPETMAN DIAMOND Tips are used.
Each pipette is inspected and validated by qualified technicians in
accordance with the Gilson Quality System. Gilson declares that its
manufactured pipettes comply with the requirements of the ISO 8655
standard, by type testing.
The adjustment is carried out under strictly defined and monitored
conditions (ISO 8655-6).
The data given in the tables conform to the
ISO 8655-2 Standard.
With a precise pipetting technique (see
Chapter 7 - General guidelines for good
pipetting) the P2L model may be used to
aspirate volumes as low as 0.1 µL and the
P10L model as low as 0.5 µL.
Maximum Permissible Errors
Single Model Volume Gilson ISO 8655
(Reference) (µL) Systematic Random Systematic Random
error (µL) error (µL) error (µL) error (µL)
P2L Min 0.2 ± 0.024 0.012 ± 0.08 0.04
(FA10001P) 0.5 ± 0.025 0.012 ± 0.08 0.04
(FA10001M) 1 ± 0.027 0.013 ± 0.08 0.04
Max. 2 ± 0.030 0.014 ± 0.08 0.04
P10L Min. 1 ± 0.025 0.012 ± 0.12 0.08
(FA10002P) 5 ± 0.075 0.030 ± 0.12 0.08
(FA10002M) Max 10 ± 0.100 0.040 ± 0.12 0.08
P20L Min. 2 ± 0.10 0.03 ± 0.20 0.10
(FA10003P) 10 ± 0.10 0.05 ± 0.20 0.10
(FA10003M) Max. 20 ± 0.20 0.06 ± 0.20 0.10
P100L Min. 10 ± 0.35 0.10 ± 0.80 0.30
(FA10004P) 50 ± 0.40 0.12 ± 0.80 0.30
(FA10004M) Max. 100 ± 0.80 0.15 ± 0.80 0.30
P200L Min. 20 ± 0.50 0.20 ± 1.60 0.60
(FA10005P) 100 ± 0.80 0.25 ± 1.60 0.60
(FA10005M) Max. 200 ± 1.60 0.30 ± 1.60 0.60
P1000L Min. 100 ± 3 0.6 ± 8 3.0
(FA10006P) 500 ± 4 1.0 ± 8 3.0
(FA10006M) Max. 1000 ± 8 1.5 ± 8 3.0
P5000L Min. 500 ± 12 3 ± 40 15
(FA10007) 2500 ± 15 5 ± 40 15
Max. 5000 ± 30 8 ± 40 15
P10mlL Min. 1000 ± 30 6 ± 60 30
(FA10008) 5000 ± 40 10 ± 60 30
Max. 10000 ± 60 16 ± 60 30
Gilson Maximum Permissible Errors
Each Single pipette model (except P5000L and P10mlL) has two different ordering references to
identify the kind of tip-ejector required. For a pipette with a plastic tip-ejector, the ordering refer-
ence is ended by the letter P, for a pipette with a stainless steel tip-ejector, the ordering reference is
ended by the letter M.
Ex: For a P10L model with the plastic tip-ejector the ordering reference is FA10002P. For the same
pipette with a stainless steel tip-ejector, the ordering reference is FA10002M.
Maximum Permissible Errors
Fixed Model Volume Gilson ISO 8655
(Reference) (µL) Systematic Random Systematic Random
error (µL) error (µL) error (µL) error (µL)
F1L (FA10017) 1 ± 0.020 0.015 ± 0.05 0.05
F2L (FA10018) 2 ± 0.050 0.020 ± 0.08 0.04
F5L (FA10019) 5 ± 0.05 0.025 ± 0.125 0.075
F10L (FA10020) 10 ± 0.060 0.030 ± 0.12 0.08
F20L (FA10021) 20 ± 0.100 0.050 ± 0.2 0.1
F25L (FA10022) 25 ± 0.200 0.070 ± 0.5 0.2
F50L (FA10023) 50 ± 0.35 0.12 ± 0.5 0.2
F100L (FA10024) 100 ± 0.55 0.15 ± 0.8 0.3
F200L (FA10025) 200 ± 1.20 0.30 ± 1.6 0.6
F250L (FA10026) 250 ± 1.50 0.75 ± 4 1.5
F300L (FA10027) 300 ± 2.4 0.5 ± 4 1.5
F400L (FA10028) 400 ± 2.4 0.8 ± 4 1.5
F500L (FA10029) 500 ± 3.0 0.8 ± 4 1.5
F1000L (FA10030) 1000 ± 5.0 1.3 ± 8 3
F5000L (FA10031) 5000 ± 20.0 7.0 ± 40 15
Multichannel Maximum Permissible Errors
Model Volume Gilson ISO 8655
(Reference) (µL) Systematic Random Systematic Random
error (µL) error (µL) error (µL) error (µL)
L8x10 Min 0.5 ± 0.08 0.04 ± 0.24 0.16
(FA10013)* 1 ± 0.08 0.05 ± 0.24 0.16
L12x10 5 ± 0.2 0.1 ± 0.24 0.16
(FA10014)* Max. 10 ± 0.2 0.1 ± 0.24 0.16
L8x20 Min. 2 ± 0.10 0.08 ± 0.40 0.20
(FA10009)*
10 ± 0.2 0.10 ± 0.40 0.20
L12x20
(FA10010)*
Max 20 ± 0.4 0.15 ± 0.40 0.20
L8x200 Min. 20 ± 0.50 0.25 ± 3.2 1.2
(FA10011)
100 ± 1.0 0.40 ± 3.2 1.2
L12x200
(FA10012)
Max. 200 ± 2.0 0.5 ± 3.2 1.2
L8x300 Min. 20 ± 1 0.35 ± 8 3
(FA10015) 30 ± 1 0.35 ± 8 3
L12x300 Min. 150 ± 1.5 0.6 ± 8 3
(FA10016) 300 ± 3 1 ± 8 3
Multichannel modelsSingle models Fixed models

- 14 -
15A SPARE PARTS FOR SINGLE MODELS
Service Kit 1
st
level
includes:
B
F3
- 3 piston seals or seal
guides
- 3 O-rings
- 1 tip-holder
Service Kit 2
nd
level
includes:
- 1 push-button
- 1 connecting nut
- 2 tip-ejectors
for the P2L and P10L
models only:
- 1 adapter for stainless
steel tip-ejector
- 1 extension for plastic
tip-ejector
A
C
D
E
F4
F1 F2
F4
F2
F3
F1
A
B
F1
F2
E
C
D
P20L (FA10003 P or M) and P100L (FA10004 P or M)
Description P20L P100L
C+D+E Service Kit 1st level FA07002 FA07003
A+B+F Service Kit 2nd level FA07008 FA07009
C+D Seal guide + O-ring (5 sets) FA07013 FA07014
P200L (FA10005 P or M) and P1000L (FA10006 P or M)
Description P200L P1000L
C+D+E Service Kit 1st level FA07004 FA07005
A+B+F Service Kit 2nd level FA07010 FA07011
C+D Seal guide + O-ring (5 sets) FA07015 FA07016
P2L (FA10001 P or M) and P10L (FA10002 P or M)
Description P2L P10L
C+D+E Service Kit 1st level F144501 FA07001
A+B+F1 to F4 Service Kit 2nd level FA07006 FA07007
C+D Seal + O-ring (5 sets) F144861 FA07012
F3 Tip-ejector adapter F144879 F144879
F4 Tip-ejector extension F2070903 F2070903
P5000L (FA10007) and P10mlL (FA10008)
Description P5000L P10mlL
C+D+E Service Kit 1st level FA07021 FA07022
A Push-button assembly FA07019 FA07020
C+D Seal + O-ring (5 sets) FA07017 FA07018
E Tip-holder F123608 F161263
Each Single pipette model (except P5000L and P10mlL) has two
different ordering references to identify the kind of tip-ejector
required. For a pipette with a plastic tip-ejector, the ordering
reference is ended by the letter P, for a pipette with a stainless
steel tip-ejector, the ordering reference is ended by the letter M.
Ex: For a P10L model with the plastic tip-ejector the ordering
reference is FA10002P. For the same pipette with a stainless steel
tip-ejector, the ordering reference is FA10002M.
ALL MODELS
Description Ordering reference
Lubricant 5440011070
L8x20 (FA10009) and L12x20 (FA10010)
Description 8x20 12x20
F3 - F4 Tip-ejector F507005 F507006
G Ejector lock F507008 F507008
H1 - H2 Ejector spacer F507001 F507003
H3 - H4 Ejector spacer D10 F807114 F807115
L8x200 (FA10011) and L12x200 (FA10012)
Description 8x20 12x20
F3 - F4 Tip-ejector F507005 F507006
G Ejector lock F507008 F507008
H1 - H2 Ejector spacer F507001 F507003
L8x10 (FA10013) and L12x10 (FA10014)
Description 8x10 12x10
F3 - F4 Tip-ejector F507005 F507006
G Ejector lock F507008 F507008
H1 - H2 Ejector spacer F507001 F507003
H3 - H4 Ejector spacer D10 F807114 F807115
L8x300 (FA10015) and L12x300 (FA10016)
Description 8x20 12x20
F3 - F4 Tip-ejector F507005 F507006
G Ejector lock F507008 F507008
H1 - H2 Ejector spacer F507001 F507003
Tip-ejector (12 channels)
Ejector lock
Ejector spacer (8 channels)
F3
G
H1
Ejector spacer (12 channels)
H2
Ejector spacer D10 (8 channels)
H3
Ejector spacer D10 (12 channels)
H4
F4
Tip-ejector (8 channels)
15B SPARE PARTS FOR MULTICHANNEL MODELS

ENGLISH
- 15 -
15C SPARE PARTS
FOR FIXED MODELS
F300L (FA10027), F400L (FA10028), F500L (FA10029) and
F1000L (FA10030) F5000L (FA10031)
Description
F300L/F400L
F5000L
F500L/F1000L
C+D+E Service Kit 1st level FA07005 FA07021
A+B+F1 Service Kit 2nd level FA07072 NA
C+D Seal + O-ring (5 sets) FA07016 FA07017
F1
E
C
D
B
A
Service Kit 1
st
level
includes:
B
- 3 piston seals or seal
guides
- 3 O-rings
- 1 tip-holder
Service Kit 2
nd
level
includes:
- 1 push-button
- 1 connecting nut
- 1 tip-ejector
for the F1L, F2L, F5L and
F10L models only:
- 1 extension for plastic
tip-ejector
A
C
D
E
F1
F4
F1
F4
F1L (FA10017), F2L (FA10018), F5L (FA10019), F10L (FA10020)
Description F1L/F2L F5L/F10L
C+D+E Service Kit 1st level F144501 FA07001
A+B+F1 Service Kit 2nd level FA07067 FA07068
C+D Seal + O-ring (5 sets) F144861 FA07012
F4 Tip-ejector extension F2070903 F2070903
F20L (FA10021), F25L (FA10022), F50L (FA10023)
and F100L (FA10023),
Description F20L/F25L F50L/F100L
C+D+E Service Kit 1st level FA07002 FA07003
A+B+F1 Service Kit 2nd level FA07069 FA07070
C+D Seal guide + O-ring (5 sets) FA07013 FA07014
F200L (FA10025), F250L (FA10026),
Description F200L F250L
C+D+E Service Kit 1st level FA07004 FA07004
A+B+F1 Service Kit 2nd level FA07071 FA07073
C+D Seal guide + O-ring (5 sets) FA07015 FA07015
ALL MODELS
Description Ordering reference
Lubricant 5440011070
EC DECLARATION OF CONFORMITY
PIPETMAN® L
P2L, P10L, P20L, P100L, P200L, P1000L,
P5000L and P10mlL
L8x10, L12x10, L8x20, L12x20,
L8x200, L12x200, L8x300, L12x300
F1L, F2L, F5L, F10L, F20L, F25L, F50L, F100L, F200L,
F250L, F300L, F400L, F500L, F1000L, F5000L
98/79/EC* on In Vitro Diagnostic Medical Devices
comply with the requirements of the following European Directives:
Villiers-le-Bel, January 14
th
, 2013
GILSON S.A.S.
19, avenue des Entrepreneurs
BP. 145 - 95400 Villiers-le-Bel (France)
Tel.: +33(0) 1 34 29 50 00
Fax: +33(0) 1 34 29 50 20
www.gilson.com
* Annex III, self-declared
The company,
Hereby certies on its sole responsibility that the products listed below:
A. El Sayed H. Ledorze
General Manager Quality Manager
WARRANTY
Gilson warrants this pipette against defects in material under normal
use and service for a period of 12 months from the date of purchase.
This warranty shall not apply to pipettes which are subject to abnormal
use and/or improper or inadequate maintenance (contrary to the
recommendations given in the User’s guide), including, but not limited
to pipettes which have been subjected to physical damage, improper
handling, or spillage or exposure to any corrosive environment. This
warranty shall also be void in the event pipettes are altered or modied
by any party other than Gilson or its designates. Gilson’s sole liability
under this warranty shall be limited to, at Gilson’s sole option, repair
or replacement of any defective components of pipettes or refund of
the purchase price paid for such pipettes.
THE FOREGOING WARRANTY IS EXCLUSIVE AND GILSON HEREBY
DISCLAIMS ALL OTHER WARRANTIES, WHETHER EXPRESS OR
IMPLIED, INCLUDING ANY WARRANTIES OF MERCHANTABILITY
AND ANY WARRANTIES OF FITNESS FOR A PARTICULAR PUR-
POSE, UNDER NO CIRCUMSTANCES SHALL GILSON BE LIABLE
FOR ANY CONSEQUENTIAL, PUNITIVE, INDIRECT OR INCIDENTAL
DAMAGES ARISING OUT OF ANY BREACH OF ANY EXPRESS OR
IMPLIED WARRANTY.

LT801124/D - ©2013 Gilson SAS All rights reserved January 2013
English Printed in France
Specifications subject to change without notifications - errors omitted.
Gilson, Inc. World Headquarters
3000 Parmenter Street
I
P.O. Box 620027
I
Middleton, WI 53562-0027, USA
Tel: (1) 800-445-7661 or (1) 608-836-1551
I
Fax: (1) 608-831-4451
Gilson S.A.S.
19, avenue des Entrepreneurs
I
BP 145, F-95400 Villiers-le-Bel, France
Tel: +33 (0) 1 34 29 50 00
I
Fax: +33 (0) 1 34 29 50 20
www.gilson.com
/