Page is loading ...

Specifications HID-1
Amps / Volts requirements 15 amps @ 120 volts
Min / Max operating temperature 32 to 120° F
Min / Max Humidity 0-99% RH
Time setting Hours, Minutes, Seconds
Hi-temp setting Fully adjustable
24-hour Timeclock Accuracy +/- 30 seconds / year
Weight / Dimensions 4 lbs / 8” x 4” x 3”
Life Expectancy > 10 years
Hot-start delay time Fully Adjustable
All Sentinel Timers and controllers offer a 3-year warranty.
Sentinel products are distributed by:
GPS / Global Product Solutions LLC.
www.growgps.com
Printed in China using 100% recycled materials
Instruction Manual
HID-1
HID Lighting Controller

Welcome to the future... The HID-1 HID Lighting Controller is the
simplest and BEST lighting controller you can buy. It is 100% digital
and programmable. The HID-1 features a 24-hour time-clock that is
extremely accurate and EASY to use. It also features a “Hi-temp
shutdown” to protect plants from overheating by disabling HID
lights AND “Hot-start” prevention to protect your HID lamps. No
other timer or controller can do all of that!
The HID-1 has been designed to control
supplemental lighting .
Mechanical time-clocks don’t allow settings
less than 15 minute intervals.
Other “digital” timers only allow you to set
a few cycles and programming them can be a
complicated process.
The HID-1 changes all of that!
CONTENTS
A quick look at the HID-1
Installing the HID-1
Pushbuttons
Changing from F to C
Explaining the HID-1
Light Settings
Connection Examples
What the HID-1 controls
Troubleshooting & Specs
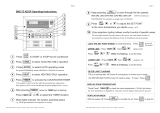
A quick look at the HID-1…
Green LED
display
(10) Color-coded
buttons makes it
easy to use.
Heavy duty
re-settable
circuit breaker
(2) receptacles
makes connections
easy
Problem: The timeclock is not keeping the correct time.
The timeclock is backed-up with a long-life lithium battery that only
needs to be replaced every 5 years or so. If the clock does not retain the
time after a power failure, chances are the battery must be replaced.
The battery required is a lithium CR2032 3 volt.
Contact the factory for assistance.
Problem: How can I return the unit to the factory settings?
Under some situations, it may be desirable to reset the unit’s factory
setpoints. Press and hold the Down and the Enter / Reset buttons for 3
seconds. When the display says F.Set, press the Enter / Reset button for
3 seconds and the display should say DonE.

Troubleshooting
Problem: The unit does not power up at all.
Check the circuit breaker and reset it if necessary. If the problem
continues, reduce the number of devices connected to the unit.
Problem: The green LED next to Light Delay Timer Set is
blinking, The HID lights are not turning on after a power failure.
The “Hot-start” prevention feature has been activated. The Light
Delay Timer allows time for the HID lamps to cool properly before
trying to restart them. The Light Delay Timer can be set by the user.
Problem: The display is flashing Hot _ _ F
The Maximum-temperature protection feature has disabled the HID
light receptacle to keep the area from getting too hot. The air
temperature exceeded the user setpoint for Max Temp. The green
LED for Maximum Temperature blinks On & Off until the temp has
dropped below the Max Temp setting. The display also records the
actual time that the fault occurred to aid in troubleshooting the
problem. Check ventilation equipment for proper operation. To reset
the error, press the Enter / Reset pushbutton. If the Light Delay timer
has not yet expired, the light output will not be allowed to turn ON
until the timer times out. (Green LED Light Delay Timer Set blinks)
Problem: The display reads Err SEn
The internal temperature sensor has been damaged or is not communi-
cating with the unit. If water has been allowed to enter the sensor area,
the sensor could be damaged. If resetting (OFF / ON) the power does
not help, contact the factory.
Problem: I want to manually over-ride the Lights.
Press the TEST LIGHT DEVICE button for 1 second to activate /
de-activate the devices connected to the Light ON and Light OFF
receptacles. The Light timer will return to normal operation when
TEST LIGHT DEVICE button is pressed again. If the test button is
not pressed a second time, the test will continue until the next timed
light event occurs.
*Note: Activating the Test Light Device may also cause the Recycle
device to begin functioning IF the Recycle mode is set to Daytime.
Installing the HID-1
The HID-1 is simple to install, however we recommend reading the
manual before attempting to operate the unit so that all of it’s features
are fully understood.
1) Locate a suitable location. First secure the provided bracket to the wall.
Next snap the controller into place and tighten the (2) thumb-screw.s on the
top & bottom of the bracket.
2) The device(s) that will be controlled must be less than 15-amps @ 120V
/ 10-amps @ 240V COMBINED load. There are two outlets (receptacles)
on the HID-1. One receptacle provides power for your lighting or lighting
controllers. The second receptacle allows devices that are connected to the
Night receptacle to be activated during the Nighttime. Connect HID lights
to the Light On (Day) outlet so they run during the Day. Other devices like
dehumidifiers, exhaust fans etc. can be connected to the Light Off (Night)
outlet to be activated only during the Night when the lights are turned
OFF. Refer to Connection Examples for more information.
3) The unit requires a 120 volt, 15-amp power supply. Plug the power
cable into a standard Nema 5-15 wall outlet. The built-in circuit breaker will
protect the unit from overloads.
4) Verify all connections are secure, turn the circuit breaker to the ON
position and you are ready to go.
5) Programming the unit is simple. Become familiar with the unit by
customizing the setpoints for YOUR application. The following pages
explain the available settings and other special functions.
NOTE:
*Note: Make sure the thumb-screws are in place before
attempting to use the controller. The thumb screws securely fasten the unit
to the bracket.

Pushbuttons
There are 10 push-buttons on the unit that control all the functions.
• UP: Press this button to display to increase the setting.
• Down: Press this button to display to increase the setting.
• Enter/Reset: Press this button enter the new setpoint or to reset a
Recycle or Light timer test.
• Light On Time: Press this button for 1 second to set the Light On
time. This is the time the Light outlet will be energized once each “day”.
• Light Off Time:Press this button for 1 second to set the Light Off
time. This is the time the Light outlet will be turned OFF once each 24
- hour period.
• Set Time: Press this button for 1 second to set the 24-hour timeclock.
Once set, an internal battery will keep time even when power is re-
moved from the unit.
• Max Temp: Press this button for 1 second to set the Maximum
temperature. If the temp goes above this level, the Light(s) are disabled.
• Light Delay Time: Press this button for 1 second to set the Light delay
timer. The Delay timer prevents “hot-starts” by allowing your HID
lamps to cool before trying to re-fire them when power is interrupted.
• Test Light Device: Press this button for 1 second to activate the
devices connected to the Light ON and Light OFF receptacles. The
Light timer will return to normal operation when Enter/Reset is pressed
or the next timed event occurs.
• Display Temp: Press this button to display the current temperature.
See below for display options.
Changing display from F to C
The HID-1 can display the temperature in either in F or C. To
change the temperature display, press and hold the Up
and Down
pushbuttons for 3 seconds.
What the HID-1 controls...
The HID-1 has been designed to control both your Daytime and
Nighttime devices.
1) HID lights that must turn ON and OFF at the proper times.
The HID-1 also protects your HID lights from “Hot-starts”.
Even more important is the HID-1’s ability to monitor the tem-
perature inside the growing area and turn off the HID lights if
the temp rises above a safe setpoint, saving crop loss in the
event of a ventilation failure.
2) Night devices that only need to be activated at night when the
lights are off. You could connect a small ventilation fan, a
heater, a de-humidifier etc.
Light On receptacle: 1 provided
The light On receptacle is used to control your HID or other
supplemental lighting. Any 120 volt lighting less than 1200 watts
combined can be connected to the Light On receptacle. To control more
than one light, a power splitter can be used. If multiple high wattage lights
are to be controlled, an optional HPH-4 o r HPH-8 lighting controller
can be connected to control as many HID lights as required. Each HPH-4
can control up to (4) 1000 watt HID lights. The safety functions built into
the HID-1 keeps your expensive HID lamps safe and protects against
ventilation failures.
(See Max Temp / Hot-start)
Light Off receptacle: 1 provided
The light Off receptacle is used to control any device that needs to be
turned On only at night. The HID-1’s digital timeclock will turn Off the
lights before the night device is turned On. Any 120 volt AC device can be
connected to the Light Off receptacle as long as it is 1200 watts or
(15-amps)or below. Some users have to operate small space heaters only at
night to keep plants from freezing. Since all heaters have an internal
thermostat, simply set the heater thermostat at the minimum level and
plug it into the Light Off receptacle. When the lights turn Off and the area
begins to cool, the heater will take over until “morning” when the lights
are again activated.
Other users may want to activate a small exhaust fan at night to keep
humidity levels for getting too high during transpiration by the plants at
night. There may be other devices only used at night which will work great
with the HID-1.

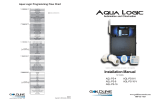
Connection examples
Connect up to 1200 watts of HID lighting directly to the
HID-1 OR use 1 or more HPH-4 or HPH-8 or PXM to
be able to operate as many HID lights as you need.
OR
HPH-8
Night devices such as heaters, dehumidifiers or exhaust fans
are connected to the “Light Off” receptacle. When Lights are
Off, the device is enabled.
OR
OR
PXM-1
OR
Lights
HID-1
Fan
Dehumidifier
Heater
Explaining the HID-1
Other digital timers can be difficult to set-up and “Program”.
The HID-1 has been designed to be simple and easy to use.
Separate buttons for each setting make changes easy.
The 24-hour timeclock on the HID-1 keeps track of the actual time in
hours, minutes and seconds and controls supplemental HID lighting.
The 24-hour Light(s) timeclock has two setpoints, one to turn ON the
lights, the other to turn OFF the lights. Normally, HID lights are used
for 12 to 18 hours each day.
The HID-1 also has a “Hi-temp” function which is used to protect
the plants from excessive temperatures by turning OFF supplemental
HID lights if the temperature inside the growing area gets above safe
levels. High temps can be then result of failed ventilation equipment or
high heat loads inside the area. The user can set the maximum
temperature to whatever level they would like to have. Once activated,
the Light outlet remains OFF until the user “resets” the unit by pressing
the Enter / Reset button for 3-seconds.
To protect your HID lamps from “Hot-starts”, the HID-1 also has an
intelligent function that allows the HID lamps to cool properly in the
event of a power outage. The “Light Delay Time” setpoint is preset to
allow the lights to cool for 10 minutes after a power failure. The timer
setting is fully adjustable. This timer is not activated during normal
operation.
Hot-starts can shorten the lifetime of your lamp and can burn out the
igniters in HPS systems prematurely.

Light settings
Setting the Time: The time on the 24-hour timeclock displays hours,
minutes, seconds and AM or PM. Once the time is set, a battery backup
will continue to keep time even with power removed.
Press and hold the Set Time
button for 1-second. The first 2 digits
(hours) flash. Use the Up
or Down button to change the setting. Press
Enter
to move to the next 2 digits (minutes). Repeat for the minutes and
seconds and also the AM or PM.
Setting the Light On timer: The Light On Time activates the lights
connected to the Light On outlet and also determines that it is “Daytime”
for the recycling timer. If the lights are to be on from 6:00 AM to 6:00
PM, the Light On Time should be set to 6:00 AM.
Press and hold the Light On Time
button for 1-second. The first 2
digits (hours) flash. Use the Up
or Down button to change the setting.
Press Enter
to move to the next 2 digits (minutes). Repeat for the minutes
and seconds and also the AM or PM.
Setting the Light Off timer: The Light Off Time activates the Light
Off outlet and also determines that it is “Nighttime” for the recycling
timer. If the lights are to be on from 6:00 AM to 6:00 PM, the Light Off
Time should be set to 6:00 PM.
Press and hold the Light Off Time
button for 1-second. The first 2
digits (hours) flash. Use the Up
or Down button to change the setting.
Press Enter
to move to the next 2 digits (minutes). Repeat for the minutes
and seconds and also the AM or PM.
Setting the Max Temp: The Max Temp setpoint is the maximum
temperature the area can be at. If the temperature rises above the level you
set, the temperature probe mounted outside the HID-1 will sense the area
is getting to hot and disable the Light On outlet. Shutting off the lights
allows the area to cool down.
To change the Max Temp setting, press and hold the Max Temp
button
for 1-second. The unit will display the current setpoint. Use the Up
or
Down
button to change the setting. Press Enter to accept the new
setting.
Resetting the Max Temp error: Once the Max Temp function is
activated, the lights will remain off with the display reading “Hi Temp”
and the time that the Hi-temp occurred until reset by the user. Press
and hold the Enter / Reset button for 3 seconds to reset the error. You
will then need to determine why the temperature raised beyond safe levels
and correct the problem.
Setting the Light Delay Time / “Hot-Start”: The Light Delay
function only activates if power is interrupted WHILE the Light On outlet
is ON. The timer is not activated during normal operation.
The Light Delay timer is used to allow the HID lamps to properly cool
before attempting to re-fire them. A minimum of 10-minutes is generally
acceptable for most light systems. Should you want to change the factory
setpoint, press and hold the Light Delay Time
button for 1-second.
The unit will display the current setpoint. Use the Up
or Down button to
change the setting. Press Enter
to accept the new setting.
Testing (Over-riding) the Light Device: Normally, the Light ON
and Light OFF outputs are controlled by the timeclock and the user
setpoints. Occasionally the user may want to test or override the Light
output for testing purposes. This is easily accomplished using the Test
Light Device button. When the Test Light Device button is pressed for
1 second, the Light Output will be “forced” to change state.
Let’s assume it is “night” and the Light OFF output is ON. If the user
wants to “force” the Lights to turn ON, press and hold the Test Light
Device button. The Light OFF output will be turned Off and the Light
On output will be turned On. The Lights On output will remain On until
the next scheduled Off cycle occurs and then the unit will return to
normal operation. Once the “test” is activated, it can also be reset to allow
the timeclock to continue normally by pressing the Test Light Device
pushbutton. While the test is in process, the green “Light On time Set”
LED will be flashing.
The same thing can be done to force the Lights OFF. Let’s assume now
it is “day” and the Light On output is ON. If the user wants to “force”
the Lights to turn Off, press and hold the Test Light Device
button for
1 second. The Light On output will be turned Off and the Light Off
output will be turned On. The Lights Off output will remain On until the
next scheduled On cycle occurs and then the unit will return to normal
operation. Once the “test” is activated, it can also be reset to allow the
timeclock to continue normally by pressing the Test Light Device
pushbutton. While the test is in process, the green “Light Off time Set”
LED will be flashing.
*Note: Activating the Test Light Device may also cause the Recycle
device to begin functioning IF the Recycle mode is set to Daytime.
Displaying the current temperature: In order to see what the
current temperature being measured by the remote probe is, the Display
Temp button can be pressed momentarily in order to display the
temperature. This can help verify the correct setting for the Hi-temp
setpoint.
/