17En
•To clean a CD, wipe the disc with a soft
cloth outward from the center.
•Condensation may temporarily impair
the player’s performance. Let it rest for
about one hour to adjust to a warmer
temperature. Also, wipe any damp discs
off with a soft cloth.
•When using discs that can be printed on
label surfaces, check the instructions and
the warnings of the discs. Depending on
the discs, inserting and ejecting may not
be possible. Using such discs may result
in damage to this equipment.
•Do not attach commercially available
labels or other materials to the discs.
– The discs may warp making the disc
unplayable.
– The labels may come off during
playback and prevent ejection of the
discs, which may result in damage to
the equipment.
USB storage device
•Connections via USB hubs are not
supported.
•Firmly secure the USB storage device
before driving. Do not let the USB storage
device fall onto the floor, where it may
become jammed under the brake or
accelerator pedal.
•Depending on the USB storage device,
the following problems may occur.
–Operations may vary.
– The storage device may not be
recognized.
– Files may not be played back properly.
– The device may cause audible
interference when you are listening to
the radio.
iPod
•Do not leave the iPod in places with high
temperatures.
•Firmly secure the iPod when driving. Do
not let the iPod fall onto the floor, where
it may become jammed under the brake
or accelerator pedal.
•The settings of the iPod such as the
equalizer and repeat play are changed
automatically when the iPod is
connected to the unit. Once the iPod is
disconnected, those settings will return
to the original settings.
•Incompatible text saved on the iPod will
not be displayed by the unit.
•Only the first 32 characters can be
displayed as a file name (including the file
extension) or a folder name.
•The unit may not work properly
depending on the application used to
encode WMA files.
•There may be a slight delay at the start of
the playback of audio files embedded
with image data, or audio files stored on a
USB device with numerous folder
hierarchies.
•Russian text to be displayed on this unit
should be encoded in one of the
following character sets:
–Unicode (UTF-8, UTF-16)
– A character set other than Unicode that
is used in a Windows environment and
is set to Russian in the multi-language
setting
•Pioneer cannot guarantee compatibility
with all USB mass storage devices, and
assumes no responsibility for any loss of
data on media players, smartphones, or
other devices while using this product.
•Do not leave discs or a USB storage
device in any place that is subject to high
temperatures.
Compressed audio
compatibility
WMA files
MP3 files
WAV files
•WAV file formats cannot be connected via
MTP.
AAC files
Disc
•Regardless of the length of the blank
section between the songs from the
original recording, compressed audio
discs play with a short pause between
songs.
USB device
•There may be a slight delay when starting
playback of audio files on a USB storage
device with numerous folder hierarchies.
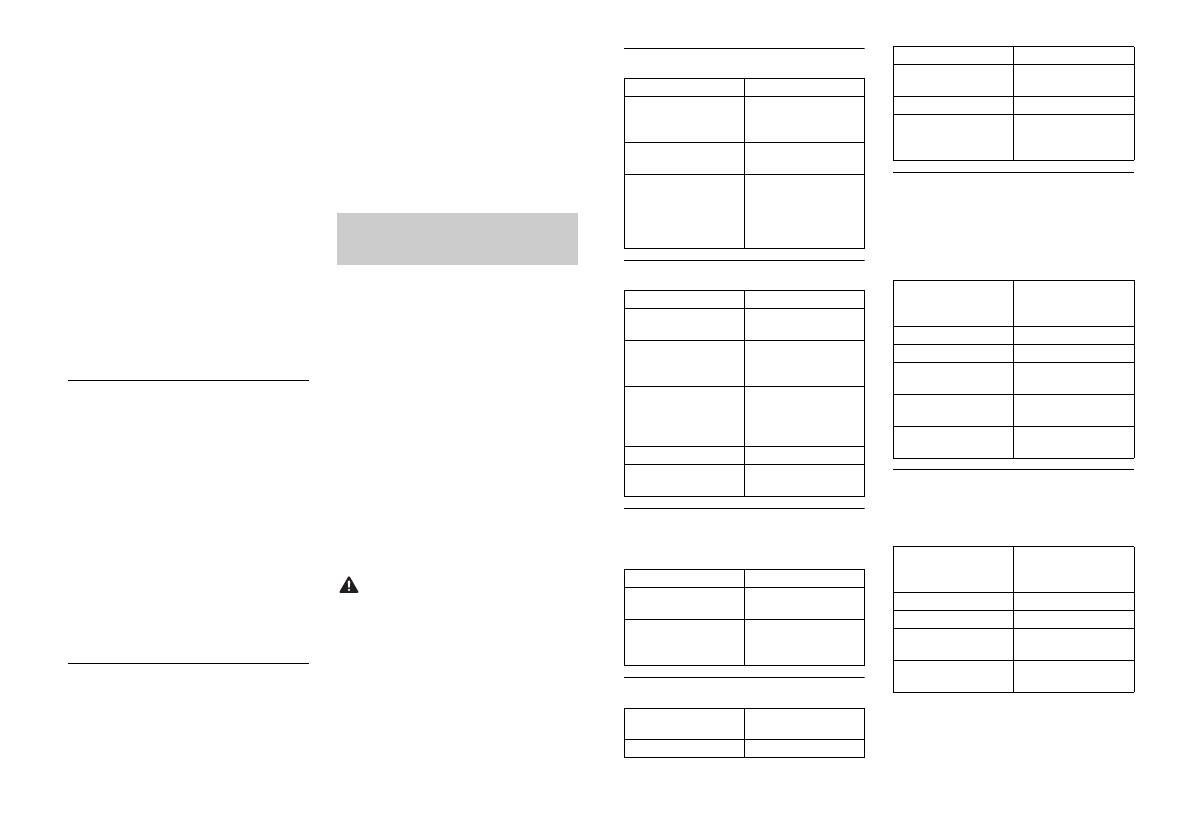
File extension .wma
Bit rate 48 kbps to 320 kbps
(CBR), 48 kbps to 384
kbps (VBR)
Sampling frequency 32 kHz, 44.1 kHz, 48
kHz
Windows Media™
Audio Professional,
Lossless, Voice/DRM
Stream/Stream with
video
Not compatible
File extension .mp3
Bit rate 8 kbps to 320 kbps
(CBR), VBR
Sampling frequency 8 kHz to 48 kHz (32
kHz, 44.1 kHz, 48 kHz
for emphasis)
Compatible ID3 tag
version
1.0, 1.1, 2.2, 2.3, 2.4
(ID3 tag Version 2.x is
given priority over
Version 1.x.)
M3u playlist Not compatible
MP3i (MP3
interactive), mp3 PRO
Not compatible
File extension .wav
Quantization bits 8 and 16 (LPCM), 4
(MSADPCM)
Sampling frequency 16 kHz to 48 kHz
(LPCM), 22.05 kHz and
44.1 kHz (MS ADPCM)
Compatible format AAC encoded by
iTunes
File extension .m4a
Sampling frequency 11.025 kHz to 48 kHz
Transmission rate 16 kbps to 320 kbps,
VBR
Apple Lossless Not compatible
AAC file bought from
the iTunes Store (.m4p
file extension)
Not compatible
Playable folder
hierarchy
Up to eight tiers (A
practical hierarchy is
less than two tiers.)
Playable folders Up to 99
Playable files Up to 999
File system ISO 9660 Level 1 and
2, Romeo, Joliet
Multi-session
playback
Compatible
Packet write data
transfer
Not compatible
Playable folder
hierarchy
Up to eight tiers (A
practical hierarchy is
less than two tiers.)
Playable folders Up to 500
Playable files Up to 15 000
Playback of copyright-
protected files
Not compatible
Partitioned USB
device
Only the first partition
can be played.


