Page is loading ...

P
r
o
t
e
c
t
e
d
b
y
c
o
p
y
r
i
g
h
t
.
C
o
p
y
i
n
g
f
o
r
p
r
i
v
a
t
e
o
r
c
o
m
m
e
r
c
i
a
l
p
u
r
p
o
s
e
s
,
i
n
p
a
r
t
o
r
i
n
w
h
o
l
e
,
i
s
n
o
t
p
e
r
m
i
t
t
e
d
u
n
l
e
s
s
a
u
t
h
o
r
i
s
e
d
b
y
V
o
l
k
s
w
a
g
e
n
A
G
.
V
o
l
k
s
w
a
g
e
n
A
G
d
o
e
s
n
o
t
g
u
a
r
a
n
t
e
e
o
r
a
c
c
e
p
t
a
n
y
l
i
a
b
i
l
i
t
y
w
i
t
h
r
e
s
p
e
c
t
t
o
t
h
e
c
o
r
r
e
c
t
n
e
s
s
o
f
i
n
f
o
r
m
a
t
i
o
n
i
n
t
h
i
s
d
o
c
u
m
e
n
t
.
C
o
p
y
r
i
g
h
t
b
y
V
o
l
k
s
w
a
g
e
n
A
G
.
Workshop Manual
Golf 2004 ➤
General body repairs, exterior
Edition 04.2008
Service
Service Department. Technical Information

P
r
o
t
e
c
t
e
d
b
y
c
o
p
y
r
i
g
h
t
.
C
o
p
y
i
n
g
f
o
r
p
r
i
v
a
t
e
o
r
c
o
m
m
e
r
c
i
a
l
p
u
r
p
o
s
e
s
,
i
n
p
a
r
t
o
r
i
n
w
h
o
l
e
,
i
s
n
o
t
p
e
r
m
i
t
t
e
d
u
n
l
e
s
s
a
u
t
h
o
r
i
s
e
d
b
y
V
o
l
k
s
w
a
g
e
n
A
G
.
V
o
l
k
s
w
a
g
e
n
A
G
d
o
e
s
n
o
t
g
u
a
r
a
n
t
e
e
o
r
a
c
c
e
p
t
a
n
y
l
i
a
b
i
l
i
t
y
w
i
t
h
r
e
s
p
e
c
t
t
o
t
h
e
c
o
r
r
e
c
t
n
e
s
s
o
f
i
n
f
o
r
m
a
t
i
o
n
i
n
t
h
i
s
d
o
c
u
m
e
n
t
.
C
o
p
y
r
i
g
h
t
b
y
V
o
l
k
s
w
a
g
e
n
A
G
.
List of Workshop Manual Repair GroupsList of Workshop Manual
Repair GroupsList of Workshop Manual Repair Groups
Repair Group
50 - Body - front
55 - Bonnet, rear lid
57 - Front doors, door components, central locking
58 - Rear doors, door components
60 - Sunroof
63 - Bumpers
64 - Glazing
66 - Exterior equipment
Technical information should always be available to the foremen and mechanics, because their
careful and constant adherence to the instructions is essential to ensure vehicle road-worthiness and
safety. In addition, the normal basic safety precautions for working on motor vehicles must, as a
matter of course, be observed.
Service
All rights reserved.
No reproduction without prior agreement from publisher.
Copyright © 2010 Volkswagen AG, Wolfsburg K0058991620

P
r
o
t
e
c
t
e
d
b
y
c
o
p
y
r
i
g
h
t
.
C
o
p
y
i
n
g
f
o
r
p
r
i
v
a
t
e
o
r
c
o
m
m
e
r
c
i
a
l
p
u
r
p
o
s
e
s
,
i
n
p
a
r
t
o
r
i
n
w
h
o
l
e
,
i
s
n
o
t
p
e
r
m
i
t
t
e
d
u
n
l
e
s
s
a
u
t
h
o
r
i
s
e
d
b
y
V
o
l
k
s
w
a
g
e
n
A
G
.
V
o
l
k
s
w
a
g
e
n
A
G
d
o
e
s
n
o
t
g
u
a
r
a
n
t
e
e
o
r
a
c
c
e
p
t
a
n
y
l
i
a
b
i
l
i
t
y
w
i
t
h
r
e
s
p
e
c
t
t
o
t
h
e
c
o
r
r
e
c
t
n
e
s
s
o
f
i
n
f
o
r
m
a
t
i
o
n
i
n
t
h
i
s
d
o
c
u
m
e
n
t
.
C
o
p
y
r
i
g
h
t
b
y
V
o
l
k
s
w
a
g
e
n
A
G
.
Contents
50 - Body - front . . . . . . . . . . . . . . . . . . . . . . . . . . . . . . . . . . . . . . . . . . . . . . . . . . . . . . 1
1 Lock carrier . . . . . . . . . . . . . . . . . . . . . . . . . . . . . . . . . . . . . . . . . . . . . . . . . . . . . . . . . . . . 1
1.1 Tools . . . . . . . . . . . . . . . . . . . . . . . . . . . . . . . . . . . . . . . . . . . . . . . . . . . . . . . . . . . . . . . . . . 1
1.2 Assembly overview - lock carrier, service position . . . . . . . . . . . . . . . . . . . . . . . . . . . . . . . . 2
1.3 Service position . . . . . . . . . . . . . . . . . . . . . . . . . . . . . . . . . . . . . . . . . . . . . . . . . . . . . . . . . . 3
1.4 Removing and installing lock carrier with add-on parts . . . . . . . . . . . . . . . . . . . . . . . . . . . . 4
2 Wing . . . . . . . . . . . . . . . . . . . . . . . . . . . . . . . . . . . . . . . . . . . . . . . . . . . . . . . . . . . . . . . . . . 7
2.1 Tools . . . . . . . . . . . . . . . . . . . . . . . . . . . . . . . . . . . . . . . . . . . . . . . . . . . . . . . . . . . . . . . . . . 7
2.2 Assembly overview - front wing . . . . . . . . . . . . . . . . . . . . . . . . . . . . . . . . . . . . . . . . . . . . . . 8
2.3 Removing and installing wing . . . . . . . . . . . . . . . . . . . . . . . . . . . . . . . . . . . . . . . . . . . . . . . . 8
2.4 Removing and installing wing strut . . . . . . . . . . . . . . . . . . . . . . . . . . . . . . . . . . . . . . . . . . . . 10
3 Noise insulation . . . . . . . . . . . . . . . . . . . . . . . . . . . . . . . . . . . . . . . . . . . . . . . . . . . . . . . . . . 12
3.1 Tools . . . . . . . . . . . . . . . . . . . . . . . . . . . . . . . . . . . . . . . . . . . . . . . . . . . . . . . . . . . . . . . . . . 12
3.2 Assembly overview - noise insulation . . . . . . . . . . . . . . . . . . . . . . . . . . . . . . . . . . . . . . . . . . 13
4 Underbody cladding . . . . . . . . . . . . . . . . . . . . . . . . . . . . . . . . . . . . . . . . . . . . . . . . . . . . . . 14
4.1 Tools . . . . . . . . . . . . . . . . . . . . . . . . . . . . . . . . . . . . . . . . . . . . . . . . . . . . . . . . . . . . . . . . . . 14
4.2 Assembly overview - underbody cladding . . . . . . . . . . . . . . . . . . . . . . . . . . . . . . . . . . . . . . 15
5 Plenum chamber bulkhead . . . . . . . . . . . . . . . . . . . . . . . . . . . . . . . . . . . . . . . . . . . . . . . . . . 16
5.1 Tools . . . . . . . . . . . . . . . . . . . . . . . . . . . . . . . . . . . . . . . . . . . . . . . . . . . . . . . . . . . . . . . . . . 16
5.2 Assembly overview - plenum chamber bulkhead . . . . . . . . . . . . . . . . . . . . . . . . . . . . . . . . 16
55 - Bonnet, rear lid . . . . . . . . . . . . . . . . . . . . . . . . . . . . . . . . . . . . . . . . . . . . . . . . . . . . 17
1 Bonnet . . . . . . . . . . . . . . . . . . . . . . . . . . . . . . . . . . . . . . . . . . . . . . . . . . . . . . . . . . . . . . . . 17
1.1 Tools . . . . . . . . . . . . . . . . . . . . . . . . . . . . . . . . . . . . . . . . . . . . . . . . . . . . . . . . . . . . . . . . . . 17
1.2 Assembly overview - bonnet . . . . . . . . . . . . . . . . . . . . . . . . . . . . . . . . . . . . . . . . . . . . . . . . 18
1.3 Removing and installing bonnet . . . . . . . . . . . . . . . . . . . . . . . . . . . . . . . . . . . . . . . . . . . . . . 19
1.4 Removing gas strut . . . . . . . . . . . . . . . . . . . . . . . . . . . . . . . . . . . . . . . . . . . . . . . . . . . . . . 20
1.5 Releasing gas from gas strut . . . . . . . . . . . . . . . . . . . . . . . . . . . . . . . . . . . . . . . . . . . . . . . . 20
1.6 Removing and installing flap hinge . . . . . . . . . . . . . . . . . . . . . . . . . . . . . . . . . . . . . . . . . . . . 20
1.7 Removing and installing insulation . . . . . . . . . . . . . . . . . . . . . . . . . . . . . . . . . . . . . . . . . . . . 22
1.8 Assembly overview - bonnet latch and release components . . . . . . . . . . . . . . . . . . . . . . . . 24
1.9 Removing and installing bonnet lock . . . . . . . . . . . . . . . . . . . . . . . . . . . . . . . . . . . . . . . . . . 25
1.10 Separating Bowden cable . . . . . . . . . . . . . . . . . . . . . . . . . . . . . . . . . . . . . . . . . . . . . . . . . . 26
1.11 Adjusting bonnet . . . . . . . . . . . . . . . . . . . . . . . . . . . . . . . . . . . . . . . . . . . . . . . . . . . . . . . . . . 26
1.12 Removing and installing release lever . . . . . . . . . . . . . . . . . . . . . . . . . . . . . . . . . . . . . . . . 28
2 Rear lid . . . . . . . . . . . . . . . . . . . . . . . . . . . . . . . . . . . . . . . . . . . . . . . . . . . . . . . . . . . . . . . . 29
2.1 Tools . . . . . . . . . . . . . . . . . . . . . . . . . . . . . . . . . . . . . . . . . . . . . . . . . . . . . . . . . . . . . . . . . . 29
2.2 Assembly overview - rear lid . . . . . . . . . . . . . . . . . . . . . . . . . . . . . . . . . . . . . . . . . . . . . . . . 29
2.3 Removing and installing rear lid . . . . . . . . . . . . . . . . . . . . . . . . . . . . . . . . . . . . . . . . . . . . . . 30
2.4 Removing gas strut . . . . . . . . . . . . . . . . . . . . . . . . . . . . . . . . . . . . . . . . . . . . . . . . . . . . . . 31
2.5 Releasing gas from gas strut . . . . . . . . . . . . . . . . . . . . . . . . . . . . . . . . . . . . . . . . . . . . . . . . 31
2.6 Removing and installing rear lid hinges . . . . . . . . . . . . . . . . . . . . . . . . . . . . . . . . . . . . . . . . 31
2.7 Removing and installing striker pin . . . . . . . . . . . . . . . . . . . . . . . . . . . . . . . . . . . . . . . . . . . . 34
2.8 Adjusting lid . . . . . . . . . . . . . . . . . . . . . . . . . . . . . . . . . . . . . . . . . . . . . . . . . . . . . . . . . . . . 34
2.9 Assembly overview - rear lid latch and release components . . . . . . . . . . . . . . . . . . . . . . . . 37
2.10 Removing and installing release element . . . . . . . . . . . . . . . . . . . . . . . . . . . . . . . . . . . . . . 37
2.11 Removing and installing lid lock . . . . . . . . . . . . . . . . . . . . . . . . . . . . . . . . . . . . . . . . . . . . . . 39
2.12 Rear lid seal . . . . . . . . . . . . . . . . . . . . . . . . . . . . . . . . . . . . . . . . . . . . . . . . . . . . . . . . . . . . 39
2.13 Removing and installing rear lid seal . . . . . . . . . . . . . . . . . . . . . . . . . . . . . . . . . . . . . . . . . . 40
3 Tank flap unit . . . . . . . . . . . . . . . . . . . . . . . . . . . . . . . . . . . . . . . . . . . . . . . . . . . . . . . . . . . . 41
3.1 Tools . . . . . . . . . . . . . . . . . . . . . . . . . . . . . . . . . . . . . . . . . . . . . . . . . . . . . . . . . . . . . . . . . . 41
3.2 Assembly overview - tank flap unit . . . . . . . . . . . . . . . . . . . . . . . . . . . . . . . . . . . . . . . . . . . . 41
Golf 2004 ➤
General body repairs, exterior - Edition 04.2008
Contents i

P
r
o
t
e
c
t
e
d
b
y
c
o
p
y
r
i
g
h
t
.
C
o
p
y
i
n
g
f
o
r
p
r
i
v
a
t
e
o
r
c
o
m
m
e
r
c
i
a
l
p
u
r
p
o
s
e
s
,
i
n
p
a
r
t
o
r
i
n
w
h
o
l
e
,
i
s
n
o
t
p
e
r
m
i
t
t
e
d
u
n
l
e
s
s
a
u
t
h
o
r
i
s
e
d
b
y
V
o
l
k
s
w
a
g
e
n
A
G
.
V
o
l
k
s
w
a
g
e
n
A
G
d
o
e
s
n
o
t
g
u
a
r
a
n
t
e
e
o
r
a
c
c
e
p
t
a
n
y
l
i
a
b
i
l
i
t
y
w
i
t
h
r
e
s
p
e
c
t
t
o
t
h
e
c
o
r
r
e
c
t
n
e
s
s
o
f
i
n
f
o
r
m
a
t
i
o
n
i
n
t
h
i
s
d
o
c
u
m
e
n
t
.
C
o
p
y
r
i
g
h
t
b
y
V
o
l
k
s
w
a
g
e
n
A
G
.
57 - Front doors, door components, central locking . . . . . . . . . . . . . . . . . . . . . . . . . . 45
1 Front door . . . . . . . . . . . . . . . . . . . . . . . . . . . . . . . . . . . . . . . . . . . . . . . . . . . . . . . . . . . . . . 45
1.1 Tools . . . . . . . . . . . . . . . . . . . . . . . . . . . . . . . . . . . . . . . . . . . . . . . . . . . . . . . . . . . . . . . . . . 45
1.2 Materials . . . . . . . . . . . . . . . . . . . . . . . . . . . . . . . . . . . . . . . . . . . . . . . . . . . . . . . . . . . . . . . . 46
1.3 Assembly overview - door assembly . . . . . . . . . . . . . . . . . . . . . . . . . . . . . . . . . . . . . . . . . . 46
1.4 Assembly overview - door hinges . . . . . . . . . . . . . . . . . . . . . . . . . . . . . . . . . . . . . . . . . . . . 48
1.5 Removing and installing door . . . . . . . . . . . . . . . . . . . . . . . . . . . . . . . . . . . . . . . . . . . . . . . . 50
1.6 Adjusting door . . . . . . . . . . . . . . . . . . . . . . . . . . . . . . . . . . . . . . . . . . . . . . . . . . . . . . . . . . 52
1.7 Removing and installing door outer panel . . . . . . . . . . . . . . . . . . . . . . . . . . . . . . . . . . . . . . 55
1.8 Installing new outer panel for door . . . . . . . . . . . . . . . . . . . . . . . . . . . . . . . . . . . . . . . . . . . . 58
1.9 Removing and installing retaining rail on door outer panel . . . . . . . . . . . . . . . . . . . . . . . . 62
1.10 Installation instructions for bonding in new door outer panel . . . . . . . . . . . . . . . . . . . . . . . . 63
1.11 Minimum curing period . . . . . . . . . . . . . . . . . . . . . . . . . . . . . . . . . . . . . . . . . . . . . . . . . . . . 64
1.12 Cleaning off excess adhesive sealing material . . . . . . . . . . . . . . . . . . . . . . . . . . . . . . . . . . 64
1.13 Assembly overview - door inner part . . . . . . . . . . . . . . . . . . . . . . . . . . . . . . . . . . . . . . . . . . 65
1.14 Assembly overview - door handle and door lock . . . . . . . . . . . . . . . . . . . . . . . . . . . . . . . . 66
1.15 Removing and installing housing . . . . . . . . . . . . . . . . . . . . . . . . . . . . . . . . . . . . . . . . . . . . 67
1.16 Removing and installing door handle . . . . . . . . . . . . . . . . . . . . . . . . . . . . . . . . . . . . . . . . . . 68
1.17 Removing and installing mounting plate . . . . . . . . . . . . . . . . . . . . . . . . . . . . . . . . . . . . . . . . 70
1.18 Removing and installing door lock . . . . . . . . . . . . . . . . . . . . . . . . . . . . . . . . . . . . . . . . . . . . 72
1.19 Assembly overview - side impact protection . . . . . . . . . . . . . . . . . . . . . . . . . . . . . . . . . . . . 74
1.20 Door inner seal . . . . . . . . . . . . . . . . . . . . . . . . . . . . . . . . . . . . . . . . . . . . . . . . . . . . . . . . . . 74
1.21 Removing and installing door inner seal . . . . . . . . . . . . . . . . . . . . . . . . . . . . . . . . . . . . . . 75
1.22 Removing and installing door outer seal . . . . . . . . . . . . . . . . . . . . . . . . . . . . . . . . . . . . . . 77
2 Central locking . . . . . . . . . . . . . . . . . . . . . . . . . . . . . . . . . . . . . . . . . . . . . . . . . . . . . . . . . . 80
2.1 Location overview - central locking components . . . . . . . . . . . . . . . . . . . . . . . . . . . . . . . . 80
2.2 Adapting keys with remote control . . . . . . . . . . . . . . . . . . . . . . . . . . . . . . . . . . . . . . . . . . . . 81
2.3 Assembly overview - battery for folding key with remote control . . . . . . . . . . . . . . . . . . . . 82
2.4 Removing and installing battery for folding key with remote control . . . . . . . . . . . . . . . . . . 83
58 - Rear doors, door components . . . . . . . . . . . . . . . . . . . . . . . . . . . . . . . . . . . . . . . . 85
1 Rear door . . . . . . . . . . . . . . . . . . . . . . . . . . . . . . . . . . . . . . . . . . . . . . . . . . . . . . . . . . . . . . 85
1.1 Tools . . . . . . . . . . . . . . . . . . . . . . . . . . . . . . . . . . . . . . . . . . . . . . . . . . . . . . . . . . . . . . . . . . 85
1.2 Materials . . . . . . . . . . . . . . . . . . . . . . . . . . . . . . . . . . . . . . . . . . . . . . . . . . . . . . . . . . . . . . . . 86
1.3 Assembly overview - door assembly . . . . . . . . . . . . . . . . . . . . . . . . . . . . . . . . . . . . . . . . . . 86
1.4 Assembly overview - door hinges . . . . . . . . . . . . . . . . . . . . . . . . . . . . . . . . . . . . . . . . . . . . 88
1.5 Removing and installing door . . . . . . . . . . . . . . . . . . . . . . . . . . . . . . . . . . . . . . . . . . . . . . . . 89
1.6 Adjusting door . . . . . . . . . . . . . . . . . . . . . . . . . . . . . . . . . . . . . . . . . . . . . . . . . . . . . . . . . . 91
1.7 Removing and installing door outer panel . . . . . . . . . . . . . . . . . . . . . . . . . . . . . . . . . . . . . . 94
1.8 Installing new outer panel for door . . . . . . . . . . . . . . . . . . . . . . . . . . . . . . . . . . . . . . . . . . . . 97
1.9 Removing and installing retaining rail on door outer panel . . . . . . . . . . . . . . . . . . . . . . . . 101
1.10 Installation instructions for bonding in new door outer panel . . . . . . . . . . . . . . . . . . . . . . . . 102
1.11 Minimum curing period . . . . . . . . . . . . . . . . . . . . . . . . . . . . . . . . . . . . . . . . . . . . . . . . . . . . 103
1.12 Cleaning off excess adhesive sealing material . . . . . . . . . . . . . . . . . . . . . . . . . . . . . . . . . . 103
1.13 Assembly overview - door inner part . . . . . . . . . . . . . . . . . . . . . . . . . . . . . . . . . . . . . . . . . . 104
1.14 Assembly overview - door handle and door lock . . . . . . . . . . . . . . . . . . . . . . . . . . . . . . . . 105
1.15 Removing and installing housing . . . . . . . . . . . . . . . . . . . . . . . . . . . . . . . . . . . . . . . . . . . . 106
1.16 Removing and installing door handle . . . . . . . . . . . . . . . . . . . . . . . . . . . . . . . . . . . . . . . . . . 106
1.17 Removing bearing bracket . . . . . . . . . . . . . . . . . . . . . . . . . . . . . . . . . . . . . . . . . . . . . . . . . . 108
1.18 Removing and installing door lock . . . . . . . . . . . . . . . . . . . . . . . . . . . . . . . . . . . . . . . . . . . . 110
1.19 Assembly overview - side impact protection . . . . . . . . . . . . . . . . . . . . . . . . . . . . . . . . . . . . 111
1.20 Door inner seals . . . . . . . . . . . . . . . . . . . . . . . . . . . . . . . . . . . . . . . . . . . . . . . . . . . . . . . . . . 112
1.21 Removing and installing door inner seal . . . . . . . . . . . . . . . . . . . . . . . . . . . . . . . . . . . . . . 113
1.22 Removing and installing door outer seal . . . . . . . . . . . . . . . . . . . . . . . . . . . . . . . . . . . . . . 114
Golf 2004 ➤
General body repairs, exterior - Edition 04.2008
ii Contents

P
r
o
t
e
c
t
e
d
b
y
c
o
p
y
r
i
g
h
t
.
C
o
p
y
i
n
g
f
o
r
p
r
i
v
a
t
e
o
r
c
o
m
m
e
r
c
i
a
l
p
u
r
p
o
s
e
s
,
i
n
p
a
r
t
o
r
i
n
w
h
o
l
e
,
i
s
n
o
t
p
e
r
m
i
t
t
e
d
u
n
l
e
s
s
a
u
t
h
o
r
i
s
e
d
b
y
V
o
l
k
s
w
a
g
e
n
A
G
.
V
o
l
k
s
w
a
g
e
n
A
G
d
o
e
s
n
o
t
g
u
a
r
a
n
t
e
e
o
r
a
c
c
e
p
t
a
n
y
l
i
a
b
i
l
i
t
y
w
i
t
h
r
e
s
p
e
c
t
t
o
t
h
e
c
o
r
r
e
c
t
n
e
s
s
o
f
i
n
f
o
r
m
a
t
i
o
n
i
n
t
h
i
s
d
o
c
u
m
e
n
t
.
C
o
p
y
r
i
g
h
t
b
y
V
o
l
k
s
w
a
g
e
n
A
G
.
60 - Sunroof . . . . . . . . . . . . . . . . . . . . . . . . . . . . . . . . . . . . . . . . . . . . . . . . . . . . . . . . 118
1 Sliding/tilting sunroof with glass panel (Meritor) . . . . . . . . . . . . . . . . . . . . . . . . . . . . . . . . . . 118
1.1 Tools . . . . . . . . . . . . . . . . . . . . . . . . . . . . . . . . . . . . . . . . . . . . . . . . . . . . . . . . . . . . . . . . . . 118
1.2 Function . . . . . . . . . . . . . . . . . . . . . . . . . . . . . . . . . . . . . . . . . . . . . . . . . . . . . . . . . . . . . . . . 119
1.3 Assembly overview - sliding/tilting sunroof with glass panel . . . . . . . . . . . . . . . . . . . . . . . . 120
1.4 Removing and installing bellows . . . . . . . . . . . . . . . . . . . . . . . . . . . . . . . . . . . . . . . . . . . . 122
1.5 Removing glass panel of sliding/tilting sunroof . . . . . . . . . . . . . . . . . . . . . . . . . . . . . . . . . . 123
1.6 Installing glass panel of sliding/tilting sunroof . . . . . . . . . . . . . . . . . . . . . . . . . . . . . . . . . . 124
1.7 Adjusting height of glass panel of sliding/tilting sunroof . . . . . . . . . . . . . . . . . . . . . . . . . . . . 124
1.8 Adjusting panel seal . . . . . . . . . . . . . . . . . . . . . . . . . . . . . . . . . . . . . . . . . . . . . . . . . . . . . . 125
1.9 Renewing panel seal . . . . . . . . . . . . . . . . . . . . . . . . . . . . . . . . . . . . . . . . . . . . . . . . . . . . . . 126
1.10 Removing and installing wind deflector . . . . . . . . . . . . . . . . . . . . . . . . . . . . . . . . . . . . . . . . 126
1.11 Removing and installing sliding headliner . . . . . . . . . . . . . . . . . . . . . . . . . . . . . . . . . . . . . . 127
1.12 Removing and installing sliding/tilting sunroof glass panel drive . . . . . . . . . . . . . . . . . . . . 128
1.13 Adjusting drive for sliding/tilting sunroof glass panel (0 position) . . . . . . . . . . . . . . . . . . . . 129
1.14 Removing and installing sliding/tilting sunroof glass panel automatic preselection switch
. . . . . . . . . . . . . . . . . . . . . . . . . . . . . . . . . . . . . . . . . . . . . . . . . . . . . . . . . . . . . . . . . . . . . . . . 130
1.15 Checking parallel running . . . . . . . . . . . . . . . . . . . . . . . . . . . . . . . . . . . . . . . . . . . . . . . . . . 130
1.16 Adjusting parallel running . . . . . . . . . . . . . . . . . . . . . . . . . . . . . . . . . . . . . . . . . . . . . . . . . . 130
1.17 Assembly overview - carrier unit . . . . . . . . . . . . . . . . . . . . . . . . . . . . . . . . . . . . . . . . . . . . 131
1.18 Removing and installing carrier unit . . . . . . . . . . . . . . . . . . . . . . . . . . . . . . . . . . . . . . . . . . 132
1.19 Operating without electrics . . . . . . . . . . . . . . . . . . . . . . . . . . . . . . . . . . . . . . . . . . . . . . . . . . 134
1.20 Removing and installing guide plate . . . . . . . . . . . . . . . . . . . . . . . . . . . . . . . . . . . . . . . . . . 134
1.21 Removing and installing sliding gate . . . . . . . . . . . . . . . . . . . . . . . . . . . . . . . . . . . . . . . . . . 135
1.22 Cleaning water drain hoses . . . . . . . . . . . . . . . . . . . . . . . . . . . . . . . . . . . . . . . . . . . . . . . . 136
63 - Bumpers . . . . . . . . . . . . . . . . . . . . . . . . . . . . . . . . . . . . . . . . . . . . . . . . . . . . . . . . 139
1 Front bumper . . . . . . . . . . . . . . . . . . . . . . . . . . . . . . . . . . . . . . . . . . . . . . . . . . . . . . . . . . . . 139
1.1 Tools . . . . . . . . . . . . . . . . . . . . . . . . . . . . . . . . . . . . . . . . . . . . . . . . . . . . . . . . . . . . . . . . . . 139
1.2 Repairing bumper cover . . . . . . . . . . . . . . . . . . . . . . . . . . . . . . . . . . . . . . . . . . . . . . . . . . . . 139
1.3 Assembly overview - bumper cover . . . . . . . . . . . . . . . . . . . . . . . . . . . . . . . . . . . . . . . . . . 140
1.4 Removing and installing front bumper cover . . . . . . . . . . . . . . . . . . . . . . . . . . . . . . . . . . . . 140
1.5 Front bumper attachments . . . . . . . . . . . . . . . . . . . . . . . . . . . . . . . . . . . . . . . . . . . . . . . . . . 142
1.6 Front bumper substructure . . . . . . . . . . . . . . . . . . . . . . . . . . . . . . . . . . . . . . . . . . . . . . . . . . 143
1.7 Assembly overview - bumper carrier . . . . . . . . . . . . . . . . . . . . . . . . . . . . . . . . . . . . . . . . . . 144
1.8 Assembly overview - number plate carrier . . . . . . . . . . . . . . . . . . . . . . . . . . . . . . . . . . . . . . 145
2 Front bumper for GTI, GTI special models, GT, R32 . . . . . . . . . . . . . . . . . . . . . . . . . . . . . . 146
2.1 Tools . . . . . . . . . . . . . . . . . . . . . . . . . . . . . . . . . . . . . . . . . . . . . . . . . . . . . . . . . . . . . . . . . . 146
2.2 Repairing bumper cover . . . . . . . . . . . . . . . . . . . . . . . . . . . . . . . . . . . . . . . . . . . . . . . . . . . . 146
2.3 Assembly overview - bumper cover for GTI, GT . . . . . . . . . . . . . . . . . . . . . . . . . . . . . . . . 146
2.4 Removing and installing front bumper cover for GT, GTI . . . . . . . . . . . . . . . . . . . . . . . . . . 147
2.5 Front bumper attachments for GT, GTI . . . . . . . . . . . . . . . . . . . . . . . . . . . . . . . . . . . . . . . . 149
2.6 Assembly overview - bumper cover for R32 . . . . . . . . . . . . . . . . . . . . . . . . . . . . . . . . . . . . 151
2.7 Removing and installing front bumper cover for R32 . . . . . . . . . . . . . . . . . . . . . . . . . . . . . . 151
2.8 Front bumper attachments for R32 . . . . . . . . . . . . . . . . . . . . . . . . . . . . . . . . . . . . . . . . . . 153
2.9 Assembly overview - front bumper cover for GTI special models . . . . . . . . . . . . . . . . . . . . 154
2.10 Removing and installing front bumper cover for GTI special models . . . . . . . . . . . . . . . . . . 154
2.11 Front bumper attachments for GTI special models . . . . . . . . . . . . . . . . . . . . . . . . . . . . . . 156
2.12 Front bumper substructure . . . . . . . . . . . . . . . . . . . . . . . . . . . . . . . . . . . . . . . . . . . . . . . . . . 157
2.13 Assembly overview - bumper carrier . . . . . . . . . . . . . . . . . . . . . . . . . . . . . . . . . . . . . . . . . . 158
3 Rear bumper . . . . . . . . . . . . . . . . . . . . . . . . . . . . . . . . . . . . . . . . . . . . . . . . . . . . . . . . . . . . 159
3.1 Tools . . . . . . . . . . . . . . . . . . . . . . . . . . . . . . . . . . . . . . . . . . . . . . . . . . . . . . . . . . . . . . . . . . 159
3.2 Repairing bumper cover . . . . . . . . . . . . . . . . . . . . . . . . . . . . . . . . . . . . . . . . . . . . . . . . . . . . 159
3.3 Assembly overview - bumper cover . . . . . . . . . . . . . . . . . . . . . . . . . . . . . . . . . . . . . . . . . . 160
3.4 Removing and installing bumper cover . . . . . . . . . . . . . . . . . . . . . . . . . . . . . . . . . . . . . . . . 160
Golf 2004 ➤
General body repairs, exterior - Edition 04.2008
Contents iii

P
r
o
t
e
c
t
e
d
b
y
c
o
p
y
r
i
g
h
t
.
C
o
p
y
i
n
g
f
o
r
p
r
i
v
a
t
e
o
r
c
o
m
m
e
r
c
i
a
l
p
u
r
p
o
s
e
s
,
i
n
p
a
r
t
o
r
i
n
w
h
o
l
e
,
i
s
n
o
t
p
e
r
m
i
t
t
e
d
u
n
l
e
s
s
a
u
t
h
o
r
i
s
e
d
b
y
V
o
l
k
s
w
a
g
e
n
A
G
.
V
o
l
k
s
w
a
g
e
n
A
G
d
o
e
s
n
o
t
g
u
a
r
a
n
t
e
e
o
r
a
c
c
e
p
t
a
n
y
l
i
a
b
i
l
i
t
y
w
i
t
h
r
e
s
p
e
c
t
t
o
t
h
e
c
o
r
r
e
c
t
n
e
s
s
o
f
i
n
f
o
r
m
a
t
i
o
n
i
n
t
h
i
s
d
o
c
u
m
e
n
t
.
C
o
p
y
r
i
g
h
t
b
y
V
o
l
k
s
w
a
g
e
n
A
G
.
3.5 Rear bumper attachments . . . . . . . . . . . . . . . . . . . . . . . . . . . . . . . . . . . . . . . . . . . . . . . . . . 162
3.6 Rear bumper substructure . . . . . . . . . . . . . . . . . . . . . . . . . . . . . . . . . . . . . . . . . . . . . . . . . . 163
3.7 Assembly overview - bumper carrier . . . . . . . . . . . . . . . . . . . . . . . . . . . . . . . . . . . . . . . . . . 164
3.8 Assembly overview - towing bracket . . . . . . . . . . . . . . . . . . . . . . . . . . . . . . . . . . . . . . . . . . 164
4 Rear bumper for R32 and GTI special models . . . . . . . . . . . . . . . . . . . . . . . . . . . . . . . . . . 166
4.1 Tools . . . . . . . . . . . . . . . . . . . . . . . . . . . . . . . . . . . . . . . . . . . . . . . . . . . . . . . . . . . . . . . . . . 166
4.2 Repairing bumper cover . . . . . . . . . . . . . . . . . . . . . . . . . . . . . . . . . . . . . . . . . . . . . . . . . . . . 166
4.3 Assembly overview - bumper cover for R32 . . . . . . . . . . . . . . . . . . . . . . . . . . . . . . . . . . . . 167
4.4 Removing and installing bumper cover for R32 . . . . . . . . . . . . . . . . . . . . . . . . . . . . . . . . . . 167
4.5 Rear bumper attachments for R32 . . . . . . . . . . . . . . . . . . . . . . . . . . . . . . . . . . . . . . . . . . . . 169
4.6 Assembly overview - rear bumper cover for GTI special models . . . . . . . . . . . . . . . . . . . . 170
4.7 Removing and installing rear bumper cover for GTI special models . . . . . . . . . . . . . . . . . . 170
4.8 Rear bumper attachments for GTI special models . . . . . . . . . . . . . . . . . . . . . . . . . . . . . . . . 172
4.9 Rear bumper substructure . . . . . . . . . . . . . . . . . . . . . . . . . . . . . . . . . . . . . . . . . . . . . . . . . . 173
4.10 Assembly overview - bumper carrier . . . . . . . . . . . . . . . . . . . . . . . . . . . . . . . . . . . . . . . . . . 174
64 - Glazing . . . . . . . . . . . . . . . . . . . . . . . . . . . . . . . . . . . . . . . . . . . . . . . . . . . . . . . . . . 175
1 Flush bonded windows . . . . . . . . . . . . . . . . . . . . . . . . . . . . . . . . . . . . . . . . . . . . . . . . . . . . 175
1.1 Tools . . . . . . . . . . . . . . . . . . . . . . . . . . . . . . . . . . . . . . . . . . . . . . . . . . . . . . . . . . . . . . . . . . 175
1.2 Materials . . . . . . . . . . . . . . . . . . . . . . . . . . . . . . . . . . . . . . . . . . . . . . . . . . . . . . . . . . . . . . . . 177
1.3 Repairing windscreen . . . . . . . . . . . . . . . . . . . . . . . . . . . . . . . . . . . . . . . . . . . . . . . . . . . . . . 177
1.4 Assembly overview - windscreen . . . . . . . . . . . . . . . . . . . . . . . . . . . . . . . . . . . . . . . . . . . . 178
1.5 Assembly overview - plenum chamber cover . . . . . . . . . . . . . . . . . . . . . . . . . . . . . . . . . . . . 179
1.6 Removing windscreen . . . . . . . . . . . . . . . . . . . . . . . . . . . . . . . . . . . . . . . . . . . . . . . . . . . . 182
1.7 Installing windscreen . . . . . . . . . . . . . . . . . . . . . . . . . . . . . . . . . . . . . . . . . . . . . . . . . . . . . . 182
1.8 Assembly overview - rear window . . . . . . . . . . . . . . . . . . . . . . . . . . . . . . . . . . . . . . . . . . . . 183
1.9 Removing undamaged rear window . . . . . . . . . . . . . . . . . . . . . . . . . . . . . . . . . . . . . . . . . . 183
1.10 Removing broken rear window . . . . . . . . . . . . . . . . . . . . . . . . . . . . . . . . . . . . . . . . . . . . . . 184
1.11 Installing rear window . . . . . . . . . . . . . . . . . . . . . . . . . . . . . . . . . . . . . . . . . . . . . . . . . . . . . . 185
1.12 Assembly overview - rear side window . . . . . . . . . . . . . . . . . . . . . . . . . . . . . . . . . . . . . . . . 186
1.13 Removing undamaged rear side window . . . . . . . . . . . . . . . . . . . . . . . . . . . . . . . . . . . . . . 186
1.14 Removing damaged rear side window . . . . . . . . . . . . . . . . . . . . . . . . . . . . . . . . . . . . . . . . 187
1.15 Installing rear side window . . . . . . . . . . . . . . . . . . . . . . . . . . . . . . . . . . . . . . . . . . . . . . . . . . 187
1.16 Preparing old undamaged window for glazing . . . . . . . . . . . . . . . . . . . . . . . . . . . . . . . . . . 188
1.17 Preparing new window without precoating for glazing . . . . . . . . . . . . . . . . . . . . . . . . . . . . 188
1.18 Preparing new window with precoating for glazing . . . . . . . . . . . . . . . . . . . . . . . . . . . . . . 189
1.19 Preparing body flange for glazing . . . . . . . . . . . . . . . . . . . . . . . . . . . . . . . . . . . . . . . . . . . . 190
1.20 Installation instructions . . . . . . . . . . . . . . . . . . . . . . . . . . . . . . . . . . . . . . . . . . . . . . . . . . . . 191
1.21 Minimum curing period . . . . . . . . . . . . . . . . . . . . . . . . . . . . . . . . . . . . . . . . . . . . . . . . . . . . 191
1.22 Touching up paint damage . . . . . . . . . . . . . . . . . . . . . . . . . . . . . . . . . . . . . . . . . . . . . . . . . . 192
1.23 Cleaning off excess adhesive sealing material . . . . . . . . . . . . . . . . . . . . . . . . . . . . . . . . . . 192
2 Front door windows . . . . . . . . . . . . . . . . . . . . . . . . . . . . . . . . . . . . . . . . . . . . . . . . . . . . . . 193
2.1 Tools . . . . . . . . . . . . . . . . . . . . . . . . . . . . . . . . . . . . . . . . . . . . . . . . . . . . . . . . . . . . . . . . . . 193
2.2 Assembly overview - front door window . . . . . . . . . . . . . . . . . . . . . . . . . . . . . . . . . . . . . . . . 194
2.3 Removing and installing door window . . . . . . . . . . . . . . . . . . . . . . . . . . . . . . . . . . . . . . . . 195
2.4 Adjusting door window . . . . . . . . . . . . . . . . . . . . . . . . . . . . . . . . . . . . . . . . . . . . . . . . . . . . 197
2.5 Assembly overview - window regulator motor . . . . . . . . . . . . . . . . . . . . . . . . . . . . . . . . . . 198
2.6 Removing and installing window regulator motor . . . . . . . . . . . . . . . . . . . . . . . . . . . . . . . . 199
2.7 Assembly overview - window guide . . . . . . . . . . . . . . . . . . . . . . . . . . . . . . . . . . . . . . . . . . 201
2.8 Removing and installing window guide . . . . . . . . . . . . . . . . . . . . . . . . . . . . . . . . . . . . . . . . 201
2.9 Assembly overview - window regulator . . . . . . . . . . . . . . . . . . . . . . . . . . . . . . . . . . . . . . . . 203
2.10 Removing and installing window regulator . . . . . . . . . . . . . . . . . . . . . . . . . . . . . . . . . . . . . . 203
3 Rear door windows . . . . . . . . . . . . . . . . . . . . . . . . . . . . . . . . . . . . . . . . . . . . . . . . . . . . . . . . 205
3.1 Tools . . . . . . . . . . . . . . . . . . . . . . . . . . . . . . . . . . . . . . . . . . . . . . . . . . . . . . . . . . . . . . . . . . 205
3.2 Assembly overview - rear door window . . . . . . . . . . . . . . . . . . . . . . . . . . . . . . . . . . . . . . . . 206
Golf 2004 ➤
General body repairs, exterior - Edition 04.2008
iv Contents

P
r
o
t
e
c
t
e
d
b
y
c
o
p
y
r
i
g
h
t
.
C
o
p
y
i
n
g
f
o
r
p
r
i
v
a
t
e
o
r
c
o
m
m
e
r
c
i
a
l
p
u
r
p
o
s
e
s
,
i
n
p
a
r
t
o
r
i
n
w
h
o
l
e
,
i
s
n
o
t
p
e
r
m
i
t
t
e
d
u
n
l
e
s
s
a
u
t
h
o
r
i
s
e
d
b
y
V
o
l
k
s
w
a
g
e
n
A
G
.
V
o
l
k
s
w
a
g
e
n
A
G
d
o
e
s
n
o
t
g
u
a
r
a
n
t
e
e
o
r
a
c
c
e
p
t
a
n
y
l
i
a
b
i
l
i
t
y
w
i
t
h
r
e
s
p
e
c
t
t
o
t
h
e
c
o
r
r
e
c
t
n
e
s
s
o
f
i
n
f
o
r
m
a
t
i
o
n
i
n
t
h
i
s
d
o
c
u
m
e
n
t
.
C
o
p
y
r
i
g
h
t
b
y
V
o
l
k
s
w
a
g
e
n
A
G
.
3.3 Removing and installing door window . . . . . . . . . . . . . . . . . . . . . . . . . . . . . . . . . . . . . . . . 206
3.4 Assembly overview - fixed door window with window guide . . . . . . . . . . . . . . . . . . . . . . . . 209
3.5 Removing and installing fixed door window with window guide . . . . . . . . . . . . . . . . . . . . . . 209
3.6 Assembly overview - window regulator motor . . . . . . . . . . . . . . . . . . . . . . . . . . . . . . . . . . 212
3.7 Removing and installing window regulator motor . . . . . . . . . . . . . . . . . . . . . . . . . . . . . . . . 212
3.8 Assembly overview - window regulator . . . . . . . . . . . . . . . . . . . . . . . . . . . . . . . . . . . . . . . . 215
3.9 Removing and installing window regulator . . . . . . . . . . . . . . . . . . . . . . . . . . . . . . . . . . . . . . 215
66 - Exterior equipment . . . . . . . . . . . . . . . . . . . . . . . . . . . . . . . . . . . . . . . . . . . . . . . . 217
1 Wheel housing liner . . . . . . . . . . . . . . . . . . . . . . . . . . . . . . . . . . . . . . . . . . . . . . . . . . . . . . 217
1.1 Tools . . . . . . . . . . . . . . . . . . . . . . . . . . . . . . . . . . . . . . . . . . . . . . . . . . . . . . . . . . . . . . . . . . 217
1.2 Assembly overview - front wheel housing liner . . . . . . . . . . . . . . . . . . . . . . . . . . . . . . . . . . 218
1.3 Removing and installing front wheel housing liner . . . . . . . . . . . . . . . . . . . . . . . . . . . . . . 218
1.4 Assembly overview - rear wheel housing liner . . . . . . . . . . . . . . . . . . . . . . . . . . . . . . . . . . 220
1.5 Removing and installing rear wheel housing liner . . . . . . . . . . . . . . . . . . . . . . . . . . . . . . . . 220
2 Exterior mirror . . . . . . . . . . . . . . . . . . . . . . . . . . . . . . . . . . . . . . . . . . . . . . . . . . . . . . . . . . . . 222
2.1 Tools . . . . . . . . . . . . . . . . . . . . . . . . . . . . . . . . . . . . . . . . . . . . . . . . . . . . . . . . . . . . . . . . . . 222
2.2 Assembly overview - exterior mirror . . . . . . . . . . . . . . . . . . . . . . . . . . . . . . . . . . . . . . . . . . 223
2.3 Removing and installing mirror glass . . . . . . . . . . . . . . . . . . . . . . . . . . . . . . . . . . . . . . . . . . 223
2.4 Removing and installing mirror housing . . . . . . . . . . . . . . . . . . . . . . . . . . . . . . . . . . . . . . . . 224
2.5 Removing and installing trim . . . . . . . . . . . . . . . . . . . . . . . . . . . . . . . . . . . . . . . . . . . . . . . . 226
2.6 Removing and installing side turn signals . . . . . . . . . . . . . . . . . . . . . . . . . . . . . . . . . . . . . . 226
2.7 Removing and installing exterior mirror . . . . . . . . . . . . . . . . . . . . . . . . . . . . . . . . . . . . . . . . 227
3 Radiator grille . . . . . . . . . . . . . . . . . . . . . . . . . . . . . . . . . . . . . . . . . . . . . . . . . . . . . . . . . . . . 229
3.1 Tools . . . . . . . . . . . . . . . . . . . . . . . . . . . . . . . . . . . . . . . . . . . . . . . . . . . . . . . . . . . . . . . . . . 229
3.2 Assembly overview - radiator grille . . . . . . . . . . . . . . . . . . . . . . . . . . . . . . . . . . . . . . . . . . . . 229
3.3 Removing and installing radiator grille . . . . . . . . . . . . . . . . . . . . . . . . . . . . . . . . . . . . . . . . 230
3.4 Assembly overview - radiator grille for GTI, GTI special models and GT . . . . . . . . . . . . . . 231
3.5 Removing and installing radiator grille for GT, GTI special models and GT . . . . . . . . . . . . 233
3.6 Radiator grille for GTI, GTI special models, GT and R32 - number plate carrier . . . . . . . . 235
3.7 Assembly overview - radiator grille for R32 . . . . . . . . . . . . . . . . . . . . . . . . . . . . . . . . . . . . 236
3.8 Removing and installing radiator grille for R32 . . . . . . . . . . . . . . . . . . . . . . . . . . . . . . . . . . 237
3.9 R32 radiator grille - company emblem . . . . . . . . . . . . . . . . . . . . . . . . . . . . . . . . . . . . . . . . 239
4 Mouldings and trims . . . . . . . . . . . . . . . . . . . . . . . . . . . . . . . . . . . . . . . . . . . . . . . . . . . . . . 240
4.1 Tools . . . . . . . . . . . . . . . . . . . . . . . . . . . . . . . . . . . . . . . . . . . . . . . . . . . . . . . . . . . . . . . . . . 240
4.2 Assembly overview - water deflector . . . . . . . . . . . . . . . . . . . . . . . . . . . . . . . . . . . . . . . . . . 241
4.3 Removing and installing water deflector . . . . . . . . . . . . . . . . . . . . . . . . . . . . . . . . . . . . . . . . 242
4.4 Assembly overview - protective side strips . . . . . . . . . . . . . . . . . . . . . . . . . . . . . . . . . . . . . . 244
4.5 Renewing side protective mouldings . . . . . . . . . . . . . . . . . . . . . . . . . . . . . . . . . . . . . . . . . . 245
4.6 Removing and installing stone-chip protection trim . . . . . . . . . . . . . . . . . . . . . . . . . . . . . . 246
4.7 Assembly overview - side member extension for GTI, GTI special models and R32 . . . . . . 250
4.8 Removing and installing side member extension for GTI, GTI special models and R32 . . 251
4.9 Retaining strip for side member extension . . . . . . . . . . . . . . . . . . . . . . . . . . . . . . . . . . . . . . 253
5 Roof edge spoiler . . . . . . . . . . . . . . . . . . . . . . . . . . . . . . . . . . . . . . . . . . . . . . . . . . . . . . . . 257
5.1 Tools . . . . . . . . . . . . . . . . . . . . . . . . . . . . . . . . . . . . . . . . . . . . . . . . . . . . . . . . . . . . . . . . . . 257
5.2 Materials . . . . . . . . . . . . . . . . . . . . . . . . . . . . . . . . . . . . . . . . . . . . . . . . . . . . . . . . . . . . . . . . 257
5.3 Assembly overview - roof spoiler for GTI, GTI special models and R32 . . . . . . . . . . . . . . 258
5.4 Removing and installing roof spoiler for GTI, GTI special models and R32 . . . . . . . . . . . . 259
5.5 Retaining strip . . . . . . . . . . . . . . . . . . . . . . . . . . . . . . . . . . . . . . . . . . . . . . . . . . . . . . . . . . 262
5.6 Preparing body kit component for bonding . . . . . . . . . . . . . . . . . . . . . . . . . . . . . . . . . . . . . . 263
5.7 Installation instructions . . . . . . . . . . . . . . . . . . . . . . . . . . . . . . . . . . . . . . . . . . . . . . . . . . . . 264
5.8 Minimum curing period . . . . . . . . . . . . . . . . . . . . . . . . . . . . . . . . . . . . . . . . . . . . . . . . . . . . 264
5.9 Touching up paint damage . . . . . . . . . . . . . . . . . . . . . . . . . . . . . . . . . . . . . . . . . . . . . . . . . . 264
5.10 Cleaning off excess adhesive sealing material . . . . . . . . . . . . . . . . . . . . . . . . . . . . . . . . . . 265
6 Protective backing . . . . . . . . . . . . . . . . . . . . . . . . . . . . . . . . . . . . . . . . . . . . . . . . . . . . . . . . 266
Golf 2004 ➤
General body repairs, exterior - Edition 04.2008
Contents v

P
r
o
t
e
c
t
e
d
b
y
c
o
p
y
r
i
g
h
t
.
C
o
p
y
i
n
g
f
o
r
p
r
i
v
a
t
e
o
r
c
o
m
m
e
r
c
i
a
l
p
u
r
p
o
s
e
s
,
i
n
p
a
r
t
o
r
i
n
w
h
o
l
e
,
i
s
n
o
t
p
e
r
m
i
t
t
e
d
u
n
l
e
s
s
a
u
t
h
o
r
i
s
e
d
b
y
V
o
l
k
s
w
a
g
e
n
A
G
.
V
o
l
k
s
w
a
g
e
n
A
G
d
o
e
s
n
o
t
g
u
a
r
a
n
t
e
e
o
r
a
c
c
e
p
t
a
n
y
l
i
a
b
i
l
i
t
y
w
i
t
h
r
e
s
p
e
c
t
t
o
t
h
e
c
o
r
r
e
c
t
n
e
s
s
o
f
i
n
f
o
r
m
a
t
i
o
n
i
n
t
h
i
s
d
o
c
u
m
e
n
t
.
C
o
p
y
r
i
g
h
t
b
y
V
o
l
k
s
w
a
g
e
n
A
G
.
6.1 Attachment notes for protective backing . . . . . . . . . . . . . . . . . . . . . . . . . . . . . . . . . . . . . . 266
6.2 Renewing scuff protection film . . . . . . . . . . . . . . . . . . . . . . . . . . . . . . . . . . . . . . . . . . . . . . 267
7 Lettering . . . . . . . . . . . . . . . . . . . . . . . . . . . . . . . . . . . . . . . . . . . . . . . . . . . . . . . . . . . . . . . . 268
7.1 Tools . . . . . . . . . . . . . . . . . . . . . . . . . . . . . . . . . . . . . . . . . . . . . . . . . . . . . . . . . . . . . . . . . . 268
7.2 Installation instructions for lettering and emblems . . . . . . . . . . . . . . . . . . . . . . . . . . . . . . . . 268
7.3 Rear lettering dimensions . . . . . . . . . . . . . . . . . . . . . . . . . . . . . . . . . . . . . . . . . . . . . . . . . . 269
7.4 Rear lettering dimensions for GTI and R32 . . . . . . . . . . . . . . . . . . . . . . . . . . . . . . . . . . . . 270
7.5 Rear lettering dimensions - USA . . . . . . . . . . . . . . . . . . . . . . . . . . . . . . . . . . . . . . . . . . . . 272
7.6 Side lettering dimensions - Individual . . . . . . . . . . . . . . . . . . . . . . . . . . . . . . . . . . . . . . . . . . 273
8 Vermin repellent system . . . . . . . . . . . . . . . . . . . . . . . . . . . . . . . . . . . . . . . . . . . . . . . . . . . . 276
8.1 Assembly overview - vermin repellent system . . . . . . . . . . . . . . . . . . . . . . . . . . . . . . . . . . 276
Golf 2004 ➤
General body repairs, exterior - Edition 04.2008
vi Contents

P
r
o
t
e
c
t
e
d
b
y
c
o
p
y
r
i
g
h
t
.
C
o
p
y
i
n
g
f
o
r
p
r
i
v
a
t
e
o
r
c
o
m
m
e
r
c
i
a
l
p
u
r
p
o
s
e
s
,
i
n
p
a
r
t
o
r
i
n
w
h
o
l
e
,
i
s
n
o
t
p
e
r
m
i
t
t
e
d
u
n
l
e
s
s
a
u
t
h
o
r
i
s
e
d
b
y
V
o
l
k
s
w
a
g
e
n
A
G
.
V
o
l
k
s
w
a
g
e
n
A
G
d
o
e
s
n
o
t
g
u
a
r
a
n
t
e
e
o
r
a
c
c
e
p
t
a
n
y
l
i
a
b
i
l
i
t
y
w
i
t
h
r
e
s
p
e
c
t
t
o
t
h
e
c
o
r
r
e
c
t
n
e
s
s
o
f
i
n
f
o
r
m
a
t
i
o
n
i
n
t
h
i
s
d
o
c
u
m
e
n
t
.
C
o
p
y
r
i
g
h
t
b
y
V
o
l
k
s
w
a
g
e
n
A
G
.
50 – Body - front
1 Lock carrier
1.1 Tools
1.1.1 Required special tools, workshop equip‐
ment, test and measuring devices and
auxiliary items
♦ Guide pins -T 10093-
♦ Torque wrench 5...50 Nm -V.A.G 1331-
♦ Torque wrench 40...200 Nm -V.A.G 1332-
Golf 2004 ➤
General body repairs, exterior - Edition 04.2008
1. Lock carrier 1

P
r
o
t
e
c
t
e
d
b
y
c
o
p
y
r
i
g
h
t
.
C
o
p
y
i
n
g
f
o
r
p
r
i
v
a
t
e
o
r
c
o
m
m
e
r
c
i
a
l
p
u
r
p
o
s
e
s
,
i
n
p
a
r
t
o
r
i
n
w
h
o
l
e
,
i
s
n
o
t
p
e
r
m
i
t
t
e
d
u
n
l
e
s
s
a
u
t
h
o
r
i
s
e
d
b
y
V
o
l
k
s
w
a
g
e
n
A
G
.
V
o
l
k
s
w
a
g
e
n
A
G
d
o
e
s
n
o
t
g
u
a
r
a
n
t
e
e
o
r
a
c
c
e
p
t
a
n
y
l
i
a
b
i
l
i
t
y
w
i
t
h
r
e
s
p
e
c
t
t
o
t
h
e
c
o
r
r
e
c
t
n
e
s
s
o
f
i
n
f
o
r
m
a
t
i
o
n
i
n
t
h
i
s
d
o
c
u
m
e
n
t
.
C
o
p
y
r
i
g
h
t
b
y
V
o
l
k
s
w
a
g
e
n
A
G
.
1.2 Assembly overview - lock carrier, service position
1 - Lock carrier with add-on
parts
❑ Removing and installing
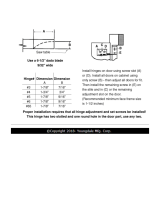
⇒ page 4
❑ Service position
⇒ page 3
2 - Bolt
❑ Qty. 4
❑ 8 Nm
3 - Bolt
❑ Qty. 8
❑ 60 Nm
Golf 2004 ➤
General body repairs, exterior - Edition 04.2008
2 Rep. Gr.50 - Body - front

P
r
o
t
e
c
t
e
d
b
y
c
o
p
y
r
i
g
h
t
.
C
o
p
y
i
n
g
f
o
r
p
r
i
v
a
t
e
o
r
c
o
m
m
e
r
c
i
a
l
p
u
r
p
o
s
e
s
,
i
n
p
a
r
t
o
r
i
n
w
h
o
l
e
,
i
s
n
o
t
p
e
r
m
i
t
t
e
d
u
n
l
e
s
s
a
u
t
h
o
r
i
s
e
d
b
y
V
o
l
k
s
w
a
g
e
n
A
G
.
V
o
l
k
s
w
a
g
e
n
A
G
d
o
e
s
n
o
t
g
u
a
r
a
n
t
e
e
o
r
a
c
c
e
p
t
a
n
y
l
i
a
b
i
l
i
t
y
w
i
t
h
r
e
s
p
e
c
t
t
o
t
h
e
c
o
r
r
e
c
t
n
e
s
s
o
f
i
n
f
o
r
m
a
t
i
o
n
i
n
t
h
i
s
d
o
c
u
m
e
n
t
.
C
o
p
y
r
i
g
h
t
b
y
V
o
l
k
s
w
a
g
e
n
A
G
.
1.3 Service position
1.3.1 Moving to service position
– Remove front bumper ⇒ page 140 , GTI ⇒ page 147 , R32
⇒ page 151 .
– Unhook Bowden cable at coupling ⇒ page 26 .
– If vehicle has charge air cooler, disconnect pressure hoses
⇒ page 4
– Unscrew horn -4- with bracket on right side of longitudinal
member.⇒ Electrical system; Rep. Gr. 96 ; Interior lights,
lamps, switches; Removing and installing horn .
– Remove bolts -3- from left and right longitudinal members.
– Attach special tool guide pins -T 10093- to left and right lon‐
gitudinal members.
– Remove bolts -2- on left and right from upper part of lock car‐
rier -1-.
– The lock carrier -1- can be pulled forwards about 10 cm on the
special tool guide pins -T 10093- .
Golf 2004 ➤
General body repairs, exterior - Edition 04.2008
1. Lock carrier 3

P
r
o
t
e
c
t
e
d
b
y
c
o
p
y
r
i
g
h
t
.
C
o
p
y
i
n
g
f
o
r
p
r
i
v
a
t
e
o
r
c
o
m
m
e
r
c
i
a
l
p
u
r
p
o
s
e
s
,
i
n
p
a
r
t
o
r
i
n
w
h
o
l
e
,
i
s
n
o
t
p
e
r
m
i
t
t
e
d
u
n
l
e
s
s
a
u
t
h
o
r
i
s
e
d
b
y
V
o
l
k
s
w
a
g
e
n
A
G
.
V
o
l
k
s
w
a
g
e
n
A
G
d
o
e
s
n
o
t
g
u
a
r
a
n
t
e
e
o
r
a
c
c
e
p
t
a
n
y
l
i
a
b
i
l
i
t
y
w
i
t
h
r
e
s
p
e
c
t
t
o
t
h
e
c
o
r
r
e
c
t
n
e
s
s
o
f
i
n
f
o
r
m
a
t
i
o
n
i
n
t
h
i
s
d
o
c
u
m
e
n
t
.
C
o
p
y
r
i
g
h
t
b
y
V
o
l
k
s
w
a
g
e
n
A
G
.
1.3.2 Moving from service position
Install in reverse order of removal.
– Align lock carrier to longitudinal members and between wings
⇒ Body Repairs; Rep. Gr. 00 ; Technical data; Body gap di‐
mensions .
Note
♦
Ensure that the charge air cooler pressure hoses are properly
engaged again.
♦
Hoses and lines must not be pinched.
1.3.3 Releasing pressure hoses
– Release push-on coupling -1- and pull pressure hose -2- in
-direction of arrow- out of coupling.
– During installation of pressure hoses, ensure that push-on
coupling engages audibly.
1.4 Removing and installing lock carrier with
add-on parts
1.4.1 Removing
Note
♦
Because the lock carrier is a safety-relevant component, it
must not be repaired.
♦
If damaged, the lock carrier must be renewed.
Golf 2004 ➤
General body repairs, exterior - Edition 04.2008
4 Rep. Gr.50 - Body - front

P
r
o
t
e
c
t
e
d
b
y
c
o
p
y
r
i
g
h
t
.
C
o
p
y
i
n
g
f
o
r
p
r
i
v
a
t
e
o
r
c
o
m
m
e
r
c
i
a
l
p
u
r
p
o
s
e
s
,
i
n
p
a
r
t
o
r
i
n
w
h
o
l
e
,
i
s
n
o
t
p
e
r
m
i
t
t
e
d
u
n
l
e
s
s
a
u
t
h
o
r
i
s
e
d
b
y
V
o
l
k
s
w
a
g
e
n
A
G
.
V
o
l
k
s
w
a
g
e
n
A
G
d
o
e
s
n
o
t
g
u
a
r
a
n
t
e
e
o
r
a
c
c
e
p
t
a
n
y
l
i
a
b
i
l
i
t
y
w
i
t
h
r
e
s
p
e
c
t
t
o
t
h
e
c
o
r
r
e
c
t
n
e
s
s
o
f
i
n
f
o
r
m
a
t
i
o
n
i
n
t
h
i
s
d
o
c
u
m
e
n
t
.
C
o
p
y
r
i
g
h
t
b
y
V
o
l
k
s
w
a
g
e
n
A
G
.
– Set lock carrier with add-on parts -1- to service position
⇒ page 3
– Disconnect all electrical connectors.
– Drain coolant and disconnect coolant lines ⇒ Engine cooling
system; Rep. Gr. 19 ; Parts of cooling system; Draining and
filling coolant .
– Disconnect wiring for condenser ⇒ Heating and air condition‐
ing system; Rep. Gr. 87 ; Air conditioning system; Removing
and installing condenser .
– Together with a second mechanic, unscrew guide pins -T
10093- from left and right longitudinal member and lift lock
carrier out.
WARNING
Do not start the engine if the air conditioning system and/or the
coolant system lines are disconnected.
Golf 2004 ➤
General body repairs, exterior - Edition 04.2008
1. Lock carrier 5

P
r
o
t
e
c
t
e
d
b
y
c
o
p
y
r
i
g
h
t
.
C
o
p
y
i
n
g
f
o
r
p
r
i
v
a
t
e
o
r
c
o
m
m
e
r
c
i
a
l
p
u
r
p
o
s
e
s
,
i
n
p
a
r
t
o
r
i
n
w
h
o
l
e
,
i
s
n
o
t
p
e
r
m
i
t
t
e
d
u
n
l
e
s
s
a
u
t
h
o
r
i
s
e
d
b
y
V
o
l
k
s
w
a
g
e
n
A
G
.
V
o
l
k
s
w
a
g
e
n
A
G
d
o
e
s
n
o
t
g
u
a
r
a
n
t
e
e
o
r
a
c
c
e
p
t
a
n
y
l
i
a
b
i
l
i
t
y
w
i
t
h
r
e
s
p
e
c
t
t
o
t
h
e
c
o
r
r
e
c
t
n
e
s
s
o
f
i
n
f
o
r
m
a
t
i
o
n
i
n
t
h
i
s
d
o
c
u
m
e
n
t
.
C
o
p
y
r
i
g
h
t
b
y
V
o
l
k
s
w
a
g
e
n
A
G
.
Note
♦
Do not hang condenser and hydraulic oil cooler from lines.
♦
Do not kink condenser and hydraulic lines.
1.4.2 Installing
Install in reverse order of removal.
• During assembly, ensure that all connectors and hose con‐
nections are properly installed.
– Align lock carrier to longitudinal members and between wings
⇒ Body Repairs; Rep. Gr. 00 ; Technical data; Body gap di‐
mensions .
Golf 2004 ➤
General body repairs, exterior - Edition 04.2008
6 Rep. Gr.50 - Body - front

P
r
o
t
e
c
t
e
d
b
y
c
o
p
y
r
i
g
h
t
.
C
o
p
y
i
n
g
f
o
r
p
r
i
v
a
t
e
o
r
c
o
m
m
e
r
c
i
a
l
p
u
r
p
o
s
e
s
,
i
n
p
a
r
t
o
r
i
n
w
h
o
l
e
,
i
s
n
o
t
p
e
r
m
i
t
t
e
d
u
n
l
e
s
s
a
u
t
h
o
r
i
s
e
d
b
y
V
o
l
k
s
w
a
g
e
n
A
G
.
V
o
l
k
s
w
a
g
e
n
A
G
d
o
e
s
n
o
t
g
u
a
r
a
n
t
e
e
o
r
a
c
c
e
p
t
a
n
y
l
i
a
b
i
l
i
t
y
w
i
t
h
r
e
s
p
e
c
t
t
o
t
h
e
c
o
r
r
e
c
t
n
e
s
s
o
f
i
n
f
o
r
m
a
t
i
o
n
i
n
t
h
i
s
d
o
c
u
m
e
n
t
.
C
o
p
y
r
i
g
h
t
b
y
V
o
l
k
s
w
a
g
e
n
A
G
.
2 Wing
2.1 Tools
Special tools and workshop equipment required
♦ Torque wrench 2...10 Nm -V.A.G 1783-
♦ Hot air blower -V.A.G 1416-
Golf 2004 ➤
General body repairs, exterior - Edition 04.2008
2. Wing 7

P
r
o
t
e
c
t
e
d
b
y
c
o
p
y
r
i
g
h
t
.
C
o
p
y
i
n
g
f
o
r
p
r
i
v
a
t
e
o
r
c
o
m
m
e
r
c
i
a
l
p
u
r
p
o
s
e
s
,
i
n
p
a
r
t
o
r
i
n
w
h
o
l
e
,
i
s
n
o
t
p
e
r
m
i
t
t
e
d
u
n
l
e
s
s
a
u
t
h
o
r
i
s
e
d
b
y
V
o
l
k
s
w
a
g
e
n
A
G
.
V
o
l
k
s
w
a
g
e
n
A
G
d
o
e
s
n
o
t
g
u
a
r
a
n
t
e
e
o
r
a
c
c
e
p
t
a
n
y
l
i
a
b
i
l
i
t
y
w
i
t
h
r
e
s
p
e
c
t
t
o
t
h
e
c
o
r
r
e
c
t
n
e
s
s
o
f
i
n
f
o
r
m
a
t
i
o
n
i
n
t
h
i
s
d
o
c
u
m
e
n
t
.
C
o
p
y
r
i
g
h
t
b
y
V
o
l
k
s
w
a
g
e
n
A
G
.
2.2 Assembly overview - front wing
Note
Only the left side is shown. The right side is similar.
1 - Wing
❑ Removing and installing
⇒ page 8
2 - Bolt
❑ Qty. 1, A-pillar
❑ Qty. 2, side member
❑ Qty. 2, wheel housing
❑ Qty. 2, wing strut
❑ Qty. 3, wing connection
piece
❑ 6 Nm
3 - Intermediate piece (zinc)
❑ AKL 381 035 50
4 - Foam piece
❑ Loosely inserted be‐
tween wing and top of
longitudinal member
5 - Wing strut
❑ Removing and installing
⇒ page 10
6 - Moulded foamed plastic
part
❑ Inserted on top of longi‐
tudinal member
❑ Bonds to wing
7 - Hexagon nut
❑ One, on wing connec‐
tion piece
❑ 6 Nm
2.3 Removing and installing wing
Note
The removal and installation sequence is only described for the
left wing. The removal and installation of the right wing is similar.
Golf 2004 ➤
General body repairs, exterior - Edition 04.2008
8 Rep. Gr.50 - Body - front

P
r
o
t
e
c
t
e
d
b
y
c
o
p
y
r
i
g
h
t
.
C
o
p
y
i
n
g
f
o
r
p
r
i
v
a
t
e
o
r
c
o
m
m
e
r
c
i
a
l
p
u
r
p
o
s
e
s
,
i
n
p
a
r
t
o
r
i
n
w
h
o
l
e
,
i
s
n
o
t
p
e
r
m
i
t
t
e
d
u
n
l
e
s
s
a
u
t
h
o
r
i
s
e
d
b
y
V
o
l
k
s
w
a
g
e
n
A
G
.
V
o
l
k
s
w
a
g
e
n
A
G
d
o
e
s
n
o
t
g
u
a
r
a
n
t
e
e
o
r
a
c
c
e
p
t
a
n
y
l
i
a
b
i
l
i
t
y
w
i
t
h
r
e
s
p
e
c
t
t
o
t
h
e
c
o
r
r
e
c
t
n
e
s
s
o
f
i
n
f
o
r
m
a
t
i
o
n
i
n
t
h
i
s
d
o
c
u
m
e
n
t
.
C
o
p
y
r
i
g
h
t
b
y
V
o
l
k
s
w
a
g
e
n
A
G
.
2.3.1 Removing
– Remove front bumper ⇒ page 140 .
– Remove wheel housing liners ⇒ page 218
– Remove guide ⇒ Item 10 (page 143) .
– Loosen hexagon nut -6- and remove bolts -2-.
– Pull out moulded plastic part -3- between wing and longitudinal
member.
– Lightly heat outside of wing -1- in area of moulded foam part
-arrow- using hot air blower -V.A.G 1416- .
– The bonding on moulded foamed plastic part -5- releases and
the wing -1- can be removed.
Golf 2004 ➤
General body repairs, exterior - Edition 04.2008
2. Wing 9

P
r
o
t
e
c
t
e
d
b
y
c
o
p
y
r
i
g
h
t
.
C
o
p
y
i
n
g
f
o
r
p
r
i
v
a
t
e
o
r
c
o
m
m
e
r
c
i
a
l
p
u
r
p
o
s
e
s
,
i
n
p
a
r
t
o
r
i
n
w
h
o
l
e
,
i
s
n
o
t
p
e
r
m
i
t
t
e
d
u
n
l
e
s
s
a
u
t
h
o
r
i
s
e
d
b
y
V
o
l
k
s
w
a
g
e
n
A
G
.
V
o
l
k
s
w
a
g
e
n
A
G
d
o
e
s
n
o
t
g
u
a
r
a
n
t
e
e
o
r
a
c
c
e
p
t
a
n
y
l
i
a
b
i
l
i
t
y
w
i
t
h
r
e
s
p
e
c
t
t
o
t
h
e
c
o
r
r
e
c
t
n
e
s
s
o
f
i
n
f
o
r
m
a
t
i
o
n
i
n
t
h
i
s
d
o
c
u
m
e
n
t
.
C
o
p
y
r
i
g
h
t
b
y
V
o
l
k
s
w
a
g
e
n
A
G
.
2.3.2 Installing
Install in reverse order of removal.
– Always insert “zinc intermediate piece AKL 381 035 50” be‐
tween wing and side member.
– Specified torque for bolts -2- and hexagon nuts -5-: 6 Nm.
– Ensure that gaps are parallel and specified dimensions are
maintained ⇒ Body Repairs; Rep. Gr. 00 ; Technical data;
Body panel gaps/shut lines .
2.4 Removing and installing wing strut
Note
The removal and installation sequence is described for the left
wing strut. The removal and installation of the right wing strut is
similar.
2.4.1 Removing
• The wing has been removed.
Golf 2004 ➤
General body repairs, exterior - Edition 04.2008
10 Rep. Gr.50 - Body - front

P
r
o
t
e
c
t
e
d
b
y
c
o
p
y
r
i
g
h
t
.
C
o
p
y
i
n
g
f
o
r
p
r
i
v
a
t
e
o
r
c
o
m
m
e
r
c
i
a
l
p
u
r
p
o
s
e
s
,
i
n
p
a
r
t
o
r
i
n
w
h
o
l
e
,
i
s
n
o
t
p
e
r
m
i
t
t
e
d
u
n
l
e
s
s
a
u
t
h
o
r
i
s
e
d
b
y
V
o
l
k
s
w
a
g
e
n
A
G
.
V
o
l
k
s
w
a
g
e
n
A
G
d
o
e
s
n
o
t
g
u
a
r
a
n
t
e
e
o
r
a
c
c
e
p
t
a
n
y
l
i
a
b
i
l
i
t
y
w
i
t
h
r
e
s
p
e
c
t
t
o
t
h
e
c
o
r
r
e
c
t
n
e
s
s
o
f
i
n
f
o
r
m
a
t
i
o
n
i
n
t
h
i
s
d
o
c
u
m
e
n
t
.
C
o
p
y
r
i
g
h
t
b
y
V
o
l
k
s
w
a
g
e
n
A
G
.
– Remove bolts -2- and remove wing strut -1-.
2.4.2 Installing
– Install wing strut -1-.
– Specified torque for bolts -2-: 6 Nm
– Wing and wing strut are adjusted together to bonnet and
bumper ⇒ Body Repairs; Rep. Gr. 00 ; Technical data; Body
gap dimensions .
Golf 2004 ➤
General body repairs, exterior - Edition 04.2008
2. Wing 11

P
r
o
t
e
c
t
e
d
b
y
c
o
p
y
r
i
g
h
t
.
C
o
p
y
i
n
g
f
o
r
p
r
i
v
a
t
e
o
r
c
o
m
m
e
r
c
i
a
l
p
u
r
p
o
s
e
s
,
i
n
p
a
r
t
o
r
i
n
w
h
o
l
e
,
i
s
n
o
t
p
e
r
m
i
t
t
e
d
u
n
l
e
s
s
a
u
t
h
o
r
i
s
e
d
b
y
V
o
l
k
s
w
a
g
e
n
A
G
.
V
o
l
k
s
w
a
g
e
n
A
G
d
o
e
s
n
o
t
g
u
a
r
a
n
t
e
e
o
r
a
c
c
e
p
t
a
n
y
l
i
a
b
i
l
i
t
y
w
i
t
h
r
e
s
p
e
c
t
t
o
t
h
e
c
o
r
r
e
c
t
n
e
s
s
o
f
i
n
f
o
r
m
a
t
i
o
n
i
n
t
h
i
s
d
o
c
u
m
e
n
t
.
C
o
p
y
r
i
g
h
t
b
y
V
o
l
k
s
w
a
g
e
n
A
G
.
3 Noise insulation
3.1 Tools
Special tools and workshop equipment required
♦ Torque wrench 2...10 Nm -V.A.G 1783-
Golf 2004 ➤
General body repairs, exterior - Edition 04.2008
12 Rep. Gr.50 - Body - front
/